Homemade Mozzarella Sticks – Your New Secret Weapon for Snack Time
Hey friends, Jackson here from Food Meld. Let’s be real for a second: we’ve all been there. It’s late, you’re craving something gloriously cheesy and satisfying, and the only solution seems to be dialing up a takeout joint for some overpriced, often disappointing mozzarella sticks. They show up lukewarm, the cheese has already made a break for it, and you’re left with a cardboard box of regret. Sound familiar? Well, my friends, I’m here to liberate you from the tyranny of mediocre takeout. I’m about to show you how to create the most incredibly crispy, melty, utterly perfect homemade mozzarella sticks right in your own kitchen. And the best part? They’re shockingly simple to make.
This isn’t just a recipe; it’s a game-changer for game nights, a party hero in waiting, and the ultimate answer to those “I need something awesome right now” cravings. We’re taking a classic and injecting it with that Food Meld energy—a few simple twists to elevate the flavor, a foolproof method to guarantee that iconic cheese pull, and all the fun of creating something unforgettable with your own two hands. So, tie on your favorite apron, and let’s turn your kitchen into the best snack spot in town. Trust me, after you taste these, you’ll be the one everyone asks for the recipe.

The Night We Declared War on Soggy Cheese
This recipe was born out of a serious snack emergency. Picture it: my college apartment, circa 2 a.m., during a legendary Mario Kart tournament. The stakes were high, the competition was fierce, and our fuel was a sad, greasy box of delivery mozzarella sticks. They were… fine. But as I looked at my friend’s face after a particularly un-stringy bite, I had a moment of clarity. “We can do better,” I declared, mid-race. We paused the game, raided the fridge, and embarked on a mission. What followed was a messy, hilarious, flour-covered experiment that resulted in our first batch of truly epic homemade sticks. They weren’t pretty, but that moment of pulling apart two sticks and watching a foot-long cheese bridge form between them? Pure magic. That’s the feeling I want to share with you—the joy of creating those “you’ve gotta try this” moments yourself, right at home.
Gathering Your Flavor Arsenal
Here’s everything you’ll need to create this doubled batch of cheesy greatness. This makes enough for a crowd (about 24 sticks), because let’s be honest, you’re not gonna want to share. Pro tip: read the notes for each ingredient—they’re little flavor hacks I’ve picked up over the years!
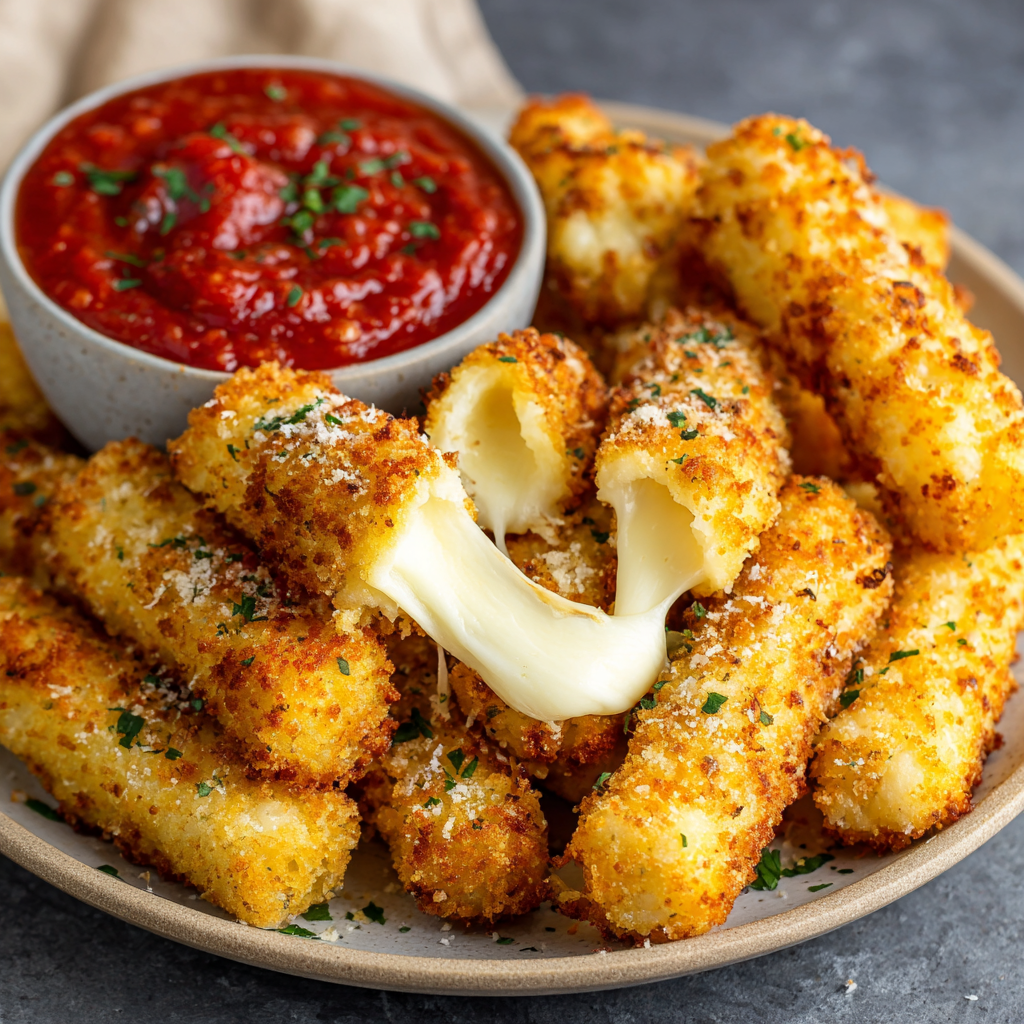
- 24 oz low-moisture, part-skim mozzarella cheese – This is non-negotiable! Low-moisture cheese has less water, which means it melts beautifully without turning into a puddle in your oil. You can buy a block and cut it into ½-inch thick sticks, or for ultimate ease, grab 12 string cheese sticks and cut them in half. Seriously, it’s a genius shortcut.
- 1 ½ cups all-purpose flour – Our first layer of defense. This creates a dry base for the egg to stick to, ensuring our crispy coating has something to hold onto.
- 4 large eggs – The glue! Beaten well, these act as the delicious mortar that binds the flour to the breadcrumbs.
- 4 cups panko breadcrumbs – The secret to an insanely crispy, crunchy, never-soggy exterior. Panko is lighter and flakier than traditional breadcrumbs, giving you that professional-grade crunch. Don’t swap it out!
- 2 quarts vegetable oil (or peanut oil) – For frying. You’ll need enough to come up about 2-3 inches in your pot. These oils have a high smoke point and neutral flavor, letting the cheese truly shine.
- 4 tsp sea salt – Seasons every layer. We’re not shy with salt here—it makes all the other flavors pop.
- 1 tsp black pepper – A little warm, earthy kick.
- 2 tsp garlic powder – Because what isn’t made better with a hit of garlic? This adds a deep, savory undertone.
- 4 tsp Italian seasoning – The classic flavor we all know and love. This goes right into the panko for that authentic Italian-American restaurant vibe.
- Warm marinara sauce, for serving – The quintessential dip. I like to warm up a good-quality jarred sauce, but hey, if you’ve got a homemade batch, even better!
Let’s Build Some Cheesy Magic: Step-by-Step
Okay, team, let’s get into it. The key to success here is patience and a good assembly line. Set up your station, put on some good music, and enjoy the process. You’re creating something awesome!
Step 1: The Big Chill. First things first, get your cheese sticks cut to size if you’re using a block. If you’re using string cheese, just halve them. Now, this is the most important step: FREEZE THEM SOLID. Arrange them in a single layer on a parchment-lined baking sheet and pop them in the freezer for at least 1 hour, but 2 is even better. This is your insurance policy against a melted cheese disaster. A frozen center means a molten, gooey interior and a fully cooked, crispy exterior.
Step 2: Set Up Your Breading Station. This is where the fun begins. Get three shallow bowls or plates. In the first one, whisk together the flour, salt, pepper, and garlic powder (and if you’re feeling spicy, that smoked paprika or cayenne!). In the second, beat the four eggs until they’re uniform. In the third, stir together the panko breadcrumbs and Italian seasoning (and that optional Parmesan for extra umami goodness). Line them up: flour, egg, breadcrumbs. This is your flavor assembly line.
Step 3: The Double-Dip Dance. Working with a few frozen cheese sticks at a time (keep the rest in the freezer!), start coating. Use one hand for the dry ingredients (flour and breadcrumbs) and the other for the wet (egg) to avoid “club hand” – a condition where your fingers become a breaded mess. Roll a stick in the flour, shake off the excess. Dunk it completely in the egg, let the excess drip off. Then, roll it in the panko mixture, pressing gently to make sure every millimeter is covered. Now, for the pro move: do a second dip in the egg and then the breadcrumbs. This double coat is what gives you that thick, craggy, incredibly crunchy shell that stands up to frying.
Step 4: The Second Freeze. Place each beautifully coated stick back onto the baking sheet. Once they’re all done, send the whole tray back into the freezer for another 30 minutes. This sets the coating, preventing it from sliding off the second it hits the hot oil.
Step 5: Fry Time! In a large, heavy-bottomed pot or Dutch oven, heat your oil to 350°F (175°C). Use a thermometer! This is non-negotiable for perfect results. If the oil is too cool, the sticks will soak up grease and get soggy. Too hot, and the outside will burn before the cheese even thinks about melting. Carefully lower 4-5 sticks into the oil at a time using tongs. Don’t overcrowd the pot! Fry for 1-2 minutes, turning occasionally, until they’re a deep, glorious golden brown.
Step 6: Drain and Devour. Use a slotted spoon or spider strainer to lift them out, letting excess oil drip back into the pot. Transfer them to a wire rack set over a baking sheet or a plate lined with paper towels. Sprinkle with a little extra salt while they’re still hot. Serve immediately! They wait for no one.
How to Serve These Golden Beauties
Presentation is part of the fun! Don’t just dump these masterpieces on a plate. Give them the spotlight they deserve. I love serving a big pile of them on a wooden board or in a wide, shallow bowl, with a few small ramekins of dipping sauces scattered around. The contrast looks amazing. Speaking of dips, while marinara is the classic, don’t be afraid to get creative! Offer a trio: classic marinara, a cool and creamy ranch, and a spicy buffalo sauce. Or wow your guests with a quick garlic aioli or a spicy chipotle mayo. Place a few lemon wedges on the side for a bright pop—a quick squeeze over the sticks right before eating can cut through the richness in the most wonderful way. This isn’t just a snack; it’s an experience.
Make It Your Own: Flavor Twists & Swaps
The beauty of this recipe is its versatility. Once you’ve mastered the basic method, the flavor world is your oyster! Here are a few of my favorite ways to mix it up:
- Spicy ‘Nduja Twist: Mix 2 tablespoons of ‘nduja (a spicy, spreadable Italian sausage) or finely chopped pepperoni into the breadcrumb mixture. It adds a incredible spicy, meaty flavor to every bite.
- Everything Bagel Bliss: Swap out the Italian seasoning and replace half of the panko with Everything Bagel Seasoning. Serve with a cool dill and chive yogurt dip. Unreal.
- Gluten-Free Game: No problem! Use a 1:1 gluten-free flour blend and gluten-free panko breadcrumbs. The method remains exactly the same.
- Baked, Not Fried (Lighter Option): For a slightly lighter version, preheat your oven to 425°F. Arrange the frozen, breaded sticks on a parchment-lined baking sheet. Spray or brush them generously with olive oil. Bake for 7-8 minutes, flip carefully, and bake for another 5-7 minutes until golden and melty. They won’t be *quite* as crispy as fried, but they’re still delicious!
- Fancy Pants Parmesan Crisps: After the first egg wash, roll the stick in finely grated Parmesan cheese before the final breadcrumb layer. It creates an extra savory, cheesy, crispy crust.
Jackson’s Chef Notes & Kitchen Confessions
This recipe has evolved from that late-night college experiment into my go-to party trick. The double-freeze method was a hard-learned lesson after a few batches of cheesy lava explosions! I also highly recommend making a huge batch and freezing them after the second freeze step. They keep for months in a freezer bag, so you can have homemade mozzarella sticks on demand. Just fry straight from frozen, adding a minute to the cooking time. It’s the ultimate “I’m a culinary genius” secret without any of the last-minute stress. And a funny story: I once was so eager to try one that I completely forgot to let it cool. Let’s just say I learned the true meaning of “molten” cheese that day. Consider this your warning—let them rest for a minute or two! The wait is worth it, I promise.
Mozzarella Stick FAQs: Your Questions, Answered
Q: My cheese exploded and leaked out everywhere! What did I do wrong?
A: Ah, the great cheese breach! This almost always means the cheese wasn’t frozen solid enough. The center must be rock-hard before it goes into the oil. Extend that initial freeze time to at least 2 hours. Also, make sure your oil is at the correct temperature (350°F). Too hot and the outside cooks too fast, trapping expanding air and cheese inside until it bursts.
Q: Can I bake these instead of frying?
A: You can! See the variation above. For best results, use an oven thermometer to ensure your oven is truly at 425°F, and don’t skip spraying them with oil—it’s crucial for browning and crispiness. They’ll be good, but just know they won’t achieve the same level of shatteringly crisp perfection as the fried version.
Q: Can I make these ahead of time?
A: Absolutely! This is actually my preferred method. Complete the recipe through the second freeze. Once the breaded sticks are frozen solid, transfer them to a large airtight container or freezer bag, separating layers with parchment paper. They’ll keep for up to 3 months. Fry directly from frozen, no need to thaw!
Q: My breading is falling off. Help!
A: This is usually a rushing issue. The second freeze after breading is critical—it fuses the layers together. Also, make sure you’re shaking off the excess flour and egg at each step. A too-thick layer of flour won’t stick properly to the cheese, and a gloppy layer of egg will cause the breadcrumbs to slide off.
Nutritional Information (Approximate, Per Serving)
Alright, let’s keep it real. This is a celebratory snack, a game-day treat, a “living your best life” kind of food. It’s not everyday health food, and that’s okay! Food is about joy, too. This info is per serving (based on 2 sticks), and remember, these are estimates as ingredients can vary. Frying at the correct temperature ensures less oil is absorbed. To lighten it up, try the baked option and serve with a side salad to balance things out. Most importantly, enjoy every single delicious, cheesy bite without guilt!
Calories: 295 | Fat: 18g | Saturated Fat: 6g | Carbohydrates: 19g | Fiber: 1g | Sugar: 2g | Protein: 14g | Sodium: 580mg
You’ve Got This!
And there you have it! Your complete guide to ditching the takeout menu and creating the most incredibly satisfying, crispy, melty homemade mozzarella sticks you’ve ever tasted. This recipe is built for fun, for sharing, and for creating those big, cheesy grins around your table. It might seem like a few steps, but I promise, the process is a blast and the payoff is a thousand times better than anything that gets delivered to your door.
So, what are you waiting for? Grab that cheese, get it freezing, and get ready to become a snack-time legend. I can’t wait for you to experience that perfect cheese pull for yourself. When you make them, tag me on social @FoodMeld and show me your creations! I love seeing your kitchen wins. Now, let’s cook something awesome together.
Cheers,
Jackson


