
Spooky, Creamy, and No-Bake: Your New Halloween Party Hero!
Hey there, Food Meld family! Jackson here. Is there anything better than a dessert that looks like you spent all day in the kitchen but secretly comes together with zero baking and a whole lot of fun? I didn’t think so. And when that dessert is layered with creepy, cool colors and topped with all the candy your inner child desires? Well, that’s a straight-up Halloween miracle right there.
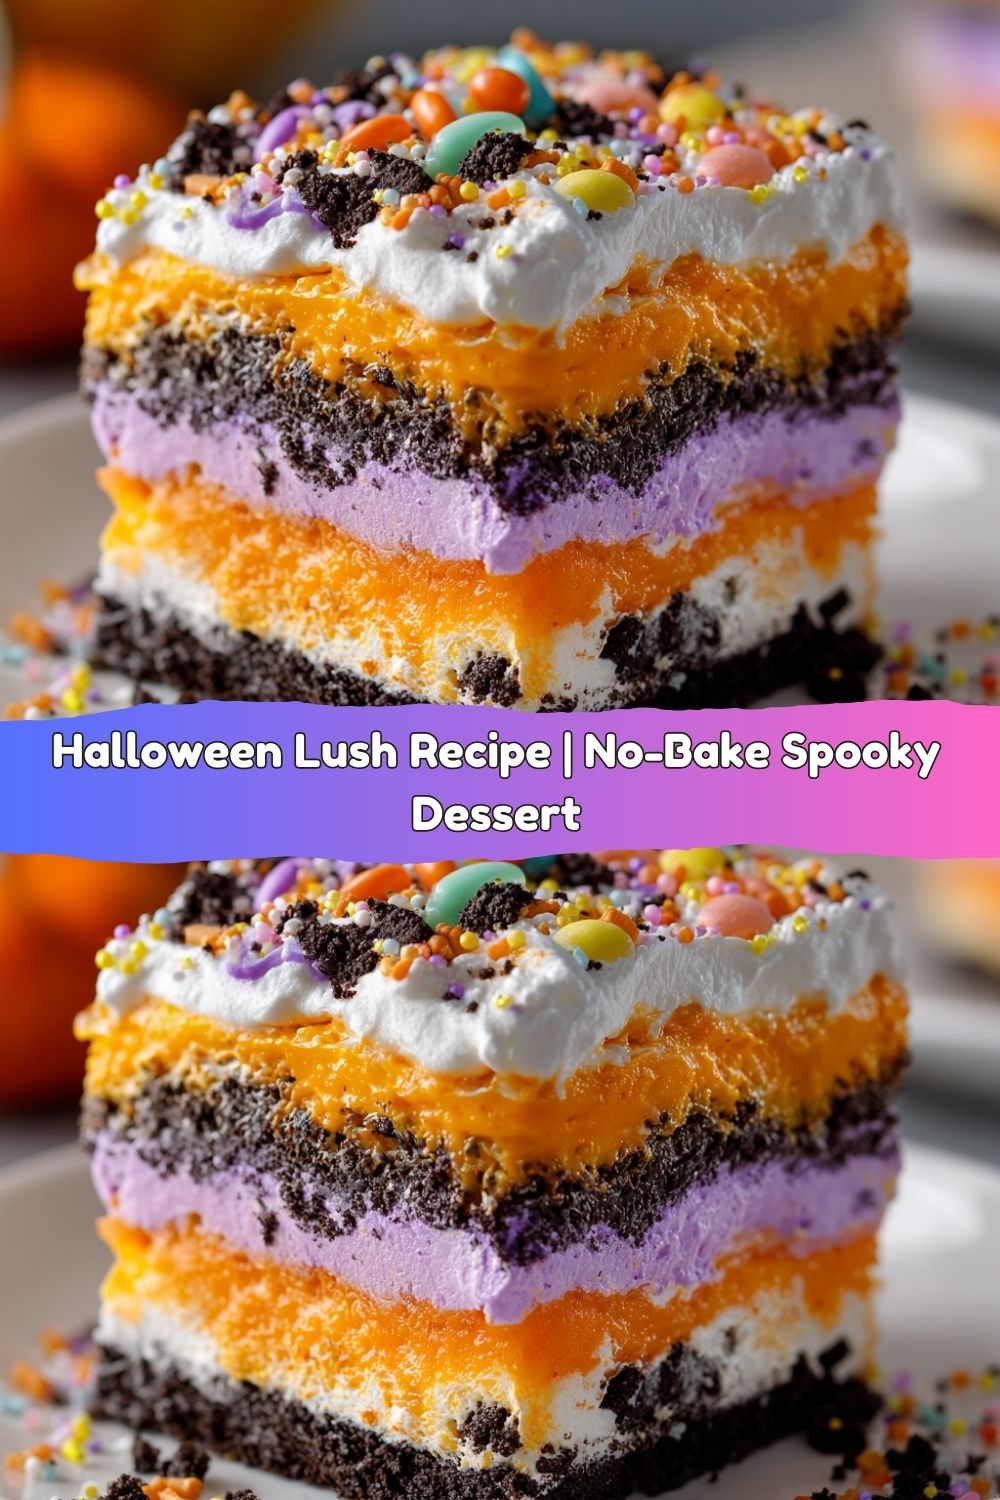
Today, we’re whipping up the ultimate show-stopping centerpiece for your Halloween bash: the Halloween Lush. Imagine this: a crunchy, dark chocolate cookie crust, a layer of smooth vanilla pudding, vibrant stripes of purple and green cream cheese fluff, a wobbly orange gelatin layer that’s bursting with citrusy zest, and a final cloud of whipped topping just begging for a sprinkle of spooky decorations. It’s cold, it’s creamy, it’s crunchy, and every single bite is an explosion of texture and flavor. This isn’t just a dessert; it’s an experience. It’s the kind of treat that has kids (and let’s be real, adults too) gathering around the table with their phones out before they even think about digging in. So, grab your biggest mixing bowl and your favorite spatula—we’re about to create some edible magic that’s scary good.
The Ghost of Halloween Parties Past
This recipe takes me right back to my first “real” Halloween party in my first apartment. The place was tiny, the budget was tighter, but the ambition? Sky-high. I wanted to make a dessert that would wow my friends—something that looked straight out of a fancy bakery window. After a few… let’s call them “learning experiences” involving melted chocolate and a regrettable black frosting incident… I landed on a version of this lush. It was an instant hit. My friend Sarah, dressed as a very convincing zombie, went back for thirds, mumbling “braaaaains… and more of this pudding stuff” through her makeup. That’s when I knew. This dessert had power. It was approachable, impossible to mess up, and it brought everyone together in that fun, messy, “you’ve gotta try this” way I love. It’s been a staple in my Halloween rotation ever since, always evolving with a new candy topping or a flavor twist. It’s more than a recipe; it’s a little container of happy, spooky memories.
Gathering Our Potion Ingredients
Here’s the magical lineup for our cauldron—er, I mean, mixing bowls. This recipe is designed to feed a crowd (20-24 generous slices!), because you’re gonna be popular once this hits the table. Remember, cooking is an adventure, so don’t be afraid to swap things out based on what you have!
- For the Crust:
- 72 chocolate sandwich cookies, crushed: The classic choice is Oreos, but any chocolate sandwich cookie will work its magic. No need to remove the cream filling—it just adds more flavor! Pro tip: a food processor makes this a 10-second job. If you’re going manual, throw them in a zip-top bag and let out some stress with a rolling pin.
- 12 tbsp (1 ½ sticks) butter, melted: This is the glue that holds our crunchy foundation together. Use unsalted so we can control the sweetness. For a twist, try using browned butter for a deep, nutty flavor that pairs amazingly with chocolate.
- For the Orange Gelatin Layer:
- 12 oz orange gelatin: This is what gives us that iconic, wobbly, vibrant orange layer. I use two 6-oz boxes.
- ⅔ cup boiling water: Just enough to dissolve the gelatin powder completely. We’re not making a full firm Jell-O, so we use less water.
- 8 oz whipped topping (like Cool Whip), thawed: Folding this into the slightly cooled gelatin creates a mousse-like, light, and airy texture that’s absolutely dreamy.
- Optional: 1 tsp orange extract + zest of one orange: My chef’s hack for taking this from good to “WOW.” The extract intensifies the orange flavor, and the fresh zest adds little bursts of citrus oil that cut through the sweetness beautifully.
- For the Pudding Layer:
- 13.6 oz vanilla instant pudding mix: That’s two standard 3.4 oz boxes. Instant pudding is key here—it sets quickly without needing to be cooked. For a richer flavor, you could use French vanilla.
- 5 cups cold milk: The cold temperature is non-negotiable! It helps the pudding set properly. Whole milk will give you the creamiest result, but 2% works great too.
- For the Cream Cheese Layer:
- 16 oz cream cheese, softened: This is the heart of the lush’s richness. Leave it on the counter for a good hour before you start. Soft cream cheese blends smoothly and avoids lumpy layers!
- 2 cups powdered sugar: Sweetens and helps thicken the cream cheese mixture. Sift it if you have time to avoid any little lumps.
- 8 oz whipped topping, thawed: We’re folding this in to make the cream cheese layer light and fluffy instead of dense and cheesecake-like.
- Green & purple food coloring: Gel food coloring is my top choice—it gives vibrant color without adding extra liquid. A few drops will do!
- For the Topping & Decoration:
- 16 oz whipped topping: The final snowy blanket that holds all our spooky decorations.
- Halloween sprinkles, candy eyeballs, gummy worms, candy pumpkins, crushed pretzels: This is where you get creative! The pretzels are my favorite “chef’s secret” for adding a salty crunch that balances all the sweet, creamy layers.
Conjuring the Halloween Lush: Step-by-Step
Alright, team, let’s get building. This is the fun part. Put on some spooky tunes, and let’s create layer upon layer of deliciousness.
- Make the Crust: In a large bowl, combine your finely crushed chocolate cookies and the melted butter. Stir until it looks like dark, wet sand and every crumb is coated. Pour this mixture into a 9×13-inch baking dish and press it down firmly and evenly into the bottom. I like to use the bottom of a measuring cup to really pack it in—this prevents a crumbly crust later. Pop it in the fridge for at least 10 minutes to let it set. This chills the butter, solidifying our foundation.
- Conjure the Orange Gelatin Layer: In a heat-proof bowl, whisk the orange gelatin powder with the boiling water until it’s completely, totally dissolved. This is important—no granules left! Now, walk away. Let it cool on the counter for about 15-20 minutes. You want it to be room temperature or just slightly warm to the touch. If you add the whipped topping to hot gelatin, it’ll just melt into a soupy mess. Once cooled, gently fold in the 8 oz of whipped topping and your orange extract/zest if using. It will become a beautiful, smooth, orange dream. Place this bowl in the fridge for now. We want it to thicken up to a spreadable consistency, like thick pudding, which will make layering much easier.
- Whip Up the Pudding Layer: In another bowl, whisk the vanilla instant pudding mixes with the 5 cups of cold milk. Whisk for a solid 2 minutes until it’s thick and smooth. Set this aside for a moment. It will continue to thicken as it sits, which is perfect.
- Create the Cream Cheese Layer: In the bowl of a stand mixer (or using a hand mixer), beat the softened cream cheese on medium speed until it’s completely smooth and lump-free. This might take 2-3 minutes. Scrape down the sides of the bowl. Add the powdered sugar and beat again until it’s fully incorporated and smooth. Now, here’s the key: gently fold in the 8 oz of whipped topping by hand. Don’t use the mixer here, or you’ll deflate all the air and it won’t be light and fluffy. Once combined, divide the mixture evenly between two smaller bowls. Tint one bowl with purple food coloring and the other with green. Stir until the colors are vibrant and even.
- The Grand Assembly: Now for the architectural fun! Pull your chilled crust out of the fridge.
- Layer 1: Your beautiful chocolate cookie crust.
- Layer 2: Pour your thickened vanilla pudding over the crust and spread it into an even layer.
- Layer 3: Take your purple cream cheese mixture and dollop it over the pudding layer. Then, carefully spread it out into an even layer, reaching the edges.
- Layer 4: By now, your orange gelatin mixture should be thick enough to spread. Dollop and spread this over the purple layer. Be gentle to keep the layers distinct.
- Layer 5: Dollop and spread your green cream cheese mixture over the orange layer.
- Layer 6: Finally, spread the entire 16 oz container of whipped topping over the very top like a fresh blanket of snow.
- Decorate and Chill: This is your masterpiece moment! Scatter your Halloween sprinkles, press in candy eyeballs, lay down gummy worms, and add any other spooky decorations your heart desires. I always add a sprinkle of crushed pretzels for that salty crunch. Now, the hardest part: patience. Cover the dish with plastic wrap and refrigerate for at least 2 hours, but ideally 4 hours or even overnight. This waiting time is crucial for all the layers to set and meld together, making it easy to slice into perfect, clean squares.
How to Serve This Spooky Spectacle
When it’s finally time to serve, use a sharp knife to slice clean squares. For the absolute perfect cut, dip your knife in hot water and wipe it dry between each slice. It glides right through those creamy layers! Plate each piece on a little napkin or a festive Halloween plate. This dessert is rich, so a smaller square is often plenty. Watch everyone’s eyes light up when they see the colorful cross-section of layers in their bowl. It’s a total showstopper!
Mix It Up! Spooky Variations
The beauty of this recipe is its flexibility. Don’t be afraid to make it your own!
- Cookies & Cream: Use golden Oreos for the crust and cheesecake-flavored instant pudding instead of vanilla.
- Chocolate Haunt: Swap the vanilla pudding for chocolate. Use black cocoa powder in the cream cheese layers dyed with black food coloring for a deep, eerie gray and black effect.
- Fruity Ghost: Not a fan of orange? Use strawberry or lime gelatin for a different color and flavor profile!
- Dairy-Free Friendly: Use your favorite plant-based milk, vegan cream cheese, and coconut whipped topping. Most sandwich cookies are accidentally vegan, too!
- Nutty Crunch: Add ½ cup of very finely chopped toasted pecans or walnuts to the crust mixture for extra texture and flavor.
Jackson’s Chef Notes
This recipe has come a long way from my first apartment experiment. I originally tried to make a red layer with strawberry Jell-O, but it turned a weird pinkish-brown when mixed with the whipped topping. Lesson learned: vibrant, opaque colors work best! The orange extract and zest hack was a game-changer I discovered one year when I was out of orange Jell-O and only had lemon. I used lemon Jell-O but added orange extract to trick everyone—and it was even better! The biggest laugh came when my dog, Biscuit, somehow managed to sneak a single candy eyeball off the counter and paraded around with it stuck to his nose. Now, I always decorate well out of his reach. Remember, the kitchen is for fun. If your layers aren’t perfectly even or a little color bleeds, it just adds to the haunted, messy charm. It’s going to taste incredible regardless.
FAQs & Troubleshooting Your Lush
Q: My orange layer is runny and won’t set. What happened?
A: This usually means the gelatin was still too warm when folded into the whipped topping, or it didn’t have enough time to chill and thicken before assembling. You can pop the whole assembled dessert in the fridge for an extra hour or two to firm it up. It might not slice as cleanly, but it will still taste amazing.
Q: Can I make this ahead of time?
A: Absolutely! This is the perfect make-ahead dessert. You can assemble it completely, cover it tightly, and keep it in the fridge for up to 2 days before serving. I’d wait to add the final candy decorations until a few hours before serving so they don’t get soggy.
Q: My cream cheese layer is lumpy. How can I avoid this?
A: Lumpy cream cheese is almost always because it wasn’t softened enough. Take it out of the fridge at least 1-2 hours before you start. If you’re in a pinch, you can microwave it on a plate for 10-15 seconds, but be very careful not to melt it. Beat the cream cheese alone until it’s completely smooth before adding anything else.
Q: Is there a way to make this less sweet?
A: For a slightly less sweet version, you can use reduced-sugar pudding mix, reduce the powdered sugar in the cream cheese layer by ¼ cup, and use a lightly sweetened whipped cream instead of whipped topping. The tang from the cream cheese will shine through more!
Halloween Lush Recipe
- Total Time: 2.5 hrs
- Yield: 20 - 24 1x
Description
This Halloween Lush is a multi-layered dream of creamy filling, pudding, spooky orange gelatin, and crushed cookie crust. It’s cold, creamy, crunchy, and packed with festive colors and flavor. We’ve doubled the batch for your Halloween crew and added some eerie extras to give it unforgettable flair.
Ingredients
Crust
72 chocolate sandwich cookies, crushed
12 tbsp butter, melted
Orange Gelatin Layer
12 oz orange gelatin
⅔ cup boiling water
8 oz whipped topping
Optional: 1 tsp orange extract + zest for a citrus kick
Pudding Layer
13.6 oz vanilla instant pudding mix
5 cups cold milk
Cream Cheese Layer
16 oz cream cheese, softened
2 cups powdered sugar
8 oz whipped topping
Green & purple food coloring
Topping
16 oz whipped topping (for top layer)
Halloween sprinkles
Optional extras: candy eyeballs, gummy worms, candy pumpkins, crushed pretzels for crunch
Instructions
Make the Crust: Combine crushed cookies and melted butter. Press into a 9×13-inch dish. Chill for 10 minutes.
Orange Layer: Dissolve gelatin in boiling water. Cool slightly, then fold in 8 oz whipped topping and orange zest/extract if using. Chill until thick but spreadable.
Cream Cheese Layer: Beat cream cheese and powdered sugar until smooth. Fold in 8 oz whipped topping. Divide and tint half green, half purple.
Pudding Layer: Whisk pudding mix with milk until thickened.
Assemble:
Layer 1: Cookie crust
Layer 2: Vanilla pudding
Layer 3: Purple cream cheese
Layer 4: Orange gelatin mix
Layer 5: Green cream cheese
Layer 6: Top with whipped topping
Decorate with Halloween sprinkles, candy, and fun spooky toppings.
Chill for 2+ hours before serving for best texture.
- Prep Time: 30 minutes
- Chill Time: 2 hrs
Nutrition
- Calories: 340 / Slice
- Sugar: 28g / Slice
- Fat: 17g / Slice
- Carbohydrates: 42g / Slice
- Protein: 4g / Slice
Nutritional Information
*This is an estimate per serving (1 of 24 slices) and will vary based on specific ingredients and brands used.
- Calories: ~340
- Fat: 17g
- Carbohydrates: 42g
- Sugar: 28g
- Protein: 4g
Well, that’s it, friends! Your guide to creating the most talked-about dessert at the Halloween party. I can’t wait for you to try it. Remember, cooking is about having fun and making memories. So get in that kitchen, make a fabulous mess, and enjoy every single spooky, creamy, crunchy bite. Tag me on social @FoodMeld with your creations—I love seeing your kitchen wins! Until next time, let’s cook something awesome together.
Jackson


