
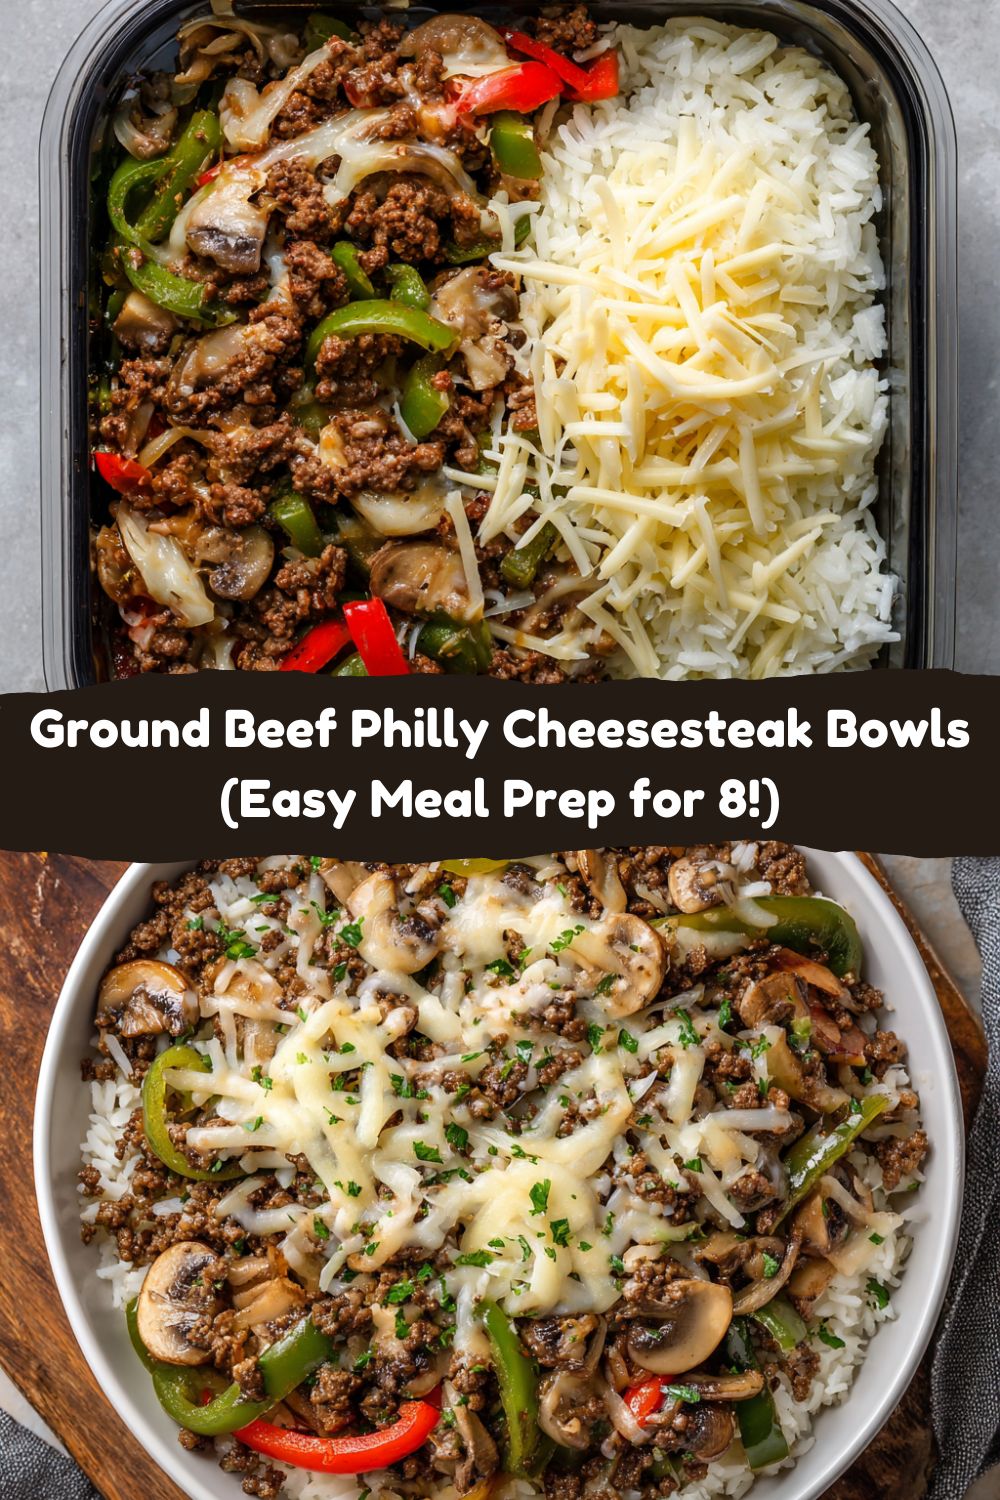
Ditch the Takeout: Your Bold, Easy Philly Cheesesteak Bowl Adventure Starts Here!
Hey Food Meld fam! Jackson here, ready to shake up your meal prep game with a flavor bomb that’s about to become your weekly MVP. Picture this: all that glorious, savory, cheesy magic of a classic Philly cheesesteak… but ditch the bread, grab a fork, and get ready for serious convenience. We’re talking tender ground beef sizzled with caramelized onions, peppers, and earthy mushrooms, all smothered in melty cheese, piled high over fluffy rice. It’s **comfort food reimagined for your busy life** – bold, satisfying, and reheats like an absolute dream. Seriously, you’ll be counting down the minutes ’til lunchtime.
Disclaimer:This post may contain affiliate links. As an Amazon Associate, I earn from qualifying purchases at no extra cost to you.
I get it. The words “meal prep” can sometimes sound about as exciting as watching paint dry. But trust me, this ain’t your average sad desk lunch! This is about capturing that **”you’ve gotta try this!” energy** I live for. It’s about transforming humble ingredients into something unforgettable, right in your own kitchen, without spending hours chained to the stove. Think juicy beef, that signature Worcestershire tang, and cheese pulling in all the right ways – all prepped and ready to fuel your week. Whether you’re a meal prep newbie or a seasoned pro looking for a fresh spin, this recipe is your ticket to **flavor-packed, stress-free wins**. So, grab your favorite skillet (you know the one that’s seen some serious action!), crank up some tunes, and let’s turn your kitchen into a Philly cheesesteak haven. Ready to cook something awesome? Let’s dive in!
My First Taste of Philly (& The Inspiration Behind the Bowl)
Okay, story time! My love affair with the Philly cheesesteak started on a freezing, rain-lashed trip to Philadelphia years ago. I was just a wide-eyed kid from the South, and I’d built this sandwich up in my head like the holy grail of eats. After shivering in line at a legendary spot (you know the one with the neon sign!), I finally got my hands on that steamy, cheese-dripping masterpiece. One bite? Absolute FLAVOR EXPLOSION! The tender beef, the sweet onions, the sharp provolone… it was pure, unadulterated comfort. But here’s the thing – trying to eat it gracefully while juggling an umbrella? Total comedy show. Sauce everywhere, napkins failing miserably. I remember laughing so hard with my buddy, cheese smudged on my chin, thinking, “This is amazing… but man, this needs a fork!”
That messy, joyful chaos stuck with me. Years later, deep in meal prep mode and craving those iconic Philly flavors without the hoagie hassle, the idea clicked: **Why not make it bowl-friendly?** Take all that incredible savory goodness – the beef, the veggies, the melty cheese – and let it shine over something hearty like rice. No soggy bread worries, perfect for portioning, and it reheats like a champ. It was my “what if we tried this?” moment in action! This recipe channels that same delicious spirit I fell for on that rainy Philly street, but makes it work for *your* real, busy, gotta-have-it-ready life. It’s the messy joy of the cheesesteak, transformed into your new prep-day bestie.
Gathering Your Flavor Arsenal: What You’ll Need
Here’s your shopping list for 8 epic servings! Don’t sweat substitutions – cooking should be flexible and fun. I’ve got your back with some chef insights:
- 3 lbs Lean Ground Beef (85/15 or 90/10): Leaner is better here to avoid a greasy bowl. It browns beautifully and lets the other flavors sing. Chef Insight: Don’t overcrowd the pan! Brown it in batches for perfect caramelization.
- 2 Medium Green Bell Peppers, Diced: Classic Philly crunch and a touch of sweetness. Sub Tip: Red, yellow, or orange bells work great too for extra color and sweetness!
- 2 Small Onions, Sliced: Thin slices are key for that perfect caramelized sweetness. Yellow onions are my go-to for flavor depth. Chef Hack: Slice ’em pole-to-pole for less breakage when cooking!
- 4 Cups Sliced Mushrooms (like cremini or white button): Earthy umami boosters! Sub Tip: Not a mushroom fan? Zucchini slices work surprisingly well for bulk.
- 4 tsp Worcestershire Sauce: The SECRET flavor weapon! Adds depth, tang, and that signature savory note. Chef Insight: This is non-negotiable for authentic taste – don’t skip it!
- ½ Cup Beef Broth: Builds the sauce and keeps everything juicy. Sub Tip: No broth? Use hot water with a teaspoon of beef bouillon paste or powder.
- 2 Cups Shredded Cheese (Colby Jack or Provolone): Melty goodness! Colby Jack is creamy and mild, Provolone is sharper and more traditional. Chef Hack: Shred it yourself for better melt! Pre-shredded has anti-caking agents.
- 4 Cups Cooked Basmati Rice: Fluffy, slightly nutty, and the perfect neutral base. Sub Tip: Brown rice, quinoa, or cauliflower rice are awesome healthy swaps!
Building Your Flavor Masterpiece: Step-by-Step
Alright, let’s get cooking! This comes together fast, so have your containers ready. Active voice engaged!
- Fire Up the Rice: (If not pre-cooked) Get your basmati rice cooking according to the package directions right away. While it simmers, you can tackle the rest! Chef Hack: Add a teaspoon of butter or olive oil and a pinch of salt to the cooking water for extra flavor and fluffiness. Set that gorgeous fluffy rice aside once it’s done.
- Sizzle Those Veggies to Perfection: Grab your largest, trustiest skillet (cast iron is my MVP here!) and heat it over medium heat. Add a drizzle of oil if your pan isn’t non-stick. Toss in the sliced onions, diced peppers, and mushrooms. Now, here’s the key: **DON’T STIR TOO MUCH!** Let them hang out for a few minutes to get some beautiful caramelization – those browned bits are FLAVOR GOLD. Give them an occasional stir for 5-7 minutes until they’re tender, sweet, and smelling incredible. Transfer them to a bowl. Chef Tip: Season the veggies lightly with salt and pepper while they cook!
- Brown the Beef Like a Boss: In that same glorious skillet (keep those tasty pan drippings!), crank the heat to medium-high. Add the ground beef. Break it up with your spoon or spatula as it cooks. Pro Move: Spread it out in an even layer and resist stirring for the first minute or two – this gives it a chance to develop a gorgeous brown crust (the Maillard reaction, baby!). Cook until no pink remains, about 5-7 minutes. Drain off any excess fat – we want flavor, not grease! Chef Insight: Draining is crucial for lean beef too; even a little fat can make the dish oily later.
- Unlock the Flavor Magic: Time for the Worcestershire! Pour it over the browned beef and stir well, letting it sizzle for about 30 seconds – smell that depth? Now, pour in the beef broth. Give it a good stir, scraping up any delicious browned bits stuck to the bottom of the pan (that’s pure flavor!). Let it bubble and simmer for 2-3 minutes. This reduces slightly and lets the flavors meld beautifully. Chef Hack: Taste it now! Need more salt? A grind of black pepper? Adjust to your liking.
- The Big Reunion: Dump those gorgeous sautéed veggies back into the skillet with the beef mixture. Stir everything together until it’s one happy, flavorful family. Let it cook together for another minute just to heat through.
- Cheese, Please! The Grand Finale: Reduce the heat to low. Sprinkle the shredded cheese evenly over the entire beef and veggie mixture. Pop a lid on that skillet! Let it sit for 2-4 minutes. Don’t peek too soon – you want the steam to work its magic and melt that cheese into gooey perfection. Chef Tip: If your cheese isn’t quite melted after 4 minutes, you can briefly pop the covered skillet into a preheated 350°F oven for 3-4 minutes.
- Meal Prep Victory Lap: Now, the fun part! Grab your 8 meal prep containers. Divide the fluffy cooked rice evenly among them. Then, generously top the rice with that cheesy, beefy, veggie-packed Philly magic. Seal those containers up! Chef Insight: Let the mixture cool slightly (about 10-15 minutes) before putting the lids on fully to prevent condensation making things soggy.
Serving Up the Goodness
For lunch? Grab a container, pop off the lid, and microwave it for 1.5-2 minutes, or until piping hot. Give it a good stir – that cheese will get beautifully melty again! Want to level it up at home? Top it with a sprinkle of fresh chopped parsley or green onions for brightness, or a tiny drizzle of hot sauce for a kick. It’s fantastic just as is, but feel free to add a simple side salad or some crisp carrot sticks for crunch. The beauty is in its simplicity and bold flavor – no fancy plating needed, just pure, satisfying deliciousness in a bowl!
Make It Your Own: Flavor Twists & Swaps
This recipe is your canvas! Get creative:
- Cheese Swap: Use sharp white cheddar for bite, Pepper Jack for heat, or mozzarella for ultimate stretchiness. Mix and match!
- Spice It Up: Add 1-2 teaspoons of smoked paprika or a pinch of red pepper flakes to the beef while browning. Or stir in diced jalapeños with the peppers.
- Lower-Carb/Lower-Cal: Swap the rice for cauliflower rice (steam it first!) or double up on the peppers and mushrooms. Use extra-lean ground turkey or chicken instead of beef.
- “Steak”-ier Feel: Instead of ground beef, use very thinly sliced flank steak or sirloin (quickly sear it after the veggies).
- Extra Veggie Power: Throw in a handful of fresh spinach right at the end with the cheese – it wilts perfectly! Or add some diced zucchini with the other veggies.
Jackson’s Kitchen Chronicles: Notes & Nostalgia
This recipe has seriously evolved in my kitchen! The first attempt? Let’s just say I used *way* too much Worcestershire (my kitchen smelled like a British pub for a week!) and didn’t drain the beef properly. Lesson learned! The key is balance. Over the years, simplifying the veggies to the classic trio (peppers, onions, mushrooms) and nailing the cheese melt technique made all the difference. The ground beef twist? Honestly, born out of convenience and cost one hectic prep Sunday, and it turned out so darn tasty and easy it stuck!
One funny fail involved trying to make this in a tiny skillet – veggies flying everywhere, beef overflowing… my dog was VERY interested in cleanup that day! Now I strictly enforce the “use the biggest darn skillet you own” rule. The best part? Seeing friends’ faces light up when they try it. One buddy swore it tasted *better* than his favorite Philly spot’s sandwich! That’s the Food Meld magic – taking familiar flavors, twisting them just right, and making them work effortlessly for real life. This bowl is pure comfort, pure convenience, and packed with those bold, satisfying flavors I love sharing. Enjoy every messy, cheesy bite!
Your Questions, Answered!
Q: My mixture seems a bit watery after reheating. What happened?
A: This usually means either: 1) The beef wasn’t drained well enough after browning (fat turns to liquid when cold), or 2) The veggies released a lot of liquid. Fix: Drain the beef thoroughly! Also, make sure your cooked rice is cooled completely before assembling, and let the beef/veggie mixture cool slightly before adding to containers. If it happens, stir well after reheating – it often reabsorbs.
Q: Can I freeze these meal prep bowls?
A: Absolutely! Assemble the bowls (cooled rice and cooled cheesesteak mixture). Seal tightly. Freeze for up to 2 months. Reheating: Thaw overnight in the fridge, then microwave (remove lid first!) for 2.5-3.5 minutes, stirring halfway. You can microwave from frozen too, but it takes longer (4-6 mins) and stir well to heat evenly.
Q: The cheese doesn’t melt smoothly when I reheat. Help!
A: Two culprits: 1) Pre-shredded cheese has anti-caking agents that can make it melt less smoothly. Fix: Shred your own block cheese! 2) Overheating. Nuke it in shorter bursts (start with 1 min, stir, then 30-sec bursts). Adding a tiny splash (1 tsp) of water or broth before reheating can help create steam.
Q: Can I use a different type of rice?
A: 100%! Jasmine rice is fragrant, brown rice adds nuttiness and fiber (adjust cooking time!), even quinoa works great for extra protein. Just ensure it’s cooked and cooled properly before assembling. Cauliflower rice is a fantastic low-carb option – just steam it first and squeeze out excess moisture.
🍳 Kitchen Gear You’ll Need to Nail This Bowl
Good news: you don’t need a flat-top grill the size of Philly to pull this off. Just grab these basics and you’re golden:
-
Extra-large skillet or cast-iron pan – your MVP for browning beef and caramelizing veggies. (Bigger is better—trust me, overcrowding kills flavor!)
-
Rice cooker, Instant Pot, or saucepan – for fluffy basmati rice (or whatever base you’re rolling with).
-
Sharp chef’s knife & cutting board – for slicing onions pole-to-pole and dicing peppers cleanly.
-
Wooden spoon or spatula – to break up ground beef and scrape up those flavor-packed browned bits.
-
Mixing bowls – handy for holding sautéed veggies while the beef gets its turn.
-
Measuring cups & spoons – to keep that Worcestershire-broth ratio just right.
-
Box grater – shred your own cheese for the silkiest melt.
-
Meal prep containers (8) – because this bowl was built for grab-and-go wins.
🔥 That’s it—no fancy gadgets, no excuses. Just your trusty skillet, some sharp tools, and a little Food Meld hustle.
Nutritional Info (Per Serving, Approximate)
Calories: ~480 kcal | Protein: 32g | Carbohydrates: 24g | Fat: 28g | Fiber: 2g | Sugar: 3g | Sodium: ~450mg
Note: Values are estimates and can vary based on specific ingredients used (e.g., exact beef fat %, cheese type, broth sodium). Using extra-lean beef, low-sodium broth, and less cheese can reduce calories/fat/sodium.
Print
Ground Beef Philly Cheesesteak Meal Prep
- Total Time: 35 minutes
- Yield: 8 1x
Description
All the bold, savory flavors of a Philly cheesesteak—minus the hoagie. This bowl-style version uses ground beef, tender veggies, melty cheese, and fluffy rice for an easy, satisfying, and reheatable meal you’ll look forward to all week.
Ingredients
3 lbs lean ground beef
2 medium green bell peppers, diced
2 small onions, sliced
4 cups sliced mushrooms
4 tsp Worcestershire sauce
½ cup beef broth
2 cups shredded Colby Jack or provolone cheese
4 cups cooked basmati rice
Instructions
Cook the rice: If not pre-cooked, prepare rice according to package directions. Set aside.
Sauté veggies: In a large skillet over medium heat, sauté onions, peppers, and mushrooms for 5–7 minutes until soft and slightly caramelized. Remove and set aside.
Brown the beef: In the same skillet, cook ground beef until browned. Drain excess fat.
Add flavor: Stir in Worcestershire sauce and beef broth. Simmer for 2–3 minutes. Add veggies back in and mix well.
Melt the cheese: Sprinkle cheese evenly over the mixture. Cover and cook on low until melted.
Assemble meal prep: Divide rice and cheesesteak mix into 8 containers. Store in the fridge for up to 4 days.
- Prep Time: 15 minutes
- Cook Time: 20 minutes
Nutrition
- Calories: 480/serving
- Sugar: 3g/serving
- Sodium: 450mg/serving
- Fat: 28g/serving
- Carbohydrates: 24g/serving
- Fiber: 2g/serving
- Protein: 32g/serving
Final Thoughts: Bold Flavor Meets Real Life
There’s something deeply satisfying about turning a classic sandwich into a bowl that fits your life—less mess, all the flavor, and a whole lot more flexibility. These Ground Beef Philly Cheesesteak Bowls are a love letter to comfort food that doesn’t ask you to compromise your time, budget, or goals. They’re easy enough for a weeknight, hearty enough to crush hunger, and delicious enough to make you look forward to your next lunch.
Whether you’re meal prepping for a busy week or just craving that nostalgic cheesesteak bite with a new twist, this bowl has your back. It’s savory, cheesy, customizable, and packed with feel-good energy. So the next time you’re tempted by takeout, remember: you’ve got everything you need in your own kitchen—and it starts with one pan, one idea, and one big bite of bold.
Stay cheesy, stay hungry,
– Jackson @ Food Meld


