Fudgy Greek Yogurt Brownies: The No-Sugar Game Changer You NEED to Try
Hey friends, Jackson here from Food Meld! Let’s get real for a second. We’ve all been there: that 3 PM slump hits, or a serious chocolate craving strikes after dinner, and you’re staring into the pantry abyss, wishing for something decadent that won’t send you on a sugar rollercoaster. You want a brownie. Not a “healthy-ish” sad square that tastes like sweetened cardboard, but a real, fudgy, crackly-top, chocolate-forward brownie.
Well, my fellow flavor seekers, I’m about to make your entire week. These Fudgy Greek Yogurt Brownies are my latest kitchen obsession, and they are a total revelation. We’re talking unbelievably rich, intensely chocolatey, and so moist they practically melt in your mouth. And the best part? There is zero added sugar in the entire recipe. Not a single grain!
Before you raise an eyebrow, let me stop you. This isn’t magic, it’s just a really, really good Food Meld. We’re using simple, whole ingredients you can feel good about—creamy Greek yogurt, natural unsweetened applesauce, and rich cocoa powder—to create a treat that’s packed with protein and pure, unadulterated pleasure. They’re gluten-free, guilt-free, and so easy to whip up, you’ll have them in the oven in under 10 minutes. So, tie on that apron, grab your favorite mixing bowl, and let’s cook something awesome that proves you can have your brownie and eat it too, no compromises.

The Brownie That Started It All
This whole recipe actually started in my grandma’s kitchen, though she’d probably get a kick out of this “fancy” version. Her classic “from-the-box” brownies were my ultimate childhood comfort food. The smell of them baking was my personal welcome home scent after school. I’d always hover by the oven, begging for the first corner piece with the most crust.
But as I got older and my cooking style evolved, I wanted to capture that same deep, comforting joy in a treat that aligned with how I like to eat now—bold flavors, but with a smarter, cleaner approach. I must have tested two dozen versions. Some were too cakey, some were bitter, and one infamous batch was so dense we joked it could double as a doorstop. But that moment I finally got the ratio of yogurt to applesauce just right? Boom. The lid came off the Dutch-process cocoa, and I knew we had a winner. It was that same soul-warming, chocolate-hug feeling I got from my grandma’s kitchen, just remixed for the Food Meld era. It’s a little nod to the past and a big, delicious leap forward.
Gathering Your A-Team: The Ingredients
This is where the magic happens. Every single ingredient in this bowl is pulling double duty for flavor and function. Here’s your shopping list and my quick chef insights for each one.
- 1 cup Unsweetened Cocoa Powder: This is the star of the show, so use a good one! I prefer Dutch-process cocoa for its deeper, smoother chocolate flavor, but natural unsweetened works perfectly too. Chef’s Tip: Sift your cocoa powder if it’s clumpy to avoid any dry pockets in your batter.
- 1 cup Plain Greek Yogurt: This is our secret weapon. It adds incredible moisture, a tangy depth that balances the chocolate, and a huge protein boost. Go for full-fat for the richest texture, but low-fat works in a pinch. Substitution: An equal amount of sour cream or Skyr will work beautifully.
- ½ cup Unsweetened Applesauce: Our natural sweetener! It brings a subtle fruity sweetness and keeps the brownies incredibly moist without any oil or butter. Make sure it’s unsweetened to control the sugar content.
- 2 Large Eggs: The backbone of our structure. Eggs bind everything together and help create that beautiful, slightly crackly top we all love. Pro Tip: Use room temperature eggs for a smoother, easier-to-mix batter.
- ¼ cup Almond Flour: This gives our brownies just enough body without making them heavy. It keeps them gluten-free and adds a nutty undertone. Substitution: Oat flour is a fantastic swap for a slightly softer, more cake-like crumb.
Let’s Get Baking: Your Foolproof Steps to Brownie Bliss
Ready? This is the easy part. We’re going for a “meld, not beat” approach here. Over-mixing is the enemy of fudgy brownies, so keep it gentle and watch the magic happen.
- Preheat & Prep: Fire up your oven to 350°F (175°C). While it’s heating, line an 8×8-inch baking dish with parchment paper, leaving some overhang on two sides. This is my favorite chef hack—it creates a sling so you can lift the entire brownie block out for super clean, easy slicing. If you don’t have parchment, just give the pan a light greasing.
- The Chocolate Base: In a good-sized mixing bowl, add your unsweetened cocoa powder, Greek yogurt, and applesauce. Now, take a whisk and go to town! You want to whisk this until it’s completely smooth, glossy, and looks like the most decadent chocolate pudding you’ve ever seen. Getting rid of all the cocoa lumps here is crucial for that perfect, fudgy texture.
- Incorporate the Eggs: Crack your eggs into a small bowl first (this saves you from any rogue shell accidents!). Add the first egg to your chocolate base and whisk it in until it’s fully absorbed. Then, add the second egg and do the same. You’ll see the batter become a little looser and even shinier. That’s exactly what we want!
- Bring It All Together: Now, switch to a spatula. Sprinkle the almond flour over the batter. Gently fold it in. I’m talking big, sweeping motions, scraping from the bottom of the bowl and folding over on itself. Stop as soon as you no longer see streaks of flour. Remember, we’re being gentle giants here.
- Pan & Bake: Pour that beautiful, thick batter into your prepared pan. Use your spatula to spread it into an even layer, getting it right into the corners. Slide it into the middle of your preheated oven and set your timer for 22 minutes.
- The Toothpick Test: At the 22-minute mark, give the pan a little jiggle. The center should be just set, not liquidy. Now, the most important part: poke a toothpick into the center. You are not looking for it to come out clean. You want it to come out with a few moist crumbs clinging to it. That’s the secret to a fudgy, not cakey, brownie! If it looks too wet, give it another 2-4 minutes.
- The Hardest Part: Wait. I know, I know. The smell is incredible. But you have to let these brownies cool completely in the pan on a wire rack. This step allows them to finish setting up, making them easier to slice and intensifying that fudgy texture. For the ultimate experience, pop them in the fridge for an hour after they cool. Trust me on this.
How to Serve These Beauties
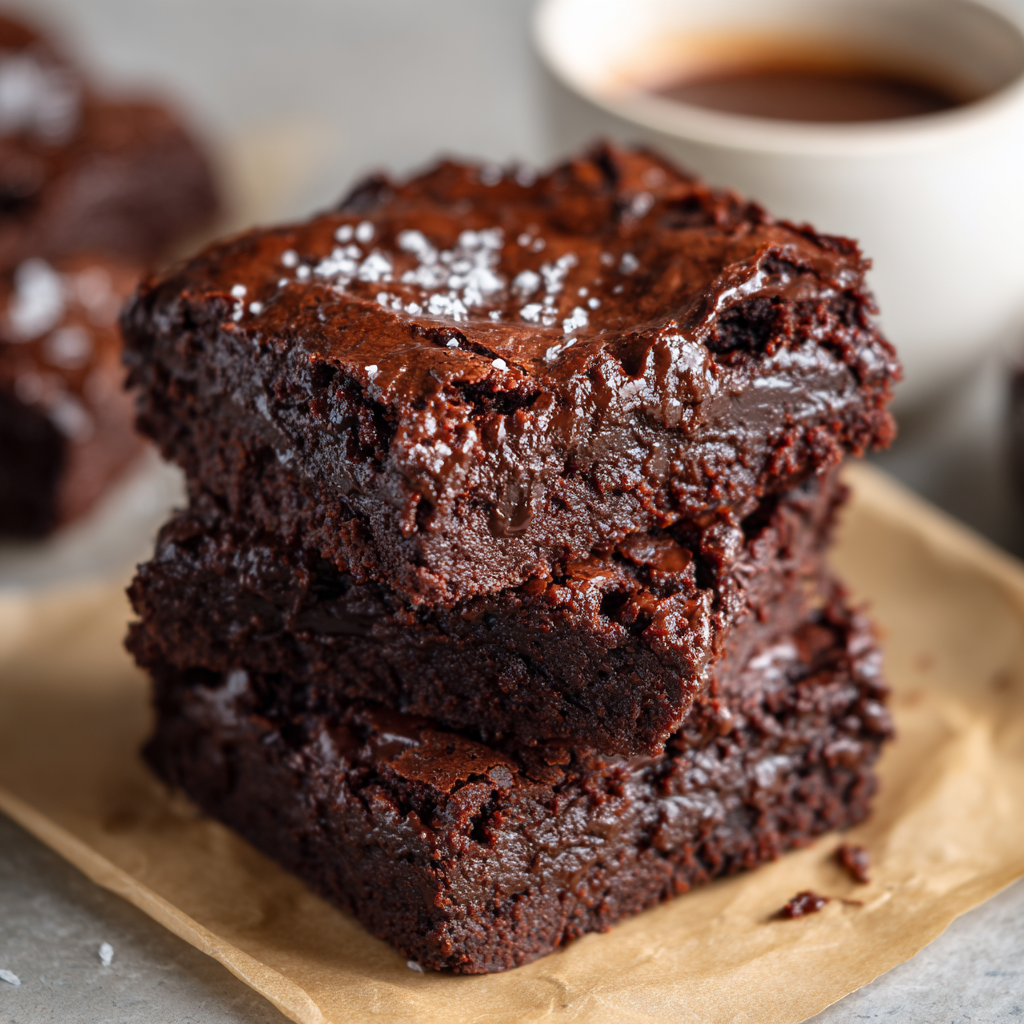
Once they’re cooled and sliced into 9 perfect squares, the fun begins. My absolute favorite way to eat one is slightly warmed for about 15 seconds in the microwave—it brings back that just-out-of-the-oven gooeyness.
For a next-level dessert, top a warm brownie with a scoop of rich vanilla bean ice cream or a dollop of whipped coconut cream. The contrast of hot and cold is pure heaven. For a little crunch, a sprinkle of toasted chopped walnuts or a few fresh raspberries adds a fantastic texture and flavor pop. And for my fellow coffee lovers, enjoy one with a hot cup of black coffee—the bitterness of the coffee makes the chocolate taste even deeper and more complex.
Mix It Up! Fun Flavor Twists
This recipe is an amazing canvas for your own creativity. Here are a few of my favorite ways to mix it up:
- Mocha Chip: Whisk 1-2 teaspoons of instant espresso powder into the cocoa powder for a deep coffee flavor. Fold in ¼ cup of sugar-free chocolate chips right before pouring into the pan.
- Orange Zest & Almond: Add the zest of one whole orange to the batter with the eggs. The citrus brightens everything up beautifully. Fold in 2-3 tablespoons of sliced almonds for a little crunch.
- Peanut Butter Swirl: Drop 3-4 dollops of unsweetened peanut butter (or any nut butter) onto the batter in the pan. Use a knife or toothpick to swirl it dramatically through the chocolate batter.
- Mint Chocolate: Add ½ teaspoon of peppermint extract along with the eggs for a refreshing, classic flavor combination.
- Double Chocolate “Chunk”: Chop up a bar of 100% cacao baking chocolate (or a very high-percentage dark chocolate bar) into rough chunks and fold them in for intense, melty pockets of pure chocolate.
Jackson’s Chef Notes & Kitchen Stories
This recipe has become a staple in my house, and it’s hilarious to see people’s reactions when I tell them what’s not in them. I once brought them to a potluck, and my friend Sarah, a self-proclaimed sugar fiend, ate three before I broke the news. Her jaw literally dropped. That’s the Food Meld win I live for.
Over time, I’ve learned that the brand of cocoa powder can slightly change the bitterness level. If you find your batch is a tad too intense for your taste (especially for kids), don’t be afraid to add a tablespoon or two of a natural sweetener like maple syrup or honey to the batter. Cooking is about making it yours! The recipe is forgiving, so play around and find your perfect blend.
FAQs & Quick Fixes
Q: My brownies turned out a bit bitter. What happened?
A: This usually comes down to the cocoa powder. Since there’s no added sugar, the natural bitterness of cocoa is front and center. Using a high-quality Dutch-process cocoa can help, as it’s often less acidic. If it’s still too strong for you, try adding a tablespoon of maple syrup to the batter, or balance it with a sweet topping like the vanilla ice cream we talked about.
Q: Can I make these dairy-free?
A: Absolutely! Just swap the Greek yogurt for an equal amount of a thick, plain dairy-free yogurt. Coconut yogurt works incredibly well and adds a lovely subtle flavor.
Q: The center sunk a little after cooling. Is that normal?
A: A slight dip is totally normal for a brownie this fudgy and flourless! It’s a sign of a moist, dense interior. If you got a huge sinkhole, it might mean you needed just a minute or two more in the oven, but a little dip is what we’re going for.
Q: How should I store these?
A: Because they’re so moist, they keep beautifully in an airtight container in the fridge for up to 5 days. You can also freeze them for up to 3 months! Just slice them, layer them between parchment paper in a freezer bag, and thaw at room temperature or in the microwave whenever a craving strikes.
The Healthy Scoop (Because It’s Awesome)
Let’s talk about why you can feel so good about grabbing one of these any time of day. Since we’re using whole food ingredients and zero added sugars, these brownies are a nutritional powerhouse compared to your standard bakery version.
Estimated per brownie (makes 9):
Calories: ~120 | Protein: 7g | Fat: 6g | Carbs: 10g | Sugar: 3g (all natural from the applesauce and yogurt) | Fiber: 2g
That 7 grams of protein is a game-changer, making these a satisfying snack that actually keeps you full. The fiber from the almond flour and cocoa helps slow down the absorption of the natural sugars, preventing a spike and crash. You’re getting a rich, chocolatey treat that fuels your body, not just your cravings. Now that’s what I call a win-win.
Your New Go-To Brownie
And there you have it! My complete guide to the brownie that changed my perspective on guilt-free baking. It’s proof that with a little creativity and the right ingredients, you don’t have to give up the foods you love to feel your best.
I hope this recipe brings as much joy to your kitchen as it has to mine. I want to see your creations! When you make them, snap a pic and tag me on social @FoodMeld with #FoodMeld. I love seeing your “you’ve gotta try this” moments.
Now, go enjoy every single bite of that fudgy, chocolatey goodness. You’ve earned it. Until next time, keep cooking boldly and having fun with it!
– Jackson


