Fried Taco Samosas: The Ultimate Fusion Snack Attack!
Hey friends, Jackson from Food Meld here! Let’s be real for a second: is there anything in this world that can’t be improved by wrapping it in a crispy, golden, fried pocket of deliciousness? I’m willing to bet the answer is a resounding “no.” And that’s exactly the kind of “what if we tried this?” energy that led me straight to these Fried Taco Samosas.
We all have those classic, go-to meals we fall back on. For me, that’s taco night. It’s a tradition. It’s reliable. But sometimes, you just get that itch to shake things up, to take those familiar, beloved flavors and present them in a way that makes everyone at the table stop and say, “Whoa, what is THAT?”
That’s where the magic of fusion comes in. I took the hearty, spiced goodness of a taco filling—the seasoned beef, the melty cheese, the zesty salsa—and hugged it tight with a crispy, flaky samosa wrapper. The result? A handheld, dippable, utterly irresistible explosion of flavor and texture. They’re the perfect party appetizer that will disappear in seconds, a fun twist on family dinner, or a dangerously good snack for when those late-night cravings hit. They’re surprisingly simple to make, and I promise, the “wow” factor is off the charts. So, let’s ditch the ordinary and cook up something awesomely unforgettable together.
The Happy Accident That Started It All
This recipe was born from one of those beautifully chaotic “clean out the fridge” moments. Picture it: a post-game day mess in my kitchen. We had a mountain of leftover taco meat, a half-eaten block of cream cheese from a bagel breakfast, a handful of shredded cheese, and a lone sleeve of egg roll wrappers I’d bought for a spring roll experiment that never happened.
My buddy Mike, who has the appetite of a linebacker and the culinary curiosity of a goldfish, looked at the spread and said, “Dude, just throw it all in a tortilla and call it a day.” But my brain started whirring. I remembered the incredible, flaky texture of the samosas I’d devoured at a food truck the week before. I thought, “What if we could get that taco filling inside *that* kind of crispy shell?”
So, we started experimenting. We mashed, we folded, we fried. The first one was a leaky mess. The second one was overstuffed. But the third one? The third one was pure, golden perfection. The moment we bit into that crispy shell and hit that warm, cheesy, tangy beef filling, we knew we’d stumbled onto something special. It was a classic Food Meld moment—a little Southern comfort, a global inspo, and a whole lot of “let’s see what happens.”
Gathering Your Flavor Arsenal
Here’s everything you’ll need to create these crispy pockets of joy. Don’t stress about being exact—cooking is about feeling, and these ingredients are super flexible!
- 1 lb Ground Beef (80/20 is ideal): This is our flavor base. The little bit of extra fat adds so much richness. Chef’s Insight: For a lighter option, ground turkey or chicken works beautifully, just bump up the seasoning a touch!
- 1 block Cream Cheese (8 oz), softened: This is the secret weapon! It doesn’t just add creaminess; it binds the filling together and gives it a luxurious, tangy depth that sets these apart. Pro Tip: Leave it on the counter for 30 minutes before you start—it’ll mix in like a dream.
- 1 cup Shredded Cheese (Mexican blend or Cheddar): Because more cheese is always the answer. This gives you those glorious, stretchy, cheesy pulls.
- ½ cup Salsa: This is your built-in seasoning! It adds moisture, a little acidity, and a kick of flavor. Use your favorite—mild, medium, or hot—it’s your kitchen, your rules!
- 2 tbsp Sour Cream: This mellows everything out and adds another layer of creamy tang. If you’re out, plain Greek yogurt is a perfect stand-in.
- Flour Tortillas or Egg Roll Wrappers: The great debate! Egg roll wrappers are my go-to for the crispiest, most authentic “samosa” feel. Flour tortillas work in a pinch and give a softer, more quesadilla-like texture. I’ll walk you through folding both!
- Oil for Frying: Canola, vegetable, or peanut oil are all great. You’ll need enough for about 1-2 inches in your skillet.
- Water or Flour-Water Paste: Your edible glue! A simple paste of 2 tbsp flour and 3 tbsp water mixed together creates the ultimate seal to keep those fillings locked in.
Let’s Build Some Flavor Bombs: A Step-by-Step Guide
Alright, let’s get our hands dirty! This process is actually super fun and therapeutic. Put on some music, grab a friend or your kids, and make an assembly line. Here’s how we turn these ingredients into golden perfection.
- Brown the Beef: Crank a large skillet to medium-high heat and add your ground beef. Break it up with a wooden spoon and cook until it’s beautifully browned and no pink remains. This is where we build our foundation, so don’t rush it! Chef’s Hack: Once the beef is cooked, drain off the excess grease. This is key for a non-greasy filling and a crispier final product.
- Create the Cheesy Filling: Reduce the heat to low. Now, add that entire block of softened cream cheese, your shredded cheese, salsa, and sour cream right into the skillet with the beef. Stir, stir, stir! You’ll watch as it all melts together into a gloriously creamy, cohesive mixture. Take it off the heat and let it cool for at least 15 minutes. Important! A hot filling will steam and soften your wrappers, making them tricky to fold and more likely to burst in the oil.
- Prep Your Wrappers & Create Your Station: While the filling cools, get your wrapping station ready. If using egg roll wrappers, keep them under a damp paper towel so they don’t dry out. If using flour tortillas, slice them in half (for large burrito-sized) or quarters (for smaller street-taco-sized). Have your flour-water paste or a small bowl of water ready. This is your “glue” station!
- The Art of the Fold: This is the fun part!
- For Egg Roll Wrappers (Triangle Fold): Place a wrapper like a diamond in front of you. Spoon about 1 ½ tablespoons of filling in the center-bottom third. Fold the bottom corner up over the filling. Fold in the left and right corners. Now, gently roll it up like a tiny burrito, and seal the final top corner with your paste. It should look like a neat little triangle packet.
- For Tortilla Halves (Pocket Fold): Take a half-moon shaped piece. Fold it in half to create a rough triangle, but don’t crease it. Open it up, place filling on one side, then fold the other side over to create a pocket. Use your paste to seal the curved edge well.
Pro Tip: Don’t overfill! This is the number one mistake. A modest amount of filling ensures a tight seal and prevents blowouts.
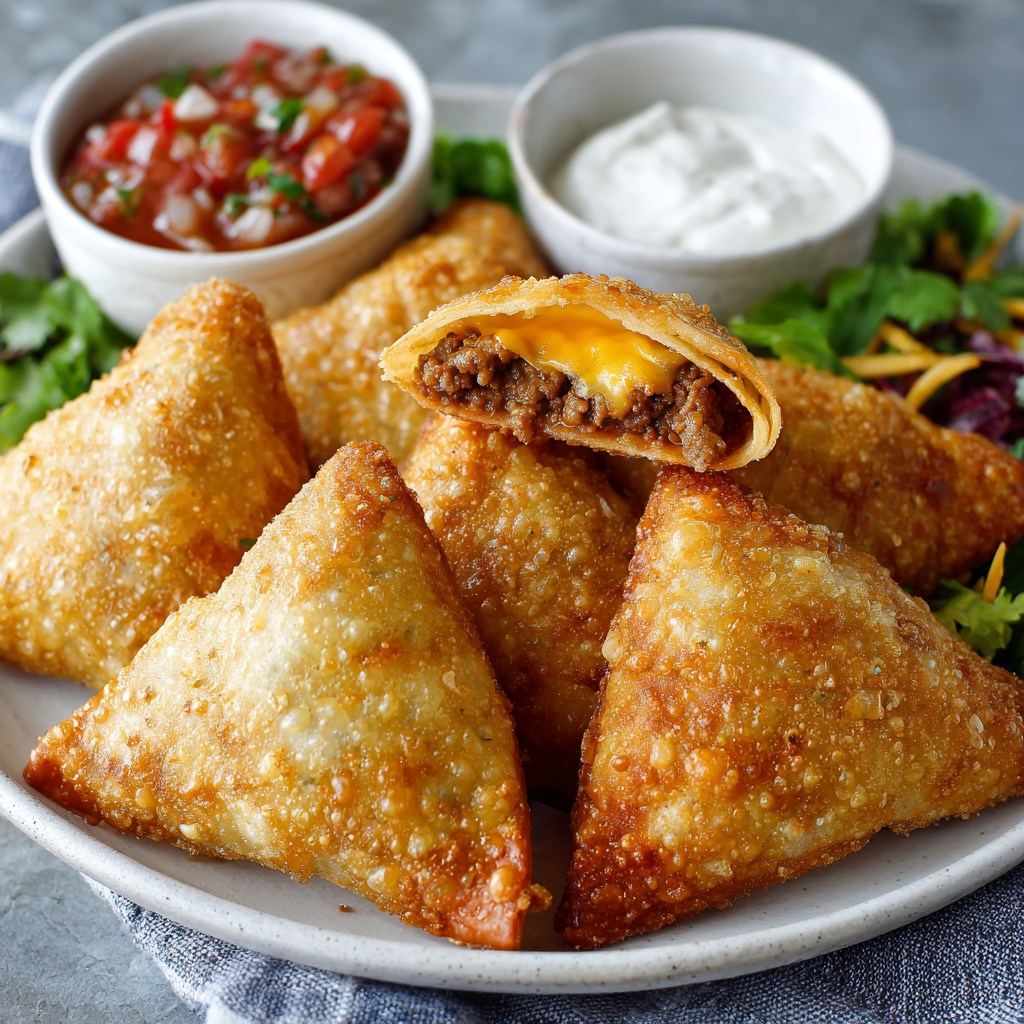
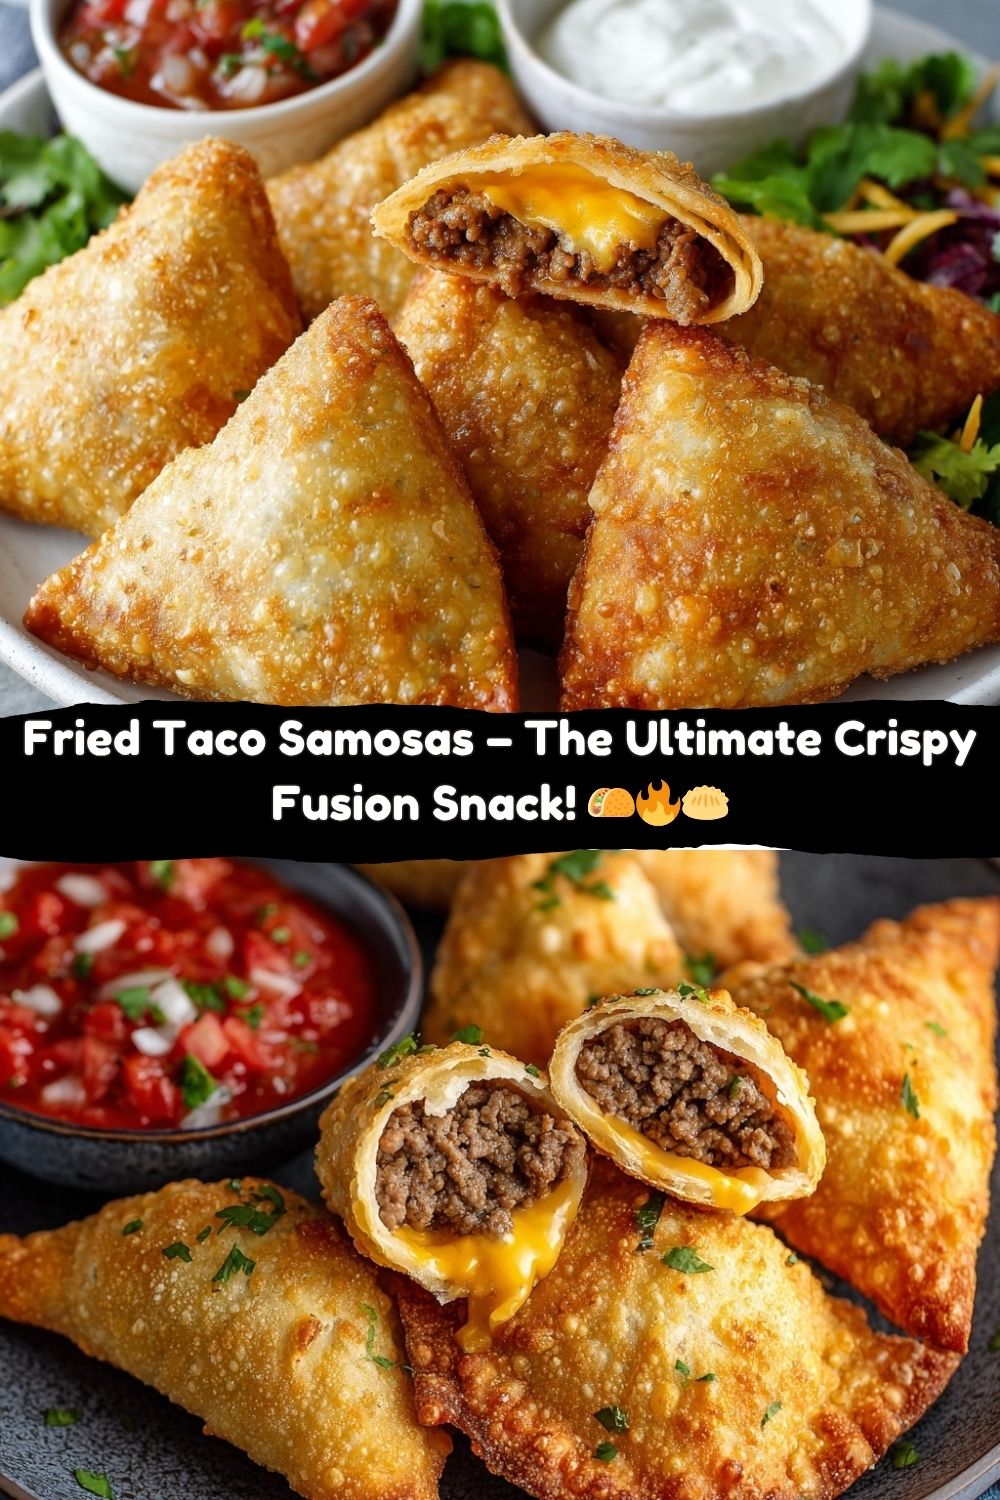
- Fry to Golden Perfection: Pour oil into a heavy-bottomed skillet or Dutch oven until it’s about 1 ½ inches deep. Heat it over medium-high heat until it reaches 350°F (175°C). If you don’t have a thermometer, test it by dropping a tiny piece of wrapper in; if it sizzles and floats immediately, you’re good. Carefully place 3-4 samosas in the oil, don’t crowd the pan! Fry for 2-3 minutes per side until they’re a deep, golden brown and incredibly crispy.
- The All-Important Drain: Use tongs to pull your gorgeous, golden samosas from the oil and place them directly onto a wire rack set over a baking sheet or a plate lined with paper towels. Letting them drain on a rack keeps the bottom from getting soggy, ensuring maximum crunch on every surface.
How to Serve These Crispy Stars of the Show
You’ve done the hard work, now for the best part: the grand presentation! These samosas are social food, so put them right in the middle of the table and let everyone dig in.
I love serving them on a big wooden board or a vibrant platter. Scatter some fresh cilantro leaves over the top for a pop of color. Then, the real fun begins: the dipping sauce bar! Don’t just stick to one sauce—offer a variety. Put out small bowls of:
- Cooling Creamy Dip: A classic sour cream, a creamy cilantro-lime crema, or even a quick avocado dip.
- Something with a Kick: Your favorite salsa (a chunky one is great for texture), a spicy chipotle mayo, or a smoky hot sauce.
- The Classic: A big bowl of guacamole is non-negotiable for me. The cool, creamy avocado is the perfect contrast to the hot, crispy shell.
For a full meal, pair them with a simple corn and black bean salad or a light, citrusy slaw to balance out the richness. They’re the life of the party, no matter the occasion!
Make It Your Own: Creative Twists & Swaps
The beauty of this recipe is its versatility. Once you master the basic fold, the filling world is your oyster! Here are a few of my favorite ways to mix it up:
- Buffalo Chicken Swap: Use 2 cups of shredded cooked chicken tossed in ½ cup of buffalo sauce instead of the taco meat. Keep the cream cheese and cheddar. It’s a game-day favorite!
- Fully Loaded Veggie: For a meatless Monday win, sauté a mix of black beans, corn, diced bell peppers, and onions. Use a taco seasoning packet or your own blend of cumin, chili powder, and paprika for that classic flavor.
- Breakfast Samosa: Yep, you read that right. Fill them with scrambled eggs, cooked breakfast sausage, and a bit of cheddar cheese. Fry them up for the most epic brunch ever.
- Spicy Chorizo & Potato: Swap half the beef for Mexican chorizo and add ½ cup of finely diced, cooked potatoes. It’s a heartier, deeply flavorful twist.
- Baked, Not Fried (Lighter Option): Want to cut back on oil? No problem! Arrange your sealed samosas on a parchment-lined baking sheet, brush them lightly with oil or spray with cooking spray, and bake at 400°F (200°C) for 15-20 minutes, flipping halfway, until golden and crispy.
Jackson’s Kitchen Notes & Stories
This recipe has come a long way from that first messy kitchen experiment. The biggest lesson learned? Patience with the filling. I can’t tell you how many times I got impatient and tried to fold a warm filling, only to end up with a wrapper that tore and a samosa that burst open in the oil like a flavor volcano. Letting it cool completely is the ultimate chef’s secret I’m passing on to you.
Another funny evolution: my folding technique. I used to be so meticulous, trying to make every single one look like a perfect, identical triangle. Now, I love the little imperfections. Some are fatter, some are a little lopsided—it gives them character and tells a story of a kitchen filled with laughter and fun, not stress. Remember, we’re going for delicious, not necessarily perfect. The mess is part of the memory!
Your Questions, Answered!
I’ve gotten a lot of questions about this recipe over time, so here are the answers to the most common head-scratchers.
Q: My samosas are splitting open in the oil! What did I do wrong?
A: Ah, the classic blowout! This is almost always one of two things: 1) The filling was too hot when you wrapped them, making the wrapper soggy and weak. Or 2) You overfilled them. Be generous but not greedy with that filling, and make sure it’s cool to the touch. Also, that flour-water paste is a much stronger seal than just water.
Q: Can I make these ahead of time?
A> Absolutely! You can assemble them completely, place them on a baking sheet, and freeze them solid. Once frozen, transfer to a zip-top bag. Fry them straight from frozen—just add an extra minute or two to the cooking time. It’s the ultimate party hack!
Q: My oil is smoking, but my samosas are still pale. What’s up?
A: This usually means your oil is too hot! The outside cooks too fast, leaving the inside cold. If you don’t have a thermometer, use the bread test. The oil should be hot enough to sizzle vigorously but not so hot that it smokes or burns the wrapper in 30 seconds. Adjust the heat as you go to maintain that perfect 350°F golden-fry zone.
Q: Can I use an air fryer?
A> You can! Brush or spray your assembled samosas generously with oil. Air fry at 375°F (190°C) for 10-12 minutes, flipping halfway through, until golden and crisp. They won’t be *quite* as decadently crispy as the deep-fried version, but they’re a fantastic lighter alternative.
A Quick Look at the Numbers
Okay, let’s talk nutrition real quick. I’m all about balance, and while this is definitely a treat-yo-self kind of recipe, it’s good to know what you’re working with. This is an estimated breakdown per samosa (assuming the recipe makes 12 and you’re using egg roll wrappers and frying). Remember, these numbers can change based on your specific ingredients, how much oil is absorbed, and the size of your samosas.
Per Samosa (Estimated):
Calories: 220 | Fat: 15g | Saturated Fat: 7g | Carbohydrates: 12g | Fiber: 1g | Sugar: 2g | Protein: 9g
To lighten things up, you can use lean ground beef (or turkey), low-fat cream cheese and shredded cheese, and opt for the baking or air frying method I mentioned above.
Final Thoughts: The Joy of the Unexpected
And there you have it, my friends — a crispy, golden, flavor-packed mashup that proves magic happens when you’re willing to play with your food. These Fried Taco Samosas are everything I love about cooking: familiar comfort, global inspiration, and just the right amount of chaos.
What started as a “what if” moment turned into one of those recipes that never fails to surprise and delight. Every bite delivers that satisfying crunch, the gooey melted cheese, the zesty taco filling — it’s the kind of snack that makes people stop mid-bite and say, “Wait… what is this?”
So, whether you’re frying up a batch for a game-day feast, impressing friends at your next get-together, or just treating yourself after a long day, remember this: good food doesn’t have to be serious. It just has to be fun, flavorful, and made with heart.
Tag me @FoodMeld when you make them — I can’t wait to see your golden creations. Until next time, keep experimenting, keep laughing, and keep melding those flavors!
— Jackson


