French Silk Pie Cookies: Your New Chocolate Obsession Awaits
Hey friends, Jackson from Food Meld here. Let’s get real for a second. Are you tired of boring, flat, one-note chocolate cookies that promise the world and deliver a sad, crumbly mess? Yeah, me too. That’s why we’re throwing the whole cookie playbook out the window today and making something that’s not just a dessert—it’s an experience. We’re talking about French Silk Pie Cookies that are so decadent, so luxurious, and so downright delicious, they’ll ruin all other cookies for you. Forever. And the best part? They’re inspired by that famous cookie shop (you know the one), but I’ve put my own bold, from-scratch, “what-if-we-tried-this” spin on them.
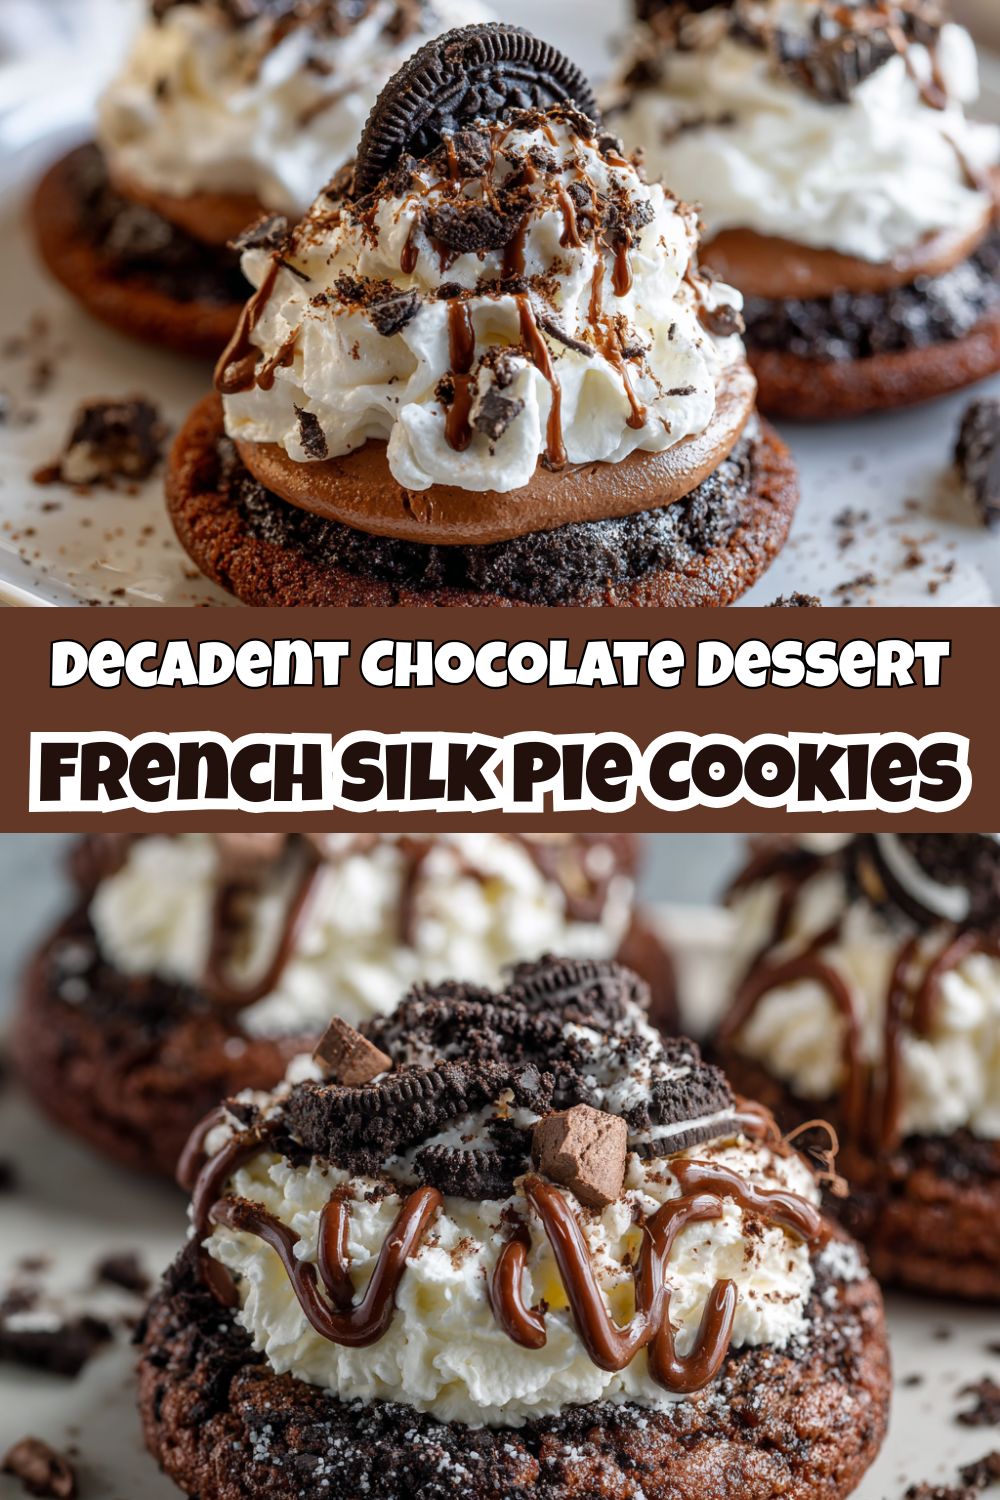
Imagine this: a deeply fudgy, almost brownie-like Oreo chocolate cookie base. Not too cakey, not too crisp—just perfect. On top of that, we’re piling a cloud of silky, rich chocolate mousse that’s so smooth it’ll make you swoon. And because we believe in going big or going home, we’re crowning it all with a fluffy, sweet whipped cream topping and maybe a few chocolate curls because, well, why not? It’s a triple threat of chocolatey goodness in one handheld, shareable (or, let’s be honest, definitely-not-shareable) bite.
I know it sounds like something you’d only get from a professional bakery, but I’m here to show you just how easy and fun it is to create these unforgettable treats right on your own kitchen counter. So, grab your favorite mixing bowl, put on some good music, and let’s melt some chocolate and make some memories. Let’s cook something awesome together.
The Pie That Started It All
This recipe takes me right back to my grandma’s kitchen in Georgia. Sundays were for church, family, and her legendary French silk pie. It was the kind of pie that had its own reputation. The adults would try to talk politics, but all us kids could think about was that pie waiting in the fridge. The rule was you had to eat your greens before you could have a slice, and let me tell you, I’ve never eaten collard greens so fast in my life.
My job was always to help her with the whipped cream topping. She’d hand me the big, cold metal bowl and the whisk, and I’d whisk until my arm felt like it was gonna fall off. She’d laugh and say, “Almost there, Jackson! Just a little more elbow grease!” That moment when the soft peaks finally formed felt like a magic trick. The joy wasn’t just in eating it; it was in the messy, fun process of making it together. These cookies are my way of capturing that same magic—the rich chocolate, the fluffy cream, the pure joy—but in a fun, portable, cookie form that’s perfect for passing around and watching people’s eyes light up. It’s my Southern roots meets a whole lot of creative, “what-if” energy.
Gathering Your Flavor Arsenal
Here’s everything you’ll need to create this masterpiece. This is a double batch because, trust me, you’ll want plenty to go around. Read through these notes—I’ve packed them with my chef insights and easy swaps to make this recipe work for you!
For the Ultra-Fudgy Cookie Base:
- 20 Crushed Oreos: This is our secret weapon! They add a deep chocolate flavor and a fantastic texture. No need to remove the cream—it all gets blended in! Chef’s Insight: Blitz them in a food processor or throw them in a zip-top bag and go to town with a rolling pin. Therapeutic and effective!
- 2 ½ cups All-Purpose Flour: The backbone of our cookie. Spoon and level it into your measuring cup to avoid a dry, dense cookie.
- 2 tbsp Cornstarch: This is my little hack for an incredibly soft and tender cookie crumb. It’s a non-negotiable for the perfect texture!
- ½ cup Black Cocoa Powder: This is what gives these cookies their intense, almost Oreo-like color and flavor. Substitution Tip: If you can’t find black cocoa, use ¼ cup regular Dutch-process cocoa and ¼ cup natural cocoa powder. It won’t be as dark, but it’ll still be delicious.
- 1 tsp Baking Soda & ½ tsp Baking Powder: Our leavening dream team for the perfect rise.
- ½ tsp Salt: Crucial for balancing all that sweetness and making the chocolate flavor pop.
- 1 cup Unsalted Butter, softened: For richness and that classic cookie texture. Pro Tip: “Softened” means you can leave a slight indent with your finger. Not melted, not cold—just perfectly pliable.
- 1 cup Brown Sugar & ½ cup Granulated Sugar: Brown sugar adds moisture and a hint of molasses, while white sugar helps with spread and crispness.
- 2 large Eggs: Binds everything together. Make sure they’re at room temperature to cream properly with the butter.
- 2 tsp Vanilla Extract: The flavor enhancer. Use the real stuff—it makes a difference!
For the Silky Chocolate Mousse Filling:
- 4 oz package Chocolate Instant Pudding Mix: This is the cheat code for an instantly thick, flavorful, and stable mousse. It’s genius and saves so much time.
- 1 cup Cold Milk: Whole milk is best for the creamiest result.
- 1 ½ cups Heavy Cream: We’re whipping this into stiff peaks to lighten the pudding into a mousse-like consistency.
- ½ cup Powdered Sugar: Sweetens the whipped cream without any graininess.
- 2 tsp Vanilla Extract: More vanilla for that underlying warmth.
- 6 tbsp Melted Chocolate: Use semi-sweet chocolate chips or a bar you love. This boosts the real chocolate flavor and makes the filling even richer. Chef’s Insight: Let it cool slightly before folding it in so it doesn’t deflate the whipped cream.
For the Fluffy Whipped Cream Topping:
- ⅔ cup Heavy Cream: Yes, more cream. We’re not holding back today.
- 4 tbsp Powdered Sugar: For sweetness.
- ½ tsp Vanilla Extract: A classic finish.
Let’s Build Some Cookie Magic: Step-by-Step
Don’t be intimidated by the layers—we’re tackling this one step at a time. I’ll be right here with you, talking you through every move.
- Preheat and Prep: Fire up your oven to 350°F (175°C). Line two large baking sheets with parchment paper. This is a must for easy cleanup and preventing any sticking! Chef’s Hack: If you only have one baking sheet, just let it cool completely between batches. Hot pans make cookies spread too much.
- Combine the Dry Goods: In a medium bowl, whisk together the flour, crushed Oreos, cornstarch, black cocoa, baking soda, baking powder, and salt. Whisk it really well—we want every single tablespoon of that cookie base to be perfectly seasoned and mixed. Set this aside.
- Cream the Butter and Sugars: In a large bowl, use a hand mixer or stand mixer with a paddle attachment to beat the softened butter, brown sugar, and granulated sugar together on medium-high speed. We’re not just mixing; we’re creaming. Do this for a good 2-3 minutes until it’s light, pale, and fluffy. This incorporates air, which is key for texture!
- Add the Wet Ingredients: Scrape down the sides of the bowl with a spatula. Add the eggs one at a time, beating well after each addition. Then beat in the 2 teaspoons of vanilla. Your mixture might look a little curdled at this point—that’s totally normal, don’t panic!
- Bring It All Together: Gradually add the dry ingredient mixture to the wet ingredients, mixing on low speed just until the flour disappears. Do not overmix! Overmixing = tough cookies. We want tender, fudgy cookies. The dough will be thick and glorious.
- Portion and Bake: Use a kitchen scale to weigh out 16 dough balls, about 70 grams each. This ensures they all bake evenly. Roll them into smooth balls, place them on your prepared sheets (8 per sheet), and flatten them slightly into thick discs. They won’t spread a ton. Bake for 10-12 minutes. They will look soft in the center—that’s perfect! They firm up as they cool.
- The Crucial Post-Bake Step: As soon as the cookies come out of the oven, take the bottom of a measuring cup or a small glass and gently press down into the center of each cookie to create a well. This little divot is where our beautiful mousse filling will live! Let them cool completely on the baking sheet.
- Make the Silk Filling: In a medium bowl, whisk the chocolate pudding mix with the 1 cup of cold milk for 2 minutes until it thickens. In another bowl, whip the 1 ½ cups of heavy cream, ½ cup powdered sugar, and 2 tsp vanilla until you have stiff peaks. Gently fold the whipped cream into the thickened pudding. Finally, fold in the slightly cooled melted chocolate until you have a uniform, dreamy, chocolate mousse. Cover and chill for at least 20 minutes to let it set up.
- Whip the Topping: Just before assembling, whip the ⅔ cup heavy cream, 4 tbsp powdered sugar, and ½ tsp vanilla until medium-stiff peaks form.
- ASSEMBLE! This is the fun part. Once cookies are completely cool, dollop a generous amount of the chilled chocolate mousse into the well of each cookie. Pipe or dollop the fresh whipped cream on top. Garnish with chocolate curls, a drizzle of ganache, or more Oreo crumbs. Dive in!
How to Serve These Showstoppers
Presentation is part of the fun! These cookies are a total crowd-pleaser, so let them shine.
I love serving these on a big, rustic wooden board or a beautiful platter. Arrange them so everyone can see all those gorgeous layers. For a real diner-style vibe, you can even plate them individually on small dessert plates with a little dusting of cocoa powder or a single chocolate curl on the side.
These are rich, so a glass of cold milk, a sharp espresso, or even a glass of red wine like a Cabernet Sauvignon are absolutely perfect pairing partners. The key is to serve them immediately after assembling so the whipped cream is still pillowy and perfect. Call everyone to the kitchen—these are meant to be enjoyed fresh and with plenty of “oohs” and “aahs.”
Mix It Up! Creative Twists on the Classic
Once you’ve mastered the base recipe, the world is your oyster! Here are a few of my favorite ways to mix it up:
- Mocha Magic: Add 1-2 teaspoons of instant espresso powder to the dry ingredients for the cookie base AND to the pudding mix. It won’t make it taste like coffee, just deeply, intensely more chocolatey. It’s my favorite trick!
- Mint Chocolate Chip: Add ½ teaspoon of peppermint extract (not mint extract!) to the mousse filling and fold in ¼ cup of mini chocolate chips. Top with a small mint leaf for a gorgeous, refreshing twist.
- Orange Zest Dream: Add the zest of one whole orange to the cookie dough and a teaspoon of orange extract to the mousse. The chocolate-orange combo is a classic for a reason.
- Salted Caramel Swirl: After adding the mousse to the cookies, drizzle each one with a little warm salted caramel sauce before adding the whipped cream. Sweet, salty, perfect.
- Gluten-Free Friendly: Use gluten-free Oreos and a 1:1 gluten-free all-purpose flour blend. The texture might be slightly different, but they’ll still be absolutely delicious.
Jackson’s Chef Notes & Kitchen Stories
This recipe has evolved so much in my kitchen. The first time I tested it, I tried making a completely from-scratch pudding filling. It was delicious, but it was a fussy, multi-step process that I knew would scare away a lot of home cooks. I wanted that same silky texture without the stress. The moment I had the idea to fold whipped cream into instant pudding was a total “EUREKA!” moment. It was fast, foolproof, and tasted incredible.
Another funny story: my first batch of cookies spread like pancakes because I got impatient and used melted butter. I ended up with one giant, flat, cookie sheet cake. It was a delicious failure—we just broke it into pieces and ate it with the mousse like a trifle! It just goes to show that even kitchen “mistakes” can be tasty. The key is softened butter, friends. Trust me on that.
FAQs & Troubleshooting: Your Questions, Answered
Q: Can I make any part of this ahead of time?
A: Absolutely! The baked and cooled cookie bases can be stored in an airtight container at room temperature for up to 2 days. The chocolate mousse filling can be made and kept covered in the fridge for up to 24 hours. I highly whipping the final cream topping fresh right before serving for the best texture.
Q: My mousse filling is a little runny. What happened?
A: This usually happens for one of two reasons: 1) The whipped cream wasn’t whipped to stiff peaks before folding, or 2) The melted chocolate was still too hot when folded in, which can melt the cream. Make sure your cream is cold and whipped firmly, and that your melted chocolate is just warm to the touch, not hot. If it’s runny, just pop the whole bowl of mousse in the fridge for another 30 minutes; it will firm up significantly.
Q: Why did my cookies come out cakey instead of fudgy?
A> The most common culprit is overmeasuring the flour. Always spoon the flour into your measuring cup and level it off with a knife. Don’t scoop the cup directly into the flour bag—you can pack in up to an extra ¼ cup by doing that! Also, ensure you’re not overbaking them. They should look just set when you take them out.
Q: Can I freeze these cookies?
A> You can freeze the baked and cooled cookie bases beautifully for up to 3 months. Thaw at room temperature before assembling. I do not recommend freezing the assembled cookies with the mousse and whipped cream, as the dairy toppings will not thaw well and will become watery.
French Silk Pie Cookies – Crumbl-Inspired & Chocolate-Lover Approved
- Total Time: 50 minutes
- Yield: 16 Cookies 1x
Description
These ultra-rich cookies feature a fudgy Oreo chocolate base, silky mousse filling, and a fluffy whipped cream topping—just like Crumbl’s, but homemade and even better. This double batch is perfect for sharing (or not).
Ingredients
Cookie Base
20 crushed Oreos
2 1/2 cups flour
2 tbsp cornstarch
1/2 cup black cocoa
1 tsp baking soda
1/2 tsp baking powder
1/2 tsp salt
1 cup butter, softened
1 cup brown sugar
1/2 cup granulated sugar
2 eggs
2 tsp vanilla
Silk Filling
4 oz chocolate pudding mix
1 cup milk
1 1/2 cups heavy cream
1/2 cup powdered sugar
2 tsp vanilla
6 tbsp melted chocolate
Whipped Cream
2/3 cup heavy cream
4 tbsp powdered sugar
1/2 tsp vanilla
Twists
Add espresso powder to mousse
Top with chocolate curls, ganache, or Oreo crumbles
Instructions
Preheat oven to 350°F.
Mix dry ingredients. In another bowl, beat butter and sugars, add eggs and vanilla. Combine with dry mix.
Roll into 16 balls (~70g), flatten, and bake 10–12 min. Press centers post-bake to hold mousse. Cool.
Make mousse: whisk pudding with milk. Whip cream with sugar and vanilla. Fold together with melted chocolate. Chill.
Whip cream topping.
Top cookies with mousse and whipped cream. Garnish as desired.
- Prep Time: 20 minutes
- Chill Time: 20 minutes
- Cook Time: 10 minutes
Nutrition
- Calories: 420 / Cookie
- Sugar: 30g / Cookie
- Sodium: 220mg / Cookie
- Fat: 25g / Cookie
- Saturated Fat: 15g / Cookie
- Carbohydrates: 45g / Cookie
- Protein: 6g / Cookie
Nutritional Information*
Please note: These values are estimates based on the listed ingredients and may vary depending on brands and portion sizes.
Per Cookie (approx. 1/16th of the recipe):
-
Calories: 420 kcal
-
Fat: 25g
-
Saturated Fat: 15g
-
-
Carbohydrates: 45g
-
Fiber: 3g
-
Sugar: 30g
-
-
Protein: 6g
-
Sodium: 220mg
⚖️ Chef’s Note: These cookies are indulgent, bakery-style desserts—perfect for special occasions. If you’d like to lighten them up, you can:
-
Swap half the butter for Greek yogurt.
-
Use reduced-fat cream cheese in the mousse.
-
Try a sugar-free pudding mix and less powdered sugar.
Final Thoughts
And there you have it, friends—French Silk Pie Cookies that are just as decadent and swoon-worthy as the pie that inspired them. These beauties are more than just cookies; they’re little bites of nostalgia, indulgence, and pure chocolate happiness. From the fudgy Oreo base to the silky mousse and pillowy whipped cream topping, every layer tells a story of comfort, creativity, and celebration.
Whether you’re baking them for the holidays, a birthday, or just because you deserve something extraordinary on a Tuesday night, these cookies deliver the wow factor every single time. They’re a little fancy, a little playful, and totally unforgettable.
So grab your whisk, melt that chocolate, and share these gems with the people you love. Because the best desserts aren’t just about taste—they’re about the moments and memories we create along the way. And trust me, these cookies will create plenty.
Happy baking,
Jackson