
Forget Everything You Thought You Knew About Homemade Bread
Okay, team, let’s talk about one of life’s simple, perfect pleasures: a slice of toast. But I’m not talking about just any toast. I’m talking about that golden-brown, craggy, butter-absorbing, jam-hugging masterpiece that you get from a real English muffin. You know the one. The one with all those nooks and crannies that act like tiny flavor pockets for whatever deliciousness you slather on them. Now, what if I told you you could get all of that incredible texture, that signature tang, and that unbeatable toastability in an effortless, no-knead, loaf-shaped package?
Friends, meet your new kitchen best friend: English Muffin Bread.
If the idea of making bread from scratch has ever made you break a sweat, this recipe is your antidote. We’re throwing out the rulebook that says bread has to be complicated. There’s no fancy shaping, no tense windowpane tests, and definitely no stress. This is the “no-fuss, all-flavor” recipe I turn to when I want that bakery-quality satisfaction without the bakery-level effort. It’s the ultimate “mix, rise, and bake” situation, resulting in a loaf that’s so wonderfully rustic, toasty, and satisfying, you’ll be making it on repeat. So, preheat your oven and that imagination of yours—we’re about to cook something awesome together.
The Toasty Sound of Home
This recipe takes me right back to my grandma’s kitchen. Her house always had this specific, magical smell on Saturday mornings—a mix of percolating coffee and toasting bread. But it wasn’t just any bread. It was her “special toasting loaf.” As a kid, I’d sit at the Formica countertop, swinging my legs, listening for the ka-chunk of her ancient, chrome-plated toaster. The sound that followed was the real star of the show: the distinct, almost musical *crackle* as you broke through the crisp, cornmeal-dusted crust with a knife. It was a sound that promised joy.
She’d slather a warm slice with salted butter that would instantly melt into all those porous holes, followed by a generous smear of her homemade strawberry jam. That first bite was a symphony of textures—crispy, soft, chewy, and bursting with tangy, buttery, sweet flavor. I didn’t know it was “English Muffin Bread” back then; to me, it was just “Grandma’s Magic Toast.” This recipe is my tribute to that feeling. It’s the taste and sound of comfort, and I can’t wait for you to make your own memories with it.
Gathering Your Flavor Squad
Part of the beauty of this bread is its humble ingredient list. This is pantry-raiding at its finest. Here’s what you’ll need and why each one is a key player:
- 2 ¼ teaspoons Active Dry Yeast (1 packet): Our little microbial miracle workers! They’re what make the bread rise and give it that airy, hole-filled structure. Make sure your yeast is fresh for the best rise. If you only have instant yeast, you can use it here—just mix it right in with the dry ingredients.
- 1 tablespoon Sugar: Don’t worry, this isn’t for sweetness! The sugar is just a quick snack for the yeast, helping it wake up and get foamy. It also helps with browning.
- 1 cup Warm Water & 1 cup Warm Milk (110°F): The liquid dream team. The milk adds a touch of richness and softness to the crumb, while the water keeps things light. The temperature is crucial—think warm bath water, not hot. Too hot and you’ll send the yeast to an early grave; too cold and they’ll just take a nap.
- 1 ½ teaspoons Salt: The flavor amplifier. It balances the tang and makes all the other ingredients pop. Never skip the salt in bread baking!
- ¼ teaspoon Baking Soda: This is our secret weapon for that signature “English muffin tang.” It reacts with the acidic byproducts of the yeast, enhancing that classic flavor profile.
- 5 ½ cups All-Purpose or Bread Flour: All-purpose works perfectly here, but if you have bread flour, its higher protein content will give you a slightly chewier, more robust crumb—which is fantastic! We’ll be adding it gradually.
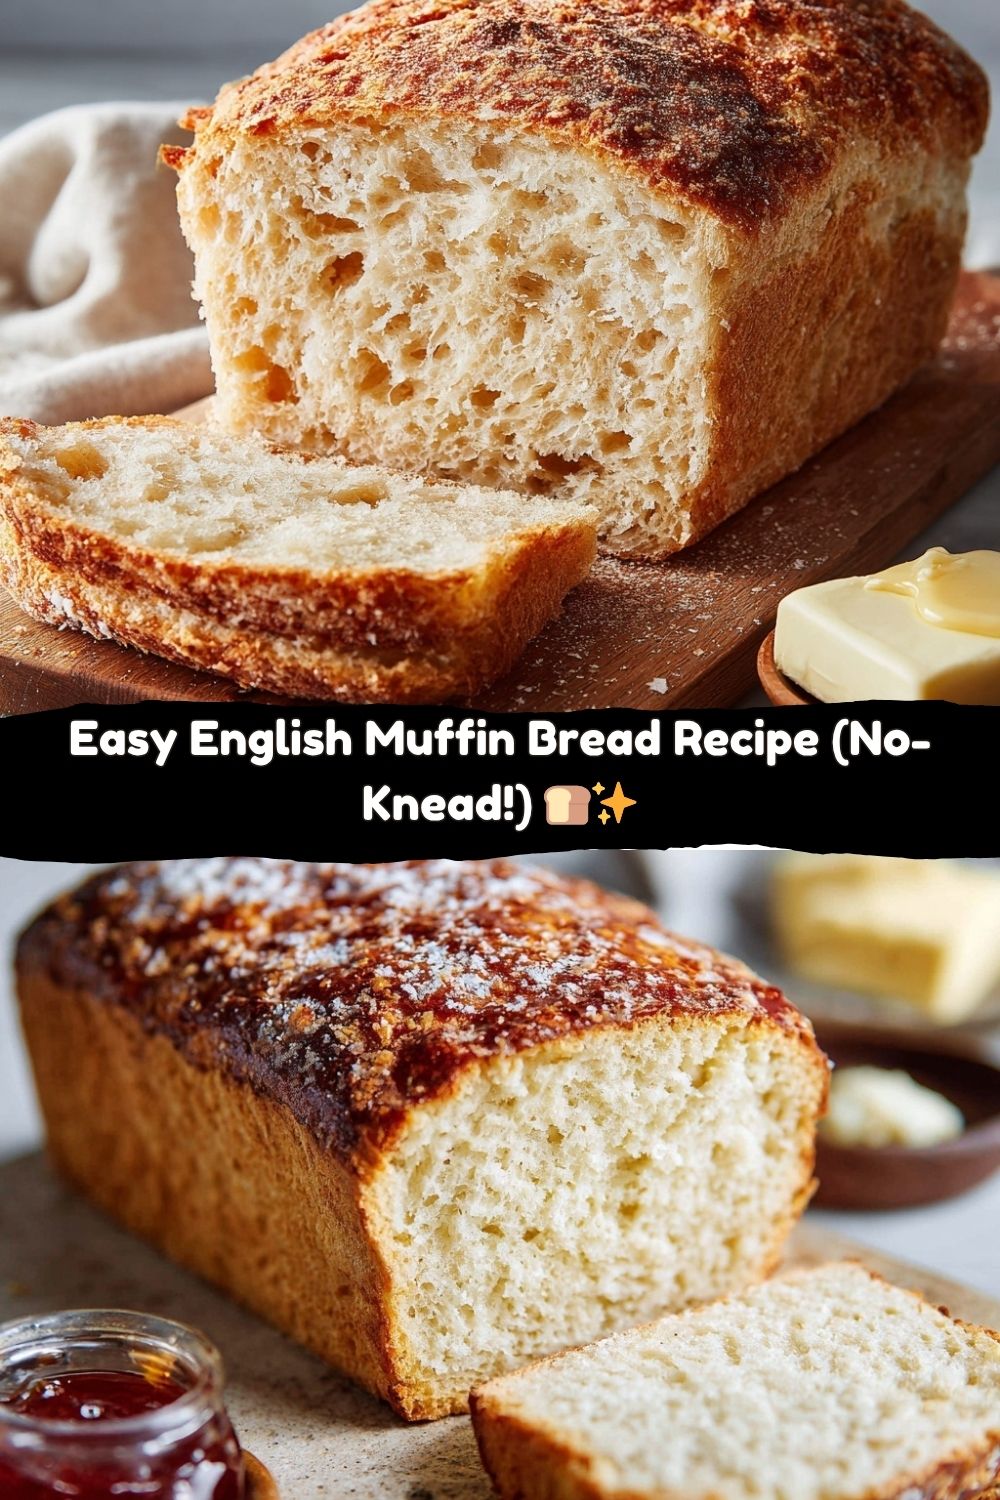
- Cornmeal, for dusting: This isn’t just for looks! Cornmeal gives the loaf its classic, rustic texture and that essential, slightly gritty crunch on the crust. It’s the textural signature of this bread.
- Butter, for greasing and brushing: For preventing stickage and for giving the baked loaves a gorgeous, glossy, and flavorful top crust.
Let’s Get Our Hands (Minimally) Dirty: The No-Stress Steps
Ready? This is where the magic happens. I’ll walk you through every step. Remember, we’re going for a shaggy, sticky dough—that’s what creates those famous nooks and crannies!
- Wake Up the Yeast: In a large mixing bowl (I mean large—this dough rises!), combine the warm water, warm milk, sugar, and yeast. Give it a quick stir and then walk away for 5-10 minutes. You’re looking for a foamy, creamy-looking layer on top. This is your sign that the yeast is alive, happy, and ready to party. Chef’s Hack: If you don’t see foam, your yeast might be old or your liquid was too hot/cold. Dump it and start fresh—it’s worth it!
- Build the Base: Once your yeast is foamy, stir in the salt and baking soda. Now, add 3 cups of the flour. Grab a wooden spoon or a sturdy spatula and mix until it’s smooth. This is where you’ll start to see the dough come together.
- Embrace the Shaggy Dough: Here’s the key step! Gradually add the remaining 2 ½ cups of flour. I add about a half cup at a time, mixing well after each addition. The dough will become thick, sticky, and shaggy. This is NOT a smooth, elastic, kneadable bread dough. It should be somewhere between a very thick batter and a very soft dough. Resist the urge to add more flour! A wetter dough = more holes in your final bread. It might look a little wild, but trust the process.
- Prep the Pans: While the dough is resting for a minute, grab two standard 8×4-inch loaf pans. Grease them generously with butter. Then, sprinkle a good layer of cornmeal into each pan, tilting to coat the bottom and sides. This creates that fantastic crust.
- Divide and Conquer: Spoon and scrape the sticky dough into your prepared pans, dividing it as evenly as you can. Don’t worry about it being perfect. Use a spatula or wet fingers to gently spread the dough to the corners. Sprinkle the tops lightly with more cornmeal. This gives it that authentic, bakery-style look.
- The Power of Patience (The Rise): Cover the pans loosely with a clean kitchen towel or plastic wrap. Find a warm, draft-free spot in your kitchen and let the dough rise for about 45 minutes. You’re waiting for it to puff up and just crest the rim of the pan. It won’t necessarily double in size, and that’s okay!
- Bake to Golden Perfection: While the dough is rising, preheat your oven to 375°F (190°C). Once risen, pop the pans right onto the middle rack and bake for 25-30 minutes. You’ll know it’s done when the tops are a deep, golden brown and the loaf sounds hollow when you tap the top. Chef’s Hack: An instant-read thermometer is your best friend here. Slide it into the center of the loaf—if it reads 190-200°F, you’re golden!
- The Butter Glaze: As soon as you take the loaves out of the oven, run a knife around the edges and carefully turn them out onto a wire rack. Immediately brush the tops with melted butter. This gives them a beautiful sheen, adds flavor, and keeps the crust soft. Let them cool completely before slicing. I know, it’s torture, but slicing into warm bread can make it gummy!
How to Serve Up This Toasty Triumph
Okay, the loaves are cooled, and it’s finally time for the main event! The absolute, non-negotiable best way to enjoy English Muffin Bread is toasted. It’s designed for it. The heat crisps up the craggy exterior while the interior stays soft and steamy, ready to absorb all the goodness you pile on.
- The Classic: A thick swipe of high-quality salted butter and a dollop of your favorite jam or honey. This is the benchmark. This is the taste of nostalgia.
- The Ultimate Breakfast Sandwich: Toast a slice, slather it with mayo or avocado, and layer on a fried egg, a slice of sharp cheddar, and a piece of crispy bacon or a sausage patty. Life-changing.
- Savory & Sophisticated: Top toasted slices with smashed avocado, a sprinkle of flaky sea salt, red pepper flakes, and a soft-poached egg.
- Open-Faced Delight: Think of this bread as your canvas. Try ricotta cheese, fresh berries, and a drizzle of maple syrup for a sweet version, or herbed cream cheese, smoked salmon, and capers for a savory bite.
Mix It Up & Make It Yours: Flavor Twists
Once you’ve mastered the classic, it’s time to play! This dough is a fantastic base for all sorts of creative add-ins.
- Everything Bagel Style: Before the final rise, sprinkle the top of the dough liberally with everything bagel seasoning. The flavors bake right in, and you get that iconic savory kick.
- Cheesy Garlic Herb: Fold 1 cup of shredded sharp cheddar cheese and 2 teaspoons of your favorite dried herbs (like Italian seasoning) into the dough at the end of step 3. After brushing with butter out of the oven, sprinkle with garlic powder or a little grated Parmesan.
- Cinnamon Raisin Swirl: After you’ve spread the dough into the pans, mix ½ cup of sugar with 1 tablespoon of cinnamon and sprinkle it over the dough. Use a knife to swirl it gently through the loaf before the final rise. You can also knead in ¾ cup of raisins with the last addition of flour.
- Whole Wheat Version: Substitute up to half of the all-purpose flour with whole wheat flour for a heartier, nuttier flavor. The texture will be a bit denser, but still delicious.
- Dairy-Free/Vegan: Easy swap! Use a plant-based milk (unsweetened almond or oat milk work great) and replace the butter for greasing/brushing with a neutral oil like avocado or olive oil.
Jackson’s Kitchen Notes
This recipe has been a staple in my kitchen for years, and it’s evolved through plenty of happy accidents. The first time I made it, I was convinced I’d messed up because the dough was so sticky—I almost added a whole extra cup of flour! I’m so glad I didn’t. That “mistake” taught me that the key to the perfect crumb is a wet, un-kneaded dough. It’s a lesson in trusting the process. These days, I almost always double the batch and freeze a loaf. There’s no better feeling than knowing you have a loaf of homemade bread waiting for you in the freezer on a busy Tuesday morning. It’s a little piece of weekend comfort, any day of the week.
Your Questions, Answered!
Q: My dough didn’t rise much. What happened?
A: The most common culprits are old yeast or liquid that was too hot (which kills yeast) or too cold (which slows it down). Your rising environment matters, too! If your kitchen is cool, let it rise in a turned-off oven with the light on, which creates a perfect warm little incubator.
Q: The dough was impossibly sticky. Did I do it wrong?
A: You probably did it RIGHT! This is meant to be a very soft, sticky, and shaggy dough. It’s not meant to be kneaded or shaped like a traditional bread dough. Using wet hands or a wet spatula to handle it is your best bet. Remember, sticky dough = amazing nooks and crannies.
Q: Can I make this in a stand mixer?
A> Absolutely! Use the paddle attachment (not the dough hook) for this one. Mix the initial ingredients with the paddle, and then gradually add the flour until the dough is thick and sticky. The paddle is better at handling this batter-like consistency.
Q: How do I store it?
A> Once completely cool, store it in a plastic bag at room temperature for 2-3 days. For longer storage, slice it and freeze it in a freezer bag. You can pop frozen slices straight into the toaster—no need to thaw!
Nutritional Information (Per Slice, Estimated)
Let’s keep it real—this is a treat, but it’s a homemade one with simple, recognizable ingredients. Here’s a rough breakdown per slice (based on 20 slices total from the two loaves):
- Calories: 140
- Fat: 2g
- Carbohydrates: 26g
- Protein: 4g
Remember, this is a template. Using different types of milk or flour will alter these numbers slightly. But the real value is in the joy of baking it and the quality of your ingredients!
You’ve Just Baked Something Unforgettable
And there you have it! You’re now the proud creator of not one, but two incredible loaves of English Muffin Bread. Look at that crust! Admire those holes! You’ve just unlocked a whole new level of home cooking that’s impressive, deeply satisfying, and deceptively simple.
This bread is more than just a recipe; it’s a reminder that the best food often comes from the simplest techniques and the most heartfelt ingredients. It’s about creating those “you’ve gotta try this” moments for yourself and the people you share your table with. So, go on, slice a piece (after it cools!), toast it until it’s golden, and load it up with your favorite toppings. Take that first crunchy, soft, buttery bite and soak in the victory. You did it.
I’d love to hear how your bread turned out! Tag me @FoodMeld on social media so I can see your gorgeous creations. Until next time, keep mixing it up and enjoying every bite.


