
Easter Chocolate Lasagna: The No-Bake Showstopper Your Table Needs
Hey friends, Jackson here from Food Meld! Let’s be real for a second. Easter is about more than just the hunt; it’s about that moment when everyone gathers back at the table, bellies full of ham or lamb, eyes darting to see what sweet masterpiece is about to make its grand entrance. You want something that makes kids gasp and adults sneak a second (or third) slice. But you also don’t want to be chained to the oven all day, right? I hear you. That’s where this beauty comes in.
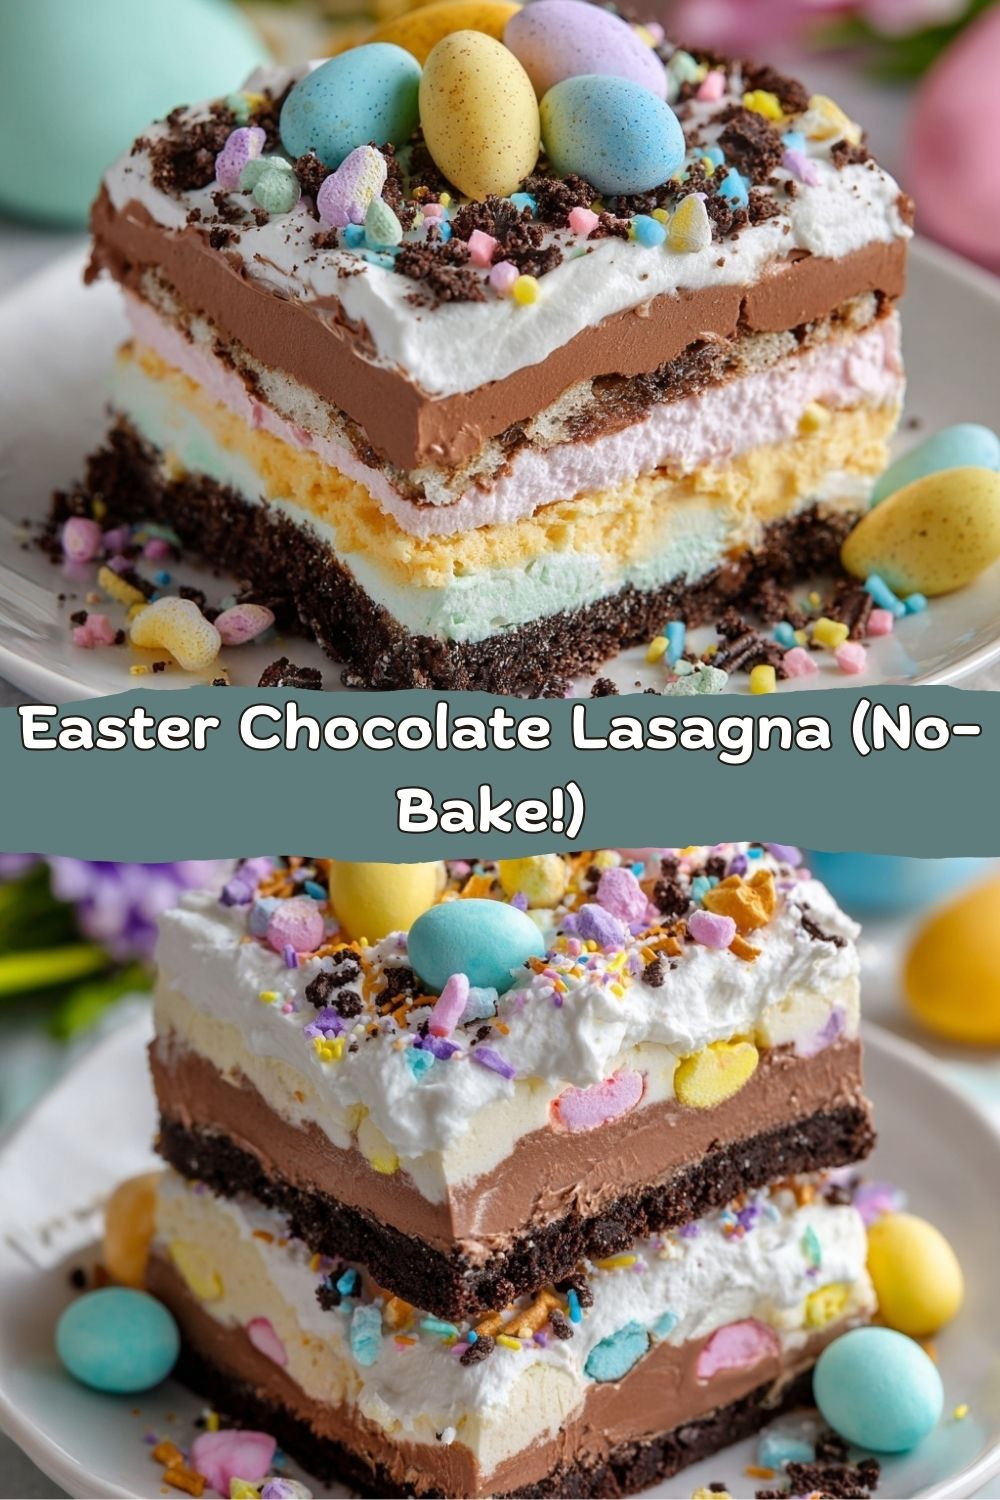
I’m talking about my Easter Chocolate Lasagna – a towering, glorious, no-bake layered dessert that’s as fun to make as it is to eat. We’re building layers of crunchy Oreo crust, a cloud-like cream cheese filling, luxuriously thick chocolate pudding, and a party of festive Easter toppings. It’s cold, creamy, chocolatey, and packed with that playful, colorful energy that just screams spring celebration.
This isn’t just a dessert; it’s an experience. It’s the kind of recipe that looks like you spent hours on, but secretly comes together with simple mixes, a few folds, and some serious layering love. No baking, no fuss, just maximum flavor and fun. Whether you’re a kitchen newbie looking for a surefire win or a seasoned pro who wants a delicious break from complicated bakes, this recipe is your new best friend. So, grab your favorite mixing bowl, and let’s build something awesome together. Welcome to the most delicious construction project you’ll tackle this Easter!
The “Aha!” Moment: Where This Chocolate Lasagna Was Born
This recipe actually has its roots in a bit of a kitchen disaster—my favorite kind of story. A few years back, I was tasked with bringing dessert to my niece’s big spring birthday party. I had grand plans for an elaborate layer cake. Spoiler: it was a humid day, the frosting wilted, and my cake layers decided to take a lean that would make the Tower of Pisa jealous. I had two hours and a mild panic.
Rifling through the pantry, I saw Oreos, pudding mix, and a tub of whipped topping. In the fridge: cream cheese and butter. It was like the culinary universe threw me a life raft. I thought, “What if I just… layer it? Like a savory lasagna, but sweet?” I crushed, I mixed, I layered, and I chilled. When I pulled that pan out of the fridge, the layers had set into something stunningly solid and beautiful. The kids went wild for the candy toppings, and the adults quietly hovered by the pan with forks. That “failed” cake taught me a brilliant lesson: sometimes, the most memorable, crowd-pleasing moments come from simple ingredients and a little creative, no-stress assembly. This Easter Chocolate Lasagna is that happy accident, perfected and dressed in its Sunday best for the holiday.
Gathering Your Flavor Crew: Ingredients & Chef Insights
Here’s the dream team for our no-bake masterpiece. I’ve included my notes on why each ingredient matters and how you can swap things in or out to make it your own.
- 300 g Oreo cookies, crushed: This is our foundation. The classic chocolate-and-cream combo gives a perfect, slightly salty crunch. Chef’s Insight: Don’t scrape out the filling! It adds to the texture and flavor. If you want a twist, try Golden Oreos for a vanilla base or Mint Oreos for a cool kick.
- 120 g unsalted butter, melted: The glue. It binds our crumbs into a firm, sliceable crust. For a richer taste, use browned butter—just let it cool slightly before mixing.
- 225 g cream cheese, softened: The tangy heart of the second layer. Full-fat is best for a lush, non-grainy texture. Pro Tip: Leave it on the counter for a good hour. Soft cream cheese blends like a dream.
- 60 g unsalted butter, softened: Combined with the cream cheese, this creates an incredibly rich and stable base for our fluffy layer.
- 100 g powdered sugar: Sweetens and helps stiffen the cream cheese mixture. Sift it in to avoid lumps!
- 1 tsp vanilla extract: The flavor enhancer. It rounds out all the sweet notes. A dash of almond extract is also a fun secret.
- 225 g whipped topping (like Cool Whip), thawed: Our fluff-maker. We’ll fold this into the cream cheese for a light, mousse-like texture. For a from-scratch feel, you can use an equal amount of freshly whipped heavy cream sweetened with a touch of the powdered sugar.
- 2 packs instant chocolate pudding mix (3.4 oz / 96 g each): The instant thickener. This sets up perfectly with cold milk without cooking. Important: Do not use “cook-and-serve” pudding.
- 700 ml cold milk: The colder, the better! Whole milk gives the creamiest, richest pudding layer. For a lighter version, 2% works, but avoid skim.
- For Topping: More whipped topping, crushed Oreos, Peeps bunnies, Easter egg candies: This is your playground! The extra whipped topping seals the layers. The candies? That’s pure Easter joy. Use mini eggs, chocolate bunnies, sprinkles—whatever makes you smile.
Let’s Build! Your Step-by-Step Guide to Layered Perfection
Ready to play dessert architect? Follow these steps, and you’ll have a flawless Chocolate Lasagna. I’ve packed each one with my personal hacks to guarantee success.
Step 1: The Unshakable Foundation. In a food processor or a sturdy zip-top bag with a rolling pin, crush your Oreos into fine crumbs. You want a few bigger pieces for texture, but mostly fine. Pour the melted butter over the crumbs and mix until it resembles wet sand. Dump this into your 9×13-inch dish and press it down HARD with the bottom of a measuring cup or glass. You want it compact and even. This firm base is what gives you clean slices later. Pop it in the fridge for 15 minutes to let the butter firm up.
Step 2: The Fluffy Cloud Layer. In a large bowl, beat the softened cream cheese and 60g of softened butter together with a hand mixer or stand mixer until it’s completely smooth and lump-free. This is crucial—no one wants chunks of cream cheese! Scrape down the sides. Add the sifted powdered sugar and vanilla, and beat again on medium-high for 2-3 minutes until it’s light and fluffy. Now, take your thawed whipped topping. With a spatula, gently fold it into the cream cheese mixture. Folding (a gentle turning motion) keeps all that lovely air in the whipped topping. Spread this fluffy heaven evenly over your chilled crust. A small offset spatula is magic here.
Step 3: The Rich Chocolate Heart. Grab another large bowl and your cold milk. Whisk the instant pudding mixes into the milk for a good 2 minutes. It will start thickening right before your eyes. Keep whisking until it’s very thick and pudding-like. Immediately pour and spread it over the cream cheese layer. Working quickly is key because the pudding sets fast. This layer should be gloriously thick and hold its own.
Step 4: The Festive Finale. Gently spread a final layer of whipped topping over the pudding. This seals in the chocolate and makes for a gorgeous white canvas. Sprinkle a handful of crushed Oreos over the top for a hint of crunch. Now, the fun part: artfully arrange your Peeps bunnies and Easter egg candies. Create a scene, make a pattern, or just toss them on with joyful abandon!
Step 5: The Essential Patience. This is the hardest but most important step. Cover the pan and refrigerate for at least 4 hours, but overnight is truly ideal. This chilling time is non-negotiable—it allows all the layers to firm up and meld so you can cut perfect, clean squares that hold their shape.
Stealing the Show: How to Serve Your Masterpiece
Presentation is half the fun with this dessert! For serving, I love to use a sharp, thin-bladed knife. Run it under very hot water, wipe it dry, and make your cuts. The heat gives you beautifully clean edges. For a true “wow” moment, serve each square on a brightly colored plate or a simple white dessert plate to let the layers pop.
Garnish with a little extra sprinkle of pastel sprinkles or a single mini egg on the side. If you’re feeling extra fancy, a tiny dollop of whipped cream and a mint leaf adds a professional touch. This dessert is rich, so smaller squares go a long way—perfect for a buffet-style Easter spread where everyone wants to try a bit of everything. Pair it with a cup of strong coffee or a cold glass of milk for the ultimate sweet finish to your holiday meal.
Make It Your Own: Creative Twists & Swaps
The beauty of this recipe is its versatility. Once you master the basic layering technique, the flavor world is your oyster. Here are a few of my favorite riffs:
- Cookies & Cream Dream: Use cookies & cream pudding mix instead of chocolate, and fold some extra crushed Oreos into the cream cheese layer for double the cookie crunch.
- Spring Berry Blast: After the pudding layer, add a thin layer of sliced fresh strawberries or a spread of raspberry jam. Top with whipped cream and fresh berries for a chocolate-berry sensation.
- Peanut Butter Cup Twist: Add ½ cup of smooth peanut butter to the cream cheese layer when beating it. Use chopped peanut butter cups as part of your topping instead of some candies. It’s a PB&Chocolate lover’s dream.
- Mint Chocolate Cool-Down: Use Mint Oreos for the crust, add ¼ tsp of peppermint extract to the cream cheese layer, and top with Andes mint pieces or a dark chocolate drizzle.
- Dairy-Free/Gluten-Free Friendly: Use gluten-free chocolate sandwich cookies. For the dairy, use plant-based cream cheese and butter, a dairy-free whipped topping, and make the pudding with your favorite non-dairy milk (oat or almond work great). Check candy toppings are suitable too.
Jackson’s Kitchen Notes: The Evolution of a Fan Favorite
Over the years, this recipe has become a requested staple, and I’ve learned a few things. The original “panic mode” version used whatever candy was on sale! Now, I love using a mix of textures for topping: smooth chocolate eggs, fluffy Peeps, and crunchy cookie crumbs. I also once accidentally used *salted* butter for the crust, and you know what? It was incredible. That hit of salt made the chocolate layers sing even louder. Don’t be afraid of a little salt in your sweets! The other evolution? I now always make it the night before. That overnight set transforms it from great to absolutely legendary, giving the flavors time to become best friends.
Your Questions, Answered: FAQs & Troubleshooting
Q: My pudding layer is runny! What happened?
A: The most common culprit is not using *instant* pudding mix. “Cook-and-serve” won’t work here. Also, ensure your milk is ice-cold and that you whisk for the full 2 minutes. If it’s still a bit soft, just give the whole dessert more chilling time—it will continue to set up firm in the fridge.
Q: Can I make this ahead of time?
A: Absolutely, and I highly recommend it! You can assemble it up to 24 hours in advance. Just wait to add delicate candy decorations like Peeps until a few hours before serving so they don’t get soggy.
Q: I don’t have a 9×13 pan. Can I use something else?
A: Sure! A deep 9×9 pan will give you thicker, more decadent squares (just note it may need longer to set). You can also use a large trifle dish for a stunning layered look—just spoon it out instead of slicing.
Q: Can I use homemade whipped cream instead of whipped topping?
A: You can! For the folding, stabilize it by whipping 2 cups of heavy cream with ¼ cup of powdered sugar and 1 tsp of vanilla until stiff peaks form. Use it in place of the whipped topping in both the cream cheese layer and the top layer. Note: The texture will be slightly less stable but incredibly delicious.
Nutritional Information (Approximate)
While this is a celebratory treat, here’s a general breakdown per serving (based on 12 squares). Remember, these are estimates as ingredients can vary.
- Calories: ~390 kcal
- Carbohydrates: 45 g
- Sugars: 28 g
- Fat: 22 g
- Saturated Fat: 13 g
- Protein: 5 g
- Sodium: 300 mg
To lighten it up slightly, you can use reduced-fat cream cheese, a light whipped topping, and lower-fat milk, though the texture and richness will be slightly altered. My philosophy? Enjoy the real deal for special occasions, savor every bite, and share the joy (and the calories!) with loved ones.
Final Thoughts: Let’s Celebrate!
And there you have it, my friends—the ultimate no-bake Easter centerpiece. This Easter Chocolate Lasagna is more than a recipe; it’s a guarantee of smiles, a catalyst for “oohs” and “aahs,” and proof that the most impressive dishes often come from a place of simplicity and fun. I hope this recipe brings as much joy to your kitchen as it has to mine.
Remember, cooking—and especially dessert-making—should be a blast. Don’t stress over perfection. If your layers aren’t perfectly even or a Peeps bunny takes a nosedive, it’s all part of the story. The flavor will still be absolutely unforgettable. So, gather your ingredients, crank up some good music, and let’s build a dessert that makes this Easter one for the memory books. Happy cooking, and happy Easter from my kitchen to yours!
– Jackson


