Introducing the Easter Showstopper That Steals the Spotlight (and Hearts)
Hey friends, Jackson here from Food Meld. Let me paint you a picture: you’re at an Easter gathering, surrounded by all the classic desserts—the pies, the cookies, the fruit platters that look a little too healthy. But then, you unveil this. A loaf cake that’s not just a cake. It’s a chocolate lover’s dream, a celebration in dessert form, a downright flavor party that makes everyone stop mid-conversation and go, “Whoa. I need a slice of that immediately.”
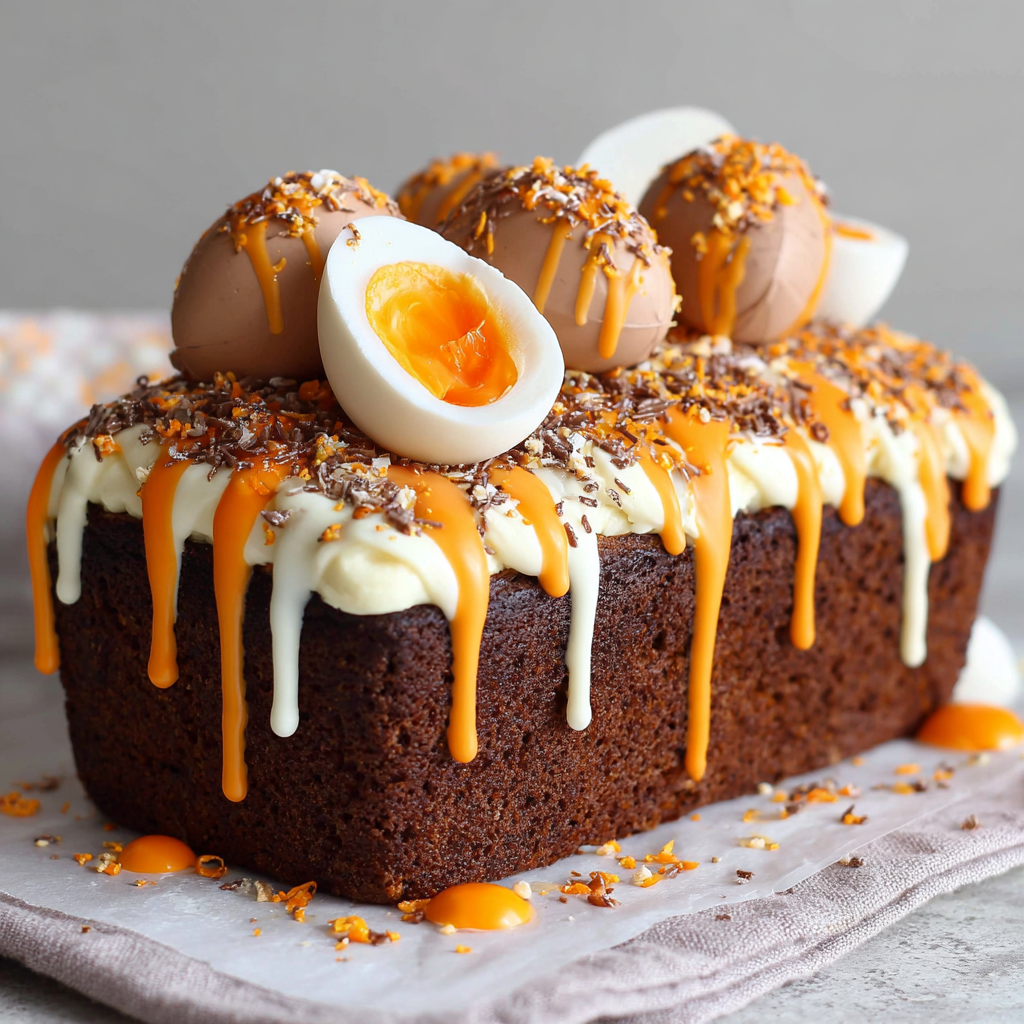
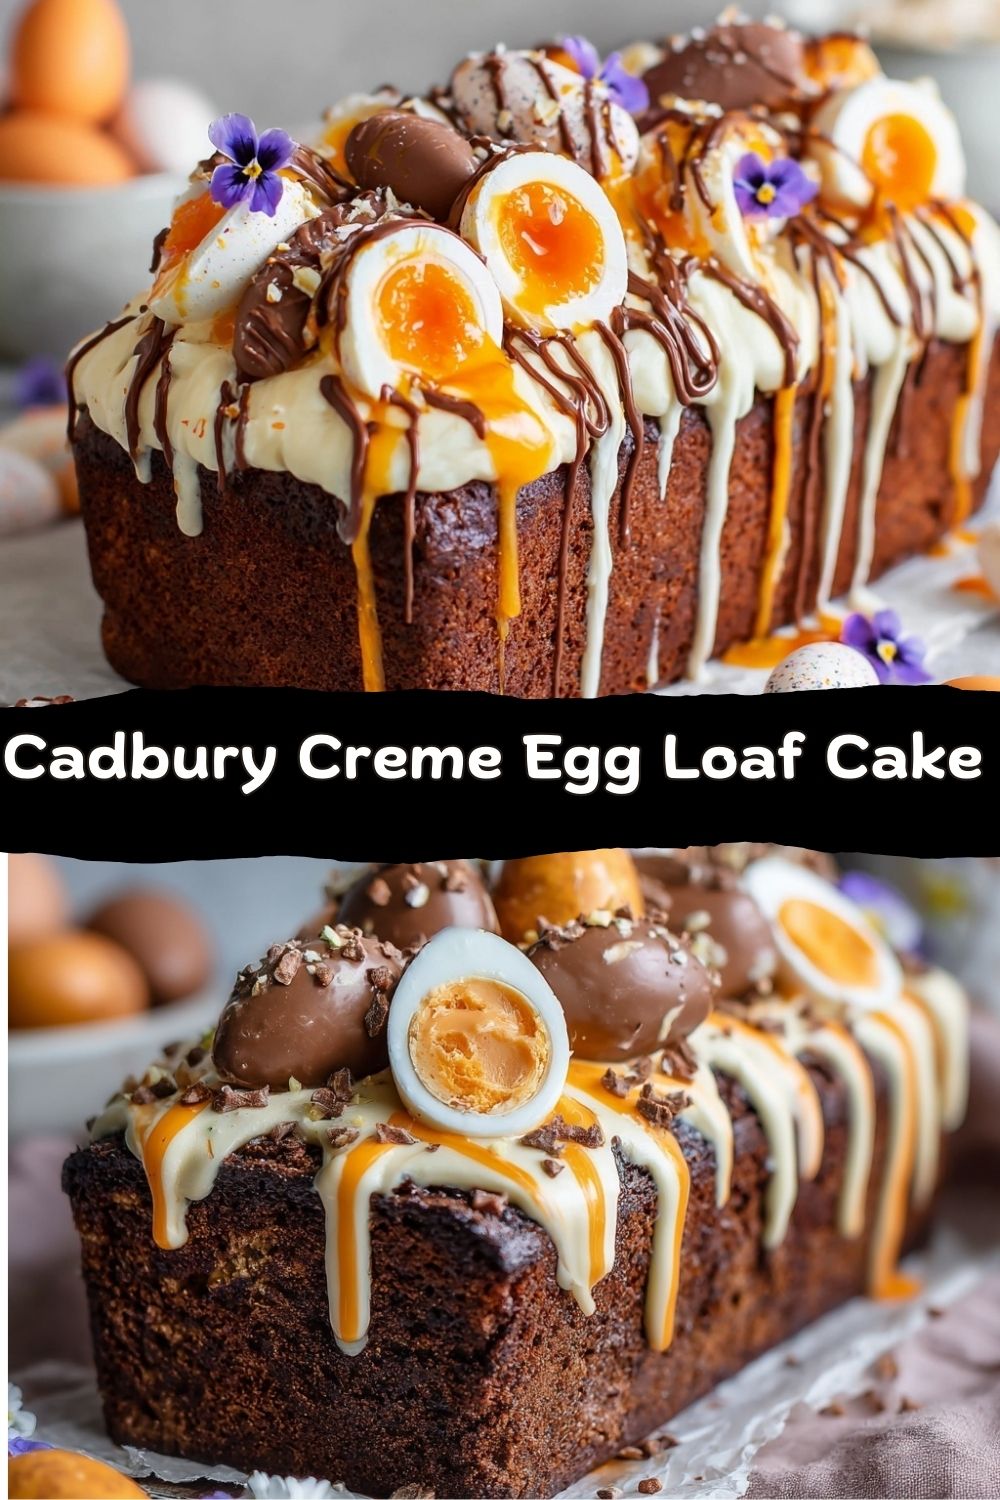
This, my friends, is my Decadent Cadbury Creme Egg Loaf Cake. Think of the softest, richest, most tender chocolate cake you’ve ever had. Now imagine it’s been crowned with swirls of the creamiest chocolate and orange buttercream, a drizzle of glossy white chocolate, and the pièce de résistance: those iconic, gooey Cadbury Creme Eggs, halved to show off their glorious, sunny centers. It’s playful, it’s nostalgic, and it is unbelievably delicious. This isn’t about fussy, complicated baking. It’s about taking a simple, foolproof loaf cake and transforming it into the ultimate centerpiece with a few fun, bold moves. It’s the kind of bake that looks like you spent all day on it, but secretly comes together with a whole lot of joy and not a lot of stress. So, preheat your oven, grab your favorite mixing bowl, and let’s cook (well, bake) something awesome together. This is the Easter treat that will have everyone begging for the recipe.
The Sweet Spark of Inspiration: A Kitchen Table Memory
This cake’s origin story starts, like so many of my best ideas, with a happy accident and a serious case of nostalgia. A few Easters back, I found myself with a small mountain of leftover Creme Eggs. (Okay, fine, I bought the giant bag “for the blog” and may have snacked on a few… or seven). I was staring at them, thinking about my grandma’s incredibly moist chocolate loaf cake—the one she’d wrap in foil and sneak to me before dinner—and I had one of those “what if we tried this?” lightbulb moments.
What if I took the soul of her simple, perfect cake and gave it a full-on Easter makeover? The kind of treat that would have made my ten-year-old self lose his mind with excitement. I remember sitting at her checkered kitchen table, carefully unwrapping those foil-wrapped eggs, trying to lick the fondant center without making a mess (and failing spectacularly). That combination of rich chocolate and that signature sweet, vanilla-y cream is pure joy. I wanted to capture that feeling in every single slice. So, I set out to “meld” that beloved candy into a dessert worthy of a celebration. The result? A cake that tastes like a hug from your past and a high-five from your present self. It’s my tribute to simple pleasures, creative twists, and the magic that happens when you’re not afraid to play with your food.
Gathering Your Flavor Arsenal: A Chef’s Guide to the Goods
Here’s everything you’ll need to build this masterpiece. Don’t just think of these as items on a list—think of them as your team players. I’ve got some chef insights and easy swaps for each one, because your kitchen, your rules!
For the Loaf Cake:
- 175g unsalted butter, softened: This is our flavor and moisture MVP. “Softened” means it should give easily when you press it, but not be melted or oily. Room temperature is key for that light, fluffy creaming action. If you only have salted butter, just skip any added salt in the recipe.
- 175g light brown sugar: I use light brown over white sugar for a reason! It adds a subtle molasses note and a hint of caramel that makes the chocolate flavor deeper and more complex. It also keeps the cake super moist.
- 3 large eggs: Bring these to room temperature too! Cold eggs can make the creamed butter seize up. Room-temp eggs incorporate smoothly, giving the cake a better rise and texture.
- 140g self-raising flour: The built-in leavening agent gives us a nice, even crumb. Chef Hack: If you only have all-purpose flour, make your own self-raising by mixing 140g all-purpose flour with 2 tsp baking powder and a pinch of salt.
- 35g cocoa powder: Use a good-quality cocoa powder here—it’s the star of the chocolate show! Dutch-processed will give a darker, smoother flavor, but natural unsweetened works perfectly too.
- 1 tsp vanilla extract: The flavor enhancer. It rounds out the chocolate and adds a warm background note. Pure extract is always worth it.
- 2–3 tbsp milk: Our texture adjuster. You might not need all of it! Add just enough to get a soft, dropping consistency—the batter should fall easily off a spoon.
For the Buttercream (“The Crown”):
- 150g unsalted butter, softened: Same rules apply. We’re beating this until it’s pale and super creamy for the silkiest frosting.
- 300g icing (powdered) sugar: Sift it! I know it’s an extra step, but it prevents lumps in your buttercream and makes it incredibly smooth.
- 2 tbsp cocoa powder: For that rich chocolate swirl.
- Orange food colouring (gel preferred): Gel colouring is a game-changer. It gives vibrant color without watering down your frosting. Aim for that classic Creme Egg orange hue!
- 1 tsp vanilla extract: For the orange buttercream half, to mimic that signature fondant flavor.
- 2–3 tbsp milk: To loosen the buttercream to the perfect piping consistency.
For the Decoration (“The Fun Part”):
- 3–4 Cadbury Creme Eggs, halved: The heroes! Chill them in the freezer for 10-15 minutes before slicing with a sharp knife—it makes for a much cleaner cut through the gooey center.
- 100g white chocolate, melted: For that gorgeous drizzle. Use a bar of baking chocolate for best results, as chocolate chips often have additives that can make them harder to melt smoothly.
- Bronze sprinkles (optional): A little sparkle never hurt anybody! They add a lovely textural crunch and festive look.
Let’s Build This Beauty: Your Step-by-Step Roadmap to Success
Follow these steps, lean into the process, and don’t forget to have fun. Baking is a sensory experience—enjoy the smells, the textures, the anticipation!
- Prep & Preheat: Start by preheating your oven to 160°C (140°C for conventional ovens)/325°F/Gas Mark 3. Line a 2lb loaf tin with parchment paper, letting the edges overhang so you can easily lift the cake out later. This is your “non-stick insurance policy.”
- Creaming is Key: In a large bowl, beat the softened butter and light brown sugar together for a good 3-4 minutes with an electric mixer. We’re not just mixing; we’re aerating. You want it to become noticeably paler, fluffy, and almost like a creamy frosting. This step builds the cake’s structure and ensures a light texture. Chef Hack: Scrape down the sides of the bowl halfway through to make sure everything is getting evenly incorporated.
- Incorporate the Eggs: Add the eggs one at a time, beating well after each addition. If the mixture looks like it’s starting to curdle (separating a bit), don’t panic! Just add a spoonful of your measured flour and mix it in—it’ll bring everything back together smoothly.
- Dry Ingredients & Fold: Sift the self-raising flour and cocoa powder directly over the wet mixture. Yes, sifting! It combines them and gets rid of any lumps. Now, put the mixer away. Grab a spatula and fold gently. You’re cutting through the middle, scooping from the bottom, and turning the mixture over itself. Stop as soon as you can’t see any dry streaks of flour. Over-mixing is the enemy of a tender cake!
- Check the Consistency: Your batter should be soft and easily fall from the spatula. If it feels a little thick or stubborn, add a splash of milk, one tablespoon at a time, until it’s just right.
- Bake to Perfection: Pour the batter into your prepared tin and smooth the top. Bake for 40-45 minutes. The cake is done when it’s risen, springs back lightly to the touch, and a skewer inserted into the center comes out clean or with just a few moist crumbs. Patience Alert: Let it cool in the tin for 10 minutes, then use the parchment paper “handles” to lift it onto a wire rack to cool completely. A warm cake + buttercream = a melty mess. We must wait!
- Make the Buttercream: While the cake cools, beat the softened butter in a clean bowl until it’s very smooth and creamy. Gradually add the sifted icing sugar, beating on low at first (to avoid a sugar cloud!) then increasing the speed until combined. Add a tablespoon of milk to help it along. Now, split this mixture evenly between two bowls.
- Color & Flavor: In one bowl, sift in the 2 tbsp of cocoa powder and beat until you have a luscious chocolate buttercream. Add a tiny splash of milk if needed. In the other bowl, add the vanilla extract and your orange gel colouring. Beat until you achieve that perfect, vibrant orange. Adjust colour and add milk for consistency until both buttercreams are smooth, spreadable, and pipeable.
- Decorate Like a Pro: Place each buttercream into a piping bag fitted with a star tip (or just snip the corner off a zip-top bag). Pipe alternating swirls of chocolate and orange buttercream all along the top of the completely cooled loaf cake. No need to be perfect—rustic, generous swirls look amazing. Press the halved Creme Eggs into the buttercream. Drizzle the melted white chocolate artfully over everything. Finish with a pinch of bronze sprinkles. Stand back and admire your work!
Presenting Your Masterpiece: How to Serve with Style
This cake is a showstopper, so let it shine! I love serving it right on a rustic wooden board or a simple white platter—the colorful decorations pop against a neutral background. Use a sharp, thin-bladed knife to slice it. For super clean slices, you can run the knife under hot water and wipe it dry between cuts. It makes slicing through the buttercream and gooey eggs a breeze.
This is rich, decadent dessert, so a modest slice goes a long way. Pair it with a cup of strong black coffee, a cold glass of milk (the ultimate childhood combo!), or even a scoop of vanilla bean ice cream on the side if you’re feeling extra indulgent. It’s perfect as the grand finale to your Easter feast, the star of an afternoon tea, or as a special weekend baking project that brings everyone to the kitchen with hopeful eyes.
Make It Yours: Fun Twists on the Classic
Love the idea but want to mix it up? Here are a few of my favorite “what if” spins on this recipe:
- Caramel Egg Explosion: Swap the Creme Eggs for Cadbury Caramel Eggs! Top with a salted caramel drizzle instead of white chocolate for a sweet-and-salty situation that’s absolutely incredible.
- Mini Egg Crunch: Fold a handful of crushed Cadbury Mini Eggs into the cake batter before baking for a fun, colorful confetti effect inside. Decorate the top with whole Mini Eggs instead of the large Creme Eggs.
- “Cracked” Egg Look: Instead of halving the Creme Eggs, gently crack the tops with the back of a spoon before placing them on the buttercream, letting some of the fondant “yolk” peek out. It looks super cool and rustic.
- Dairy-Free Swap: Use a plant-based butter block (for both cake and frosting) and oat milk. Check that your chocolate and Creme Egg alternatives are dairy-free (many dark chocolates are). The structure and flavor will still be fantastic.
- Boozy Adult Version: Add a tablespoon of orange liqueur (like Cointreau) to the orange buttercream for a sophisticated kick. It complements the chocolate and orange flavors beautifully.
Jackson’s Kitchen Notes & Stories
This cake has seen a few iterations in my test kitchen. The first time, I tried folding chopped Creme Eggs into the batter. Big mistake. They completely melted and disappeared, leaving behind mysterious sugary pockets. Lesson learned: they are decoration queens, not mix-in warriors. I also learned that chilling the eggs is the absolute best trick for a clean cut. The first time I tried slicing a room-temp one? Let’s just say it was more of a “squish and smear” situation. Not the elegant look I was going for! Now, it’s a foolproof step in my routine. This recipe is a testament to the fact that sometimes the simplest base (my grandma’s loaf) can become the most spectacular canvas for fun and flavor. Don’t be afraid to play and make it your own—that’s what Food Meld is all about.
Your Questions, Answered: FAQs & Troubleshooting
Q: My cake sunk in the middle! What happened?
A: Don’t worry, it’s still delicious! This usually means it needed just a few more minutes of baking, or the oven door was opened too early. The cake structure sets in the final minutes. Next time, trust the skewer test and ensure your oven is properly preheated. A sunken cake is just an excuse for extra buttercream to fill the dip!
Q: Can I make this cake ahead of time?
A: Absolutely! You can bake the loaf cake up to two days in advance. Let it cool completely, wrap it tightly in cling film, and store it at room temperature. Make the buttercream and decorate on the day you plan to serve it for the freshest look and texture.
Q: My buttercream is too runny / too thick. Help!
A: Easy fixes! Too runny? Beat in a little more sifted icing sugar, a tablespoon at a time. Too thick? Add milk or cream, just a teaspoon at a time, until it reaches your desired consistency. Remember, it will firm up slightly once piped.
Q: I don’t have a piping bag. How can I decorate it?
A> No problem! You can use a zip-top plastic bag and snip a corner off. For an even more rustic look, just use a spoon or a small palette knife to dollop and swoosh the two buttercreams on top. It will taste exactly the same—delicious.
Nutritional Information (Per Slice, Approximate)
Based on 10 slices. Values are estimates and will vary depending on brands and portion size.
-
Calories: ~420
-
Fat: 22g
-
Saturated Fat: 13g
-
Carbohydrates: 52g
-
Sugars: 38g
-
Protein: 5g
-
Fiber: 2g
Let’s be honest—this is an Easter treat meant to be enjoyed, not optimized. A little slice goes a long way, and it’s the kind of dessert that earns its place on the table. Balance it with a cup of coffee, a long walk, and zero guilt. Worth it. Every bite.
Final Thoughts from Jackson’s Kitchen
If Easter had an official dessert mascot, I’m convinced this cake would be it.
This Cadbury Creme Egg Loaf Cake is everything I love about holiday baking—it’s nostalgic without being old-fashioned, impressive without being stressful, and playful in a way that makes people genuinely excited about dessert. It’s the kind of cake that sparks conversations, brings out phones for photos, and disappears faster than you planned.
Most importantly, it’s fun. Baking should feel joyful, a little indulgent, and full of personality—and this cake delivers on all fronts. Whether you’re making it for an Easter table, a spring gathering, or just because you spotted Creme Eggs at the store and couldn’t resist (been there), I hope it brings the same smiles to your kitchen that it does to mine.
If you give it a try, I’d absolutely love to see it—tag me or drop a comment and tell me how it went. Did you go full buttercream swirl chaos? Add extra eggs? Eat the end slice straight off the board? No judgment here.
Until next time—keep baking boldly, trust your instincts, and never underestimate the power of a good chocolate cake.
— Jackson 🍫🐣💛


