Crispy Vegetable Spring Rolls – Your New Game Day MVP
Hey friends, Jackson from Food Meld here! Let’s talk game day. We all know the drill: a table groaning with cheesy dips, saucy wings, and loaded nachos. It’s glorious, for sure. But about halfway through the second quarter, you might find yourself wishing for something… different. Something that doesn’t weigh you down but still delivers that epic, crispy, gotta-have-another-one satisfaction.
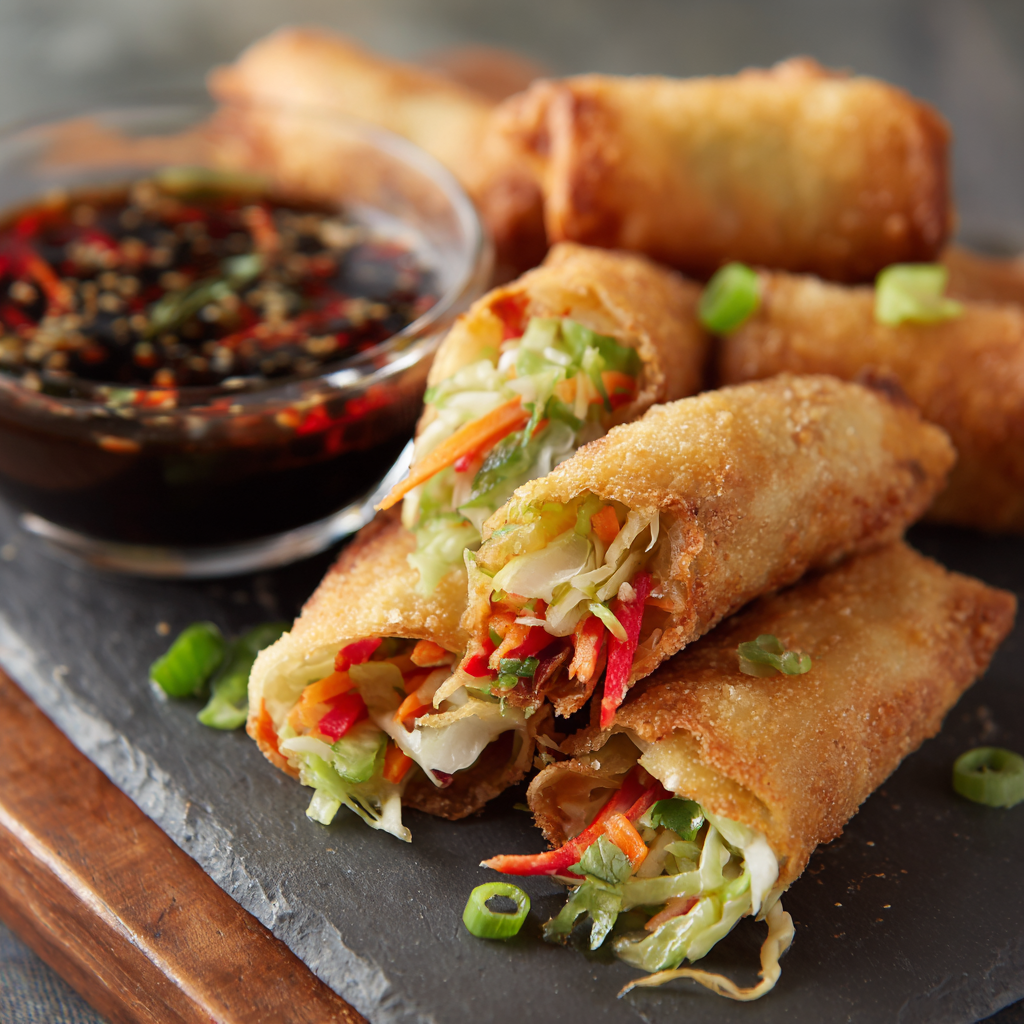
That’s where these little flavor rockets come in. I’m talking about my Crispy Vegetable Spring Rolls. We’re taking a rainbow of fresh, crunchy veggies, giving them a quick toss in a savory, gingery marinade, and wrapping them up in a shell that fries up to a perfect, shatteringly golden brown. They’re light, they’re vibrant, and I promise you, they will be the first thing to disappear from your spread. They bring a fantastic balance to your lineup, cutting through the richness of other dishes and giving everyone a fresh, flavorful option that feels just as celebratory.
And don’t you worry, this isn’t some fussy, complicated restaurant recipe. I’ve streamlined the whole process, keeping it simple, fun, and totally doable in your own kitchen, even with the pre-game excitement buzzing. We’re going to roll these up (pun totally intended), fry them to perfection, and get you back to the party with a platter of pure awesome. So, grab your favorite skillet, and let’s cook something unforgettable together!

The First Bite That Started It All
My love affair with spring rolls started way before I ever thought about starting a food blog. I was a teenager, and my best friend’s family invited me over for a huge Lunar New Year celebration. The entire house was filled with incredible smells, but what really caught my eye was his grandma, Nana Lin, stationed at the kitchen table with a mountain of fresh vegetables and a stack of paper-thin wrappers.
She moved with this effortless, rhythmic grace—scoop, fold, roll, seal. It was like watching an artist at work. She handed me my first one, fresh from the oil, still too hot to handle. I blew on it, took a cautious bite, and my world just lit up. The CRUNCH was unreal, and inside was this explosion of fresh, savory, perfectly seasoned vegetables. It was a world away from the heavy, greasy appetizers I was used to. I must have eaten a dozen, and Nana Lin just kept laughing and pushing more my way. That moment, that perfect combination of crunch, freshness, and community, is what I try to capture every time I make this recipe. It’s more than just a snack; it’s a memory.
Gathering Your Flavor All-Stars
This is where the magic begins! The beauty of this filling is its flexibility, but this specific combo gives you the perfect balance of crunch, flavor, and color. Here’s what you’ll need:
- 12 Spring Roll Wrappers: Look for the thin, translucent kind in the freezer or international aisle. They’re typically made from wheat and water and fry up super crispy. Let them thaw in the fridge overnight for the easiest handling. Chef’s Tip: Don’t confuse them with the thicker, bumpier egg roll wrappers—they’re a different texture entirely!
- 1 cup shredded green cabbage: This is our crunch backbone. It holds up beautifully to the heat and doesn’t get soggy.
- 1 cup shredded carrots: For that gorgeous pop of color and a touch of sweetness. I love using the pre-shredded bag to save time, but grating a whole carrot works just as well.
- ½ cup julienned bell peppers: I use a mix of red and yellow for maximum visual appeal. They add a fresh, slightly sweet flavor.
- ½ cup bean sprouts: These add a unique, juicy crunch. If you can’t find them, you can leave them out, but they add a wonderful authentic texture.
- 2 green onions, thinly sliced: A little bit of sharp, allium goodness to tie everything together.
- 1 tbsp soy sauce: Our salt and umami base. Substitution: Use tamari for a gluten-free version, or coconut aminos for a soy-free option.
- 1 tsp sesame oil: Just a teaspoon! This stuff is potent and gives that unmistakable, nutty aroma. Toasted sesame oil is key here.
- 1 tsp grated fresh ginger: Do not skip the fresh ginger! That zingy, warm spice is non-negotiable for the signature flavor. A microplane is your best friend for this.
- 1 tbsp cornstarch mixed with 2 tbsp water: This is our “glue.” It creates a perfect paste to seal the spring rolls shut so they don’t burst open in the oil.
- Oil for frying: Use a neutral oil with a high smoke point. Canola, vegetable, or peanut oil are all perfect candidates.
Let’s Roll: Your Step-by-Step Guide to Crispy Perfection
Alright, team huddle! This is where we turn that beautiful pile of ingredients into golden perfection. Read through all the steps once before you start, and you’ll be a spring roll pro in no time.
- Make the Filling: In a large mixing bowl, combine the shredded cabbage, carrots, bell peppers, bean sprouts, and green onions. Drizzle over the soy sauce and sesame oil, then add the grated ginger. Now, get your hands in there! Toss everything together until the vegetables are evenly coated. This isn’t a job for a spoon—using your hands ensures every nook and cranny gets that flavorful marinade. Chef’s Hack: Let this mixture sit for 5-10 minutes. The salt in the soy sauce will draw out a tiny bit of moisture from the veggies, making them more pliable for rolling.
- Set Up Your Wrapping Station: Clear a space on your counter. You’ll need your bowl of filling, the stack of spring roll wrappers (keep them covered with a slightly damp cloth to prevent drying out), the small bowl of cornstarch slurry, and a clean plate or baking sheet for your finished rolls.
- The Art of the Roll: Place one wrapper on your work surface like a diamond (a corner pointing towards you). Spoon about 2 tablespoons of filling onto the bottom third of the wrapper, shaping it into a little log. Lift the bottom corner up and over the filling, tucking it tightly. Now, fold the left and right corners inward, like you’re making an envelope. Pro Tip: Roll it tightly! A loose roll can lead to air pockets that might cause splitting during frying. Continue rolling upwards until you have just the top corner left. Use your finger to brush a thin layer of the cornstarch slurry onto that top corner, then finish rolling to seal it shut. Place it seam-side down on your plate. Repeat with the remaining wrappers and filling.
- Fry to Golden Glory: Pour oil into a heavy-bottomed skillet (I love my trusty cast-iron for this) until it’s about 1 to 1.5 inches deep. Heat it over medium-high heat until it shimmers. To test, dip the corner of a spring roll in; if it sizzles actively, you’re good to go. Carefully place a few spring rolls in the oil, seam-side down, without crowding the pan. Chef’s Secret: Frying in batches keeps the oil temperature stable, which is the key to a crispy, non-greasy result. Fry for 2-3 minutes per side, using tongs to turn them, until they’re a deep, uniform golden brown.
- The Final Drain: Once they’re perfectly bronzed, transfer the spring rolls to a wire rack set over a baking sheet or a plate lined with paper towels. This allows any excess oil to drip away, keeping them crispy all over. Let them cool for just a minute or two—they’re dangerously delicious when they’re still piping hot!
Plating Up & Dipping Deep
Presentation is part of the fun! Don’t just dump these beauties in a bowl. I like to arrange them standing up in a tall glass or small vase for a cool, modern look, or fan them out on a long wooden board. Scatter some extra sliced green onions and sesame seeds around for a pop of color.
Now, for the main event: the dip! The spring rolls are fantastic on their own, but a killer sauce takes them to the next level. My go-to is a simple sweet chili sauce—it’s the perfect sweet-and-spicy partner. For something a little more complex, whisk together 2 tbsp soy sauce, 1 tbsp rice vinegar, 1 tsp sesame oil, a pinch of sugar, and some finely minced garlic and ginger. It’s a savory, tangy dream. And if you’re feeling extra, a creamy sriracha mayo (just mayo and sriracha to taste) is always a crowd-pleaser. Offer a couple of options and let your guests have at it!
Mix It Up: Make These Spring Rolls Your Own
Once you’ve mastered the basic recipe, the world is your oyster sauce! Here are a few of my favorite twists to keep things exciting:
- Spicy “Szechuan” Kick: Add 1 teaspoon of Szechuan chili crisp or a squirt of sriracha to the veggie filling. Top it off with a dipping sauce made with chili oil and black vinegar.
- Protein Power-Up: Turn these into a main course by adding ½ cup of finely chopped, cooked shrimp, shredded chicken, or crumbled firm tofu to the vegetable mix.
- Mushroom Lover’s Dream: Sauté ½ cup of finely chopped shiitake mushrooms until they’re nice and browned, then mix them in with the raw veggies. They add a deep, savory, almost meaty flavor.
- Baked, Not Fried (Lighter Option): Want to save on the oil? You can bake these! Preheat your oven to 425°F (220°C). Brush the rolled spring rolls lightly with oil and bake for 15-20 minutes, flipping halfway, until golden and crispy. They won’t be *quite* as shatteringly crisp as the fried version, but they’re still absolutely delicious.
- Vermicelli Addition: For a more substantial bite, add a small handful of thin rice vermicelli noodles, soaked in hot water until soft and then chopped into short pieces, to the filling.
Jackson’s Kitchen Notes
This recipe has evolved so much since my first attempt, which, I’ll be honest, resulted in a few spring roll “burritos” that burst open in the oil. It was a delicious, messy lesson! The biggest game-changer for me was realizing you don’t need to overstuff them. Less is more when it comes to the filling. A tight, compact roll is a successful roll. I also used to be scared of frying, but getting the oil to the right temperature is 90% of the battle. A candy thermometer helps, but the sizzle test never fails. These days, my friends know that if there’s a big game on, I’ll be in the kitchen with a stack of wrappers, telling the story of Nana Lin while I roll. It’s become our own little tradition.
Spring Roll SOS: Your Questions, Answered
Q: My spring rolls are splitting open in the oil! What did I do wrong?
A: This usually happens for one of two reasons: 1) You overfilled the wrapper, putting too much pressure on the seams, or 2) You didn’t seal the final edge properly with enough cornstarch slurry. Make sure that final seam gets a good glue-y coating and is pressed down firmly.
Q: Can I make these ahead of time?
A> You absolutely can! You can assemble the spring rolls a few hours ahead of time. Just place them in a single layer on a parchment-lined baking sheet, cover them tightly with plastic wrap, and keep them in the fridge. Fry them just before serving for the ultimate crispiness. I don’t recommend frying them ahead, as they lose their crunch.
Q: My spring rolls are getting soggy. How do I keep them crispy?
A> The enemy of crispiness is steam. Never cover fried spring rolls with a lid or wrap them while they’re hot. Always let them drain on a wire rack instead of directly on paper towels, which can trap steam and make the bottom soggy. Serve them immediately for the best texture.
Q: Can I use an air fryer?
A> You can! Brush or spray the assembled (but uncooked) spring rolls generously with oil. Air fry at 375°F (190°C) for 8-12 minutes, flipping halfway through, until golden brown and crispy. Results can vary by machine, so keep an eye on them!
The Food Meld Breakdown (The Healthy Stuff!)
Now, I’m not a nutritionist, but I am a guy who loves food that makes you feel good. One of the reasons I adore this recipe is that it’s a fantastic way to pack a ton of vibrant vegetables into a seriously fun package. Per spring roll (calculated with estimated oil absorption), you’re looking at roughly:
- Calories: 110
- Protein: 2g
- Fat: 5g
- Carbs: 14g
- Fiber: 2g (Hey, that’s a solid contribution!)
- Sugar: 2g
- Sodium: 220mg
Remember, these are estimates and can vary based on your specific ingredients and how much oil they absorb. Compared to many other fried game day apps, these are a lighter, veggie-forward choice that doesn’t skimp on flavor or that satisfying crunch we all crave.
Your New Go-To Game Day Hero
And there you have it! My secret weapon for winning game day (or any day, really). These Crispy Vegetable Spring Rolls are proof that “healthy” and “indulgent” don’t have to be opposites. They’re a celebration of texture and fresh flavor, and they bring such a welcome vibe to any party spread.
The best part is that once you get the rolling technique down, you’ll feel like a total rockstar in the kitchen. So don’t be intimidated. Embrace the little mess, laugh if one splits open (it’s just more crispy bits for the chef to snack on!), and most importantly, share them with people you love. That’s what Food Meld is all about.
I’d love to hear how your spring rolls turn out! Tag me on social @FoodMeld with a picture of your creation. Now, go forth and cook something awesome!


