Forget Takeout: Your New Favorite 30-Minute Katsu Bowl Awaits
Hey friends, Jackson here from Food Meld. Let’s get real for a second. We’ve all been there: staring into the fridge, scrolling through endless delivery apps, craving something that hits that perfect sweet spot between comforting, crispy, and downright exciting. You want that restaurant-quality thrill, but you also want to be cozy in your own sweatpants. Sound familiar?
Well, my friend, I’m about to change your weeknight dinner game forever. I’m talking about my Crispy Japanese Katsu Bowls. Imagine this: a golden, shatteringly crisp panko-crusted pork cutlet, sliced into perfect strips and laid over a fluffy bed of steaming Japanese rice. The whole glorious situation gets drizzled with a rich, tangy, and slightly sweet homemade tonkatsu sauce that you can whip up in seconds. It’s a symphony of textures and flavors that feels fancy but is secretly one of the most straightforward, joy-filled meals you’ll ever make in your own kitchen.
I built Food Meld on recipes exactly like this—bold, comforting food with a creative twist that doesn’t require a culinary degree or a whole afternoon to pull off. This katsu bowl is a prime example of that “what if we tried this?” energy, taking simple ingredients and turning them into something truly unforgettable. So, tie on your apron, and let’s cook something awesome together. You’re about to discover why this bowl is about to become your new dinner hero.
The Train Station Bite That Started It All
My love affair with katsu didn’t start in a fancy Tokyo restaurant; it started in a bustling Kyoto train station. I was young, backpacking, and completely overwhelmed (in the best way possible). After a long day of exploring temples, my stomach was roaring, and I ducked into the first food counter I saw, drawn in by the mesmerizing sound of something sizzling in hot oil.
I pointed at something golden and crispy on a picture menu, not entirely sure what I was ordering. Minutes later, I was handed a warm, rectangular box. Inside, nestled on a bed of rice, was the most perfect, crispy cutlet I’d ever seen, glistening with a dark, savory sauce. I took my first bite right there, leaning against a pillar as commuters rushed by. The CRUNCH was seismic. The pork was juicy. The sauce was this magical, umami-packed punch that tied everything together. It was a moment of pure, unadulterated food joy—a simple dish, made perfectly, that completely turned my day around.
That’s the feeling I want to bring to your kitchen. It’s not just about following a recipe; it’s about creating those little moments of “wow” that stick with you. Every time I make this katsu, I’m right back in that train station, reminded that the best food memories are often the simplest ones.
Gathering Your Flavor Arsenal
Part of the beauty of this dish is its simplicity. We’re using humble ingredients and elevating them with technique and a killer homemade sauce. Here’s your shopping list—think of it as gathering your flavor arsenal for a quick, delicious victory.
For the Pork Katsu:
- 2 boneless pork chops: Look for ones with a nice bit of marbling for maximum juiciness. We’re going to pound them thin, which makes them cook fast and stay tender. No pork chops? A thin chicken breast will work in a pinch!
- Salt & pepper, to taste: The fundamental building blocks of flavor. Don’t be shy here—season that pork like you mean it.
- ½ cup all-purpose flour: This is our first coating, and it creates a dry surface for the egg to stick to, which is the secret to a crust that won’t fall off.
- 1 egg, beaten: The “glue” that holds our crispy panko jacket on. Give it a good whisk with a fork until it’s uniform.
- 1 cup panko breadcrumbs: The star of the crunch show! Panko is made from crustless bread, creating a lighter, flakier, and crispier texture than regular breadcrumbs. Do not substitute here—this is what gives katsu its signature crunch.
- Oil, for frying: Use a neutral oil with a high smoke point. Canola, vegetable, or avocado oil are my go-tos. You’ll need enough for about a ¼-inch depth in your pan.
For the Homemade Tonkatsu Sauce:
- 3 tbsp ketchup: This forms the sweet, tomatoey base of our quick sauce.
- 1 tbsp Worcestershire sauce: This is the umami powerhouse, providing a deep, complex savoriness.
- 1 tbsp soy sauce: For that essential salty, savory kick. Use tamari for a gluten-free version.
- 1 tbsp mirin: A sweet Japanese rice wine that adds a gentle sweetness and shine. No mirin? A tablespoon of honey or maple syrup thinned with a teaspoon of water is a great stand-in.
- 1 tsp Dijon mustard (optional): My little “chef’s twist.” It adds a subtle tang and helps emulsify the sauce. Highly recommend!
- ½ tsp sugar: Just a pinch to balance out the tanginess and help the flavors meld.
To Serve:
- 2 cups cooked Japanese short-grain rice: The fluffy, sticky foundation of our bowl. This rice is a non-negotiable for me—it holds together perfectly and has the right texture.
- Shredded cabbage or pickled vegetables: This is your crunch and freshness factor. The cool, crisp cabbage is the classic pairing and a perfect contrast to the rich katsu.
- Green onions or sesame seeds (optional garnish): For a pop of color and a final flavor flourish. Toasted sesame seeds are my personal favorite.
Let’s Build That Perfect Crunch: A Step-by-Step Guide
Alright, team, it’s go time. This is where the magic happens. We’re going to move with purpose, but there’s no rush. Cooking is a rhythm, and we’re about to find ours. I’ll walk you through every step with my favorite chef hacks along the way.
- Make the Sauce First. In a small bowl, whisk together the ketchup, Worcestershire sauce, soy sauce, mirin, Dijon mustard (if using), and sugar until it’s smooth and beautifully combined. Chef’s Hack: Taste it! Adjust to your liking. Want it a little sweeter? A tiny bit more honey. More tang? A dash more Worcestershire. This is your sauce, make it sing for you. Set it aside and let the flavors get to know each other while you cook the katsu.
- Pound the Pork. Place your pork chops between two pieces of plastic wrap or in a large zip-top bag. Using the flat side of a meat mallet, a rolling pin, or even a heavy skillet, gently pound them until they’re about ¼ to ½-inch thick. Chef’s Insight: This isn’t just about tenderizing; it’s about creating an even thickness so the pork cooks uniformly and quickly, preventing the outside from burning before the inside is done. Season both sides generously with salt and pepper.
- Set Up Your Breading Station. This is a crucial step for a mess-free, perfectly coated katsu. Get three shallow dishes or plates. Put the flour in the first, the beaten egg in the second, and the panko breadcrumbs in the third. Line them up in that order: flour, egg, panko. Pro Tip: Use one hand for the dry ingredients (flour and panko) and the other hand for the wet egg. This keeps you from getting “club hands”—fingers caked in layers of breading!
- Bread Like a Boss. Take a seasoned pork chop and dredge it in the flour, shaking off any excess. Next, dip it completely into the beaten egg, letting the excess drip off. Finally, press it firmly into the panko breadcrumbs, ensuring every inch is coated in that glorious, crunchy goodness. Chef’s Secret: Don’t just lay it in the panko—press down gently to make sure the crumbs adhere. This is what gives you that thick, craggy, ultra-crispy crust.
- Fry to Golden Perfection. Heat about ¼ inch of oil in a large, heavy-bottomed skillet (I love my cast iron for this) over medium heat. To test if the oil is ready, flick a tiny panko breadcrumb into it—if it sizzles immediately, you’re good to go. Carefully lay the breaded pork chops in the hot oil. Fry for 3-4 minutes per side, until the crust is a deep, golden brown and the pork is cooked through. Watch for the Color: Let the color be your guide. That beautiful golden-brown hue is the sign of flavor. Transfer the cooked katsu to a wire rack set over a paper towel-lined plate. This keeps the bottom from getting steamy and soggy—a game-changer for crispiness!
- Rest and Slice. Let the katsu rest for a couple of minutes before slicing. I know it’s tempting to dive right in, but this allows the juices to redistribute throughout the meat, ensuring every bite is moist. Then, using a sharp knife, slice it into 1-inch strips. That satisfying crackle as you cut is your reward.
Plating Up Your Masterpiece
We eat with our eyes first, so let’s make this bowl look as incredible as it tastes. This is the fun part where it all comes together.
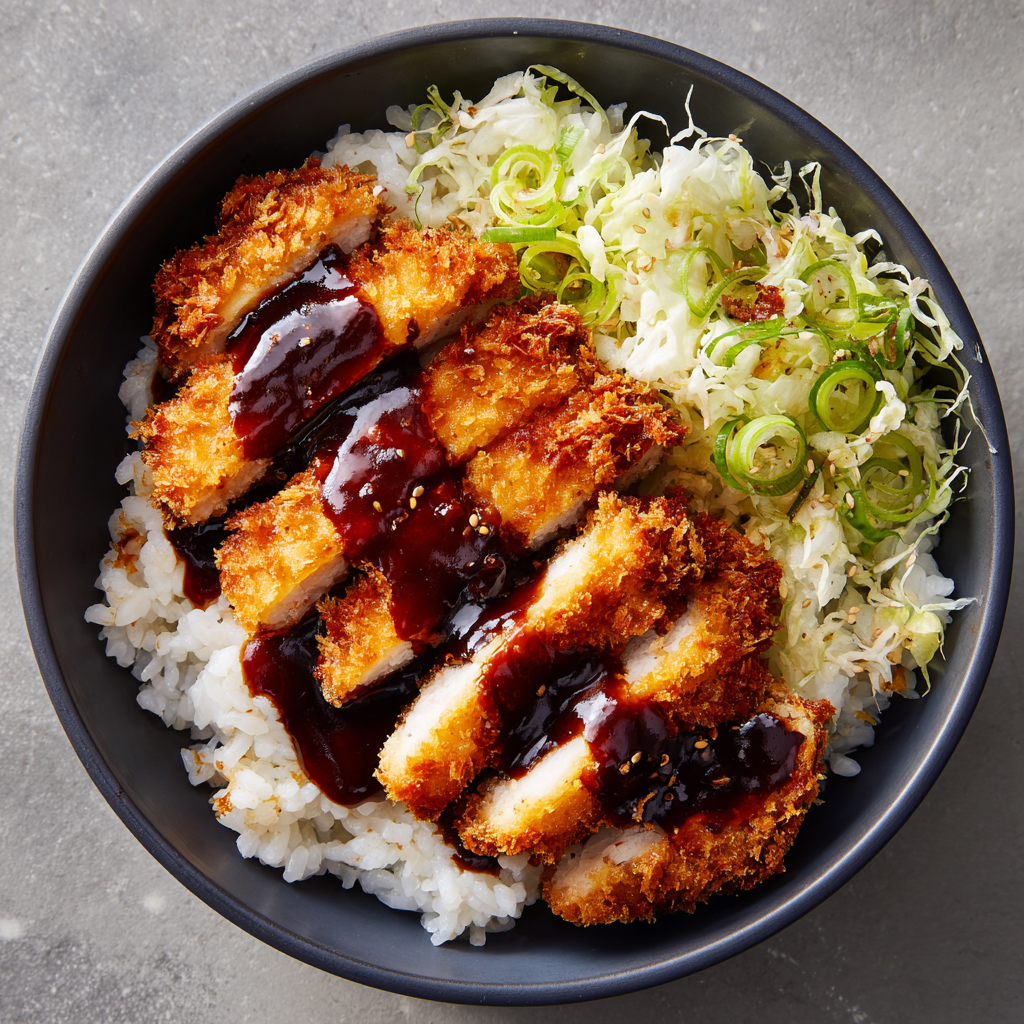
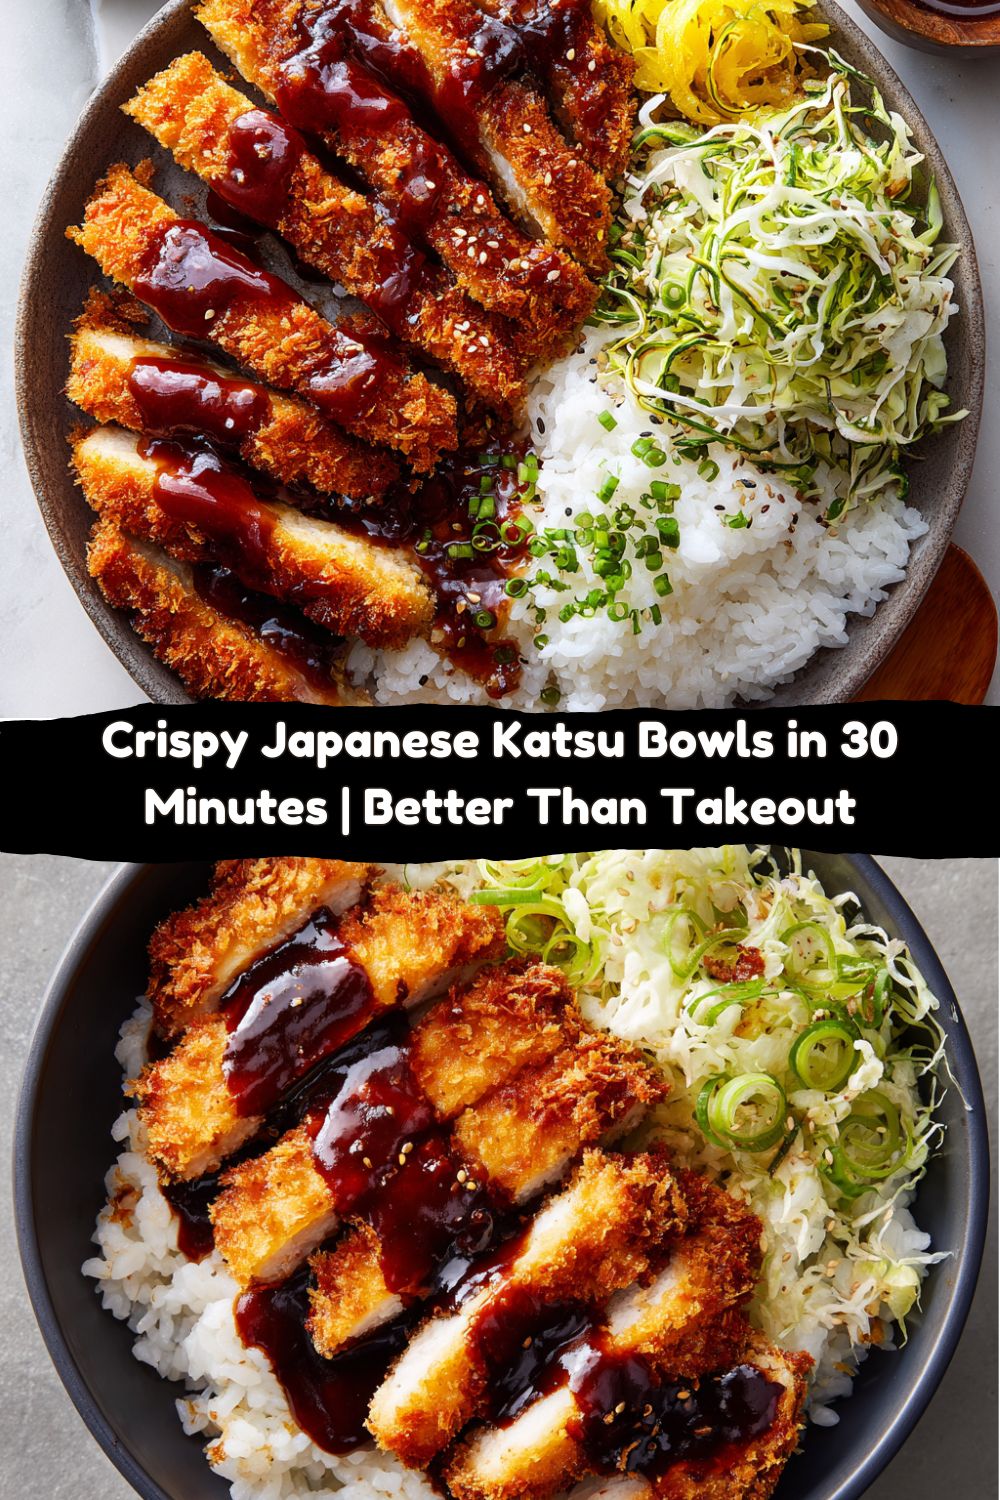
Start with a generous scoop of warm, fluffy Japanese rice in the bottom of your bowl. Use a spoon or a rice paddle to gently press it down slightly, creating a nice bed. Next, artfully arrange your sliced katsu over the rice. I like to fan the slices out so you can see that gorgeous cross-section of juicy pork and crispy crust.
Now, for the grand finale: the sauce. Drizzle that homemade tonkatsu sauce liberally over the katsu and rice. Don’t be stingy! Then, pile on a big handful of that cool, shredded cabbage right beside the katsu. The contrast of temperatures and textures is key. Finish it all off with a sprinkle of thinly sliced green onions or a shower of toasted sesame seeds for that final professional touch.
The beauty of this bowl is in the mix. Get a little bit of everything in one bite—the crispy katsu, the savory sauce, the soft rice, and the refreshing cabbage. It’s a party in a bowl, and you’re the host!
Make It Your Own: Creative Katsu Twists
Once you’ve mastered the classic, the “what if we tried this?” fun begins. This recipe is a fantastic canvas for your own culinary creativity. Here are a few of my favorite ways to mix it up.
- Chicken Katsu: The most common swap! Use thin chicken breast or chicken thighs (pounded thin) instead of pork. It’s just as delicious and a bit lighter.
- Veggie-Powered Twist: Going meatless? Thick slices of firm tofu or even large portobello mushroom caps are phenomenal. Press the tofu to remove excess water, then bread and fry as usual. You get all the crunch without the meat.
- Spicy Meld: Add a kick to your tonkatsu sauce by stirring in a teaspoon of sriracha, a dash of chili garlic sauce, or even a pinch of cayenne pepper. A little heat makes the sweet and savory flavors pop even more.
- Curry Katsu Bowl (Katsu Curry): This is a next-level comfort food. Instead of tonkatsu sauce, serve your crispy katsu over rice and smother it in a rich, warm Japanese curry sauce. You can use a block of Japanese curry roux for an easy and incredibly delicious shortcut.
- Pork Tonkatsu Style: Want the full traditional experience? Skip the bowl and serve the whole pork cutlet with a side of shredded cabbage, a wedge of lemon to squeeze over the top, and the tonkatsu sauce for dipping. It’s a classic for a reason.
Jackson’s Kitchen Notes & Stories
This recipe has seen a few evolutions in my kitchen. The first time I tried to make it, I used regular breadcrumbs and was so disappointed by the lack of that signature katsu crunch. That’s when I learned the sacred rule: always panko. Another time, I got a little overzealous with the frying and my oil was too hot. The panko burned before the pork was cooked! It was a sad, smoky affair. So trust me on the medium heat—it’s the sweet spot for a golden brown crust and a perfectly cooked interior.
The Dijon mustard in the sauce was a happy accident. I ran out of the store-bought tonkatsu sauce one day and was Frankensteining a version from what I had. The Dijon added this subtle complexity that I now absolutely love. It just goes to show that some of the best kitchen discoveries come from a little improvisation. Don’t be afraid to make it yours!
Your Katsu Questions, Answered!
I get a lot of questions about this recipe, so I’ve gathered the most common ones here to help you troubleshoot like a pro.
Q: My breading keeps falling off during frying! What am I doing wrong?
A: Ah, the great breading escape! This usually happens for one of two reasons. First, you might not have shaken off the excess flour properly. A thin, even coat is key. Second, make sure your oil is hot enough before you add the cutlet. If the oil isn’t hot, the coating won’t seize up immediately, giving it time to slide off. Use the panko sizzle test!
Q: Can I bake this instead of frying to make it healthier?
A> You absolutely can! For a baked version, place the breaded cutlets on a wire rack set over a baking sheet (this promotes air circulation for even crisping). Spray or brush them lightly with oil and bake at 400°F (200°C) for about 15-20 minutes, flipping halfway through, until golden brown and cooked through. The crunch will be slightly different but still delicious.
Q: I don’t have mirin. What’s the best substitute?
A> No worries! A tablespoon of honey or maple syrup mixed with a teaspoon of water or rice vinegar to thin it out will work beautifully. It will mimic the sweet, glossy quality of the mirin.
Nutrition Information (per bowl, approx.)
-
Calories: 620
-
Fat: 22g
-
Saturated Fat: 6g
-
Carbohydrates: 75g
-
Sugar: 10g
-
Protein: 28g
-
Fiber: 3g
-
Sodium: 940mg
Note: Estimates are based on pork katsu, rice, tonkatsu sauce, and cabbage garnish. Swaps like chicken or baked versions will alter nutrition.
Final Thoughts: Comfort Food, Elevated
So there you have it, my friends—your new weeknight hero in a bowl. Crispy, juicy pork (or chicken!) katsu, fluffy rice, and that tangy, glossy tonkatsu sauce that ties everything together. What I love most about this dish is how it delivers that restaurant-quality satisfaction without the delivery bill or the wait. It’s the kind of meal that makes you feel a little fancy but also totally at home in your sweatpants.
The beauty of this recipe is its flexibility—you can keep it classic, go spicy, swap in veggies, or pour on a rich curry sauce. However you riff, the foundation stays the same: simple ingredients, thoughtful technique, and a little bit of “what if we tried this?” energy. That’s what Food Meld is all about.
So the next time you’re tempted to hit that takeout app, grab your skillet instead. In under 30 minutes, you’ll have a bowl of golden, crispy joy that’ll have you wondering why you ever settled for soggy fries in a paper bag.
Here’s to crunch, comfort, and cooking something awesome together.
— Jackson


