Crispy Chicken Cutlet Bowls: Where Healthy Gets a High-Five
Hey friends, Jackson here from Food Meld. Let’s get real for a second: have you ever stared into your fridge, wanting something that’s both good for you and seriously satisfying, only to end up making the same sad salad or bland grilled chicken? Yeah, I’ve been there too. It’s like there’s this imaginary line between “healthy” and “comfort food,” and we’re told we can only pick one. Well, I’m here to call absolute nonsense on that.
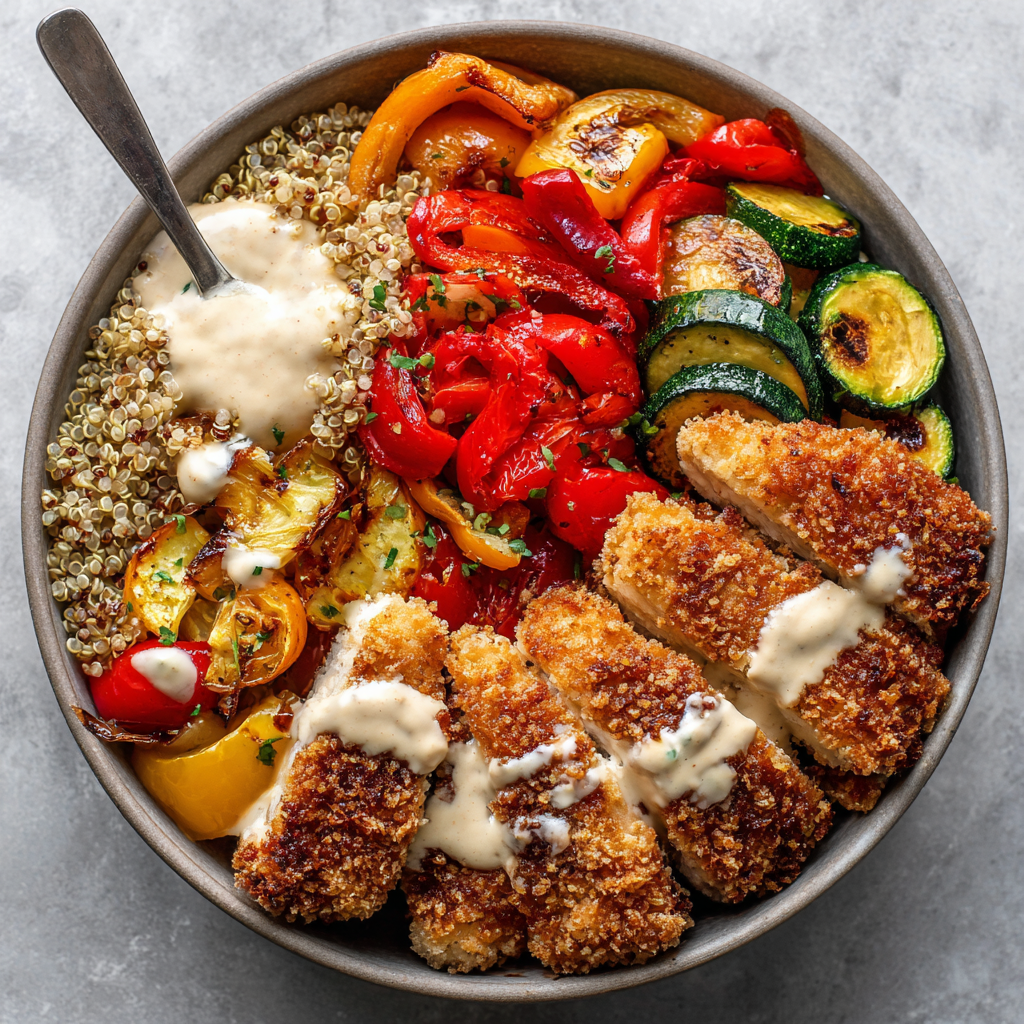
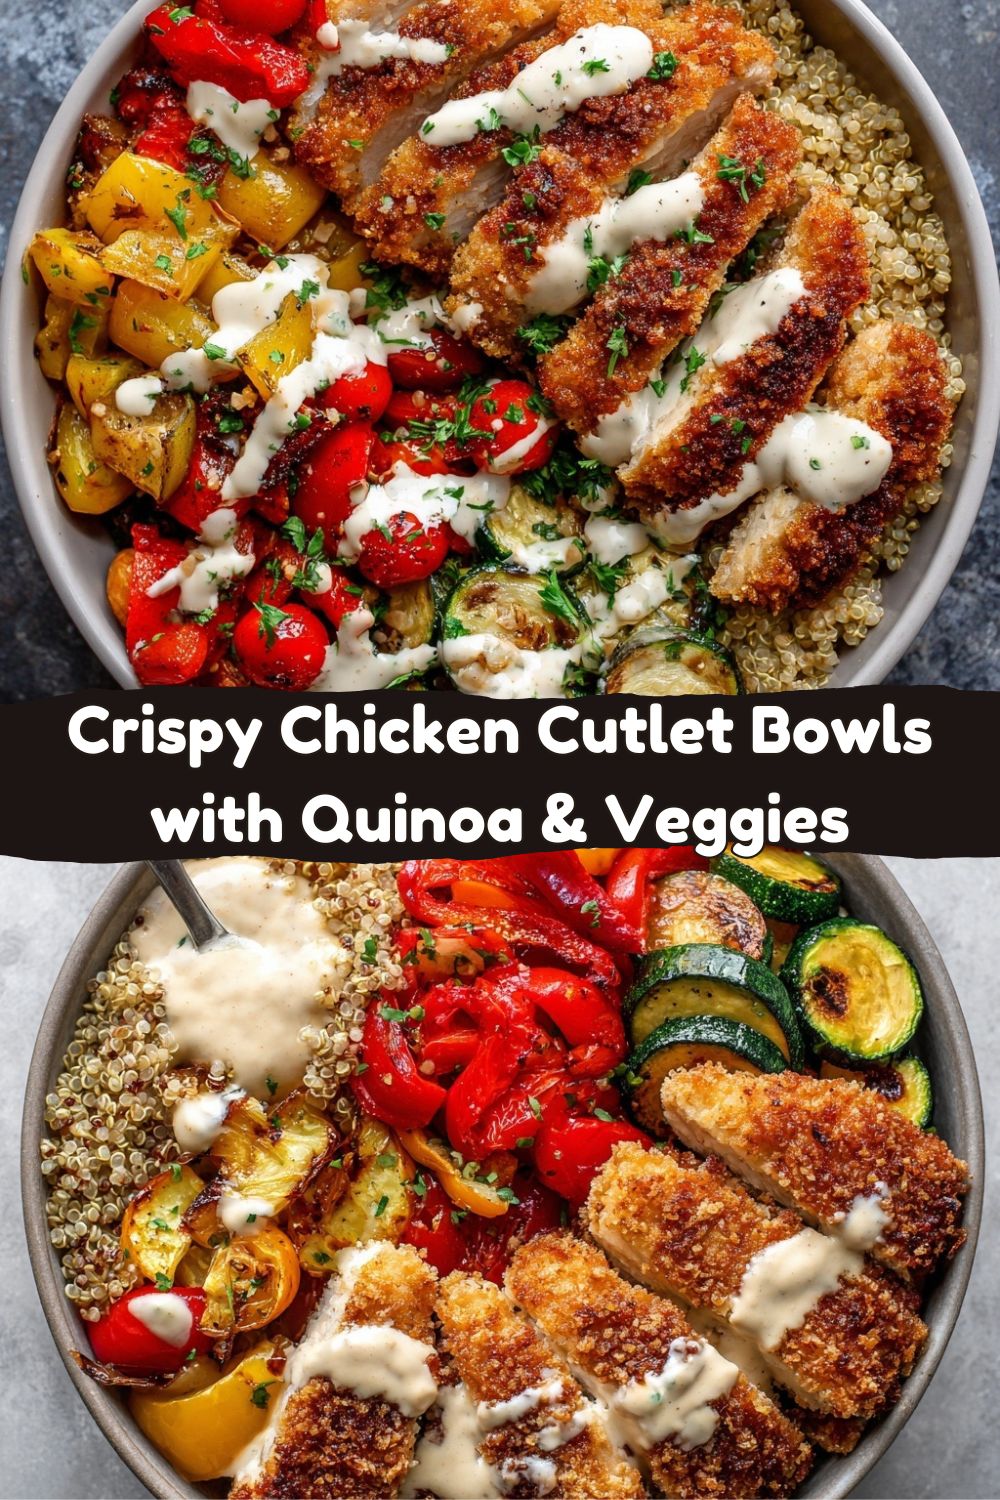
Today, we’re officially blurring that line into oblivion with my Crispy Chicken Cutlet Bowls with Quinoa & Veggies. This isn’t just a meal; it’s a flavor and texture party in a bowl. Imagine this: a golden-brown, shatteringly crisp chicken cutlet, juicy on the inside, resting on a bed of fluffy, nutty quinoa. Beside it, a riot of sweet, caramelized roasted veggies, and the whole glorious mess tied together with a creamy, tangy, or spicy sauce of your choice. Every forkful is a perfect bite—crunchy, tender, fresh, and saucy all at once.
This is the kind of recipe that proves eating well doesn’t mean sacrificing an ounce of joy. It’s weeknight warrior meets meal prep champion. It’s for the nights you want something awesome without a sink full of dishes (hello, one-pan veggies and a single skillet for chicken!). And best of all, it’s completely yours to play with. So, grab your favorite bowl, and let’s cook something that’s not just fuel, but a genuine, “you’ve gotta try this” moment. Welcome to Food Meld, where we make flavor fun and healthy food anything but boring.
The Cutlet That Started It All
This bowl’s heart and soul? That crispy chicken. And for me, that crunch is a direct line back to my grandma’s kitchen in Georgia. She didn’t call them “cutlets”; they were just “Sunday chicken,” and making them was a ritual. I’d stand on a step-stool, watching her wield her wooden mallet like a conductor’s baton, thwack-thwack-thwacking boneless breasts into tender, even canvases. The air would be thick with the scent of seasoned flour and the sizzle of chicken meeting a well-seasoned cast-iron skillet.
Her method was simple but sacred: a three-station dredging line in pie plates, the final one always holding toasted breadcrumbs she’d made from stale biscuits. There was no rushing. It was about the rhythm, the care, the anticipation of that first crunch. She’d let me taste the first tiny piece that broke off—“the cook’s treat,” she’d say. That combination of crunchy, salty, juicy perfection felt like magic. This bowl is my tribute to that feeling—taking that beloved, comforting technique and “melding” it with the bright, wholesome goodness of grains and veggies. It’s tradition, upgraded for the way we eat now, but never forgetting where the magic started.
Gathering Your Flavor Arsenal
Here’s everything you’ll need to build these epic bowls. Don’t just think of these as items on a list—think of them as your flavor and texture building blocks. I’ve thrown in some chef insights and swaps so you can make this recipe work with what you’ve got.
For the Crispy Chicken:
- 2 boneless, skinless chicken breasts (halved and pounded thin): The star! Pounding is non-negotiable—it ensures quick, even cooking and maximum crispy surface area. No mallet? A heavy pan or rolling pin works perfectly.
- 1 cup all-purpose flour: Our first layer of coating. It creates a dry surface for the egg to stick to, which is the glue for our crumbs. For a gluten-free swap, a 1:1 GF flour blend works great.
- 2 eggs, beaten: The all-important “glue.” A little tip: beat them with a splash of water or milk—it thins them slightly for a lighter, less gloopy coating.
- 1½ cups panko or seasoned breadcrumbs: The crunch factor! I love panko for its bigger, flakier, crispier texture. If using plain panko, mix in a big pinch of salt, pepper, and garlic powder. Regular breadcrumbs work too—they’ll give a denser, more traditional crunch.
- Salt, pepper, garlic powder, paprika: The simple seasoning squad. Paprika isn’t just for color; it adds a sweet, earthy depth. Smoked paprika is a killer twist here.
- Neutral oil for pan-frying: Avocado, grapeseed, or a light olive oil are my go-tos. You need about ¼ inch in the pan—enough to shallow fry for that gorgeous golden crust.
For the Bowls:
- 1 cup uncooked quinoa: Our nutritious, fluffy base. Rinse it under cold water in a fine-mesh strainer first! This removes its natural bitter coating (saponin). It’ll yield about 3 cups cooked—perfect for 4 bowls with some leftovers.
- 1 zucchini, sliced into half-moons: Adds a lovely, mild sweetness and soft texture when roasted.
- 1 bell pepper, diced: Color and crunch! Use any color you like—I often grab a red and a yellow for maximum vibrancy.
- 1 cup cherry tomatoes, halved: These little guys burst and caramelize, creating pockets of jammy, sweet-tart flavor. Don’t skip them.
- 1 tbsp olive oil, salt & pepper: All you need to make those veggies sing.
Sauce Options (Pick Your Adventure):
- Garlic Yogurt Sauce: Mix 1 cup Greek yogurt with 1 minced garlic clove, a squeeze of lemon, salt, and a drizzle of olive oil. Cool, creamy, and probiotic-packed.
- Spicy Mayo: ½ cup mayo + 1-2 tbsp sriracha or hot sauce + a squeeze of lime. Rich, spicy, and irresistible.
- Tahini Lemon Drizzle: Whisk ¼ cup tahini with juice of ½ lemon, 2 tbsp warm water, salt, and a pinch of cumin. Nutty, tangy, and dairy-free.
- Honey Mustard: Equal parts Dijon mustard and honey, thinned with a little apple cider vinegar. Sweet, tangy, and classic.
Let’s Build Those Bowls: A Step-by-Step Dance
Okay, team! Let’s fire up the kitchen. We’re going to work smart so everything comes together hot and happy. I like to get the quinoa going first, then roast the veggies while the chicken cooks. Multitasking for the win!
- Quinoa, First Up: Rinse that quinoa under cold water. Add it to a saucepan with 2 cups of water (or broth for extra flavor) and a pinch of salt. Bring to a boil, then cover, reduce heat to low, and simmer for 15 minutes. Chef’s Hack: After 15 minutes, take it off the heat but DON’T peek! Let it sit, covered, for 10 more minutes. Then fluff with a fork. This steam-rest makes it impossibly fluffy.
- Veggie Roast Party: While the quinoa simmers, preheat your oven to 425°F (220°C). On a baking sheet, toss your zucchini, bell pepper, and cherry tomatoes with that tablespoon of olive oil, salt, and pepper. Spread them out in a single layer—crowding is the enemy of caramelization! Roast for about 20 minutes, until they’re tender and have those beautiful browned edges.
- Chicken Prep Station: Let’s get set up for dredging—it’s like an assembly line. Get three shallow dishes (pie plates, shallow bowls, whatever). In the first: flour, seasoned with a good pinch of salt, pepper, garlic powder, and paprika. In the second: the beaten eggs. In the third: your panko or breadcrumbs. Line them up in that order. This “set mise en place” keeps your hands from becoming a breadcrumb catastrophe zone.
- The Pound & Season: Place your chicken breasts between two pieces of plastic wrap or in a large zip-top bag. Using your mallet (or heavy pan), pound them to an even ½-inch thickness. Season both sides generously with salt, pepper, garlic powder, and paprika. This seasoning under the crust is a flavor game-changer.
- The Dredge Dance: Here’s the rhythm: Dry hand (for flour and crumbs), wet hand (for egg). With one hand, coat a cutlet in the seasoned flour, shake off the excess. Then, using your other hand, dip it into the egg, let the excess drip off. Back to your dry hand, press it firmly into the panko, ensuring a full, even, glorious coating. Place it on a clean plate. Repeat. Pro Tip: Let the breaded cutlets sit for 5 minutes before frying. This helps the coating set so it stays on better.
- Fry to Golden Perfection: Heat about ¼ inch of oil in a large skillet (cast iron is king for this) over medium-high heat. To test if it’s ready, flick a tiny breadcrumb in—it should sizzle energetically. Carefully add the cutlets (don’t overcrowd; cook in batches if needed). Fry for 3-4 minutes per side, until deeply golden brown and the chicken is cooked through (165°F internal temp). Transfer to a wire rack set over a paper towel—this keeps the bottom crispy! Let them rest for a few minutes before slicing.
- The Grand Assembly: This is the fun part. Grab your favorite big bowls. Start with a big scoop of that fluffy quinoa. Pile on a generous helping of those vibrant roasted veggies. Slice your crispy chicken cutlet against the grain into strips and fan it out on top. Finally, and this is key, drizzle generously with your chosen sauce. Don’t be shy—the sauce brings the whole bowl into harmony.
How to Serve It Up Like a Pro
Presentation is part of the fun, and it takes about 10 seconds to make this look restaurant-worthy. Think of the bowl as your canvas. I like to build with intention: quinoa as the base layer, veggies scattered artfully around one side, and the sliced chicken fanned out prominently on the other. The sauce isn’t just a topping; it’s the final brushstroke. Drizzle it in zig-zags or a loose spiral over everything, letting it pool a little in the quinoa.
Want to take it up a notch? A final flourish does wonders. A sprinkle of fresh chopped herbs (parsley, cilantro, or chives), a few microgreens, a final crack of black pepper, or even a little extra crumble of feta or goat cheese if you’re feeling indulgent. Serve it immediately, while the chicken is still crisp and the veggies are warm. The contrast is everything!
Make It Your Own: 5 Flavor Twists
The “Meld” in Food Meld means I live for recipe variations. This bowl is a perfect template—swap, change, and get creative!
- “Parmesan Crisp” Style: Add ½ cup of finely grated Parmesan cheese to your panko breadcrumbs. It creates an insanely flavorful, cheesy-crisp crust on the chicken. Serve with a simple marinara for dipping on the side.
- Asian-Inspired Fusion: Season the chicken with ginger and five-spice powder. Use a sauce of soy sauce, rice vinegar, a touch of honey, and sesame oil. Swap quinoa for brown rice and add quick-pickled cucumbers and carrots to the bowl.
- Mediterranean Magic: Skip the paprika and use oregano and lemon zest in the chicken seasoning. Sauce = extra garlicky yogurt (tzatziki-style with grated cucumber). Add kalamata olives and crumbled feta to the bowl.
- Completely Gluten-Free: Use a GF flour blend for dredging and certified gluten-free panko breadcrumbs. The method stays exactly the same for perfect crispy GF chicken.
- Spicy Nashville Hot Twist: After frying, brush the hot cutlets with a mix of melted butter, cayenne pepper, brown sugar, and a pinch of paprika. Serve with a cool, creamy sauce and pickles on the side of your bowl for a fiery, fun twist.
Jackson’s Kitchen Notes
This recipe has become a weekly staple in my house, and it’s evolved in the best ways. My biggest lesson? Don’t skip the pound. I tried rushing it once, and the chicken cooked unevenly—thick parts dry, thin parts overdone. The mallet is your friend for juiciness! Also, I used to dread breading mess, but the “dry hand/wet hand” method was a revelation. My wife still laughs at my “breading dance,” but my countertops stay clean. Finally, the sauce choice totally changes the personality of the bowl. I often make two different ones and let everyone at the table choose their own adventure—it makes a simple dinner feel interactive and special.
FAQs & Quick Fixes
Q: My breading keeps falling off in the pan! What am I doing wrong?
A: The most common culprits are moisture and rushing. Pat your chicken bone-dry with paper towels before seasoning. Also, make sure you’re shaking off the excess flour thoroughly before dipping in egg, and let the breaded cutlets rest for 5 minutes before frying to let the coating set.
Q: Can I bake the chicken instead of frying to make it healthier?
A> Absolutely! For a baked version, place the breaded cutlets on a wire rack set over a baking sheet (this is key for air circulation). Spray lightly with cooking oil and bake at 400°F (200°C) for 15-20 minutes, flipping halfway, until golden and cooked through. It won’t be quite as shatteringly crisp as pan-fried, but it’s still delicious and lighter.
Q: How do I meal prep these bowls?
A: This is a fantastic meal prep recipe! Cook everything as directed. Let the chicken and veggies cool completely. Store each component (quinoa, veggies, sliced chicken, sauce) in separate airtight containers in the fridge for up to 4 days. Assemble your bowl cold, or give the chicken and veggies a quick reheat in the microwave or toaster oven before adding to the room-temp quinoa and sauce.
Q: My quinoa turned out mushy/bitter. Help!
A: Mushy = too much water or not enough fluffing. Stick to the 2:1 liquid-to-quinoa ratio and fluff it well after cooking. Bitter = you probably didn’t rinse it! Always give quinoa a good rinse under cold water in a fine-mesh strainer before cooking to remove saponin.
Nutritional Information (A General Guide)
Alright, let’s talk numbers! This is a general estimate for one bowl, made as written with 1 tbsp of oil for frying per batch and using the garlic yogurt sauce. Remember, exact numbers will vary based on your specific ingredients, oil absorption, and sauce choice.
~520 calories
Protein: ~38g
Carbohydrates: ~42g
Fat: ~22g
Fiber: ~6g
Why this bowl works nutritionally: you’re getting lean protein from the chicken, complete plant protein and fiber from quinoa, and a wide range of vitamins and antioxidants from the roasted veggies. The sauce adds satisfaction so you don’t feel deprived—because food that doesn’t satisfy never “works” long-term.
To lighten it further:
-
Bake or air-fry the chicken
-
Use less sauce or a yogurt-based option
-
Add more veggies and slightly less quinoa
To bulk it up for high-energy days:
-
Add avocado, feta, or a soft-boiled egg
-
Increase quinoa or add roasted sweet potatoes
Balance, not boredom.
Final Thoughts: This Is How “Healthy” Should Feel
These Crispy Chicken Cutlet Bowls are proof that eating well doesn’t mean eating sad. This is crunchy, juicy, colorful, filling, and flat-out delicious food that just happens to be nourishing. It’s the kind of meal that keeps you full, energized, and genuinely excited for lunch leftovers the next day.
Use this bowl as a template. Change the grain. Change the veggies. Change the sauce. Keep the crunch. Once you master that crispy cutlet, the rest is pure creativity—and that’s where cooking becomes fun instead of a chore.
From my grandma’s cast iron to your weeknight dinner table,
Jackson
Food Meld — where healthy and crave-worthy finally agree


