Forget Takeout: This Chicken Dinner Is Your New Kitchen Showstopper
Hey there, friend. Jackson here. Can I tell you a secret? I think we’ve all been there. Staring into the fridge at 5:30 PM, the universal “what’s for dinner?” dread setting in. You want something that feels special, something that makes your people pause their scrolling and go, “Wow, you made that?” But you also don’t want to spend two hours and use every pot in the kitchen. Sound familiar?
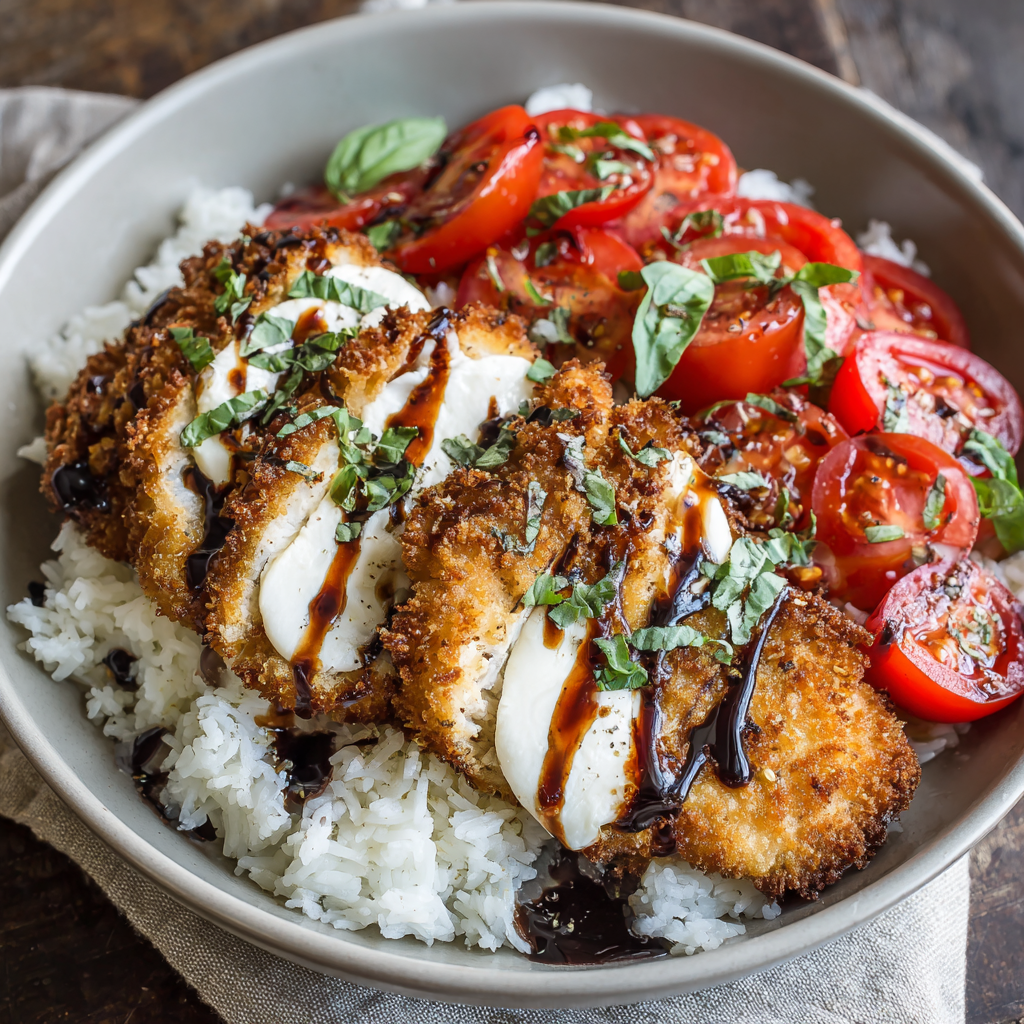
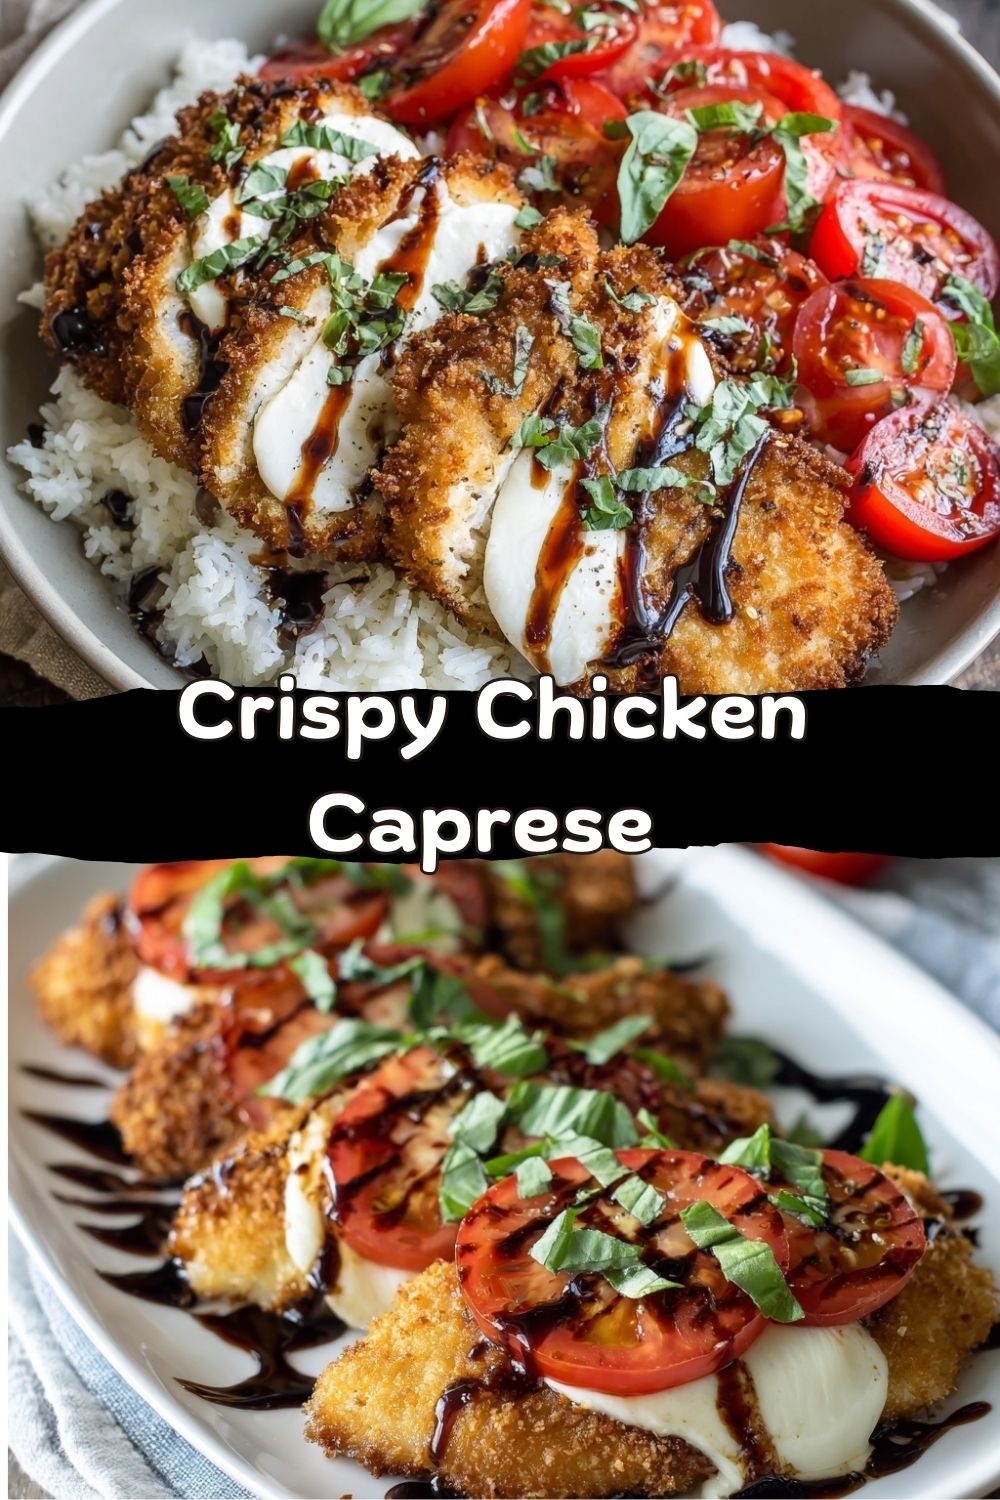
That’s exactly why this Crispy Chicken Caprese is my forever go-to, my ace in the hole, my “look-I’m-a-fancy-chef” weeknight miracle. It’s the glorious love child of crispy, golden-brown chicken parm and the fresh, vibrant flavors of a classic Caprese salad. We’re talking juicy, perfectly cooked chicken, a shatteringly good panko crust, melty fresh mozzarella, juicy tomato slices, and that pop of sweet basil, all tied together with a luxurious drizzle of balsamic glaze.
The best part? It’s deceptively simple. We’re using a one-pan, sear-then-bake method that keeps things manageable and the cleanup minimal. This isn’t about fussy techniques; it’s about smart, flavorful combinations that do the heavy lifting for you. So, tie on your apron, grab your favorite skillet, and let’s turn a regular Tuesday into a little Italian holiday. Trust me, this one’s a game-changer.
The “Aha!” Moment in a Roman Trattoria
This recipe wasn’t born in a test kitchen, but in a tiny, sun-drenched trattoria in Rome. My wife and I were on one of those whirlwind trips where you eat your way through a city. We’d had our share of perfect pastas, but one lunch, I ordered a simple Petto di Pollo. Out came this stunning plate: a golden, crisp chicken cutlet, but instead of the expected marinara and cheese, it was topped with milky mozzarella, ruby-red tomatoes, and a pile of fragrant basil. A bottle of good olive oil and aged balsamic was left on the table for us to finish it ourselves.
That first bite was a revelation. The crunch, the creaminess, the sweet acidity of the tomato, the anise-like kiss of basil, and the rich tang of the balsamic all sang in harmony. It was elegant yet utterly comforting. On the flight home, I couldn’t stop thinking about it. “How can I make this mine?” I wondered. How could I capture that magic but make it weeknight-friendly? After a few (delicious) trials, the Food Meld version was born: a bit crispier, with a handy balsamic glaze shortcut, but with all the soul of that Roman afternoon. It’s my edible postcard from Italy, and I’m so glad to finally stamp it and send it your way.
Gathering Your Flavor Arsenal
Here’s everything you’ll need to build this masterpiece. Don’t stress about exact brands—this is about quality, not pedigree.
- 2 boneless, skinless chicken breasts (about 1 lb): The main event! Look for breasts that are similar in size so they cook evenly. Chef’s Hack: If they’re huge, you can slice them horizontally into thinner cutlets before pounding.
- 1 tsp salt, ½ tsp black pepper: The fundamental building blocks of flavor. Season every layer confidently.
- 1 tsp garlic powder: This gives us a consistent, mellow garlic flavor throughout the breading. Fresh garlic would burn.
- ½ tsp Italian seasoning: My little flavor booster. It’s a blend of dried herbs like oregano, thyme, and rosemary that whispers “Italy” to the crust.
- 1 cup all-purpose flour: Our first coating station. It helps the egg wash stick and creates a foundation for the crunch.
- 2 large eggs, beaten: The “glue” that holds the breadcrumbs to the chicken. Give them a good fork whisk until uniform.
- 1 cup panko breadcrumbs: The SECRET to an ultra-crispy, non-soggy crust! Panko is lighter and flakier than regular breadcrumbs. Don’t substitute here—it’s worth it.
- 1 tbsp olive oil: For pan-searing. Use a good extra-virgin for flavor, but any high-heat oil works.
- 8 oz fresh mozzarella, sliced: Seek out the fresh kind stored in water (often called “mozzarella fresca”). It melts like a dream and has a delicate, creamy flavor that’s unmatched.
- 2 large tomatoes, sliced: Ripe, in-season tomatoes are ideal. If they’re pale and sad, a handful of cherry tomatoes, halved, is a great cheat for more flavor.
- ¼ cup fresh basil leaves: Non-negotiable! The fresh herb is the signature of Caprese. Tear it just before serving for the most aromatic punch.
- ¼ cup balsamic glaze: This is reduced balsamic vinegar, thick and syrupy. Find it near the vinegar in most stores. Pro Tip: You can make your own by simmering 1 cup balsamic vinegar until reduced by half, but the store-bought is a fantastic shortcut.
Let’s Build Some Crunch: Your Step-by-Step Roadmap
Ready? Let’s get our hands a little messy and make some magic. I’ll walk you through each step.
1. Prep & Pound the Chicken
Place your chicken breasts between two sheets of plastic wrap or inside a large zip-top bag. Using a rolling pin, meat mallet, or even a heavy skillet, gently pound them to an even ½-inch thickness. Why? This ensures they cook quickly and evenly, so you don’t end up with a dried-out edge and a raw middle. It’s also strangely therapeutic. Season both sides generously with the salt, pepper, garlic powder, and Italian seasoning.
2. The Breading Station (A.K.A. The Assembly Line)
Set up three shallow bowls or plates in this order: one with flour, one with the beaten eggs, one with the panko. This is your flavor highway. Dredge each seasoned chicken breast first in the flour, shaking off the excess. Then, dip it fully into the egg wash, letting any extra drip off. Finally, press it firmly into the panko, coating both sides. Chef’s Golden Rule: Use one hand for the dry steps (flour & panko) and the other for the wet (egg). You’ll avoid “club fingers” coated in breading!
3. Sear to Golden Perfection
Preheat your oven to 375°F (190°C). Heat the olive oil in a large, oven-safe skillet (cast iron is perfect here) over medium-high heat. Once the oil shimmers, carefully add the breaded chicken. Don’t touch it! Let it cook for 4-5 minutes undisturbed until the underside is a deep, golden brown. Flip and cook another 4-5 minutes on the other side. We’re not cooking it through here—just building that gorgeous, crunchy exterior. Remove the skillet from the heat (handle will be hot!).
4. Top & Transform in the Oven
Now for the fun part. Top each chicken breast with slices of fresh mozzarella, followed by the tomato slices. The residual heat will start melting the cheese beautifully. Carefully transfer the entire skillet to your preheated oven. Bake for 15-20 minutes, until the cheese is bubbly and slightly spotted, the tomatoes are softened, and the chicken registers 165°F in the thickest part with an instant-read thermometer.
5. The Grand Finale
Pull that beautiful, sizzling skillet from the oven (handle reminder—it’s HOT!). Let it rest for just 2-3 minutes. This lets the juices redistribute, so your first cut is juicy, not dry. Just before serving, scatter the fresh basil leaves over the top and drizzle everything liberally with that gorgeous balsamic glaze. The sweet-tangy glaze against the creamy cheese and crispy chicken is pure magic.
Plating It Pretty (The 5-Minute Dinner Party)
You’ve done the hard work—now let’s make it look as incredible as it tastes. I like to slide a spatula under each chicken breast and place it slightly off-center on a warm plate. Use a spoon to drag a little extra balsamic glaze across the plate underneath it for a restaurant-style swipe. Garnish with a few more small basil leaves for color.
What to serve with it? Keep it simple and let the star shine:
- The Classic: A simple arugula salad dressed with lemon juice, olive oil, salt, and pepper. The peppery greens are perfect with the rich chicken.
- The Comfort Move: A pile of creamy polenta or mashed potatoes to soak up all the glorious juices and glaze.
- The Light Touch: Roasted asparagus or broccolini. Toss them in oil, salt, and pepper, and pop them in the oven on another rack while the chicken bakes.
A crusty loaf of bread to mop up the plate is never a bad idea, either. Just saying.
Make It Your Own: 5 Flavor Twists to Try
This recipe is a fantastic canvas. Once you’ve mastered the base, play with it!
- The Pesto Swirl: Before adding the mozzarella, spread a thin layer of homemade or store-bought basil pesto over the seared chicken. Then add cheese and tomato. Hello, flavor explosion!
- Prosciutto-Wrapped Elegance: For a salty, savory kick, drape a slice or two of prosciutto over the chicken after searing, then top with cheese and tomato.
- Spicy ‘Nduja Kick: Love heat? Mix a teaspoon of soft ‘nduja (spicy Italian spreadable salami) or red pepper flakes into the beaten eggs before breading for a warm, subtle heat in the crust.
- Zucchini or Eggplant “Cutlet”: Want a veggie-forward version? Use thick slices of grilled or breaded zucchini or eggplant as your base instead of chicken. Top and bake as directed for an incredible vegetarian main.
- Greek Style: Swap the Italian seasoning for dried oregano. Use sliced halloumi cheese (it won’t melt much but will get deliciously warm), and top with tomato, fresh dill or mint, and a drizzle of lemon-olive oil instead of balsamic.
Jackson’s Kitchen Confidential
This recipe has seen some fun evolutions in my kitchen. Early on, I tried using shredded mozzarella. Mistake. It melted into a greasy pool instead of those beautiful, distinct slices. Fresh is the way. I also learned the hard way that a screaming-hot pan is key for the sear—if the oil isn’t hot enough, the breading absorbs it and gets soggy. Patience, young grasshopper! One time, I got distracted and burned my first batch of homemade balsamic reduction so badly it set off the smoke alarm. My dog, Biscuit, gave me the side-eye for an hour. Now I swear by the store-bought glaze for stress-free perfection. The goal is fun, not frustration!
Your Questions, Answered
Q: Can I make this ahead of time?
A: You can bread the chicken up to 4 hours ahead! Store the breaded cutlets in a single layer on a parchment-lined tray in the fridge. Let them sit at room temp for 10 minutes before cooking. I don’t recommend fully assembling ahead, as the tomatoes can make the crust soggy.
Q: My breading is falling off! What did I do wrong?
A: The most common culprit is not shaking off the excess flour after the first dredge. That loose flour creates a barrier that prevents the egg from properly adhering to the chicken. Also, make sure you’re pressing the panko on firmly in that final step.
Q: I don’t have an oven-safe skillet. Now what?
A> No problem! Just sear the chicken in any skillet, then transfer the cutlets to a baking sheet or dish lined with foil or parchment paper for the oven-topping-and-baking step. You might lose a few tasty pan drippings, but the result will still be amazing.
Q: Can I use chicken thighs?
A: Absolutely! Boneless, skinless thighs will work wonderfully. They may need a minute or two less in the oven, so keep an eye on them. Their richer flavor pairs great with these toppings.
Nutritional Info (Because Knowledge is Power)
Okay, let’s talk numbers for a minute. Please remember, I’m a cook, not a dietitian, and these are estimates based on standard ingredients. One serving of this Crispy Chicken Caprese (that’s one loaded chicken breast) comes in around:
- Calories: 580
- Protein: 52g (Chicken and cheese for the win!)
- Carbohydrates: 32g (Mostly from the breading and glaze)
- Fat: 26g (The good, flavorful fats from olive oil, cheese, and egg)
- Sodium: Around 900mg
To lighten it up: use a cooking spray for the sear, opt for part-skim fresh mozzarella, and be mindful with the balsamic glaze drizzle. But honestly? This is a balanced, satisfying meal as-is. You’re getting high-quality protein, some carbs for energy, and veggies (tomato & basil count!). Serve it with that arugula salad, and you’ve got a complete, feel-good dinner.
You Did It! Now Go Enjoy Every Bite.
And there you have it. From my kitchen to yours, the recipe that never fails to bring a little joy to the table. This Crispy Chicken Caprese proves that impressive food doesn’t have to be complicated. It’s about taking a few great ingredients and treating them right—with a good sear, a hot oven, and a fearless drizzle of something delicious.
I hope this becomes a regular in your rotation, the dish you make when you need a surefire win. Remember, cooking is supposed to be fun. If your breading isn’t perfect or your basil isn’t artfully placed, it doesn’t matter. The flavor will still be there, and the person you’re sharing it with will just be happy you cooked. So go on, take that first bite with the perfect combo of crunchy, creamy, juicy, and tangy. You’ve earned it.
Made it? Tag me @FoodMeld on Instagram so I can see your masterpiece! And if you have your own twist, drop a comment on the blog—I love hearing from you. Until next time, keep melding those flavors and making mealtime an adventure.
Cheers,
Jackson


