Forget Everything You Know About Cookie Baking: These Cool Whip Cookies Are a Game-Changer
Hey friends, Jackson from Food Meld here. Let’s be real for a second. We all have those days. You know the ones. Your brain is screaming for a warm, homemade cookie, but your motivation is hovering somewhere around “can I just order takeout instead?” You’re staring into the abyss of your pantry, wondering if you have enough butter, if your baking soda is still good, and if you really have the energy to cream anything together.
Well, my friend, I’m about to hand you the keys to the easiest, most mind-blowingly simple cookie kingdom you’ve ever entered. Meet your new secret weapon: Cool Whip Cookies.
If you’ve never heard of them, you’re in for a treat. If you have, get ready for my favorite tips and tricks to make them absolutely unforgettable. We’re talking four ingredients. One bowl. Ten minutes of prep. And the result? A cookie that’s impossibly soft, beautifully crinkled, and has a texture so light and airy it practically melts in your mouth. The powdered sugar coating bakes into this delicate, crackly shell that gives way to a pillowy-soft center. It’s pure magic.
This isn’t just a recipe; it’s a kitchen revolution. It’s the answer to “what can I make with what I have?” and “how can I impress people without any effort?” It’s the ultimate blank canvas for your flavor cravings. Chocolate, lemon, strawberry, funfetti—you name it, we can make it. So, tie on your apron (or don’t, things are about to get real simple), and let’s cook something awesome together.

The Day I Learned That the Best Recipes Don’t Need to Be Complicated
I have to take you back to my grandma’s kitchen for a second. Now, my grandma was a phenomenal cook, but she was also the queen of “semi-homemade” before it was even a thing. She had no time for fuss, but she had all the love in the world for flavor. One sweltering summer afternoon, I was probably about ten, and I was begging her for cookies. The problem was, it was too hot to turn the oven on for long, and she was, in her words, “fresh out of patience for creaming butter and sugar.”
She just winked, pulled a tub of Cool Whip from the freezer, and a box of devil’s food cake mix from the pantry. I watched, utterly confused, as she mixed them together with an egg. I thought she’d lost her marbles. But then she plopped these sticky little dough balls into powdered sugar, and twelve minutes later, we were biting into the softest, most fudgy chocolate cookies I’d ever tasted. My mind was blown. That day, she taught me one of the most important lessons I carry into Food Meld every single day: incredible food isn’t about how many steps it takes. It’s about the joy it brings. And these cookies? They bring pure, unadulterated joy.
Gather Your A-Team: Just 4 Ingredients to Cookie Bliss
Here’s the beautiful part. Your shopping list is practically non-existent. Check your pantry, you might already have everything you need. Let’s break down this dream team:
- 2 boxes of cake mix (any flavor you love!) – This is our flavor base and our flour-leavening-sugar all-in-one. Chef’s Insight: I find that standard 15.25 oz boxes work perfectly. Don’t use the “add pudding” mixes, as they can make the dough too dry. My go-to is classic Devil’s Food for a deep chocolate hit, but lemon is a close second for a bright, sunny cookie.
- 2 (8 oz) containers of Cool Whip, thawed – This is the secret superstar! It replaces the fat (butter/oil) and gives us that incredible airy, soft texture. Substitution Tip: It has to be the non-dairy whipped topping for the right texture. You can use the Lite version, but I don’t recommend the Fat-Free. For a from-scratch vibe, you could try homemade stabilized whipped cream, but the beauty of this recipe is its simplicity!
- 2 large eggs – Our trusty binder. They bring the structure and richness, holding our cloud-like dough together.
- 1 cup of powdered sugar (for rolling) – This isn’t for sweetness in the dough, it’s for that iconic, beautiful crinkled finish. As the cookies bake, the sugar melts and cracks, creating that gorgeous, classic look. It’s the fancy jacket that makes these simple cookies look like they came from a boutique bakery.
Let’s Get Baking: Your Foolproof Roadmap to Perfect Cookies
Ready? This is so easy, you’ll have it memorized after one batch. I’m talking stir, scoop, roll, bake. Let’s do this.
- Preheat and Prep: Fire up your oven to 350°F (175°C). Line your baking sheets with parchment paper. Chef’s Hack: Parchment paper is non-negotiable here, folks. It prevents sticking and makes cleanup an absolute dream. No parchment? A silicone baking mat works wonders too.
- The “Dough” Down: In a large bowl, combine the cake mix, thawed Cool Whip, and eggs. Now, ditch the electric mixer for this one. A sturdy spatula or a wooden spoon is your best friend here. Stir until you have a thick, sticky, and somewhat fluffy dough. Pro Tip: Don’t overmix! Just stir until no dry streaks of cake mix remain. The dough will be very sticky—that’s exactly what we want. This is the sign of a soft, tender cookie-to-be.
- The Powdered Sugar Plunge: Pour your powdered sugar into a separate shallow bowl. Now, here’s a key step for that perfect crackle: use a heaping teaspoon or a small cookie scoop (about 1 tablespoon in size) to drop a blob of dough directly into the powdered sugar. Chef’s Secret: Don’t roll it in your hands first! The sticky-ness is crucial. Just plop it right in. Then, use a spoon or your fingers to generously coat the sticky dough ball in powdered sugar. Roll it around until it’s completely covered—it should look like a little snowy mountain.
- Space Cadets: Place your beautiful, sugar-dusted dough balls about 2 inches apart on your prepared baking sheet. They don’t spread a ton, but they do puff up, so give them a little room to breathe and become their best cookie selves.
- Bake to Perfection: Slide those sheets into your preheated oven and bake for 12-15 minutes. You’re looking for set edges and those gorgeous, craggy cracks across the top. The centers might still look a tiny bit soft—that’s perfect! Don’t overbake them! They firm up as they cool. Overbaking is the enemy of softness.
- The Patience Payoff: This is the hardest part. Let the cookies cool on the baking sheet for at least 5 minutes before you even think about moving them. They are very delicate when hot. After 5 minutes, you can gently transfer them to a wire rack to cool completely. Or, you know, eat three of them warm because you have zero self-control (I support this).
How to Serve These Show-Stopping Cookies
Honestly, shoving one directly into your mouth as you hover over the cooling rack is a perfectly valid serving method. But if you want to get a little fancy, here are my favorite ways to present these beauties:
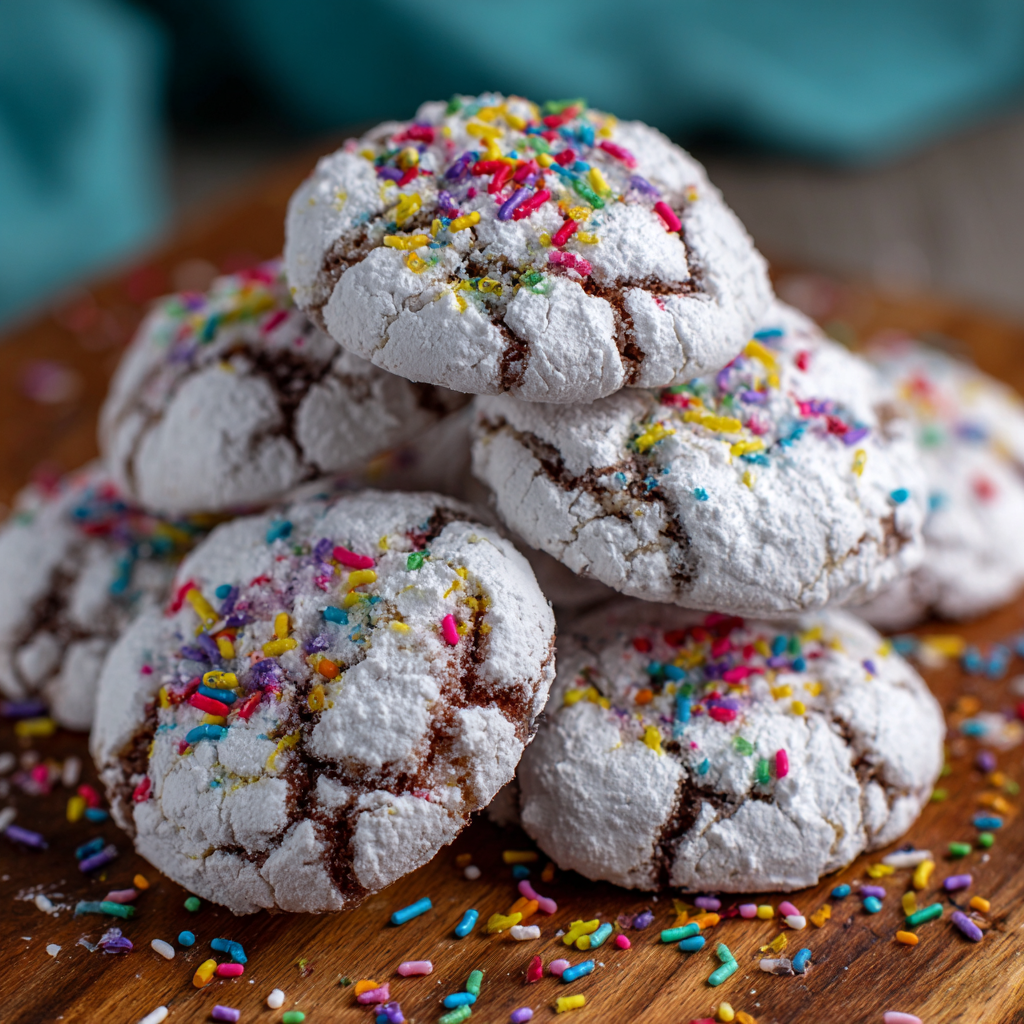
The Classic Stack: Pile them high on a rustic wooden board or a simple white platter. The contrast of the dark chocolate cookies with the white powdered sugar against a wooden background is just *chef’s kiss*.
Dessert Nachos, Anyone? For a fun party trick, bake a batch of the funfetti version, let them cool, then break them up over a bowl of vanilla ice cream. Drizzle with chocolate and caramel sauce. You’re welcome.
Gift from the Heart: These cookies are fantastic for gifting! They stay super soft for days. Tuck a dozen into a cellophane bag, tie it with a ribbon, and you’ve got a homemade gift that looks and tastes like you spent hours in the kitchen. (Our little secret!)
A cold glass of milk is, of course, the mandatory beverage pairing. For the adults, a rich cup of coffee or a glass of dessert wine like a Moscato pairs beautifully with the lemon or chocolate versions.
Mix It Up! 5 Flavor Twists to Keep Things Exciting
This is where the “Meld” in Food Meld really comes to life. The basic recipe is your playground. Here are a few of my favorite ways to customize it:
- Chocolate Lovers’ Dream: Use Devil’s Food cake mix and stir in 1 cup of mini chocolate chips right at the end. The double chocolate hit is unreal.
- Sunshine Lemon Zest: Use lemon cake mix and add the zest of one whole lemon to the dough. It brightens up the flavor and makes the entire kitchen smell like a summer day.
- Confetti Celebration: Use a white or funfetti cake mix and add ½ teaspoon of almond extract (in addition to the vanilla in the mix) and ½ cup of rainbow sprinkles. Instant party!
- Red Velvet Elegance: Use red velvet cake mix. For a next-level finish, after they’re baked and cooled, drizzle them with a simple glaze made from powdered sugar and a splash of milk.
- Peanut Butter Cup Bliss: Use a chocolate fudge cake mix and fold in 1 cup of chopped peanut butter cups. Trust me on this one.
Jackson’s Kitchen Notes & A Little Story
Over the years, this recipe has become my go-to for last-minute potlucks, bake sales, and “I need a cookie NOW” emergencies. It’s evolved from my grandma’s simple chocolate version to a whole flavor spectrum. One time, I was filming a video for the blog and I was so busy chatting to the camera that I completely forgot to add the powdered sugar coating. I baked them anyway, and let me tell you, they were… fine. Just fine. But they were missing that iconic look and that subtle textural contrast. It just proved how vital that snowy coat is!
My biggest piece of advice? Embrace the sticky dough. Don’t fight it by adding more flour or cake mix. The stickiness is what gives you that ultra-moist, tender crumb. Just use a spoon to handle it, dive it into the sugar, and let the oven work its magic.
Your Questions, Answered!
I’ve made these a zillion times, and I’ve heard all your questions. Here are the big ones:
Q: My dough is super sticky and hard to handle. Did I do something wrong?
A: Nope! You did everything right. The dough is *supposed* to be very sticky. That’s the key to a soft cookie. Don’t add extra flour. Just use a spoon or a small cookie scoop to drop it directly into the powdered sugar, and use the sugar to help you form the ball. Your hands will stay relatively clean!
Q: Can I make the dough ahead of time and chill it?
A: You can, but it’s not ideal. Chilling the dough makes it even firmer and harder to scoop, and it can change the spreading texture. For the best results, I recommend mixing and baking right away. This is a “quick fix” cookie recipe at heart!
Q: Why are my cookies flat and not puffy?
A: The most common culprit is an old or expired cake mix. The leavening agents in the mix lose their potency over time. Always check the date on your box! Also, make sure you’re coating them thickly in powdered sugar—it forms a barrier that helps them rise upwards instead of spreading outwards.
Q: How should I store these cookies?
A: Keep them in an airtight container at room temperature for up to 5 days. They stay miraculously soft! You can also freeze the baked cookies for up to 3 months. Just thaw at room temperature.
Let’s Talk Nutrition (The Fun Stuff)
Look, we’re here for a good time, not a long time. These are a treat, and they’re proudly a treat. But since knowledge is power, here’s the general breakdown. Remember, this can vary based on the specific cake mix flavor and any add-ins you use.
Estimated Per Cookie (based on a yield of 48):
- Calories: ~110
- Carbohydrates: 18g
- Fat: 4g
- Sugar: 12g
These are definitely a dessert, but because they’re so light and fluffy, one or two can be surprisingly satisfying. My philosophy? Enjoy your food, savor every bite, and balance is everything. Now, let’s have a cookie.
Your New Go-To Cookie Recipe Awaits
And there you have it! The legendary Cool Whip cookie, demystified and ready to become a staple in your kitchen. This recipe is more than just a list of ingredients; it’s a reminder that cooking should be fun, accessible, and full of those little “wow” moments. It’s about taking a simple idea and making it your own.
So, what flavor are you going to try first? The rich chocolate? The zingy lemon? Or are you going to get creative and invent your own Food Meld masterpiece? I can’t wait to hear about it. Tag me on social with #FoodMeld so I can see your beautiful, crinkly creations.
Now, get in that kitchen and bake up a storm. You’ve got this.
With flavor and fun,
Jackson


