
The Ultimate Showstopper: My Double-Batch New York Cheesecake
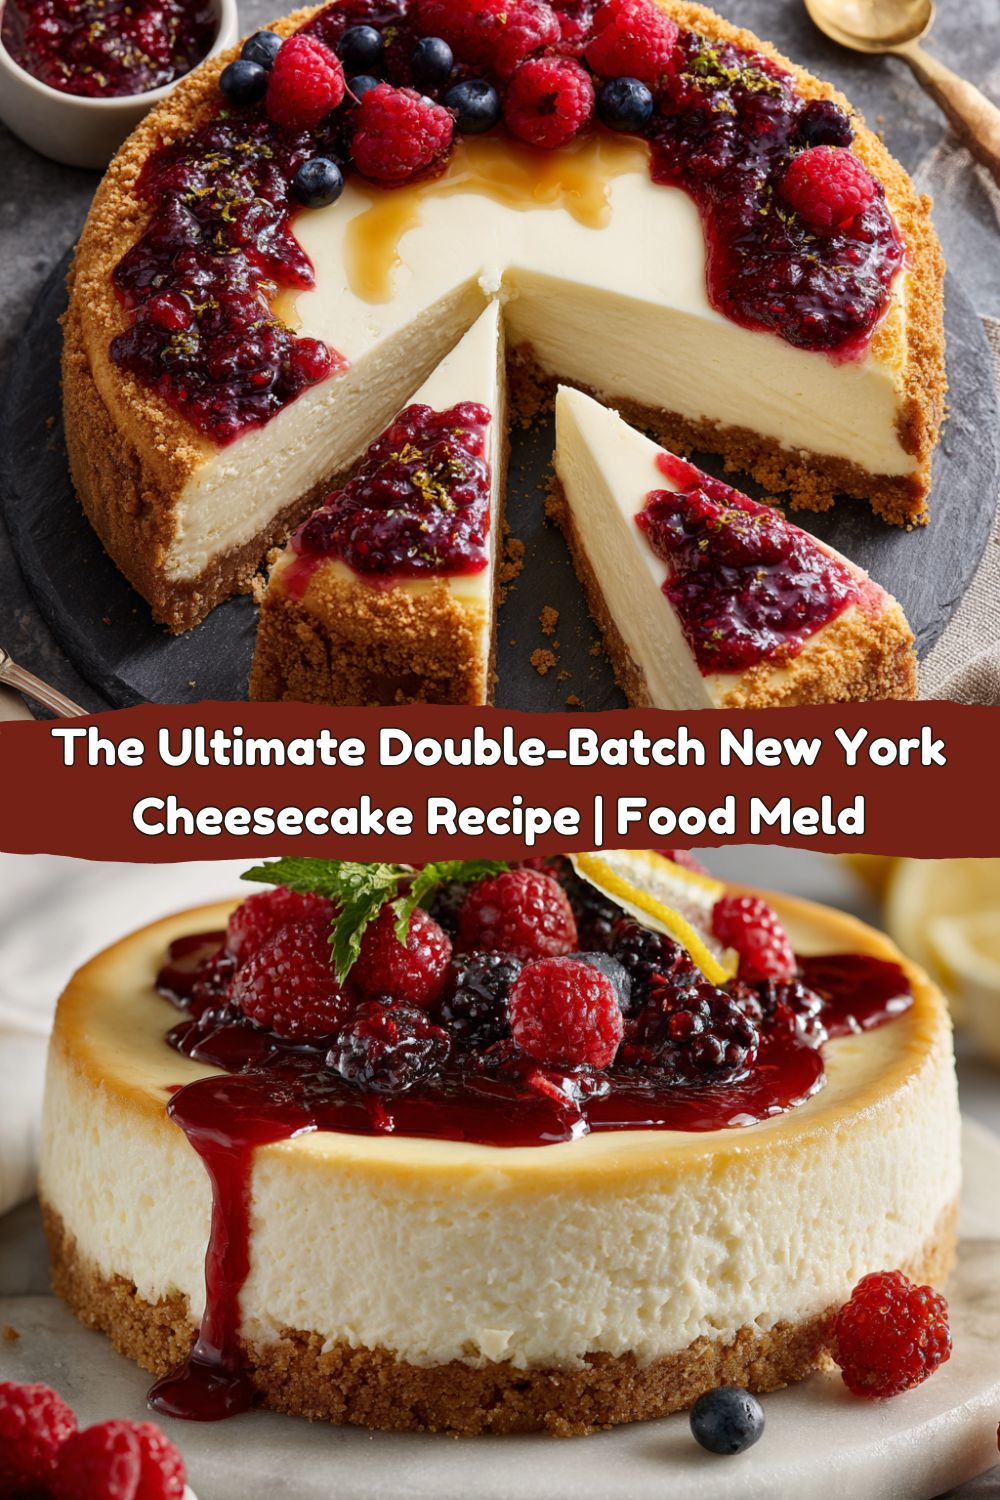
Hey friends, Jackson from Food Meld here. Let’s talk about that one dessert. You know the one. The one that makes everyone go completely silent at the dinner table, their eyes wide, followed by a chorus of happy, creamy, blissed-out moans. I’m talking about the undisputed king of desserts: the Classic New York Cheesecake. This isn’t just any cheesecake; this is the ultra-creamy, rich, and tangy behemoth of your dreams, with a golden graham cracker crust that shatters perfectly under your fork. And because I love you all—and because one cheesecake is never enough for my big, hungry family—we’re making a double batch. That’s right, two glorious, showstopping cakes. One for the party, and one for… well, let’s be real, for you to hide in the back of the fridge for midnight emergencies. I’ve added a little citrus kiss to the filling and a gorgeous fresh berry swirl to elevate this classic into something truly unforgettable. Don’t let its impressive looks fool you; we’re keeping it fun, simple, and absolutely packed with flavor. So preheat those ovens, and let’s cook something awesome together.
A Slice of the Big Apple in My Georgia Kitchen
My love affair with New York cheesecake started not in a fancy patisserie, but in my Nana’s humid Georgia kitchen. She was a phenomenal Southern baker, but her cheesecakes were always… well, they were Jell-o-no-bake-situation. Delicious, but not the dense, majestic cake I’d read about. Then, on a family trip to NYC when I was fourteen, I had my first real bite at a tiny deli near Times Square. It was a religious experience. The texture was like nothing I’d ever known—simultaneously heavy and light, tangy and sweet, with a crust that tasted like buttery heaven. I came home obsessed. I must have made two dozen versions that summer, turning our kitchen into a cheesecake laboratory. There were cracks, there were sunken centers, there was one infamous “lemon lava flow” incident. But each failure taught me something. This recipe, the one we’re making today, is the glorious result of all those messy, delicious experiments. It’s my homage to that first magical bite in the city, fused with my Southern need to make everything just a little bigger and share it with everyone I love.
Gathering Your Flavor Arsenal
Here’s everything you’ll need to create this masterpiece. Remember, quality matters here because each flavor truly shines through. And don’t worry, I’ve got all the substitution hacks you need.
For the Crust (This is for ONE cake, so you’ll do this twice!)
- 1½ cups graham cracker crumbs (about 12 full crackers): This is your foundation. The toasty, honey-kissed flavor is classic. Chef’s Insight: Pulse the crackers in a food processor for super fine, even crumbs. Substitution: Feel free to use digestive biscuits, vanilla wafers, or even speculoos cookies for a different flavor profile!
- 5 tbsp unsalted butter, melted: This is the glue that holds our sandy foundation together. Using unsalted lets us control the salt level. Chef’s Tip: Let the melted butter cool slightly before mixing it in so it doesn’t make the crumbs greasy.
- 2 tbsp sugar: A little sweetness to complement the tangy filling.
- ⅛ tsp salt: Trust me, this tiny pinch makes all the difference by balancing the sweetness and making the crust taste more complex.
For the Filling (This is a DOUBLE batch for 2 cakes!)
- 64 oz (eight 8-oz blocks) full-fat cream cheese, room temperature: This is non-negotiable. Full-fat is essential for that iconic creamy, rich texture. ROOM TEMP IS CRITICAL! This is the #1 secret to a smooth, lump-free batter. Plan ahead and take it out a few hours before.
- 4 cups sugar: Sweetens the deal. We use a good amount because the tang of the cream cheese and sour cream needs balancing.
- 6 tbsp all-purpose flour: Our silent hero! It helps stabilize the cake, giving it structure and preventing it from deflating or cracking too much.
- 8 tsp vanilla extract: Use the good stuff! Pure vanilla adds a beautiful, warm depth.
- 2 tsp packed lemon zest + 4 tsp lemon juice: This is the “tangy” part of “rich and tangy.” The zest gives incredible bright, aromatic flavor.
- ½ tsp salt: Again, the flavor enhancer. It makes the sweet and tangy notes pop.
- 12 large eggs, room temperature: Another room temp must! Cold eggs can re-solidify the cream cheese and lead to a lumpy batter. They provide structure and richness.
- 1 cup sour cream, room temperature: The final touch for unparalleled creaminess and that signature tang. Full-fat, always.
The Food Meld Twist
- ½ tsp orange zest: My secret weapon! It brightens the entire flavor profile without being overtly “orangey.” It just makes the cheesecake taste more alive.
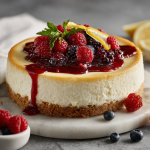
- Swirl in ½ cup raspberry jam or fresh berry purée: A beautiful, flavorful ribbon running through the cake. I love using seedless raspberry jam for ease, but a quick purée of fresh raspberries or blackberries with a tbsp of sugar is phenomenal.
Let’s Build Some Cheesecake Magic: Step-by-Step
Follow these steps, and you’ll have two perfect cheesecakes. I’m talking right beside you, handing you the spatula. You’ve got this.
- Prep Like a Pro: Preheat your oven to 325°F (160°C). Take your two 9-inch springform pans and wrap the bottom and sides tightly in a double layer of heavy-duty aluminum foil. This is our defense against the water bath! No leaks allowed. I also like to place a round parchment paper circle on the bottom of the pan for absolute guarantee of no sticking.
- Make the Crusts: In a medium bowl, combine the graham cracker crumbs, sugar, and salt for one crust. Stir in the melted butter until the mixture resembles wet sand and holds together when you pinch it. Pour it into one springform pan and press it firmly and evenly into the bottom and about halfway up the sides. I use the bottom of a flat measuring cup to really pack it down. Repeat for the second pan. Bake each crust for 10 minutes, then let them cool on a wire rack. This pre-baking (blind baking) gives us that sturdy, golden crust that won’t get soggy.
- The Big Mix (The Room Temp Rule!): In the bowl of a stand mixer fitted with a paddle attachment (a hand mixer works great too!), beat the room-temperature cream cheese on medium-low speed until it’s completely smooth and creamy. Scrape down the bowl and beater thoroughly. This is the most important step for avoiding lumps! Add the sugar and flour and beat until just combined. Scrape down the bowl again.
- Incorporate the Flavors: Beat in the vanilla extract, lemon zest, lemon juice, orange zest, and salt. Mix until just incorporated. Now, with the mixer on low speed, add the eggs one at a time, mixing until each yolk just disappears into the batter before adding the next. DO NOT overmix after adding the eggs! Overbeating incorporates too much air, which can cause the cake to puff up and then crack dramatically as it cools.
- Final Touch: Turn off the mixer and gently fold in the room-temperature sour cream with a spatula until everything is homogenous. Your batter should be gloriously smooth, thick, and lump-free.
- Swirl & Pan Up: Divide the batter evenly between your two cooled crusts. If you’re adding the berry swirl, dollop spoonfuls of the jam or purée on top. Use a knife or a skewer to gently swirl it into the batter, creating a beautiful marbled effect. Don’t over-swirl or you’ll lose the definition.
- The Infamous Water Bath: Place the foil-wrapped pans inside a large roasting pan. Carefully pour boiling water into the roasting pan until it comes about halfway up the sides of the springform pans. This water bath creates a steamy environment for gentle, even baking, which is the ultimate secret to a creamy texture and a crack-free top.
- Bake to Perfection: Carefully transfer the roasting pan to the preheated oven. Bake for about 1 hour and 45 minutes. The cakes are done when the edges are set but the center still has a slight jiggle—like Jell-o—when you gently shake the pan. The center should read about 150°F (65°C) on an instant-read thermometer.
- The Cool Down (Patience is a Virtue!): Turn off the oven and crack the oven door open with a wooden spoon. Let the cheesecakes cool in the oven for 1 hour. This gradual temperature change is our second best defense against cracking. Remove them from the water bath, take off the foil, and let them cool completely on a wire rack. Then, cover them with plastic wrap and refrigerate for at least 8 hours, preferably overnight. This waiting period is non-negotiable for the perfect sliceable, creamy texture.
Plating Your Masterpiece
When it’s finally time to serve, run a thin, sharp knife under hot water, wipe it dry, and carefully slide it between the cake and the pan to loosen the edges. Unlatch the springform ring and lift it away. For pristine slices, repeat the hot knife trick between every single slice. Wipe the blade clean each time!
I love serving this on its own to let the flavor truly shine, but a few fresh raspberries, a drizzle of the leftover berry purée, or a delicate twist of candied citrus peel on top makes it look like it came from a five-star bakery. A little dollop of whipped cream never hurt anybody either. Serve it cold straight from the fridge for that perfect, firm, creamy bite.
Make It Your Own: Creative Twists
The beauty of this base recipe is that it’s a perfect canvas. Here are a few of my favorite ways to mix it up:
- Chocolate Turtle Twist: Swap the graham crust for a chocolate cookie crust (Oreos, anyone?). Fold 1 cup of chocolate chips into the batter and swirl with caramel sauce before baking. Top with toasted pecans and a drizzle of more caramel after it cools.
- Tropical Escape: Use a vanilla wafer or coconut cookie crust. Substitute the lemon and orange zest with lime zest and add a tablespoon of dark rum to the batter. Swirl with a mango purée.
- Espresso Martini Cheesecake: Add 2 tablespoons of instant espresso powder to the batter. Swirl with a Kahlúa-infused chocolate ganache. The ultimate dinner party dessert.
- Lemon Blueberry Bliss: This is a classic for a reason. Use the lemon zest as directed and swirl in a homemade blueberry pie filling or preserves. The perfect summer treat.
- Dairy-Free / Lower-Carb Version: Use your favorite gluten-free cookies for the crust. For the filling, use high-quality dairy-free cream cheese and sour cream alternatives. Swap the sugar for a monk fruit or erythritol blend made for baking. The method remains exactly the same!
Chef’s Notes: A Few Stories from the Kitchen
This recipe has seen it all in my kitchen. I once, in a frantic pre-dinner party hurry, forgot the sugar. I didn’t realize it until a guest took a bite and said, “Wow, Jackson, it’s… very tangy.” We all had a good laugh, scooped it into bowls like a mousse, and topped it with a mountain of sweetened berries. It was saved! Another time, I thought I could skip the water bath. Reader, I could not. The cake puffed up like a soufflé and cracked into a grand canyon. I just piled on extra whipped cream and berries and called it a “rustic berry canyon cake.” The moral of the story? Even the “mistakes” are usually still delicious. Cooking is an adventure, not a perfection contest.
FAQs & Troubleshooting: Your Questions, Answered
Q: My cheesecake cracked! What did I do wrong?
A: Don’t sweat it! The three most common culprits are: 1) Overmixing the batter after adding the eggs, 2) Not using a water bath, or 3) Cooling it too quickly. Even if it cracks, it will still taste incredible. Just cover it with toppings!
Q: Can I make this in a different pan?
A: For this double batch, I highly recommend two springform pans. You could try a single large 10-inch deep springform pan, but you’ll need to extend the baking time significantly and keep a very close eye on it. A regular cake pan won’t work for the water bath method.
Q: Why is room temperature so important?
A> Cold cream cheese will never become perfectly smooth—it will always have little lumps. Cold eggs can cause the fat in the cream cheese to seize up, also leading to a lumpy batter. Taking the time to let your ingredients warm up is the single biggest guarantee of a silky-smooth texture.
Q: How long does it keep?
A> This cheesecake is a dream for make-aheads. It will keep beautifully in the refrigerator, tightly covered, for up to 5 days. You can also freeze it (without toppings) for up to 3 months. Thaw it overnight in the fridge before serving.
Classic New York Cheesecake
- Total Time: 10+ hrs
- Yield: 16 - 20 1x
Description
Ultra-creamy, rich, and tangy with a golden graham crust—this doubled-up New York-style cheesecake is a showstopping dessert for any special occasion. We’ve added a citrus-kissed filling and a fresh berry swirl for an elevated, crowd-pleasing finish.
Ingredients
For the Crust (per cake):
1½ cups graham cracker crumbs (12 crackers)
5 tbsp unsalted butter, melted
2 tbsp sugar
⅛ tsp salt
For the Filling (double batch for 2 cakes):
64 oz (eight 8-oz blocks) cream cheese, room temp
4 cups sugar
6 tbsp all-purpose flour
8 tsp vanilla extract
2 tsp packed lemon zest
4 tsp lemon juice
½ tsp salt
12 large eggs
1 cup sour cream
Twist Additions:
½ tsp orange zest (brightens the flavor)
Swirl in ½ cup raspberry jam or fresh berry purée before baking
Optional: top with candied citrus peel or fresh berries after chilling
Instructions
Preheat oven to 325°F. Wrap springform pans with foil (water bath).
Mix crust ingredients, press into pans, and bake 10 mins. Cool.
Beat cream cheese, sugar, flour until smooth. Add vanilla, lemon & orange zest, juice, salt.
Beat in eggs one at a time. Stir in sour cream. Pour into pans. Swirl in jam if using.
Bake in water bath for 1 hr 45 mins or until just set.
Cool gradually, then chill for at least 8 hrs or overnight.
- Prep Time: 30 minutes
- Cool / Chill: 8+ hrs
- Cook Time: 1 hr 55 mins
Nutrition
- Calories: 520 / Slice
- Fat: 35g / Slice
- Carbohydrates: 38g / Slice
- Protein: 8g / Slice
Nutritional Information*
*Please note: This is an estimated nutritional breakdown for one slice (assuming 20 slices total from both cakes). It is provided as a courtesy and may vary based on specific ingredients and brands used.
Per Slice (approx.): Calories: ~520 | Total Fat: 35g | Saturated Fat: 20g | Cholesterol: 180mg | Sodium: 380mg | Total Carbohydrates: 38g | Dietary Fiber: 0g | Sugars: 33g | Protein: 8g
This is a rich, indulgent dessert meant to be savored and shared for special occasions. The joy and connection it brings to the table are worth every single bite!
Final Thoughts: Share the Love
There you have it, my friends. My heart and soul in cheesecake form. This recipe might look like a project, but I promise, the steps are simple and the payoff is massive. It’s about the joy of creating something incredible from scratch and sharing it with people you love. That first perfect slice you lift out of the pan is a moment of pure pride. I hope this recipe becomes a staple in your home, creating its own messy, fun, and delicious memories for years to come. If you make it (and I really hope you do!), tag me on social @FoodMeld—I love seeing your kitchen creations! Now go forth and bake. And remember, in this kitchen, flavor always meets fun.


