
Let’s Make Some Magic: Chocolate Hazelnut Truffle Pops
Hey friends, Jackson here from Food Meld! Let’s cut right to the chase: I believe the best things in life should be eaten with your hands, preferably with a little stick attached for maximum fun. We’re talking about those desserts that make your eyes go wide, the ones you find at a fancy party and think, “I could never make that.” Well, guess what? You totally can. Today, we’re ditching the intimidation and making our own Chocolate Hazelnut Truffle Pops. Imagine this: a silky, intensely chocolatey center with a whisper of roasted hazelnut, all hugged by a crisp chocolate shell and a fun crunch on the outside. It’s part truffle, part lollipop, and 100% pure joy.
This isn’t just about a recipe; it’s about creating those “you made these?!” moments. These pops are your secret weapon for dinner parties, gifts, or just treating yourself on a Tuesday. They look like you spent all day in a professional chocolatier’s kitchen, but the truth is, they’re surprisingly simple. We’re using a classic ganache method—fancy word, I know, but it’s just cream and chocolate having a beautiful melt-together party. I’ll walk you through every single step, share all my messy-kitchen-hack secrets, and show you how to get that perfect, glossy snap on the outside. So, grab your favorite mixing bowl, put on some good music, and let’s cook something awesome together. Welcome to your new favorite kitchen project.
The Messy, Wonderful Beginning
This recipe takes me straight back to my grandma’s linoleum floor, covered in flour and chocolate smudges. She wasn’t a fancy baker, but she was a wizard with simple, good things. One rainy afternoon, she decided we were making “fancy chocolates” with what we had: a bar of baking chocolate, some cream from the fridge, and a jar of those hazelnuts she always had for salads. Our “truffles” were lopsided, our hands were completely covered in a sticky, delicious mess, and we used toothpicks because we didn’t have any proper sticks. But when we bit into them? Pure magic. That combo of rich chocolate and nutty, toasty hazelnut felt like a revelation.
Years later, when I started Food Meld, I wanted to recapture that feeling—the fun of creation without the stress. I took that messy memory, refined the technique (and upgraded from toothpicks!), and this pop was born. It’s that perfect Food Meld philosophy: taking bold, comforting flavors (hello, chocolate and hazelnut), adding a creative twist (putting it on a stick!), and keeping the process so real and simple that anyone can do it. Every time I make these, I think of her, and I hope this recipe becomes a part of your own kitchen story, too.
Gathering Your Flavor Arsenal
Here’s everything you need to build these little bites of happiness. Quality matters here, but don’t stress—use what you can find and love!
- 1 cup semi-sweet chocolate chips: The heart of the truffle. I like semi-sweet for its balance, but dark chocolate (60-70%) works beautifully for a deeper, less sweet vibe. Chef’s Insight: If you’re using a chocolate bar, chop it finely so it melts evenly with the cream.
- 1/3 cup heavy cream: Also called heavy whipping cream. This is what creates the luscious, melt-in-your-mouth ganache center. For a dairy-free version, full-fat canned coconut cream is a fantastic swap.
- 1/4 cup chocolate hazelnut spread (like Nutella): This is our flavor bomb! It brings that iconic hazelnut taste and extra creaminess. If you have a nut allergy, try a sunflower seed butter mixed with a teaspoon of cocoa powder.
- 1/4 tsp salt: Do not skip this! Salt is the secret weapon that makes all the chocolate flavors pop and keeps things from being one-dimensional sweet.
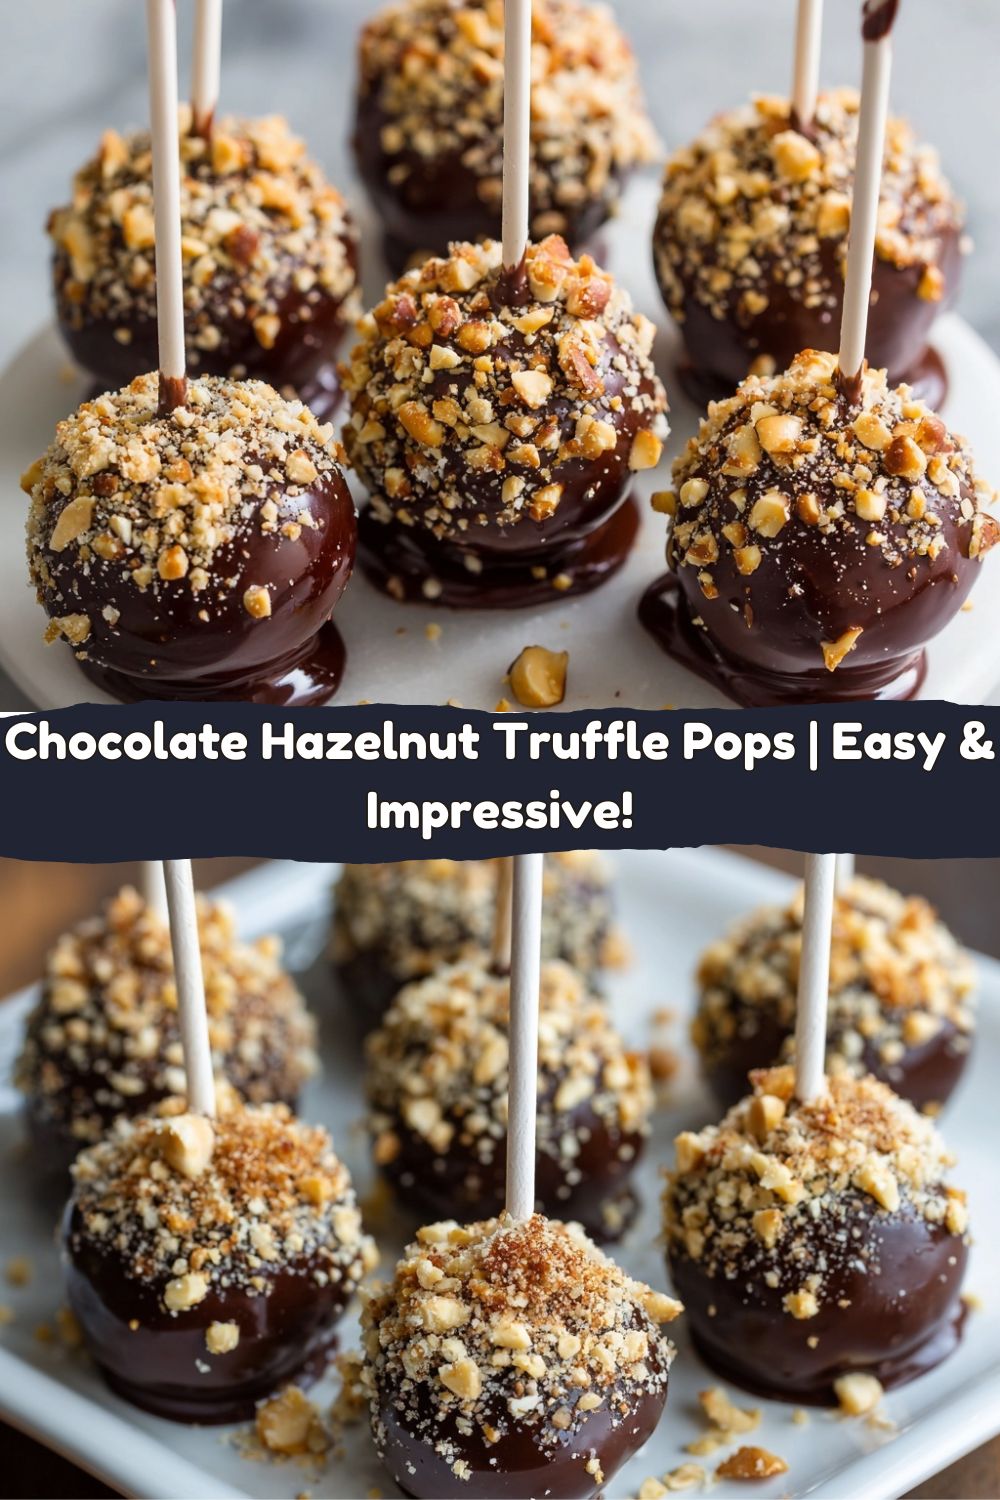
- 1/2 cup finely chopped toasted hazelnuts: We’re doubling down on that nutty flavor. Toasting is non-negotiable—it wakes up their oils and makes them incredibly fragrant. Quick Tip: Rub warm toasted hazelnuts in a kitchen towel to easily remove most of the skins.
- 1 cup melted chocolate (for coating): You can use more chips, or melting wafers/candy coating. Wafers set harder and are easier for beginners. For a gorgeous thin shell, temper your chocolate, but for a foolproof home method, I’ll share my hack below.
- Optional garnishes: More crushed hazelnuts, colorful sprinkles, a dusting of cocoa powder, or even a drizzle of white chocolate. This is where you get to play!
- Lollipop sticks or paper straws: You can find food-safe lollipop sticks at craft stores or online. In a pinch, sturdy paper straws or even short skewers cut in half work!
Let’s Build Some Pops: A Step-by-Step Dance
Follow these steps, read my little asides, and you’ll be a truffle pop pro in no time. I promise it’s more fun than fussy.
- Heat the Cream: In a small saucepan, heat the heavy cream over medium heat. You want it just barely simmering—see little bubbles forming around the edges. Don’t let it boil wildly! Why? Boiled cream can sometimes separate or develop a cooked flavor. We just want it hot enough to melt the chocolate.
- The Magic Melt: Place your chocolate chips in a heatproof bowl. Pour the hot cream directly over them. Now, walk away. Seriously, set a timer for 1 minute. This quiet time allows the chocolate to soften gently from the bottom up. After a minute, start stirring slowly from the center outwards. You’ll see it transform into a smooth, glossy masterpiece called ganache. Chef’s Hack: If a few chips aren’t melting, place the bowl over a pot of simmering water (double boiler) for 10-15 seconds off the heat to finish the job.
- Flavor Fusion: Once your ganache is smooth, stir in the chocolate hazelnut spread and that all-important salt. Mix until it’s one uniform, deliciously nutty chocolate pool.
- The Chill Phase: Cover the bowl and pop it in the fridge for 1 hour. It needs to firm up enough to be scooped and rolled. Timing Tip: If you’re in a rush, the freezer for 20-25 minutes works, but check it often! You want it scoopable, not rock hard.
- Scoop, Roll, and Stick: Use a small cookie scoop or a tablespoon to portion the mixture. Roll quickly between your palms to form a ball. If it gets too sticky, dust your hands lightly with cocoa powder. Press a lollipop stick about halfway into each ball. Place them on a parchment-lined tray and freeze for a solid 15 minutes. This is crucial—a cold center means a smoother dip and less chance of your pop sliding off the stick!
- The Big Dip: Melt your coating chocolate in a tall, narrow cup (a mason jar is perfect!). Take only 2-3 pops out of the freezer at a time. Dip each one straight down, swirl gently, lift straight up, and let the excess chocolate drip off. Pro Move: Tap the stick firmly but gently on the edge of the cup to shake off the extra chocolate. This gives you a perfect, thin shell.
- Garnish Immediately: Right after dipping, while the coating is still wet, sprinkle on your chopped hazelnuts or other toppings. Then, place the pop back on the parchment paper to set. For a super glossy finish, let them set at room temp. For speed, you can chill them.
Showing Off Your Masterpiece
You made edible art! Now, let’s serve it with style. For a party, stick the pops upright in a vase filled with sugar or dried beans, creating a beautiful, edible bouquet. Arrange them on a cake stand for a stunning centerpiece. For gifting, wrap each pop individually in clear cellophane bags tied with a ribbon—they look professional and heartwarming. Pair them with a strong cup of coffee for an afternoon pick-me-up or serve them as the grand finale to a dinner party. The beauty is in the handheld fun. Just pass them around and watch the smiles appear.
Make It Your Own: Flavor Twists & Swaps
The basic recipe is a canvas. Here’s how to paint your own flavor masterpiece:
- Salty Pretzel Crunch: Swap the hazelnut garnish for finely crushed salted pretzels. That sweet-salty combo is unbeatable.
- Orange Zest Dream: Add 1 tablespoon of fresh orange zest and 1/2 teaspoon of orange extract to the ganache. Garnish with candied orange peel. It’s like a chocolate-orange hug.
- Dairy-Free/Vegan Delight: Use dairy-free chocolate chips, full-fat coconut cream instead of heavy cream, and a vegan chocolate hazelnut spread. It works like a dream!
- Espresso Infusion: Add 1-2 teaspoons of instant espresso powder to the hot cream. It won’t make it taste like coffee, just deeply, wonderfully more chocolatey.
- “Rocky Road” Style: Roll the set ganache balls in mini marshmallows and crushed graham crackers before dipping. Pure nostalgia.
A Few Things From My Kitchen to Yours
This recipe has evolved through many, many batches (a tough job, but someone’s gotta do it). My first versions were too soft—they’d slump off the stick. The freezer step was the game-changer. I’ve also learned that a little patience during the dipping stage makes all the difference. If your coating chocolate is too thick, add a tiny spoonful of coconut oil to thin it for easier dipping. And the mess? Embrace it. My kitchen counter usually looks like a chocolate bomb went off by the end, but that’s the sign of a project well done. The best part is licking the spoons and bowls afterwards—that’s the chef’s tax!
Your Questions, Answered
Q: Can I make these ahead of time?
A: Absolutely! They are perfect for making ahead. Store the finished pops in a single layer in an airtight container in the fridge for up to 1 week, or freeze for up to a month. Let them come to room temp for 5-10 minutes before serving for the best texture.
Q: My ganache split/got grainy! What happened?
A: Don’t panic. This usually means the cream was too hot and “seized” the chocolate. To fix it, add a splash of room temperature cream or milk and whisk vigorously. If that doesn’t work, gently re-melt the whole mixture over a double boiler and stir in an extra tablespoon of cold cream until it smooths back out.
Q: Can I use milk chocolate instead?
A: You can, but be careful. Milk chocolate is more sensitive to heat. Use the same method, but make sure your cream is just under a simmer, and be extra gentle when stirring. The final pops will be sweeter.
Q: My toppings won’t stick to the coating!
A: You have to sprinkle the second the pop comes out of the melted chocolate. If the shell sets even a little (which happens fast), nothing will adhere. Work in small batches to keep that coating wet.

Chocolate Hazelnut Truffle Pops
- Total Time: 1 hr 20 mins
- Yield: 16 pops 1x
Ingredients
1 cup semi-sweet chocolate chips
1/3 cup heavy cream
1/4 cup chocolate hazelnut spread (like Nutella)
1/4 tsp salt
1/2 cup finely chopped toasted hazelnuts
1 cup melted chocolate (for coating)
Optional: crushed hazelnuts, sprinkles, or cocoa powder for garnish
Lollipop sticks or skewers
Instructions
In a small saucepan, heat heavy cream until just simmering. Pour over chocolate chips in a bowl. Let sit for 1 minute, then stir until smooth.
Stir in hazelnut spread and salt until fully combined. Chill mixture for 1 hour until firm.
Scoop and roll into small balls, then insert sticks. Freeze for 15 minutes to firm up.
Dip each truffle pop in melted chocolate and immediately sprinkle with crushed hazelnuts or toppings of choice.
Set on parchment-lined tray to harden. Store chilled until ready to serve.
- Prep Time: 20 minutes
- Chill Time: 1 hr
Nutrition
- Calories: 160 / pop
- Sugar: 10g / pop
- Fat: 11g / pop
- Carbohydrates: 14g / pop
- Protein: 2g / pop
Nutritional Information*
*Because knowledge is power, even with dessert! This is an approximate breakdown per pop (1 of 16), calculated without optional extra garnishes. Remember, these are a treat, meant to be savored and enjoyed mindfully.
- Calories: 160
- Fat: 11g
- Carbohydrates: 14g
- Sugar: 10g
- Protein: 2g
The fats come primarily from the chocolate and hazelnuts, which provide some monounsaturated fats (the “good” kind). While they’re not a health food, making them yourself means you control the ingredients—no unpronounceable additives, just real, simple stuff.
You Did It! Now, Go Enjoy the Fun.
Look at you, you magnificent chocolatier! You’ve just created something truly special. These Chocolate Hazelnut Truffle Pops are more than a recipe; they’re proof that incredible, impressive desserts belong in your kitchen, not just in fancy shops. I hope you had as much fun making them as I always do. Share them with people you love, keep a few hidden in the back of the fridge for yourself (my move), and most importantly, own that proud feeling. You made this.
Thanks for cooking with me today. If you snapped a photo of your pops (I hope you did!), tag @FoodMeld so I can celebrate with you. Got a twist you tried? I’d love to hear it. Until next time, keep mixing it up, making it yours, and remember—the best kitchens are the ones that get a little messy. Happy cooking, friends!


