The Ultimate Chocolate Cream Pie: Your New Go-To Dessert
Hey friends, Jackson here from Food Meld! If there’s one dessert that feels like a warm hug after a long day, it’s this silky, dreamy Chocolate Cream Pie. Picture this: a flaky, buttery crust cradling a cloud of rich chocolate custard so smooth it’ll make your eyes roll back. Top it off with a swoosh of whipped cream, and boom—you’ve got pure magic. I know what you’re thinking: “Jackson, cream pies sound fussy.” But trust me, this beauty comes together with pantry staples and a little patience (mostly for chilling, not skill!). Whether you’re prepping for a backyard BBQ or just treating yourself on a Tuesday, this pie turns any moment into a celebration. Let’s ditch the store-bought versions and make memories instead. Ready to create something unforgettable? Your spoon’s waiting!
Sunday Sweets & Sneaky Slice Stealing
This recipe? It’s my edible time machine. Every bite whisks me back to my Aunt Clara’s farmhouse, where Sunday dinners weren’t complete without her chocolate pie cooling on the windowsill. I’d hover nearby, “helping” wash dishes just to catch that first whiff of cocoa. One sweltering July evening, I couldn’t resist—I tiptoed over, lifted the towel covering the pie, and swiped a fingerful of filling. Silky, deep, and just sweet enough. Got caught red-handed (or chocolate-mouthed!), but Aunt Clara just laughed and handed me a spoon. “Life’s short, kiddo,” she’d say. “Eat the pie first.” That mix of rebellion and comfort? That’s what this recipe is all about. No fancy techniques, just heart.
Print
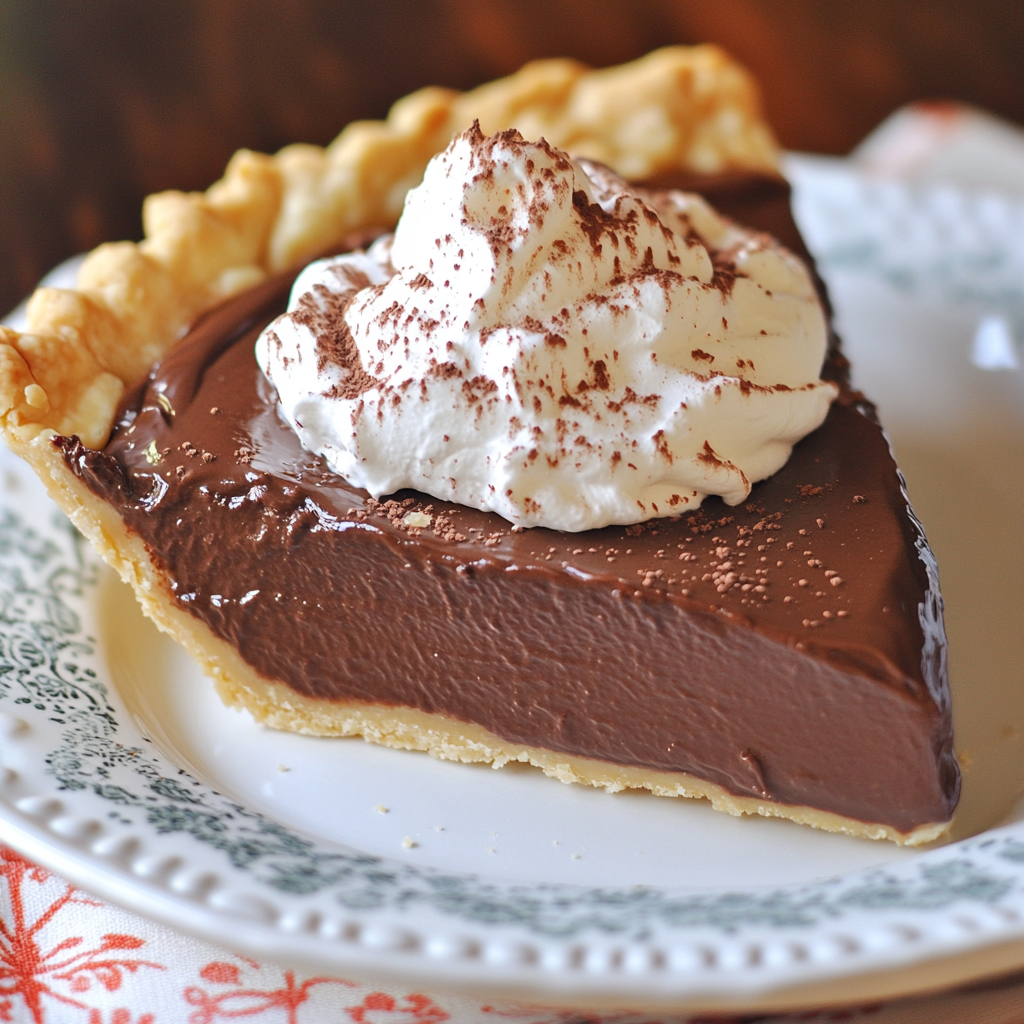
Chocolate Cream Pie
- Total Time: 4 hours 30 minutes
Description
This Chocolate Cream Pie brings back sweet memories of Sunday dinners at my aunt’s house, where dessert was never an afterthought. Silky, rich, and wrapped in a flaky crust, this pie feels like a hug with every bite. Whether you serve it chilled at a gathering or sneak a midnight slice, it’s pure comfort on a plate.
Ingredients
1½ cups white sugar
3 large egg yolks, beaten
½ cup unsweetened cocoa powder
3 tbsp cornstarch
½ tsp salt
3 cups milk
1 tbsp butter
1½ tsp vanilla extract
1 (9-inch) baked pie crust
1 cup frozen whipped topping, thawed
Instructions
In a saucepan, whisk together sugar, cocoa powder, cornstarch, and salt.
Gradually whisk in milk and cook over medium heat until mixture thickens and boils, stirring constantly.
Remove from heat. Stir a little hot mixture into the beaten egg yolks, then return yolks to the saucepan. Cook 2 more minutes, stirring.
Remove from heat again; stir in butter and vanilla until smooth.
Pour chocolate filling into the baked pie crust. Let cool, then refrigerate until set (about 4 hours).
Top with whipped topping before serving.
Notes
A slice of this pie is more than dessert—it’s tradition, joy, and just the right amount of indulgence.
- Prep Time: 15 minutes
- Chill Time: 4 hours
- Cook Time: 10 minutes
Nutrition
- Calories: 370 per serving
- Fat: 14g per serving
- Carbohydrates: 58g per serving
- Protein: 5g per serving
Gather Your Goodies
Simple ingredients, big flavor—here’s what you’ll need (and my chef-y tweaks):
- 1½ cups white sugar – Balances the cocoa’s bitterness. For deeper flavor, swap ¼ cup with brown sugar!
- 3 large egg yolks, beaten – The custard’s backbone. Save whites for meringue if you’re feeling extra!
- ½ cup unsweetened cocoa powder – Use Dutch-process for ultra-smooth richness. Regular works too!
- 3 tbsp cornstarch – Our thickening hero. Arrowroot powder? Works in a pinch.
- ½ tsp salt – Secret weapon! Enhances chocolate depth.
- 3 cups whole milk – Creaminess central. Half-and-half = next-level luxury.
- 1 tbsp butter – Adds sheen. Salted butter? Yes, please—flavor pop!
- 1½ tsp vanilla extract – Splurge on pure vanilla. Or try almond extract for fun.
- 1 (9-inch) baked pie crust – Homemade or store-bought—no shame! I’m a graham cracker crust fan too.
- 1 cup frozen whipped topping, thawed – Cool Whip works, but fresh whipped cream? *chef’s kiss*
Let’s Build That Pie, Step by Step
Don’t sweat it—I’ve got your back with pro tips!
Step 1: In a heavy-bottomed saucepan, whisk together sugar, cocoa powder, cornstarch, and salt. Chef hack: Sift the cocoa to avoid lumps! It’s like giving your pie a spa treatment.
Step 2: Gradually whisk in milk. Key move: Add it slowly to prevent clumping! Cook over medium heat, stirring constantly with a silicone spatula. Scrape the bottom—cornstarch loves to hide there. When it thickens and bubbles like a chocolate volcano (about 8-10 mins), it’s ready. Pro tip: If it coats the back of a spoon, you’re golden.
Step 3: Remove from heat. Spoon ½ cup hot mix into beaten egg yolks (this tempers them so they don’t scramble!). Whisk like crazy, then pour it all back into the pot. Cook 2 more mins—this kills any bacteria and thickens further. Watch for lava bubbles!
Step 4: Off heat, stir in butter and vanilla until glossy. Insider trick: Throw in a pinch of instant espresso powder here. It won’t taste like coffee—just amplifies chocolate!
Step 5: Pour filling into baked crust. Save your crust: Place a pie shield or foil on edges so they don’t burn. Cool at room temp 30 mins (prevents condensation!), then refrigerate 4+ hours. Patience pays!
Step 6: Top with whipped topping. Go fancy: Pipe it! Or sprinkle cocoa/chocolate shavings.
Serve It Like a Pro
Chilled is best! Slice with a warm knife (dip in hot water, dry fast) for clean cuts. Pair with cold milk, bitter coffee, or—my fave—a drizzle of salted caramel. For parties, serve on vintage plates with a mint sprig. Midnight snackers? Grab a fork and dig in straight from the fridge. No judgment here.
Mix It Up, Make It Yours
This pie is your playground:
- Peanut Butter Swirl – Melt ¼ cup peanut butter, swirl into filling before chilling.
- Vegan Magic – Use coconut milk, cornstarch, and vegan butter. Top with coconut whip!
- Mocha Madness – Add 1 tbsp instant coffee to dry ingredients.
- Cookie Crunch – Mix crushed Oreos into filling before pouring.
- Bourbon Kiss – Swap 1 tsp vanilla for bourbon. Adults only!
Jackson’s Kitchen Confessions
This recipe’s evolved since Aunt Clara’s days. I once added cayenne for “kick”—big mistake. (RIP, 2017 pie.) Now? I stick to espresso powder for depth. Funny story: My dog, Biscuit, once nabbed a whole slice off the counter. He gave zero apologies, just a chocolatey grin. Lesson? Guard your pie fiercely! Over the years, I’ve learned: Don’t rush the chill. Four hours minimum, friends—texture is everything. And that store-bought crust? I use it weekly. Life’s too short for pastry stress.
Your Pie Questions, Answered
Q: Why’s my filling lumpy?
A: Likely didn’t whisk enough when adding milk! Strain it pre-chill for silky results.
Q: Can I freeze this pie?
A: The filling? No—it gets weepy. But assembled? Freeze without topping. Thaw overnight in fridge.
Q: My crust is soggy! Help!
A: Brush baked crust with beaten egg white before adding filling. Creates a moisture barrier!
Q: Can I use almond milk?
A: Yep! But add 1 extra tbsp cornstarch—it’s thinner than dairy milk.
Nutritional Info (per slice, 1/8 pie)
Calories: ~370 | Fat: 14g | Protein: 5g | Carbs: 58g
Note: Using half-and-half or fresh whipped cream increases fat content.
Prep Time: 15 mins | Cook Time: 10 mins | Chill Time: 4 hrs | Serves: 8
Final Thoughts: A Slice of Nostalgia, a Spoonful of Joy
There’s something beautifully simple—and deeply comforting—about a Chocolate Cream Pie done right. It’s not flashy. It’s not fussy. But one bite of that silky, chilled chocolate filling cradled in buttery crust and topped with dreamy whipped cream? That’s soul food, friend.
This pie isn’t just dessert—it’s a memory in the making. Whether it reminds you of Aunt Clara’s farmhouse, your grandma’s holiday table, or your own first triumph in the kitchen, it’s the kind of treat that says, “You’re home.” And the best part? You made it. No store-bought shortcuts, no mystery ingredients—just pantry staples, a little love, and the sweet satisfaction of homemade magic.
So go ahead, serve it at your next potluck, surprise your coworkers, or sneak a midnight slice in your slippers. However you enjoy it, just promise me one thing: you’ll lick the spoon and smile like a kid again.


