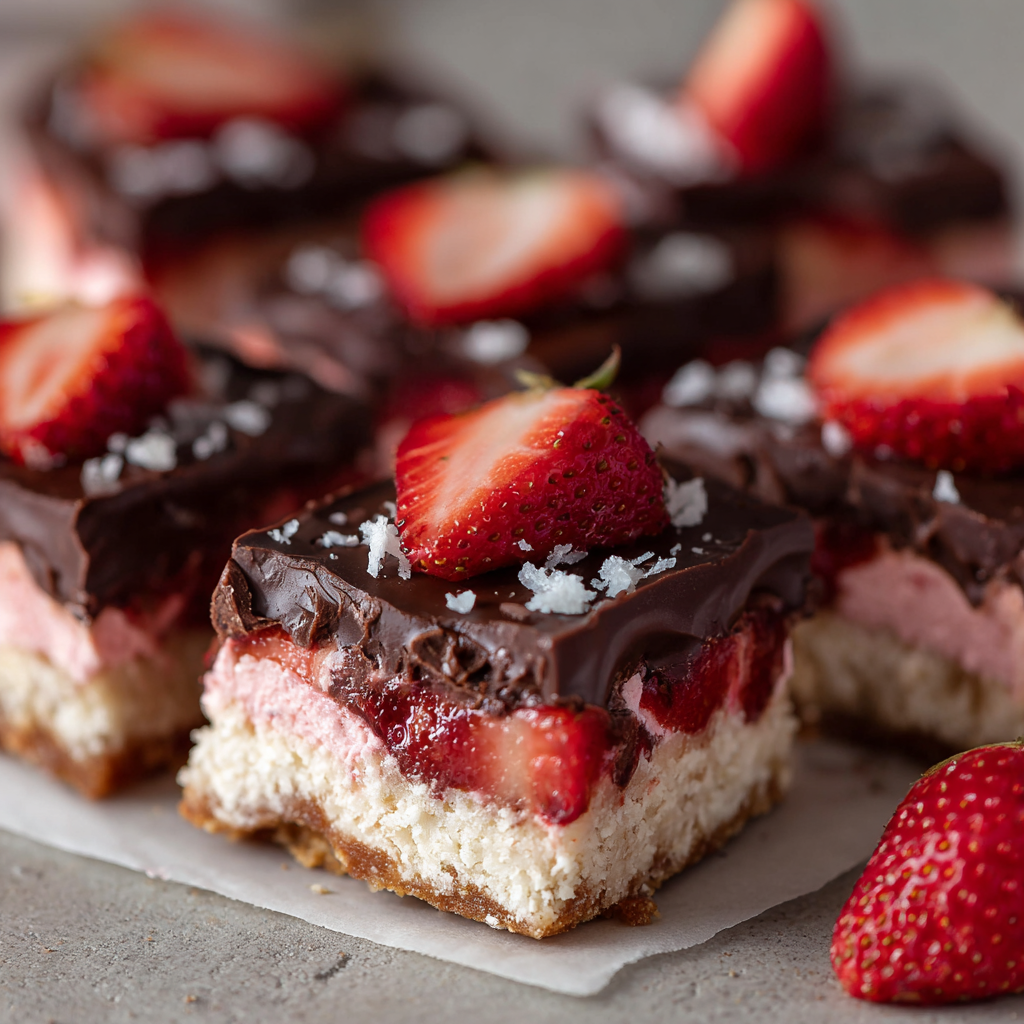
Chocolate-Covered Strawberry Bar Squares (Your New No-Bake Obsession)
Picture this: a creamy, dreamy strawberry layer that tastes like the heart of a perfect berry, with a hint of vanilla and a protein-packed punch that secretly makes you feel like a genius. Then, we top it all off with a sleek, crackable layer of dark chocolate that gives you that satisfying *snap* with every bite. It’s the classic chocolate-covered strawberry romance, but in a shareable, sliceable, totally snackable form.
The best part? This is a no-bake wonder. We’re letting the freezer do all the heavy lifting. Whether you’re prepping for a party, surprising your sweetheart, or just stocking the freezer with a treat that won’t derail your day, these squares are your new best friend. They’re forgiving, fun to make, and packed with that “what if we tried this?” energy I live for. So, grab your blender and a square pan, and let’s create some kitchen magic that’s bold, comforting, and ridiculously delicious.
The Strawberry Standoff: A Sweet Memory
This recipe takes me right back to my grandma’s kitchen table, which was always the center of the universe on Sunday afternoons. She’d have these little trays of chocolate-covered strawberries for special occasions, and my brother and I would launch into a full-scale, espionage-level negotiation to get the one with the most chocolate drizzle.
One Valentine’s Day, she caught me trying to *very carefully* dip a plain strawberry into the leftover chocolate pot when I thought no one was looking. Instead of scolding me, she just laughed, handed me a fork, and said, “If you’re gonna do it, do it right. Let’s make a whole batch just for us.” That moment—the mess, the laughter, the shared secret snack—stuck with me. It wasn’t about the perfect dessert; it was about the joy of making it. These bar squares are my tribute to that feeling. They capture that same perfect pairing of sweet fruit and rich chocolate, but in a way that’s made for sharing (or not, no judgment here). Every time I make them, I’m reminded that the best recipes are the ones that come with a side of a good story.
What You’ll Need to Make These Berry Bliss Bars
Here’s the beautiful line-up. I’ve broken it down by layer and included my favorite chef notes and swaps so you can make this recipe work with what you’ve got. Simple, real, and packed with flavor—just like we like it.
For the Strawberry Layer:
- 1 cup fresh or frozen strawberries (thawed): Frozen works like a charm here and is often sweeter! Just let them thaw and drain any excess liquid. Fresh is fabulous in season. This is our star flavor, so don’t skimp.
- 1/2 cup Greek yogurt (plain or vanilla): This gives us that incredible creamy tang and protein boost. For a dairy-free twist, a thick coconut yogurt works wonderfully.
- 1 scoop (30g) vanilla protein powder: Our secret weapon for structure and staying power. It makes these squares satisfying. A good-quality whey, pea, or collagen protein blend works. If you omit it, add an extra 2-3 tbsp of oat flour.
- 2 tbsp maple syrup or honey: Pure sweetness. Adjust to your taste and your berries’ natural sugar. Agave works too!
- 1/2 tsp vanilla extract: The flavor enhancer. It rounds out the strawberry and makes everything taste more “finished.”
- 1/2 cup oat flour or almond flour: This binds our filling. Oat flour keeps it neutral and accessible (just blend rolled oats!). Almond flour adds a lovely nutty richness and keeps things grain-free.
For the Chocolate Topping:
- 1/2 cup dark chocolate chips: I prefer 60-70% cacao for a rich, not-too-sweet shell. But milk chocolate or semi-sweet are totally fair game if that’s your jam.
- 1 tsp coconut oil: This little magic trick makes the chocolate spread like a dream and sets with a beautiful glossy snap. You won’t taste it, I promise.
Building Your No-Bake Masterpiece: Step-by-Step
Ready? This is where the fun happens. I’ll walk you through each step with my favorite tips to guarantee success.
- Blend the Berries: Toss your strawberries into a blender or food processor and pulse until you have a lovely, lumpy-purée. We’re not going for juice; we want texture! Chef’s Hack: No blender? Just mash the heck out of them with a fork. It’ll be more rustic, but just as tasty.
- Mix the Strawberry Layer: In a medium bowl, combine your strawberry purée, Greek yogurt, protein powder, maple syrup, and vanilla. Stir until it’s one gorgeous pink mixture. Now, add your oat or almond flour. Mix until just combined and smooth. You’ll have a thick, scoopable batter. Taste it! This is your moment to adjust sweetness.
- Press & Freeze (First Round): Line an 8×8 inch pan (or a loaf pan for thicker bars) with parchment paper, leaving some overhang. This is your lifeline for easy removal later—trust me! Scoop your strawberry batter into the pan and press it down into a smooth, even layer. I use the bottom of a measuring cup to get it perfectly flat. Pop it into the freezer for 30-40 minutes. You want it firm to the touch.
- Create the Chocolate Shell: When the strawberry layer is almost set, melt your chocolate and coconut oil together. You can do this in a double boiler or in a microwave-safe bowl in 20-second bursts, stirring vigorously between each. Stir until it’s silky and completely smooth.
- The Big Pour: Take your pan out of the freezer. Slowly pour the melted chocolate over the firm strawberry base. Tilt the pan gently or use an offset spatula to spread it into a thin, even layer that covers every corner.
- Final Freeze & Slice: Immediately return the pan to the freezer for 10-15 minutes, just until the chocolate is fully set. It will be firm and glossy. Using the parchment paper overhang, lift the whole slab out of the pan and onto a cutting board. Slice into squares with a sharp knife. For super clean cuts, you can run the knife under hot water and dry it quickly between slices.
How to Serve & Savor These Squares
Presentation is part of the fun! These bars are stunning all on their own, but a little flair never hurts.
For a party, arrange them on a white platter and dust with a little powdered sugar or freeze-dried strawberry powder for a pop of color. You can even drizzle a tiny bit of extra melted white chocolate over the top for a fancy finish.
These squares are best enjoyed straight from the fridge for a firmer, fudge-like texture, or from the freezer for a more ice-cream-bar experience. I like to let mine sit on the counter for just 2-3 minutes before eating to take the frosty edge off. Serve them with a hot coffee, a glass of cold almond milk, or as the grand finale to a simple weeknight dinner. They’re self-contained little packages of joy, so plating is easy—just get them to a plate before the chocolate melts on your fingers!
Mix It Up! 5 Tasty Twists on the Classic
One of my favorite things about this recipe is its adaptability. Here are a few ways to run with it and make it yours:
- Double Chocolate Berry: Add 2 tbsp of cocoa powder to the strawberry layer batter for a deep, chocolate-berry flavor throughout.
- PB&J Style: Use creamy peanut butter powder (about 3 tbsp) in place of the protein powder. Top with the dark chocolate or even a peanut butter-chocolate swirl.
- Tropical Twist: Swap strawberries for mango or raspberries. Use coconut yogurt and top the chocolate with a sprinkle of toasted coconut flakes before it sets.
- Cookie Crunch Base: Press a thin layer of crushed gluten-free graham crackers or vanilla wafers mixed with a tbsp of melted butter into the pan before adding the strawberry layer for a textured crust.
- “Cheesecake” Style: Use full-fat cream cheese (softened) instead of Greek yogurt for an ultra-rich, decadent filling. You may need a touch more sweetener.
Jackson’s Chef Notes & Kitchen Stories
This recipe is a living thing in my kitchen. The first time I tested it, I may have gotten overzealous with the strawberry purée and created something more like a smoothie bowl that refused to set. Lesson learned: drain those thawed berries if they’re watery!
I also once tried to skip the coconut oil in the chocolate. Big mistake. It was too thick, glopped on unevenly, and didn’t have that perfect crack. That one tiny ingredient is a game-changer. Over time, I’ve found these bars are the ultimate “clean out the pantry” dessert. That half-scoop of protein powder? In it. That last handful of chocolate chips? Perfect. Cooking is about intuition, so once you’ve made the base recipe, don’t be afraid to play.
Your Questions, Answered
Can I make these without protein powder?
Absolutely! Just substitute with an extra 1/4 cup of oat or almond flour. The texture will be slightly softer but still delicious. You might want a touch more sweetener to balance it.
My strawberry layer is too soft after freezing. What happened?
No worries! This usually means there was too much liquid. Next time, drain thawed frozen berries well or use very ripe, but not mushy, fresh ones. You can also add an extra tablespoon of flour to the mixture to help it firm up.
How do I store these, and how long do they last?
They must be stored in an airtight container in the freezer for up to 2 months, or in the fridge for up to 5 days. The fridge will give a softer, fudgy bar; the freezer gives a firmer, ice-cream-like treat.
Can I use a different fruit?
Yes, please do! Raspberries, blackberries, cherries (pitted!), or a berry blend all work wonderfully. Adjust sweetener to match the tartness of your chosen fruit.
Nutritional Info (A Rough Guide)
Disclaimer: I’m a chef, not a registered dietitian. These are estimates based on the specific ingredients I used (vanilla whey protein, almond flour, 70% dark chocolate) and will vary with your substitutions. This info is for one square, assuming the recipe yields 9.
- Calories: ~140
- Protein: 8g (That protein powder and Greek yogurt doing the heavy lifting!)
- Carbohydrates: 10g
- Fat: 8g
- Sugar: 5g (Primarily from the natural fruit and a touch of maple syrup)
Think of these as a satisfying, protein-forward treat that satisfies your sweet tooth without the crash. They’re a fantastic alternative to sugary store-bought desserts.
Let’s Keep the Fun Going!
And there you have it—my no-bake, crowd-pleasing, chocolate-covered strawberry heart in square form. This recipe is everything I love about cooking: it’s creative, it’s comforting, and it’s meant to be shared (or happily enjoyed solo on the couch, I won’t tell).
I hope these bars bring a little “you’ve gotta try this” moment to your kitchen. Remember, the best dishes are the ones that make you smile while you’re making them and leave you feeling awesome after you eat them. If you give these a whirl, tag me over @FoodMeld—I love seeing your creations and your kitchen stories.
Until next time, keep mixing it up, making it yours, and enjoying every single bite. Let’s cook something awesome together!
– Jackson


