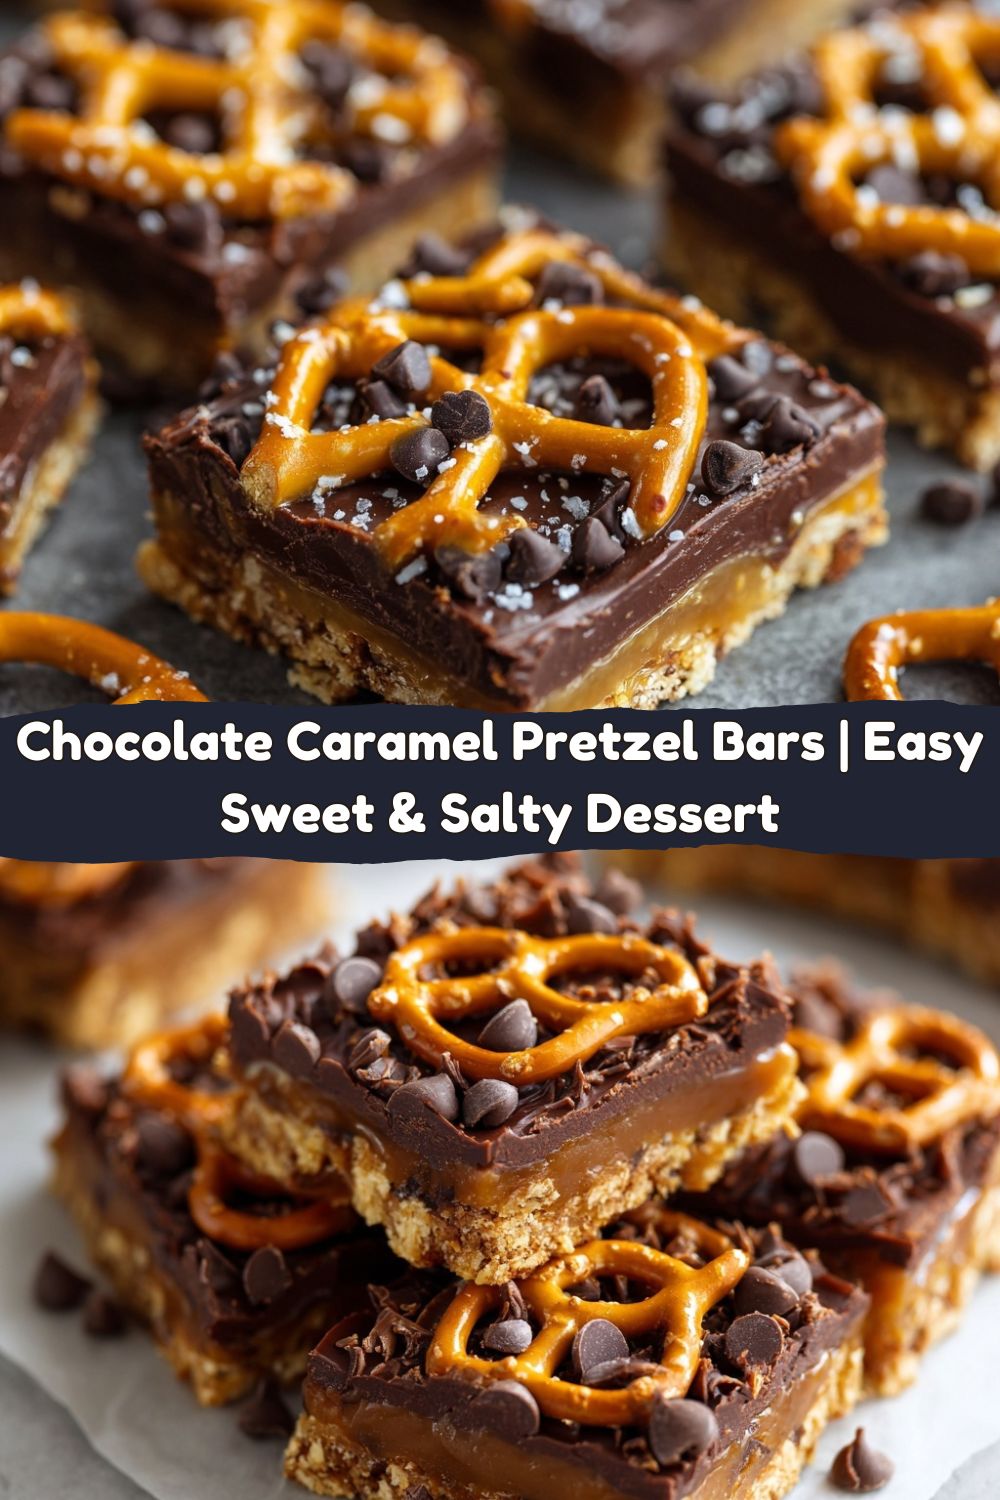
Chocolate Caramel Pretzel Bars – Easy No-Fail Sweet and Salty Treat
Hey friends, Jackson from Food Meld here. Let me ask you a question: have you ever had one of those cravings that hits you out of nowhere? The kind where you’re just minding your own business, maybe watching a movie or scrolling through your phone, and BAM. Your brain suddenly demands the perfect combination of sweet, salty, crunchy, and chewy, all in one single, life-changing bite?
Yeah, me too. And let me tell you, when that craving hits, there’s one hero that always answers the call: these Chocolate Caramel Pretzel Bars.
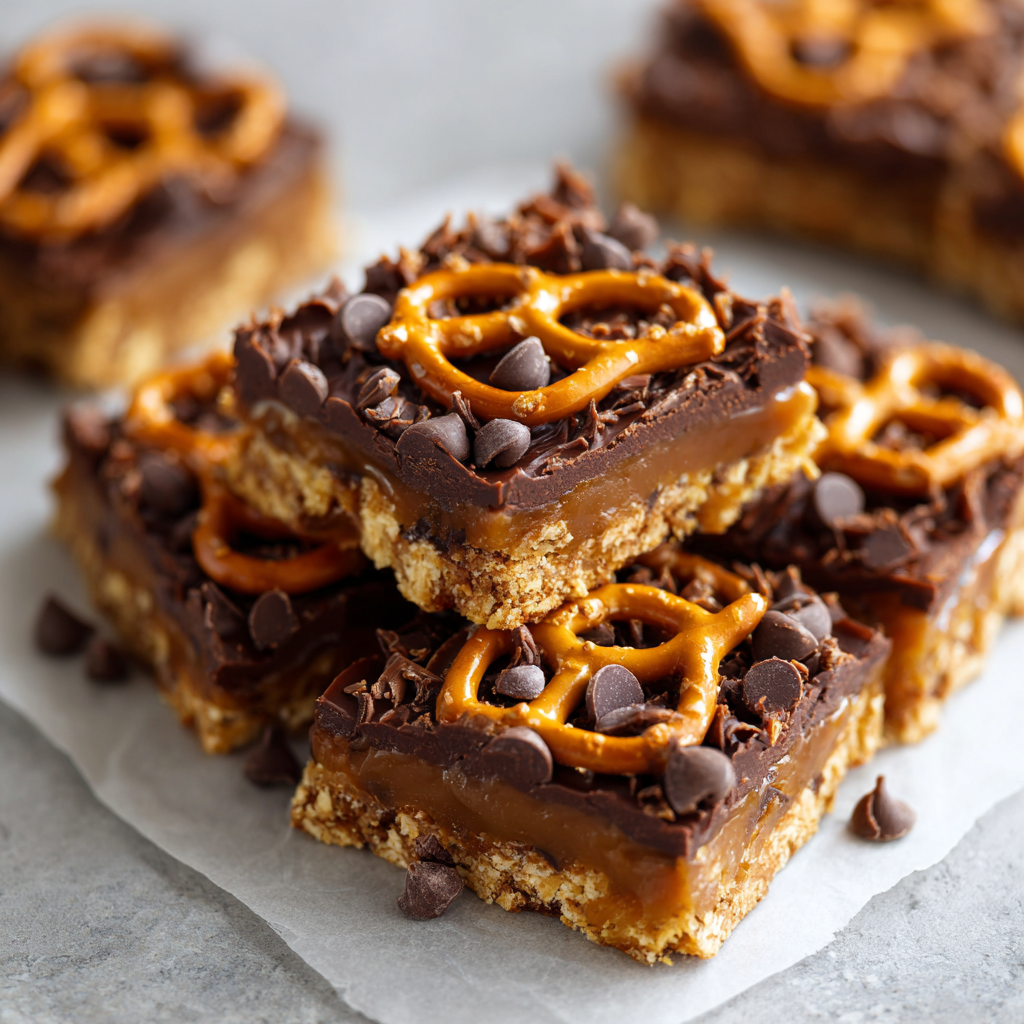
This isn’t just a recipe; it’s a flavor experience. We’re talking a solid base of salty, crunchy pretzels, smothered in a rich, buttery homemade caramel that you can make in minutes, all topped with a luxurious blanket of melted chocolate. It’s the kind of treat that makes people’s eyes go wide, followed by an immediate, “Wait, you MADE these?” They’re that good. And the best part? They are seriously, almost laughably easy. We’re talking 10 minutes of active work. No fancy equipment, no complicated techniques—just pure, unadulterated kitchen magic. So, if you’re ready to create the most addictive treat in your snack arsenal, grab a saucepan and let’s get melding!
My First “Food Meld” Moment
This recipe takes me right back to my grandma’s kitchen. She was a wizard with simple ingredients, and she had this little trick she’d do for us kids. She’d take a single pretzel stick, dab a tiny bit of caramel from a candy apple kit on it, and press a chocolate chip on top. To our seven-year-old selves, it was a culinary revelation. It felt like she had cracked a secret code to the universe of flavor.
Years later, when I was a broke college student, I was hit with a wave of nostalgia for that exact taste. I didn’t have candy apple kits, but I had a bag of pretzels, some brown sugar, butter, and a half-eaten bag of chocolate chips. I threw them together in a baking sheet, crossed my fingers, and created the very first, very messy version of these bars. When my roommates and I devoured the whole pan in under ten minutes, I knew I was onto something. It was one of those early “Food Meld” moments for me—taking humble, comforting ingredients and twisting them into something new and unforgettable.
Gather Your A-Team Ingredients
One of the best things about this recipe is the short and sweet ingredient list. You probably have most of this in your pantry right now! Here’s what you’ll need and why each one is a rockstar.
- 4 cups mini pretzel twists: This is our foundation. The mini twists are perfect because they create a stable base and their nooks and crannies hold onto that caramel for dear life. Chef’s Insight: Don’t stress about arranging every single one perfectly! A mostly single layer with some overlapping is A-OK.
- 1 cup (2 sticks) unsalted butter: This is the heart of our rich, homemade caramel. Using unsalted lets us control the saltiness, playing perfectly against the salty pretzels. Substitution Tip: If you only have salted butter, that’s totally fine! Just maybe skip the optional flaky sea salt sprinkle at the end.
- 1 cup packed brown sugar: Pack it in there, friends! The molasses in the brown sugar is what gives our caramel that deep, toffee-like flavor and beautiful chewy texture. Light or dark brown sugar will work—dark will give you a slightly richer taste.
- 2 cups semi-sweet chocolate chips: The glorious crown. Semi-sweet is my go-to because it balances the sweetness of the caramel beautifully. Creative Twist: Feel free to mix it up! Use milk chocolate for a sweeter bar, dark chocolate for a more sophisticated bite, or even a mix of chocolate and butterscotch chips.
- Flaky sea salt (optional, but highly recommended): A light sprinkle of flaky salt on top of the melted chocolate is the pro move. It elevates every single flavor and makes these bars look like they came from a fancy bakery.
Let’s Build Some Magic: Step-by-Step
Alright, team, let’s do this. Put on some good music, because this is going to be fast, fun, and oh-so-rewarding.
- Preheat and Prep. Fire up your oven to 325°F (165°C). Now, grab a 9×13 inch baking sheet (a rimmed baking sheet is crucial here!) and line it with aluminum foil. Give that foil a quick spray with non-stick cooking spray. This little step is your best friend—it makes cleanup an absolute dream and ensures your bars pop right out. Chef’s Hack: Let a little of the foil hang over the sides to create “handles” for easy lifting later.
- Create Your Pretzel Foundation. Time to lay down the crunch. Dump your 4 cups of mini pretzels onto the prepared baking sheet and spread them out into a mostly single, even layer. It doesn’t have to be perfect! Some gaps are fine, and a little overlapping is totally normal. We’re going for rustic, homemade charm here.
- Whip Up the “Magic Sauce” (a.k.a. The Caramel). In a medium saucepan, combine your 1 cup of butter and 1 cup of packed brown sugar. Place it over medium-low heat and stir it almost constantly. We’re melting the butter and dissolving the sugar gently. Once the mixture comes to a full, rolling boil, let it keep boiling for 3 full minutes, still stirring. You’ll see it thicken slightly and become a gorgeous, glossy caramel. Pro Tip: Don’t walk away during this step! That constant stirring prevents the sugar from burning and ensures a smooth, not grainy, caramel.
- The Big Pour. Carefully take your bubbling, beautiful caramel and pour it evenly over the pretzel base. Don’t worry if it doesn’t cover every single millimeter—it will spread out as it bakes. I like to use a spatula to gently guide it into the corners.
- First Bake. Pop the baking sheet into your preheated oven and bake for 8-10 minutes. You’re looking for the caramel to be actively bubbling all across the sheet. This bakes the caramel into the pretzels, creating that amazing chewy-crunchy texture.
- The Chocolate Blanket. Pull the hot pan out of the oven (carefully!) and immediately sprinkle the 2 cups of chocolate chips evenly over the top. The residual heat from the caramel will start melting them instantly. Let it sit for a minute, then return the pan to the warm (but turned off) oven for just 1-2 minutes to fully soften the chips.
- Spread the Love. Use an offset spatula or the back of a spoon to gently spread the now-melted chocolate into a smooth, even layer over the entire surface. This is the time for that optional flaky sea salt sprinkle—do it now while the chocolate is still wet so it sticks.
- The Final Chill. This is the hardest part: the wait. Carefully transfer the entire baking sheet to your freezer. Let it chill for at least 30 minutes, or until the chocolate is completely set and firm. The freezer gives us a perfect, clean break later.
- Break and Devour! Once it’s rock solid, lift the entire slab out of the pan using the foil handles. Place it on a cutting board and, using your hands, break it into rustic, irregular pieces. You can also use a sharp knife, but I love the fun, casual look of hand-broken bars.
How to Serve These Superstar Bars
Honestly, you could stand over the kitchen sink and eat these straight off the cutting board (no judgment from me!), but if you’re feeling fancy, here are a few ways to make them shine.
For a party, pile them high on a rustic wooden board or a cute platter. They look incredible next to a bowl of fresh fruit—the bright berries provide a lovely, fresh contrast to the rich bars. If you’re serving them as a dessert after a big family dinner, I love placing one on each plate with a small dollop of freshly whipped cream or a scoop of vanilla bean ice cream. The warm-cold combo is next-level. And for gifting? Stack a few in a clear cellophane bag, tie it with a ribbon, and you’ve got the most thoughtful, homemade gift that will make you an instant legend.
Mix It Up! Creative Twists on the Classic
The beauty of this recipe is its versatility. Once you’ve mastered the base, the “what if we tried this?” energy can really take over. Here are a few of my favorite spins:
- The “Rocky Road”: After sprinkering the chocolate chips, also sprinkle on 1/2 cup of mini marshmallows and 1/2 cup of chopped walnuts or pecans. Toast under the broiler for 30 seconds for a s’mores-like vibe.
- The “Peanut Butter Lover’s”: Swirl 1/2 cup of warmed creamy peanut butter into the melted chocolate layer before chilling. You can even use peanut butter pretzels for the base for a double PB punch!
- The “Candy Cane Crunch” (Holiday Special): Use white chocolate chips for the topping. Once spread, immediately sprinkle with crushed candy canes or peppermint bits for a festive and refreshing treat.
- The “Turtle Twist”: Before adding the caramel, scatter 1 cup of pecan halves over the pretzel base. Pour the caramel over the top and proceed as directed. It’s like a deconstructed turtle candy bar!
- Gluten-Free/Dairy-Free Friendly: Easy! Simply use your favorite gluten-free pretzels, a good vegan butter, and dairy-free chocolate chips. The method stays exactly the same.
Jackson’s Chef’s Notes & Kitchen Confessions
This recipe has been a part of my life for so long, it’s practically family. I’ve made it in tiny apartment ovens, for massive potlucks, and as a last-minute “I need a dessert STAT!” lifesaver more times than I can count. One time, I was so eager to taste it that I tried to break a piece off before it was fully set. Let’s just say I ended up with a handful of warm, delicious, but very messy, chocolate-caramel-pretzel goo. It was still incredible, but the lesson was learned: patience is a virtue, especially when chocolate is involved. Over the years, I’ve learned that a little imperfection in the pretzel layer or a slightly uneven chocolate spread just adds to the homemade charm. Don’t strive for perfection, strive for flavor—and this recipe has that in spades.
Your Questions, Answered!
I’ve gotten a lot of questions about these bars over the years, so here are the answers to the most common ones.
Q: My caramel got really hard after baking. What did I do wrong?
A: This usually means the caramel was boiled for a bit too long. Make sure you’re boiling for exactly 3 minutes once it reaches a full boil. Using a timer is key! Also, ensure you’re using medium-low heat to control the process.
Q: Can I use store-bought caramel or dulce de leche to save time?
A> You can, but the texture and flavor will be different. If you go this route, gently warm about 1.5 cups of store-bought caramel sauce to make it pourable, then spread it over the pretzels. You may not need to bake it for as long—just until it’s set. The homemade version is chewier and less saucy, which I prefer, but the shortcut still tastes great!
Q: Why did my chocolate get streaky when I tried to spread it?
A> This means the chocolate wasn’t quite melted enough. If you see this happening, just pop the pan back into the warm oven for another 60 seconds. The key is to let the residual heat do most of the work. Spreading partially melted chips will give you streaks, but fully melted chips will spread into a smooth, glossy layer.
Q: How long do these keep, and how should I store them?
A> They keep beautifully! Store them in an airtight container at room temperature for up to 5 days, or in the fridge for up to 2 weeks. They also freeze perfectly for up to 3 months. I actually love eating them straight from the freezer—they have a fantastic snap!
Quick Nutrition Breakdown
Now, I’m all about indulgence, but I know some of you like to keep track! Here’s a rough estimate per piece (based on getting 24 bars from the batch). Remember, this is a treat, so enjoy every single bite!
Per Piece: Approximately 160 calories | 10g fat | 18g carbs | 2g protein
Please note that these values can vary based on the specific brands of ingredients you use and the exact size of your pieces. This is just a guideline to help you plan!
You’ve Got This!
And there you have it! My all-time favorite, no-fuss, crowd-pleasing treat. I hope this recipe brings as much joy and satisfaction to your kitchen as it has to mine. It’s proof that you don’t need fancy skills or a million ingredients to create something truly special. It’s about having fun, embracing the mess, and sharing those “you’ve gotta try this” moments with the people you love.
So, did you make these? Did you add your own twist? I’d love to hear about it! Tag me on social @FoodMeld or drop a comment on the blog. Seeing your creations is my favorite part of this whole journey.
Now go forth, melt some butter, and cook something awesome. Talk soon!
– Jackson


