Chocolate Candy Cane Cookies: Your New Holiday Baking Obsession
Hey friends, Jackson from Food Meld here. Is there anything better than the smell of cookies baking in December? It’s like the whole house puts on a cozy sweater. But let’s be real, the holiday cookie game can get a little… predictable. You’ve got your sugar cookies, your gingerbread folks, and they’re all fantastic. But sometimes, you want to bake something that makes people stop, take a bite, and just go, “Wow. What is that?”
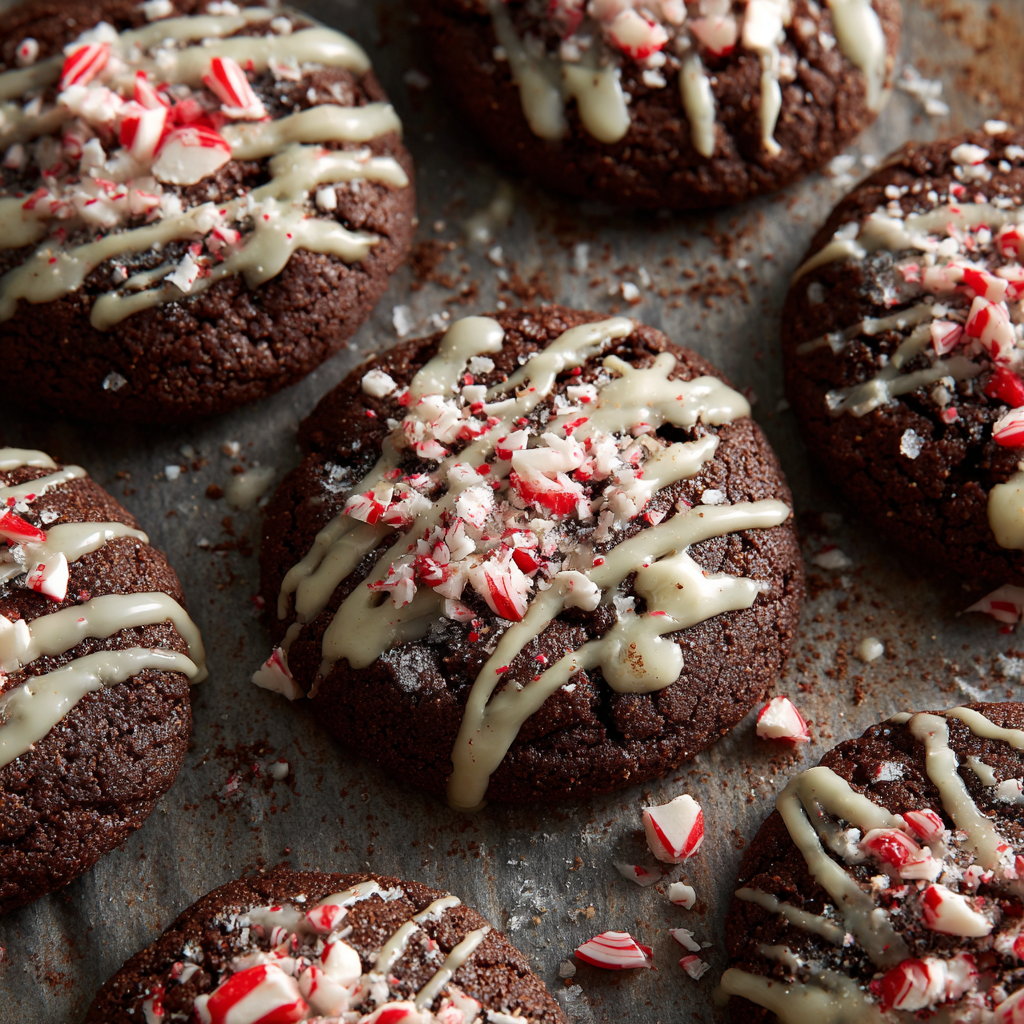
That’s exactly why I created these Chocolate Candy Cane Cookies. We’re talking a seriously rich, fudgy chocolate cookie that practically melts in your mouth. Then, we take it to the next level with a double-hit of cool peppermint and a swirly, drippy coat of both white and dark chocolate. And the final crunch? A generous shower of crushed candy cane that brings that classic holiday cheer in every single bite.
This isn’t just another cookie recipe. It’s a flavor experience. I’ve built in a few of my signature “what if we tried this?” twists—like a secret pinch of espresso powder to make the chocolate taste even more chocolatey—that truly set these apart. They look like they came from a fancy bakery, but I promise you, they are totally doable. We’re going to have fun, get a little messy with the chocolate dipping, and create the kind of cookies that disappear from the tray faster than you can say “Santa.” So, preheat that oven, and let’s cook something awesome together.

A Sweet (and Slightly Sticky) Christmas Memory
This recipe always takes me right back to my grandma’s kitchen. She was the queen of what she called “fancy cookies,” and every Christmas Eve, we’d have a massive baking marathon. The counters would be covered in flour, and the air would be thick with the smell of butter and sugar. One year, I decided I was a “big kid” (I was probably seven) and could handle the candy cane crushing duty. Instead of using the gentle zip-top bag and rolling pin method, I had the brilliant idea to use a hammer on the kitchen tile floor.
Let’s just say I got a little too much “what if we tried this?” energy. Peppermint shrapney went everywhere. We were finding tiny red and white specks for weeks. Grandma just laughed, swept it up, and handed me a bag and a rolling pin, saying, “Some explosions are worth it for a good cookie, Jackson.” That’s the spirit I want to bring to this recipe. Don’t worry about perfection. Embrace the mess! A little chaos in the kitchen just means you’re putting your heart into it. And trust me, the delicious payoff is absolutely worth it.
Gathering Your Cookie Crew: The Ingredients
Here’s the lineup for our chocolate peppermint masterpiece. I’ve included my chef insights for each one because knowing the “why” behind an ingredient makes you a more confident cook! (Makes about 24 cookies)
For the Chocolate Cookie Dough:
- 2 sticks (1 cup) butter, softened – This is the key to a soft, chewy texture. “Softened” means it gives slightly when you press it, but it’s not melted or greasy. Pro tip: if you forget to take it out, you can cube it and microwave it for 10-second bursts until it’s perfect.
- ½ cup granulated sugar – Adds sweetness and helps the cookies spread just a bit.
- 1 cup brown sugar, packed – The molasses in brown sugar is our secret weapon for chewiness and a deeper, caramel-like flavor.
- 2 large eggs – They bind everything together and add richness. Make sure they’re at room temperature for a smoother dough!
- 1 tsp vanilla extract – The classic flavor backbone that makes everything taste more like itself.
- Twist #1: ½ tsp peppermint extract – This is where the magic starts! A little goes a long way, giving the cookie itself a cool, refreshing flavor that pairs perfectly with the chocolate.
- 2 cups all-purpose flour – The structure of our cookie. Spoon and level it into your measuring cup to avoid a dry, dense dough.
- ½ cup Dutch-process cocoa powder – I highly recommend Dutch-process for this. It’s less acidic and has a smoother, richer chocolate flavor that’s perfect for our fudgy goal.
- 1 tsp baking soda – Our leavening agent that gives the cookies a little lift.
- ¼ tsp salt – Never skip the salt! It balances the sweetness and makes all the flavors pop.
- Twist #2: 1 tsp instant espresso powder – Don’t worry, your cookies won’t taste like coffee! This is my favorite chef hack. Espresso powder intensifies the chocolate flavor, making it taste deeper and more complex. It’s a total game-changer.
For the Toppings:
- 1½ cups white chocolate chips or candy melts, melted – Candy melts are great for dipping because they set firmer, but white chocolate tastes amazing. Your call!
- Twist #3: ¾ cup dark chocolate chips, melted – I love a half-dip or a swirl of dark chocolate. It cuts the sweetness of the white chocolate and adds another layer of decadence.
- 12 candy canes (or 24 peppermint candies), crushed – The festive finale! You’ll need about ¾ cup of crushed candy. Go for a mix of fine dust and some bigger pieces for great texture.
Let’s Get Baking: The Step-by-Step Fun
Okay, team, it’s go time. Put on some holiday tunes, and let’s make some cookie magic happen.
- Preheat and Prep: Fire up your oven to 350°F (175°C). Line your baking sheets with parchment paper. This is non-negotiable for easy cleanup and preventing any sticking. No parchment? A silicone baking mat works great, too.
- The Creaming Method (This is Important!): In a large bowl, cream together the softened butter, granulated sugar, and brown sugar. Use an electric mixer on medium speed for 2-3 minutes. We’re not just mixing; we’re creaming. You want it to be light, fluffy, and pale in color. This step incorporates air, which is the first secret to a perfect texture.
- Add the Wet Team: Beat in the eggs, one at a time, making sure each is fully incorporated before adding the next. Then, mix in the vanilla and that all-important peppermint extract. Scrape down the sides of the bowl with a spatula to make sure everything is homogenous.
- Whisk the Dry Goods: In a separate bowl, whisk together the flour, Dutch-process cocoa powder, baking soda, salt, and that secret weapon—the instant espresso powder. Whisking ensures the leavening and salt are evenly distributed, so every cookie bakes consistently.
- Bring It All Together: Gradually add the dry ingredients to the wet ingredients, mixing on low speed until *just* combined. Do not overmix! As soon as you see the last bit of flour disappear, stop the mixer. Overmixing develops gluten and leads to tough cookies, and we’re going for fudgy and tender.
- Scoop and Space: Using a cookie scoop or a tablespoon, portion the dough into balls about 1.5 tablespoons each. Roll them gently in your hands and place them about 2 inches apart on the prepared baking sheets. They need a little room to spread.
- Bake to Perfection: Bake for 9-11 minutes. The cookies will look a little soft in the center, and that’s exactly what we want. They will continue to set as they cool. For the perfect chewy texture, take them out when the edges look set but the centers are still puffy. Let them cool on the baking sheet for 5 minutes before transferring them to a wire rack to cool completely. I know it’s tempting, but you MUST let them cool before decorating, or the chocolate will melt into a puddle!
- The Decorating Station: Once the cookies are completely cool, melt your white and dark chocolate in separate microwave-safe bowls in 30-second bursts, stirring each time until smooth. Now for the fun part! You can fully dip one side, do a half-dip, or just drizzle. My favorite is a half-dip in white chocolate, then a quick drizzle of dark chocolate across it. Immediately after dipping, sprinkle on the crushed candy canes so they stick.
- The Final Set: Place the decorated cookies back on the parchment-lined sheet and let the chocolate set at room temperature. If you’re impatient (like me), you can pop them in the fridge for 10-15 minutes to speed things up.
How to Serve These Show-Stopping Cookies
These cookies are a whole vibe, so let’s plate them like the stars they are! Pile them high on a rustic wooden board or a vintage cake stand for a real “wow” factor. They’re the perfect addition to any holiday cookie tray, guaranteed to be the first ones gone.
For the ultimate holiday moment, serve them with a cold glass of milk, a rich hot chocolate, or even a peppermint mocha. They also make incredible edible gifts! Tuck a few into a cellophane bag tied with a pretty ribbon, and you’ve got a present that says, “I think you’re awesome” in the most delicious way possible.
Mix It Up: Fun Recipe Variations
Got an idea? Run with it! Here are a few twists to make these cookies your own:
- The Peppermint Patty: Skip the candy cane topping and sandwich two cookies together with a layer of peppermint buttercream or even store-bought peppermint frosting. Over-the-top? Absolutely. Worth it? 100%.
- Gluten-Free Friendly: Swap the all-purpose flour for a 1:1 gluten-free baking blend. I’ve had great success with Bob’s Red Mill and King Arthur brands.
- Extra Chocolate Chunk: Fold ½ cup of semi-sweet chocolate chunks into the dough right before scooping for double the chocolate goodness.
- Orange Zest Twist: Love the chocolate-orange combo? Add the zest of one orange to the dough along with the wet ingredients. The citrus brightness is incredible with the peppermint and chocolate.
- Candy Cane Blizzard: For a super festive look, dip the entire top of the cookie in white chocolate and cover it completely with crushed candy canes. It’s a peppermint explosion!
Jackson’s Chef Notes & Kitchen Confessions
This recipe has evolved so much since my first test batch. The first time, I used natural cocoa powder and skipped the espresso. They were good, but they didn’t have that deep, restaurant-quality chocolate punch. The switch to Dutch-process cocoa and the addition of espresso powder was the “aha!” moment that took them from great to unforgettable.
My biggest kitchen confession? I am the world’s messiest dipper. I always end up with chocolate on my elbows, I swear. But you know what? That’s part of the fun. I’ve learned to put down a big piece of parchment paper under my wire rack to catch the drips. Embrace the mess—it means you’re creating something with love (and a lot of chocolate).
FAQs & Troubleshooting
Q: My cookies spread too much and got flat. What happened?
A: This usually means your butter was too warm. Next time, make sure it’s just softened, not melted. Also, double-check that your baking soda is fresh! An old leavener won’t give them the lift they need.
Q: Can I make the dough ahead of time?
A: Absolutely! You can scoop the dough balls, freeze them on a baking sheet, and then transfer them to a freezer bag. When you’re ready to bake, just pop the frozen dough balls on a sheet and add 1-2 minutes to the baking time. No need to thaw!
Q: My chocolate is seizing or getting clumpy when I melt it. Help!
A: The enemy of melting chocolate is water! Make sure your bowl and utensils are completely dry. If it’s still being fussy, try adding a tiny teaspoon of coconut oil to the chocolate as you melt it. This helps thin it out and makes it super smooth for dipping.
Q: The candy cane topping got soft after a day. How can I keep it crunchy?
A> This is a common issue because the candy canes absorb moisture from the air and the chocolate. The best trick is to store the cookies in a single layer in an airtight container at room temperature. If you need to stack them, put a layer of parchment paper between them. They’re best enjoyed within 2-3 days for maximum crunch!
Nutritional Information (Per Cookie, Approximate)
Let’s keep it real—these are a treat! But it’s always good to know what you’re enjoying. The values below are estimates and can vary based on specific ingredients used and the size of your cookies.
Calories: 200 | Carbohydrates: 26g | Fat: 10g | Sugar: 18g | Protein: 2g
Remember, life is all about balance. Enjoy one (or three!) of these decadent cookies with your favorite holiday beverage, and savor every single bite.
Final Thoughts: Let’s Keep the Cookie Joy Going!
Well, there you have it—my ultimate Chocolate Candy Cane Cookies. I hope this recipe brings as much joy to your kitchen as it does to mine. Remember, baking is about the experience: the laughter, the stories, and the incredible satisfaction of sharing something you made with your own two hands.
Don’t be afraid to put on your favorite holiday playlist, crank it up, and make a beautiful mess. That’s where the real magic happens. I’d love to see your creations! Tag me on social @FoodMeld with your cookie photos and stories. You’ve got this. Now go bake something unforgettable!
Happy Holidays,
Jackson


