Chicken Breast Tasting Board: Your Chef’s Table Awaits at Home
Hey there, fellow flavor-chaser. Jackson here. Let’s be real for a second. Have you ever been at a restaurant, nibbling on one of those beautiful chef’s tasting platters, and thought, “Man, I wish I could make this at home”? That moment where you get to try a little bite of this, a little dip of that, and every flavor is a surprise party for your taste buds? I’ve been there too. The good news? That feeling isn’t reserved for fancy nights out. It’s absolutely something we can create in our own kitchens, with a little creativity and zero pretension.
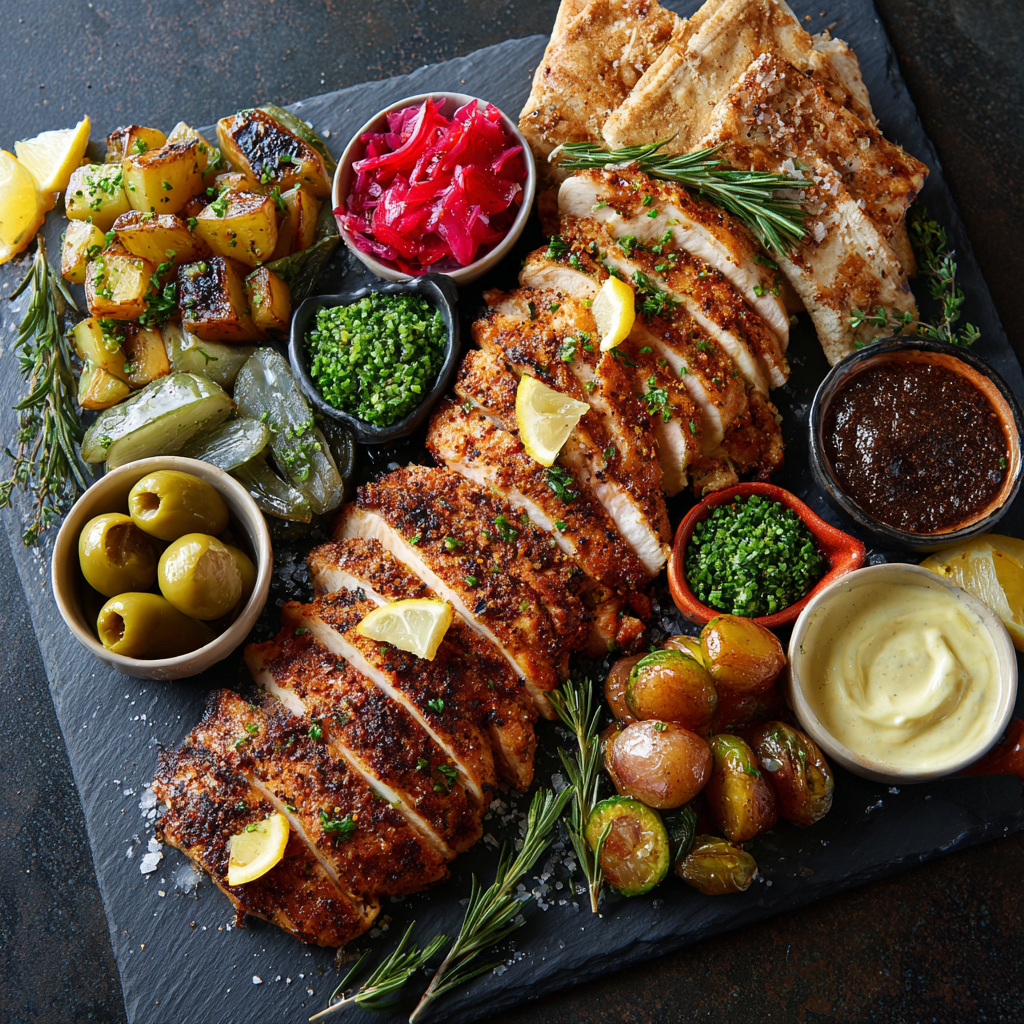
That’s why I’m so pumped to share this Chicken Breast Tasting Board with you. This isn’t just a recipe; it’s an experience. We’re taking the humble, sometimes-overlooked chicken breast and turning it into the star of a show-stopping spread. Imagine juicy, tender pieces of chicken, each wearing a completely different flavor jacket—zesty Lemon Herb one minute, smoky Spicy Cajun the next, and sweet-savory Teriyaki after that. We’ll surround them with vibrant dips, crunchy-cool sides, and soft bread for soaking it all up.
The best part? It’s incredibly simple. No complicated techniques, no hours of prep. Just bold, satisfying food that’s built for sharing, for laughing over, and for making your average Tuesday night feel like a celebration. This is Food Meld in a nutshell: taking simple ingredients, melting together inspiration from everywhere, and creating something unforgettable. So, grab your favorite board or platter, and let’s turn your kitchen into the most exciting table in town. No reservations required.

The Night That Sparked the Idea
This whole “tasting board” obsession of mine? It started in my grandma’s kitchen, though she’d never call it that. She called it “clean-out-the-fridge Friday.” She’d take one protein—often a roasted chicken—and present it three or four different ways on her big, chipped porcelain platter. A little pile with gravy, another with her spicy pepper relish, some chopped up in a mustardy salad. It was our own family-style tasting menu, and the rule was you had to try it every which way.
Fast forward to culinary school, and I saw the same principle dressed up in chef’s whites: a single, perfect ingredient, explored through multiple lenses of flavor and texture. It was storytelling on a plate. I loved the idea but wanted to strip away the intimidation factor. I started playing with chicken breast because it’s our kitchen canvas—mild, lean, and ready to carry any flavor we throw at it. The first time I laid out my own version for friends, with three saucy, glazed, and herbed-up chicken pieces and a mess of dips between us, the reaction was pure magic. “It’s like we’re at a restaurant!” one said, with her mouth full. That’s the moment I knew this had to be a Food Meld staple. It’s that “wow” moment, straight from my family’s table to yours.
Your Flavor Arsenal: What You’ll Need
Here’s the fun part—gathering your flavor squad. This is less about strict rules and more about building your dream team. Feel free to swap, change, and make it yours!
For the Chicken Canvas:
- 2 large boneless, skinless chicken breasts: Look for plump, even-sized breasts. Chef Insight: Slicing them horizontally (butterflying) into 3-4 thinner cutlets is the #1 secret to quick, even cooking and maximizing surface area for all those delicious flavors.
- 2 tbsp Olive oil: Our cooking workhorse. A good extra virgin olive oil adds a fruity note, but avocado or canola oil work great for high-heat searing.
- Kosher salt & freshly cracked black pepper: The non-negotiable foundation. Season generously and fearlessly.
Flavor Idea #1: Lemon Garlic Herb
- 2 cloves garlic, minced: Fresh is best here for that bright, pungent kick.
- Zest of 1 lemon + 1 tbsp juice: The zest is where the magic sunny oil lives. Sub Tip: No fresh lemon? 1 tsp dried lemon peel and a splash of white wine vinegar can pinch-hit.
- 1 tsp fresh thyme leaves (or ½ tsp dried): Earthy and elegant.
- 2 tbsp fresh parsley, chopped: For a fresh, clean finish.
Flavor Idea #2: Spicy Cajun
- 1 tbsp Cajun seasoning blend: Check the salt content! If it’s very salty, reduce the salt on the chicken itself. Chef Hack: Make your own by mixing 1 tsp smoked paprika, ½ tsp garlic powder, ½ tsp onion powder, ¼ tsp cayenne, ¼ tsp dried oregano, and ¼ tsp black pepper.
- 1 tsp smoked paprika: This isn’t the hot stuff—it’s for that deep, campfire smokiness. The soul of the rub.
- 1 tsp olive oil: To make a paste that really clings to the chicken.
Flavor Idea #3: Teriyaki Glaze
- 3 tbsp soy sauce (or tamari for gluten-free): The salty-umami backbone.
- 1 ½ tbsp honey (or maple syrup): For shine and sweet balance.
- 1 clove garlic, minced: Because garlic belongs everywhere.
- 1 tsp sesame oil: A few drops add an incredible, nutty fragrance. Don’t skip it!
- 1 tsp fresh ginger, grated (optional but awesome): Adds a zippy, warm dimension.
For the Board & Dipping Station:
- Dips: Store-bought is totally fine! I love chimichurri (herby, tangy), honey mustard (sweet & sharp), and a garlic aioli or creamy dill yogurt sauce (cooling).
- Board Stars: Roasted baby potatoes, grilled zucchini & bell peppers, cornichons or olives, crusty bread or warmed pita, lemon wedges, and a handful of fresh herbs (parsley, cilantro, chives).
Don’t feel locked into these three flavors! The “Creamy Dijon” option in the intro (mix 2 tbsp Dijon with 3 tbsp Greek yogurt and pepper) is a fantastic fourth. Or try a pesto-rubbed piece, or a sprinkle of za’atar and sumac. The board is your world.
Let’s Build Some Flavor: Step-by-Step
Ready to cook? Put on some tunes, clear some counter space, and let’s do this. We’re going to prep, cook, and assemble like a pro.
Step 1: The Chicken Prep (5 minutes)
Place one chicken breast on your cutting board. Lay your palm flat on top. Using a sharp knife, slice horizontally through the middle, as if you were opening a book, to create two thinner cutlets. Repeat with the second breast. You’ll have 4 cutlets total. Pro Tip: If they’re still thick, you can gently pound them between two pieces of plastic wrap to an even ½-inch thickness. This ensures lightning-fast, even cooking.
**Safety & Slickness Hack:** Pat the chicken completely dry with paper towels before you do anything. Dry chicken = beautiful golden sear. Wet chicken = sad, steamy chicken. This is my #1 rule for perfect poultry.
Step 2: Flavor Marination Station (10 minutes)
In three separate small bowls, mix the ingredients for each of your three flavors. This is where the party starts! For the Lemon Garlic Herb, just mix everything together. For the Spicy Cajun, mix the seasoning and paprika with the oil to make a paste. For the Teriyaki Glaze, whisk the soy, honey, garlic, and sesame oil together. Now, assign each chicken cutlet to a bowl (you’ll have one extra piece—choose its favorite flavor or split a mixture!). Use your hands or a brush to coat each piece thoroughly. Let them sit for 10 minutes while your pan heats up. Even a short rest lets the flavors start to get friendly with the chicken.
Step 3: The Perfect Sear (12-15 minutes)
Heat a large skillet (cast-iron is my MVP here) or grill pan over medium-high heat. Add a glug of olive oil. We’re going to cook the chicken in batches to avoid crowding the pan, which leads to steaming. Start with the Lemon Herb or Cajun pieces, as the Teriyaki glaze can burn if the pan’s too hot at the end.
Place the chicken in the hot pan. You should hear a confident sizzle. Do not move it! Let it cook, undisturbed, for 3-4 minutes, until you can see the edges turning opaque and you get a gorgeous golden-brown sear. Flip and cook for another 3-4 minutes on the other side, until cooked through (internal temp of 165°F, or juices run clear). Remove to a clean plate.
Wipe out the pan slightly if there are burned bits, reduce heat to medium, and add the Teriyaki-glazed piece. Cook as above. In the last minute of cooking, you can pour any remaining teriyaki glaze into the pan to bubble and thicken around the chicken, creating a sticky, glossy finish.
**Resting is Non-Negotiable:** Once all chicken is cooked, let it rest for 5 minutes on the plate before slicing. This lets the juices redistribute, guaranteeing every bite is succulent, not dry.
Step 4: Board Assembly & The Grand Finale (5 minutes)
While the chicken rests, get your board or large platter. Arrange your dips in small bowls or ramekins and place them on the board. Slice your rested chicken against the grain into beautiful strips or keep as whole cutlets—your call. Artfully arrange the different chicken flavors in their own sections on the board. Fill in all the glorious empty spaces with your roasted potatoes, grilled veggies, bread, and garnishes. The goal is abundance, color, and invitation. Scatter those lemon wedges and fresh herbs over everything like confetti.
How to Serve This Masterpiece
Place the board right in the center of the table. Hand out some small plates and forks, but encourage everyone to dig in with their hands, to build their perfect bite. That’s the spirit of it! The beauty is in the mixing and matching. Suggest combinations: “Try the Cajun chicken with a dab of cool garlic aioli on a potato,” or “The Lemon Herb piece wrapped in pita with a drizzle of chimichurri is *chef’s kiss*.”
This is casual, interactive dining at its best. It encourages conversation, pointing, and sharing—“Ooh, you have to try this one next!” It’s perfect for a date night in, a fun dinner with a couple of friends, or even a solo adventure where you get to be the chef and the delighted customer.
Mix It Up! Your Creative Twists
Once you’ve got the formula down, the world is your chicken board. Here are a few spins to try:
- Mediterranean Mezze Style: Swap flavors for Greek (lemon, oregano, garlic), Harissa Yogurt (harissa paste mixed into yogurt), and Za’atar Spiced (rub with olive oil and za’atar). Serve with hummus, tabbouleh, and feta.
- Asian Fusion Street Food: Go with Gochujang Glaze, Sweet Chili Lime, and Five-Spice Rubbed. Add sides like quick-pickled cucumber, steamed rice in lettuce cups, and crispy wonton strips.
- All-Out Comfort Food: Try a Buffalo Sauce piece, a BBQ Rub piece, and the Creamy Dijon. Serve with celery sticks, blue cheese dressing, and cornbread muffins.
- Dietary Swaps: Use large portobello mushroom caps or firm tofu slabs for a plant-based board. For a lower-carb option, skip the potatoes and bread and add more roasted veggies like broccoli, cauliflower, and radishes.
Jackson’s Chef Notes & Kitchen Stories
This recipe has been a living, evolving thing in my kitchen. I’ve made it for my most food-snobby friend (who declared it “bistro-level”) and for my 10-year-old nephew who just happily stacked everything on one piece of bread and called it the best chicken sandwich ever. Both reactions were a win.
The biggest lesson? Don’t stress the presentation. The first time, I spent 20 minutes meticulously arranging every single herb. Now, I just pile things on with joyful abandon. A “lived-in” board is a welcoming board. Also, I’ve learned to always make a little extra of whatever dip is the crowd favorite—it’s always the garlic aioli. Always.
FAQs & Quick Fixes
Q: My chicken always turns out dry. What am I doing wrong?
A: Three likely culprits: 1) Not pounding/drying the chicken for even thickness/dryness. 2) Overcooking. Use a meat thermometer! Pull it at 160°F—it’ll carry over to 165° F—it’ll finish cooking as it rests.
3) Skipping the rest. Those 5 minutes off the heat let the juices redistribute so every bite stays tender and juicy.
Q: Can I prep parts of this ahead of time?
Absolutely. You can slice and marinate the chicken up to 24 hours ahead and keep it covered in the fridge. You can also prep the dips and roast the veggies earlier in the day. When it’s time to eat, all you have to do is cook the chicken and assemble the board.
Q: What’s the best pan if I don’t have cast iron?
A heavy stainless-steel skillet works beautifully. Nonstick is fine too—just make sure it’s fully heated before adding the chicken so you still get some color.
Q: How do I keep flavors from mixing together in the pan?
Cook the flavors in batches and wipe the pan lightly with a paper towel between rounds. Save any sugary or glazed flavors (like teriyaki) for last and lower the heat slightly to prevent burning.
Q: Can I make this for a crowd?
Yes—and it’s perfect for entertaining. Scale up by using 4–6 chicken breasts and adding a few extra dips and sides. You can even label flavors with small cards or chalkboard tags for a fun, chef-y touch.
A Final Note from My Kitchen to Yours
This Chicken Breast Tasting Board isn’t about perfection. It’s about play. About turning dinner into something interactive, something shared, something that feels a little special even on a random weeknight.
It’s proof that chicken breast doesn’t have to be boring—and that you don’t need complicated recipes to cook like a chef. You just need curiosity, good seasoning, and the confidence to try a few bold flavors side by side.
So light a candle. Pour a drink. Set the board in the middle of the table and let everyone explore. Mix flavors. Double-dip shamelessly. Laugh when someone declares a favorite and immediately changes their mind two bites later.
If you make this, I need to see it. Tag me @FoodMeld or drop a comment and tell me which flavor stole the show—or what combo you dreamed up next.
Until then, keep cooking curious, keep melding flavors, and remember: your kitchen is already a chef’s table.
— Jackson


