
Cheesy Ground Beef Waffle Sliders – The Game Day Revolution You NEED
Hey friends, Jackson from Food Meld here. Let’s get real for a second. Are you tired of the same old sliders? The ones on those little potato rolls that are cute, sure, but don’t exactly bring the “wow” factor? I was, too. That’s why I got a little messy in my kitchen, threw the rulebook out the window, and created something so ridiculously good, it might just change your game day—and your weeknight dinner—forever.
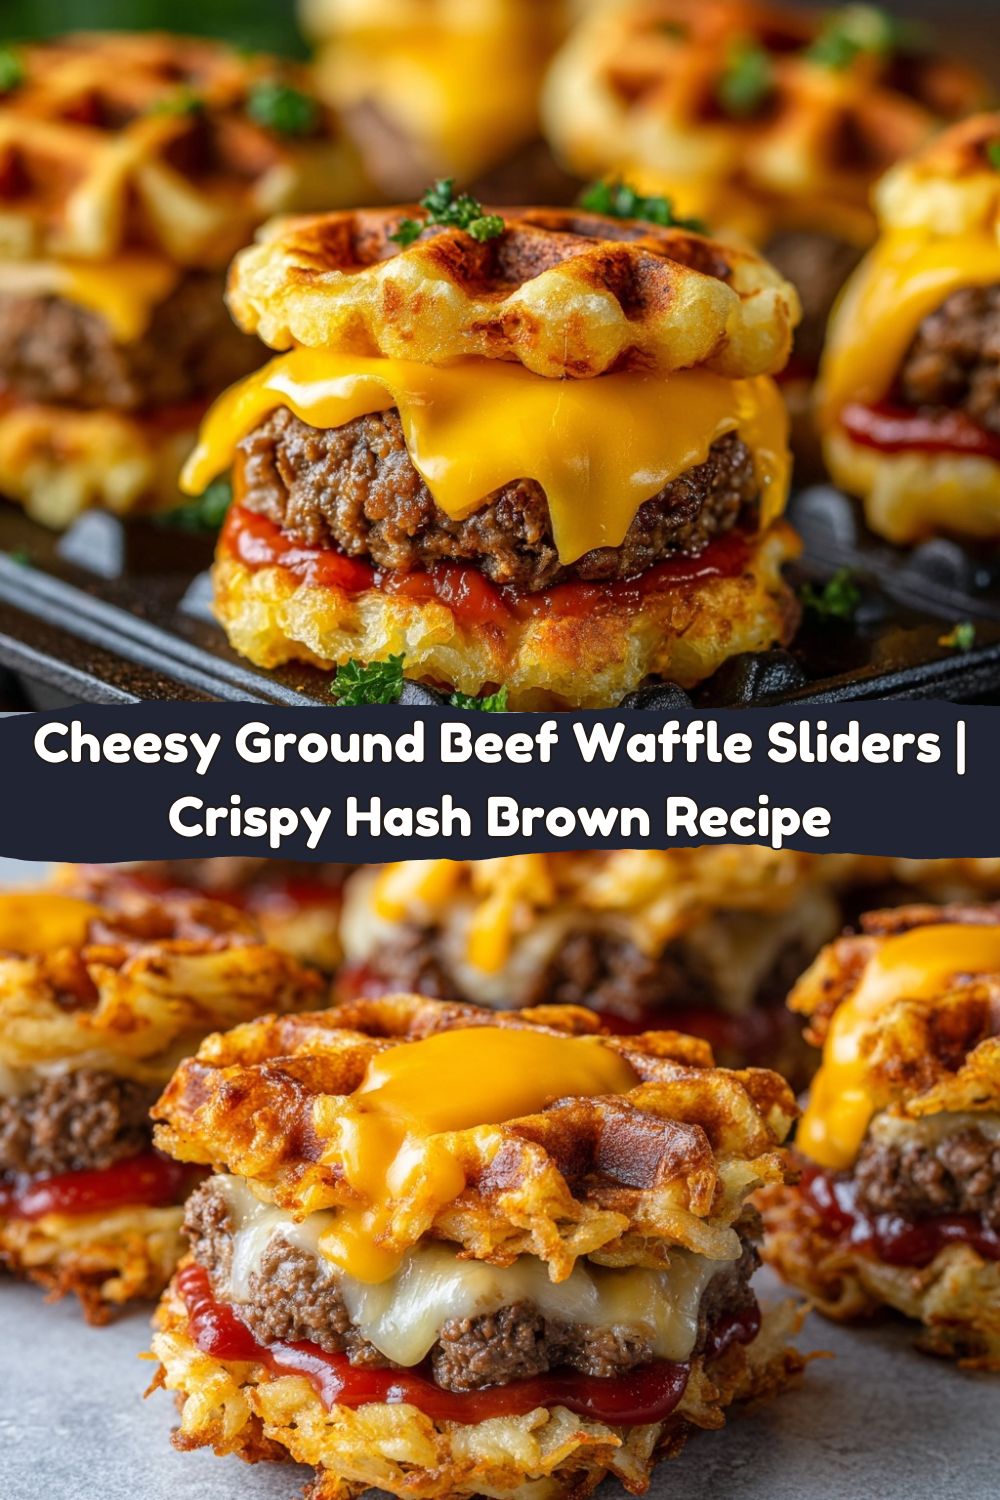
Imagine this: a perfectly seasoned, juicy ground beef patty, draped in the ooiest, gooiest American cheese you can find. But here’s the twist—we’re ditching the bread. Instead, we’re sandwiching this masterpiece between two incredibly crispy, golden-brown hash brown waffles. Yeah, you read that right. We’re using a waffle iron to turn shredded potatoes into the most gloriously crunchy “bun” you’ve ever tasted.
This, my friends, is where burger bliss meets hash brown heaven. It’s a textural symphony in every single bite. You get that satisfying crunch from the waffle, the savory, juicy beef, the melty cheese, and a tangy, secret-weapon ketchup aioli that ties it all together. It’s handheld, it’s fun, and it’s guaranteed to make you the MVP of any party. So, grab your waffle iron and let’s turn up the flavor fun. This is Cheesy Ground Beef Waffle Sliders, and you’re about to become a legend.
The Night I Waffled a Burger (And My Mind)
This recipe was born from a classic “Food Meld” moment of pure, unadulterated kitchen chaos. It was a late Sunday night, and my friends and I were deep in a serious game-day hangover (the good kind). We were hungry, the fridge was a landscape of random ingredients, and the thought of another delivery pizza felt… sad. We had leftover ground beef from taco night, a bag of frozen hash browns, and a serious craving for something crunchy and cheesy.
I looked at my waffle iron, sitting on the counter next to the toaster, and a lightbulb went off. What if… we put the hash browns in the waffle iron? And what if… we put the burger inside that? My friends called me crazy, but I saw method in the madness. I remember the first time we bit into one. The sound was incredible—a loud, definitive CRUNCH that gave way to the juicy, cheesy center. The room went silent except for the sounds of happy chewing. Then, the questions started: “What is this?” “How did you do this?” “Can I have another?” That’s when I knew we had stumbled onto something special. It was a messy, glorious accident that’s now a tried-and-true favorite.
Gather Your Flavor Arsenal
Here’s everything you need to create this masterpiece. Don’t stress about being exact—cooking is about making it yours!
For the Hash Brown Waffle “Buns”:
- 1 (20 oz) bag frozen shredded hash browns, thawed and drained – This is our foundation. The key here is to really squeeze out the excess water using a clean kitchen towel. A dry potato is a crispy potato! If you’re in a pinch, you can shred your own russet potatoes, but the frozen bag is a huge time-saver.
- 2 large eggs – Our binding agent. They hold the hash browns together so your waffle buns don’t fall apart in your hands.
- 1/2 cup shredded cheddar cheese – A little cheesy goodness mixed right into the waffle? Yes, please. It adds flavor and helps with browning.
- Salt and freshly ground black pepper – Season from within! Don’t be shy here; potatoes need a good amount of salt to truly sing.
For the Beef Patties:
- 1 lb ground beef (80/20 blend is perfect) – A little fat is our friend here. It keeps the patties juicy and flavorful. If you use a leaner blend, just be careful not to overcook them.
- 1 tsp garlic powder – For that savory, aromatic punch.
- 1 tsp onion powder – Adds a sweet, deep flavor that complements the beef beautifully.
- Salt and pepper – The dynamic duo of seasoning. Always season your meat!
- 4 slices American cheese, halved – I know, I know, but trust me on this. American cheese has superior melting qualities that are just unmatched for a burger-style slider. It creates that iconic, creamy melt we all love.
For the Tangy Ketchup Aioli:
- 1/4 cup mayonnaise – The creamy base. Use your favorite brand, or better yet, make your own!
- 2 tbsp ketchup – Adds a touch of sweetness and tang.
- 1 tsp pickle juice – This is the secret weapon! It cuts through the richness and adds a bright, briny kick. If you don’t have it, a tiny splash of vinegar works too.
Let’s Build Some Magic: Your Step-by-Step Guide
Okay, team, let’s fire up the waffle iron and get cooking. Follow these steps, and you’ll be a waffle-slider pro in no time.
- Prep Your Waffle Iron. Plug in your mini waffle iron and let it heat up to medium-high. Give it a really good spray with non-stick cooking spray. I mean, really go for it. We want those waffles to release easily and get super crispy. Chef’s Hack: If you have a Belgian waffle maker, you can use that too! Just make one large waffle and cut it into squares after it’s cooked.
- Create the Waffle Batter. In a large bowl, combine your thoroughly drained hash browns, eggs, shredded cheddar, and a generous pinch of salt and pepper. Get your hands in there and mix it all up until everything is evenly combined and coated. It’ll feel a bit messy, and that’s exactly right.
- Cook the Hash Brown Waffles. Spoon about 2 tablespoons of the hash brown mixture onto the hot waffle iron. Close the lid and press down gently. Let them cook for about 5-7 minutes, or until they are deep golden brown and very crispy. Chef’s Tip: Don’t peek for at least the first 4 minutes! You need that steady heat to build the crunch. The steam will naturally release when they’re ready. Transfer them to a wire rack (this keeps them crispy!) and repeat until all your mixture is used up. You should get about 16 mini waffles.
- Cook the Beef Patties. While the waffles are cooking, let’s tackle the beef. In a skillet over medium-high heat, shape your ground beef into 8 small, thin patties. Season both sides liberally with the garlic powder, onion powder, salt, and pepper. Cook for about 3-4 minutes per side, or until they’re cooked to your liking. In the last minute of cooking, place a halved slice of American cheese on each patty. Let it get all melty and glorious.
- Whip Up the Aioli. This is the easiest part. In a small bowl, stir together the mayo, ketchup, and that magical pickle juice until it’s smooth and beautifully pink.
- ASSEMBLE! This is the best part. Grab one crispy hash brown waffle. Top it with a cheesy beef patty. Dollop a teaspoon of that tangy aioli on top. Crown it with another hash brown waffle. Gently press together and behold your creation. Repeat with the rest. You’ve just made culinary magic.
How to Serve These Show-Stopping Sliders
Presentation is part of the fun! Don’t just throw these on a plate. Stack them high on a wooden cutting board or a large platter for that rustic, “dig in” feel. I like to drizzle a little extra aioli over the top and sprinkle on some chopped fresh chives or green onions for a pop of color.
Since these are the star of the show, keep your sides simple. A big, crisp dill pickle spear on the side is a non-negotiable for me. A light, tangy coleslaw helps cut through the richness, or for the ultimate comfort food spread, a bowl of sweet potato fries or onion rings never disappoints. For game day, I just put the whole platter in the middle of the table with some napkins and watch them disappear.
Make It Your Own: Creative Twists & Swaps
The beauty of this recipe is its versatility. Once you’ve mastered the basic blueprint, the world is your oyster! Here are a few of my favorite ways to mix it up:
- The “Breakfast Slider”: Swap the ground beef for cooked breakfast sausage patties and use a slice of cheddar cheese. Add a fried egg inside for the ultimate breakfast-for-dinner experience.
- Spicy Southwest Style: Mix 1 tbsp of taco seasoning into the ground beef. Swap the American cheese for pepper jack, and add a spoonful of pickled jalapeños inside with the aioli.
- The “Big Mac” Vibe: Change up the sauce! Mix mayo, ketchup, sweet relish, a touch of vinegar, and a pinch of paprika for a special sauce that’s downright addictive.
- Turkey or Chicken Twist: For a leaner option, use ground turkey or chicken. Just add an extra tablespoon of olive oil to the pan to keep them moist, and season well.
- Loaded Potato Style: Mix cooked, crumbled bacon and sliced green onions right into the hash brown waffle batter. It’s like a fully loaded baked potato in waffle form!
Jackson’s Kitchen Notes & Stories
This recipe has come a long way since that first chaotic night. I’ve learned that the single most important step is draining the hash browns. I can’t stress it enough. I once got lazy and skipped it, and I ended up with sad, steamed potato patties instead of crispy waffles. Lesson learned!
Another fun evolution was the aioli. It started as just plain ketchup, but one day I was eating a burger with “fancy sauce” and thought, why not here? The pickle juice was a last-minute addition that made all the difference. It’s these little “what if” moments that make cooking such an adventure. Don’t be afraid to play with your food!
Your Questions, Answered!
I get a lot of DMs about this recipe, so here are the answers to the most common questions.
Q: My hash brown waffles are sticking to the iron! What am I doing wrong?
A: Two likely culprits: 1) Not enough non-stick spray. Be generous! 2) The waffles aren’t cooked long enough. They need that full time to form a crispy crust that releases naturally. Let them go a minute or two longer until the steam stops pouring out.
Q: Can I make these ahead of time for a party?
A> You can! Cook the hash brown waffles and the patties separately. Let them cool completely, then store them in airtight containers in the fridge. When you’re ready to serve, re-crisp the waffles in a 400°F oven for 5 minutes and warm the patties in the microwave or a skillet. Then, assemble and serve immediately.
Q: My cheese isn’t melting nicely on the beef. Help!
A> The key is to add the cheese at the very end of the patty’s cooking time. Once the patty is done, place the cheese on top, then cover the skillet with a lid for just 30-60 seconds. The trapped steam will melt the cheese perfectly without overcooking the beef.

Cheesy Ground Beef Waffle Sliders : Crispy, Melty Game Day Favorite
- Total Time: 35 minutes
- Yield: 8 Sliders 1x
Description
Forget the buns—these sliders pack seasoned ground beef, gooey American cheese, and a tangy ketchup aioli between crispy hash brown waffle rounds. It’s the ultimate tailgate snack or indulgent comfort food moment, bringing texture, flavor, and fun in every handheld bite. Think sliders with extra crunch and major viral appeal.
Ingredients
Waffle Buns:
1 bag frozen shredded hash browns (thawed and drained)
2 eggs
1/2 cup shredded cheddar
Salt and pepper
Beef Patties:
1 lb ground beef
1 tsp garlic powder
1 tsp onion powder
Salt and pepper
4 slices American cheese, halved
Ketchup Aioli:
1/4 cup mayo
2 tbsp ketchup
1 tsp pickle juice
Instructions
Preheat waffle iron and spray with nonstick spray.
Mix hash browns, eggs, cheese, salt, and pepper. Spoon into mini waffle iron (about 2 tbsp per waffle), cook until golden and crisp.
Form ground beef into 8 small patties. Season with garlic, onion powder, salt, and pepper. Cook in a skillet until browned and cooked through.
Add cheese to each patty and let melt.
Mix aioli ingredients until smooth.
Assemble sliders: waffle, beef patty with cheese, aioli, top waffle. Serve hot.
- Prep Time: 15 minutes
- Cook Time: 20 minutes
Nutrition
- Calories: 310 / Slider
- Sodium: 450mg / Slider
- Fat: 21g / Slider
- Carbohydrates: 14g / Slider
- Protein: 16g / Slider
Nutritional Info (For Your Info!)
Hey, we’re all about balance here at Food Meld. This is an indulgent, fun, comfort food recipe, and it’s okay to enjoy that! Here’s a rough breakdown per slider to help you plan. Remember, these are estimates and can vary based on the specific brands of ingredients you use.
- Calories: ~310
- Protein: 16g
- Carbohydrates: 14g
- Fat: 21g
- Sodium: 450mg
To lighten it up a bit, you can use lean ground beef (90/10), low-fat cheese, and an egg white in place of one whole egg. But my philosophy? When you’re going for a recipe like this, go for the full flavor experience and savor every single, incredible bite.
Let’s Keep the Fun Going!
And there you have it! Your new secret weapon for your next game day, party, or just a Tuesday night that needs a major upgrade. These Cheesy Ground Beef Waffle Sliders are more than just a recipe; they’re a reminder that the best meals often come from a little bit of creativity and a willingness to get a little messy in the kitchen.
I want to see your creations! Did you add bacon? Make it spicy? Try the breakfast version? Tag me on social @FoodMeld with your photos. I love seeing how you make these recipes your own. Now get out there, fire up that waffle iron, and let’s cook something awesome together.
Until next time, keep melding those flavors!
– Jackson


