Forget the Takeout Menu: You’re Making Cast Iron Skillet Pizza Tonight
Hey friends, Jackson from Food Meld here. Let’s talk about one of life’s greatest simple pleasures: a perfect slice of pizza. I’m not talking about the floppy, foldable New York style or the cracker-thin crust kind (though I love those, too). I’m talking about a pizza with a crust that sings. A crust that’s audibly crispy on the bottom, chewy and airy around the edges, and sturdy enough to hold a mountain of your favorite toppings without going soggy. Sound good? I knew it would.
This, my friends, is the magic of the cast iron skillet pizza. It’s our secret weapon for achieving that incredible, pizzeria-level texture right on our stovetop. No fancy pizza stone, no screaming-hot professional oven required. Just your trusty, well-seasoned skillet and about 20 minutes of your time. This method is a total game-changer. It’s how we turn a simple ball of dough into an unforgettable, shareable masterpiece that’s bursting with flavor and fun. It’s the ultimate “wow, you made that?!” dish, and I’m so excited to show you how easy it truly is. So, grab your skillet, and let’s cook something awesome together.
The Night I Fell in Love with Skillet Pizza
I’ll never forget the first time I made a pizza in a cast iron skillet. It was a classic “Jackson” move—a complete kitchen experiment born from desperation. My buddy Mike was coming over for our weekly movie night, and I’d completely forgotten to order the pizza. The cupboard was pretty bare: some leftover dough from a bread experiment, a half-jar of marinara, and a sad-looking block of mozzarella. But I had my big cast iron skillet sitting on the stove, looking at me like, “Well? What are you waiting for?”
I figured, worst-case scenario, we order delivery and I have a funny story. I heated up the skillet, tossed the dough in, and let it sizzle. The smell that filled my kitchen was unbelievable—toasty, yeasty, and promising. When I pulled that golden, bubbling beauty out of the oven, Mike’s jaw literally dropped. We devoured the whole thing before the opening credits finished rolling. It was messy, imperfect, and absolutely delicious. That “what if we tried this?” moment is the heart and soul of Food Meld, and this pizza is a delicious reminder that the best meals often start with a happy accident.
Gathering Your Flavor Arsenal
Part of what makes this recipe so great is its simplicity. You only need a few key players to create something spectacular. Here’s what you’ll need:
- 1 ball of pizza dough (about 12–14 oz): This is your canvas. You can absolutely make your own (I have a fantastic no-knead recipe I’ll share soon!), but a high-quality store-bought dough from the deli section or even your local pizzeria works beautifully. Chef’s Insight: Let the dough sit at room temperature for at least 30 minutes before stretching. Cold dough is stubborn and will fight you every step of the way!
- 1 tbsp olive oil: This is our secret weapon for that ultra-crispy, fried bottom crust. We’re not just greasing the pan; we’re essentially pan-frying the dough. Use a good extra-virgin olive oil for a hit of flavor.
- ½ cup pizza sauce: Don’t overdo it! Too much sauce leads to a soggy pizza. Use your favorite jarred brand or whip up a quick homemade version by mixing crushed San Marzano tomatoes with a pinch of salt, dried oregano, and a garlic clove. Sub Tip: No pizza sauce? A simple basil pesto or even a drizzle of garlic-infused olive oil (white pizza style) makes an incredible base.
- 1 to 1 ½ cups shredded low-moisture mozzarella cheese: I highly recommend buying a block of mozzarella and shredding it yourself. The pre-shredded stuff is coated in anti-caking agents that prevent it from melting into those glorious, stretchy cheese pulls we all dream about.
- Toppings of your choice (pepperoni, mushrooms, bell peppers, onions, etc.): This is where you make it yours! Chef’s Hack: If using veggies like mushrooms or peppers, I like to give them a quick sauté beforehand. This cooks out excess water so your pizza doesn’t get steamy and wet.
- Fresh basil or red pepper flakes (optional for serving): The finishing touches! A few torn basil leaves added after baking bring a fresh, aromatic punch. A sprinkle of red pepper flakes adds a welcome kick of heat.
Let’s Build Your Masterpiece, Step-by-Step
Alright, let’s get our hands dirty and make some pizza magic happen. Follow these steps, and you’ll be a cast iron pizza pro in no time.
Step 1: Preheat and Position. Crank your oven to 450°F (232°C). This high heat is crucial for getting that oven-spring and beautifully bubbled cheese. If your skillet is broiler-safe (most are!), place your oven rack in the center position. We’ll use the broiler at the end for a final blast of heat.
Step 2: Heat the Skillet. This is the most important step! Place your 10-12 inch cast iron skillet over medium heat on the stovetop and let it get nice and hot for a few minutes. Add the tablespoon of olive oil and swirl it around to coat the bottom. You should see the oil shimmering—that’s how you know it’s ready.
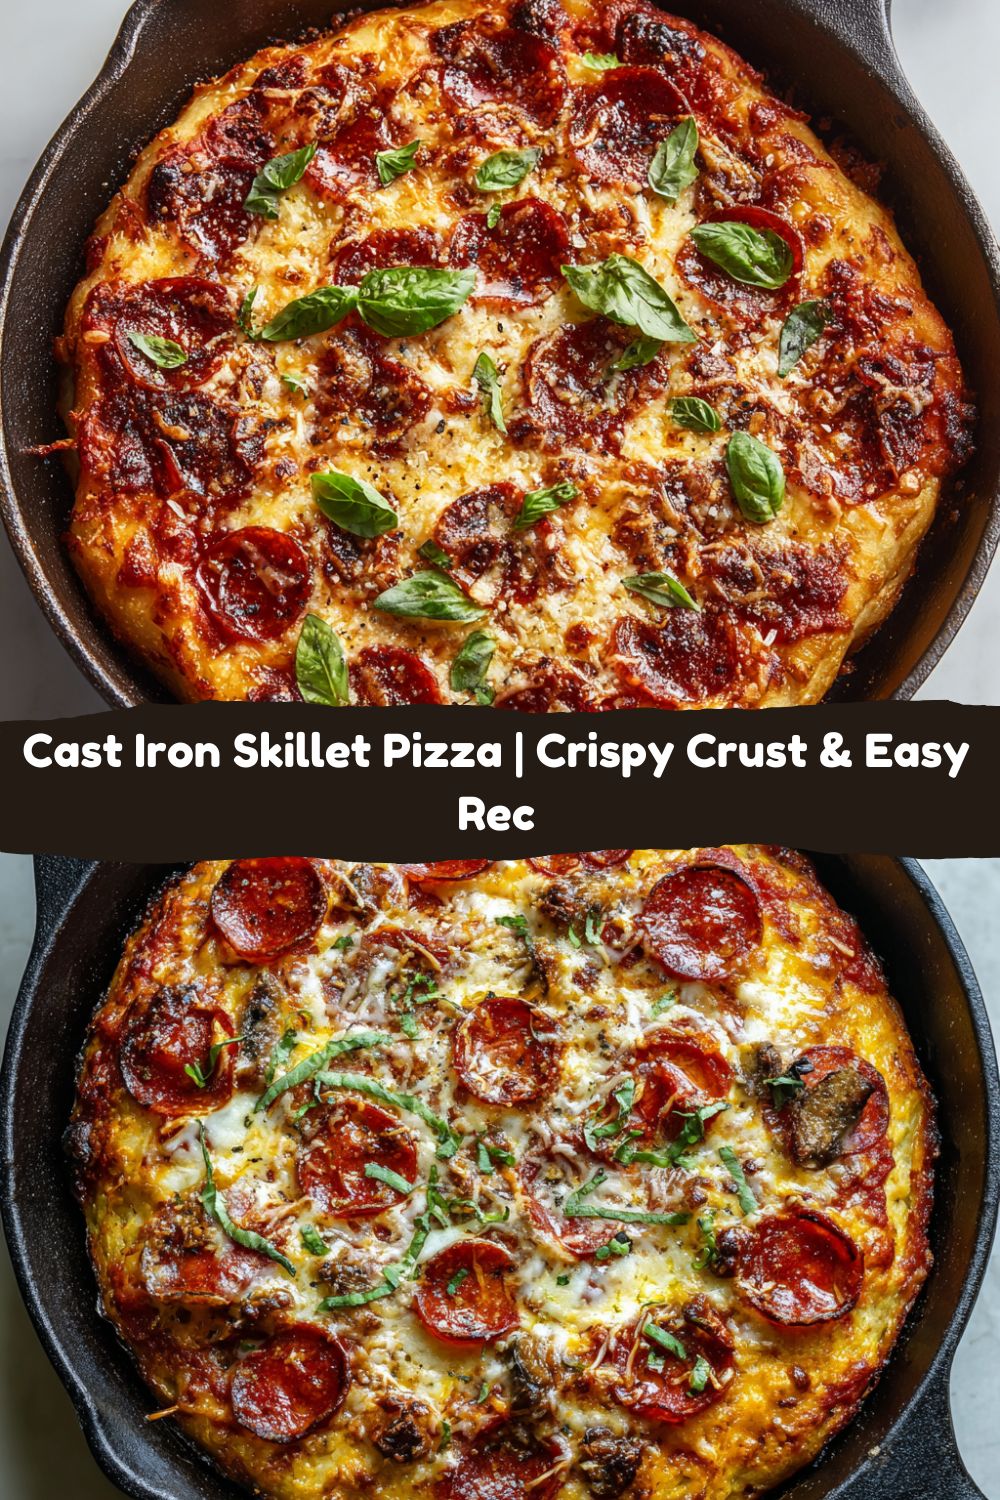
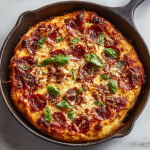
Step 3: Shape and Sear the Dough. On a lightly floured surface, gently stretch or roll your room-temperature dough into a circle roughly the size of your skillet. Don’t stress about perfection; a rustic, hand-stretched look is what we’re going for! Carefully lay the dough into the hot, oiled skillet. It will immediately start to sizzle—that’s the sound of success! Let it cook for 2-3 minutes. Peek underneath with a spatula; you’re looking for a few golden-brown spots. This pre-cook seals the bottom and ensures a shatteringly crisp crust that can stand up to the toppings.
Step 4: Top It Off! Remove the skillet from the heat. Now, work relatively quickly to assemble your pizza. Spread your sauce in an even layer, leaving a small border for the crust. Sprinkle on the cheese, and then artfully arrange your toppings. Remember: less is more. Overloading will make the center soggy.
Step 5: Bake to Bubbly Perfection. Using an oven mitt (that skillet handle is HOT!), transfer the entire skillet to your preheated oven. Bake for 12-15 minutes. You’ll know it’s done when the crust is a deep golden brown and the cheese is magnificently bubbly and slightly spotted.
Step 6: The Broiler Blitz (Optional but Highly Recommended). For that final pizzeria touch, switch your oven to broil for the last 1-2 minutes. WATCH IT CLOSELY! The line between perfectly bronzed and tragically burnt is very thin under the broiler. This gives the cheese and toppings a beautiful, irresistible finish.
Step 7: The All-Important Rest. Carefully remove the skillet from the oven (remember, the handle is a trap—I always leave an oven mitt on it as a reminder!). Let the pizza cool in the skillet for just 2-3 minutes. This allows the cheese to set slightly so you get clean slices instead of a cheesy avalanche. Then, slide it onto a cutting board, slice it up, and dig in!
How to Serve This Beauty
The best way to serve this pizza is right out of the skillet at the table—it’s a huge showstopper! Let everyone gather around and grab a slice while it’s still piping hot. I like to finish it with a flourish: a scattering of fresh basil leaves, a drizzle of high-quality olive oil, or a pinch of flaky sea salt. Serve it with a simple side salad of peppery arugula with a lemon vinaigrette to cut through the richness. And have plenty of napkins on hand. This is meant to be enjoyed with your hands, and a little mess is just a sign of a good time.
Make It Your Own: Creative Twists
The fun doesn’t stop with pepperoni! Here are a few of my favorite ways to mix it up:
- The BBQ Chicken: Swap the pizza sauce for your favorite BBQ sauce. Top with shredded cooked chicken, thin red onion slices, mozzarella, and sharp cheddar. After baking, add a handful of fresh cilantro.
- Breakfast Pizza: Use a garlic-herb oil for the base. Top with cheese, crumbled cooked sausage, and crack a few eggs on top before baking. The eggs will cook perfectly in the oven!
- Fig & Prosciutto: A gourmet twist! Use a base of olive oil or a light smear of ricotta. Top with sliced figs, prosciutto, gorgonzola crumbles, and mozzarella. Finish with a balsamic glaze drizzle after baking.
- Veggie Lover’s Delight: Load up with pre-sautéed mushrooms, bell peppers, and onions. Add artichoke hearts, black olives, and spinach for a full garden party.
- Gluten-Free/Dairy-Free: Use your favorite gluten-free pizza dough and vegan cheese. The cast iron method works great for GF crusts, giving them the structure they often lack.
Jackson’s Chef Notes & Kitchen Stories
This recipe has become a weekly ritual in my kitchen. It’s evolved from that first desperate experiment into my go-to for impressing guests. I’ve learned a few things along the way: don’t be afraid to really get the skillet hot before adding the dough—that sizzle is everything. And my dog, Biscuit, has become the official taste-tester for any rogue pieces of pepperoni that might “accidentally” fall on the floor.
The best part? This pizza has sparked more kitchen confidence in my readers than almost any other recipe. I get DMs all the time from people who swore they couldn’t make pizza at home, holding up their gorgeous, golden skillet creation with pride. That’s what Food Meld is all about. It’s not about being perfect; it’s about having fun and creating those “you’ve gotta try this!” moments for yourself. So, make a mess, play with flavors, and make it yours.
FAQs: Your Pizza Questions, Answered
Q: My dough keeps shrinking back when I try to stretch it. What am I doing wrong?
A: This is almost always because the dough is too cold! Gluten tightens up when it’s chilled. Make sure your dough has had a good 30-60 minutes to come to room temperature. If it’s still being stubborn, walk away for 5 minutes. Let the gluten relax, then try again gently.
Q: Why is my pizza soggy in the middle?
A: The two most common culprits are too much sauce or wet toppings. You really only need a thin layer of sauce—just enough to cover the base. And if you’re using vegetables like zucchini or mushrooms, sauté them first to cook off their excess moisture. Also, ensure your skillet is properly preheated to get that initial sear on the crust.
Q: Can I use a different pan if I don’t have a cast iron skillet?
A: You can try a heavy-bottomed oven-safe stainless steel skillet, but you won’t get *quite* the same level of crispy, fried crust. The cast iron’s incredible heat retention and ability to get screaming hot is what makes this method so special. It’s a kitchen workhorse worth investing in!
Q: How do I get my cheese to brown more on top?
A: Easy! That’s what the broiler is for. Just keep a very, very close eye on it. It can go from perfect to burnt in seconds. Also, placing your cheese-topped pizza on a higher oven rack for the last few minutes of baking can help.
Cast Iron Skillet Pizza
- Total Time: 25 minutes
- Yield: 2 - 3 1x
Description
Crispy edges, a chewy golden crust, and melty cheese bubbling on top—this cast iron skillet pizza brings the pizzeria right into your kitchen. It’s rustic, satisfying, and wildly flavorful with that unbeatable pan-seared texture. Great for weeknights or casual get-togethers, it’s pizza night, upgraded.
Ingredients
1 ball of pizza dough (store-bought or homemade, about 12–14 oz)
1 tbsp olive oil
½ cup pizza sauce
1 to 1 ½ cups shredded mozzarella cheese
Toppings of your choice (pepperoni, mushrooms, bell peppers, onions, etc.)
Fresh basil or red pepper flakes (optional for serving)
Instructions
Preheat oven to 450°F (232°C). If using a broiler-safe skillet, place oven rack in the center.
Heat a 10–12 inch cast iron skillet over medium heat. Add olive oil and swirl to coat the bottom.
Stretch or roll out the dough to roughly fit the skillet. Carefully lay it into the hot skillet. Let cook for 2–3 minutes until bottom starts to crisp.
Spread sauce over the dough, sprinkle with cheese, and add your favorite toppings.
Transfer the skillet to the oven and bake for 12–15 minutes until crust is golden and cheese is bubbling.
For extra crispiness, broil for 1–2 minutes at the end, watching closely.
Cool slightly, then slice and serve straight from the skillet.
- Prep Time: 10 minutes
- Cook Time: 15 minutes
Nutrition
- Calories: 260 per Slice
- Sodium: 470mg per Slice
- Fat: 11g per Slice
- Carbohydrates: 30g per Slice
- Protein: 11g per Slice
Nutritional Info (Approximate)
Prep Time: 10 min | Cook Time: 15 min
Yield: 1 skillet pizza (serves 2-3)
Calories (per slice, 6 slices total): ~260 | Fat: 11g | Saturated Fat: 4.5g | Carbs: 30g | Sugar: 3g | Protein: 11g | Sodium: 470mg
Note: Nutrition information is a rough estimate and can vary greatly based on the specific ingredients and toppings you use.
Final Thoughts
Cast iron skillet pizza is one of those rare recipes that feels both rustic and gourmet at the same time. It takes the simple joy of pizza night and elevates it with that unbeatable crispy-bottomed, chewy-edged crust that only cast iron can deliver. No pizza stone, no specialty oven—just your trusty skillet and a little confidence.
What I love most is how endlessly customizable it is. You can keep it classic with mozzarella and pepperoni, go bold with figs and prosciutto, or even turn it into a breakfast masterpiece with eggs and sausage. Once you master the skillet method, you’ll never look at delivery pizza the same way again. And the best part? It’s fun, it’s interactive, and it always gets that “wow, you MADE this?!” reaction when you set it on the table.
So next time the craving strikes, skip the takeout menu and let your cast iron skillet work its magic. With just a few ingredients and about 20 minutes, you’ll have a bubbling, golden pizza that’s equal parts comfort and showstopper. 🍕🔥


