Your New Favorite Holiday Cookie Is Here (And It’s a Showstopper!)
Hey friends, Jackson from Food Meld here! Is there anything better than the smell of cookies baking in the oven during the holidays? It’s pure magic. But let’s be real—sometimes, our cookie trays can get a little… predictable. Sugar cookies, chocolate chip, maybe a gingerbread man if we’re feeling fancy. They’re all delicious, but this year, I’m challenging you to level up. I’m talking about a cookie that doesn’t just taste incredible but looks like a total work of art.
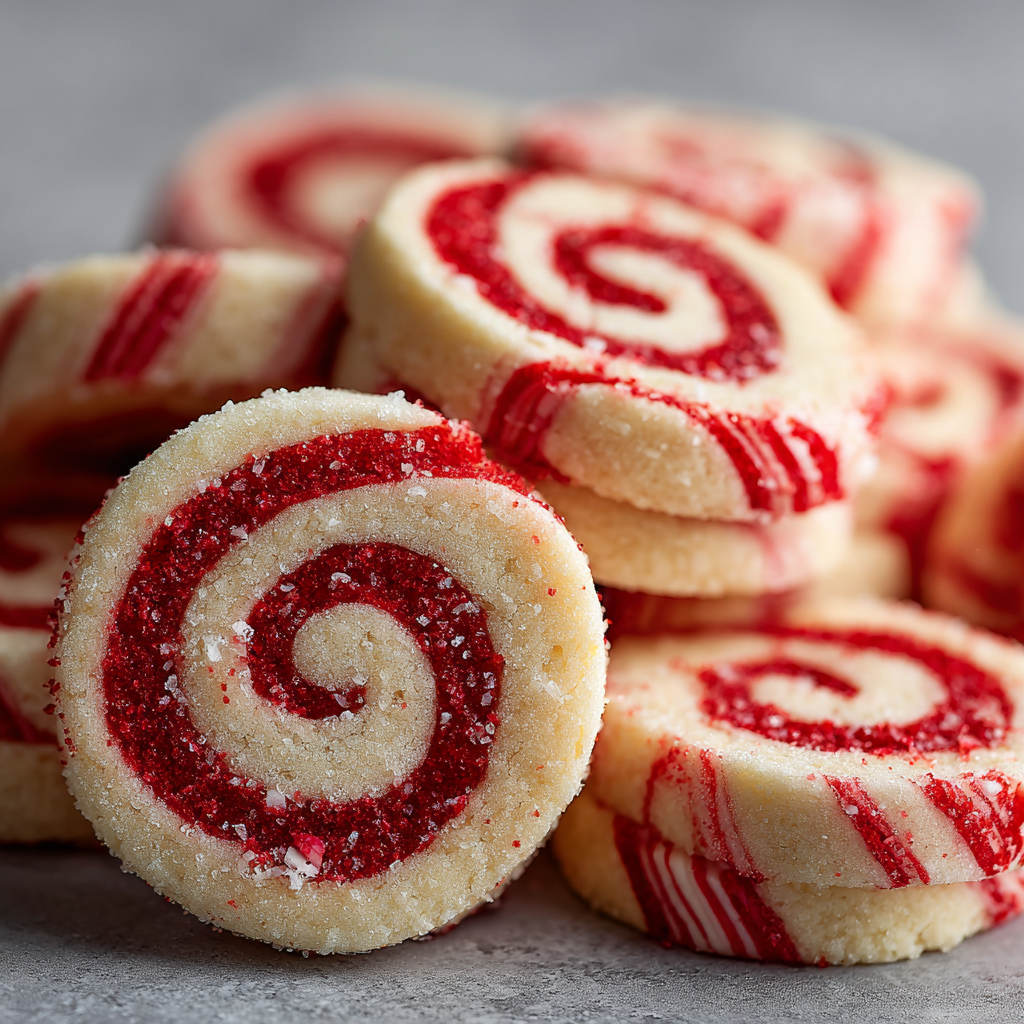
Enter the Candy Cane Swirl Pinwheel Cookie. These little guys are the life of the party. Imagine: a soft, buttery sugar cookie dough, swirled with bold red and pure white, all twisted into a perfect pepperminty spiral. They’re festive, they’re fun, and they have that “wow” factor that makes everyone stop and ask, “You MADE these?!”
Now, I see you. You might be looking at that spiral and thinking, “Jackson, that looks complicated. I’m not a pastry chef.” But trust me on this. We’re keeping it simple, real, and packed with flavor—just like we do here at Food Meld. This recipe breaks it down into totally manageable steps. It’s a little project, the kind that’s perfect for a cozy afternoon with some holiday tunes playing in the background. You’re not just baking cookies; you’re creating edible holiday cheer. So, tie on your apron, grab your favorite mixing bowl, and let’s cook something awesome together. These Candy Cane Pinwheels are about to become your new holiday baking tradition.
A Pinwheel, A Grandma, and a Floury Kitchen
This recipe always takes me right back to my grandma’s kitchen. She was the queen of “from-scratch,” and her counter during December was a landscape of baking sheets, sprinkles, and rolling pins. One year, when I was probably eight or nine, she decided it was time I learned to make her famous pinwheel cookies. I remember being mesmerized as she rolled out the dough. She had this way of making it look like play, not work. Her hands, dusted with flour, would gently guide the rolling pin, and she’d let me be in charge of the food coloring—a job I took very, very seriously.
We’d always make a classic chocolate-vanilla log, but one Christmas, I had a brilliant (or so I thought) idea. “What if we made them red and white? Like a candy cane?” Grandma didn’t miss a beat. She just smiled, handed me the little bottle of red gel, and said, “Let’s see what happens, Jack.” That first batch was a little… pink and blobby. But the taste? Pure peppermint perfection. That “what if we tried this?” moment in her flour-dusted kitchen is the heart and soul of this recipe. It’s a reminder that the best creations often come from a little curiosity and a lot of love.
Gather Your Ingredients: The Flavor Line-Up
Nothing too wild here, just simple, quality ingredients coming together to create something spectacular. Here’s your shopping list:
- 1 cup unsalted butter, softened – This is the foundation of our rich, tender cookie. “Softened” is key! It should give slightly when you press it, not be greasy or melted. Pro tip: leave it on the counter for about an hour before you start. If you’re in a pinch, you can cube it and give it a quick 10-second blast in the microwave, but watch it like a hawk!
- 1 cup granulated sugar – For that classic, sweet cookie taste and to help creame with the butter for a fluffy texture.
- 1 large egg – Our binding agent, bringing everything together. Make sure it’s at room temperature to play nice with the butter.
- 1 1/2 tsp vanilla extract – The warm, cozy background note that makes every sugar cookie sing.
- 1/2 tsp peppermint extract (optional, but highly recommended!) – This is where the “candy cane” magic happens! It gives that cool, festive flavor. If you’re not a huge peppermint fan, you can leave it out for a classic pinwheel, but I love the holiday vibe it brings.
- 2 1/2 cups all-purpose flour – The structure of our cookie. I like to fluff it up in the bag before I scoop and level it off with a knife. No packed flour here!
- 1/2 tsp baking powder – Our little leavening helper, ensuring the cookies are soft and have a slight lift.
- 1/4 tsp salt – Never, ever skip the salt! It balances the sweetness and makes all the other flavors pop.
- Red gel food coloring – I’m a firm believer in gel food coloring for this. It gives you a vibrant, bold red without watering down your dough. Liquid coloring can make the dough sticky and give you a pale pink instead of a festive red.
Let’s Make Some Magic: The Step-by-Step
Alright, team, let’s get our hands dirty! This is where the fun begins. Follow these steps, and you’ll have perfect pinwheels in no time.
- The Creaming Station: In a large bowl, beat that softened butter and granulated sugar together on medium-high speed for a good 2-3 minutes. We’re not just mixing here; we’re “creaming.” You want it to be light, pale, and fluffy. This incorporates air, which is the secret to a tender, not-dense cookie. Scrape down the sides of the bowl with a spatula to make sure everything is getting friendly.
- Wet Ingredient Party: Beat in the egg, vanilla extract, and that festive peppermint extract until everything is just combined and smooth. It might look a little curdled at first, but keep mixing—it’ll come together beautifully.
- Dry Ingredient Meet-Up: In a separate bowl, whisk together your flour, baking powder, and salt. This is your chance to evenly distribute the baking powder and salt so you don’t get a bitter bite. Now, with your mixer on low, gradually add the dry ingredients to the wet. Mix until the dough just comes together and there are no more dry streaks of flour. Chef Hack: Overmixing at this stage can lead to tough cookies. Slow and steady wins the race!
- The Great Divide & Dye Job: Split your dough right down the middle. Leave one half as it is—our beautiful, vanilla-white base. Now, for the other half, it’s time to get colorful. Add your red gel food coloring a little at a time, folding and mixing it in until you have a vibrant, consistent red. Wearing gloves for this part is a pro-move to avoid stained hands!
- Roll & Chill (The First Round): Place each ball of dough between two sheets of parchment paper. Roll each one out into a rectangle, about 1/4-inch thick. The parchment paper is a lifesaver here—it prevents sticking without adding extra flour, which can dry out the dough. Once rolled, slide the parchment-covered dough onto a baking sheet and pop it in the fridge for 20 minutes. This firms it up and makes the next step a breeze.
- The Layering & The Roll: Take your chilled dough out. Peel the top parchment off the white dough. Carefully flip the red dough layer on top of the white one, then peel off the parchment from the red dough. You should have a perfect red-on-white stack. Now, starting from the long side closest to you, use the bottom parchment paper to help you tightly and evenly roll the dough into a log, just like a jelly roll. Don’t worry if it’s not perfect—a little imperfection adds character!
- The Final Chill (Don’t Skip This!): Wrap your beautiful dough log tightly in plastic wrap. This is the most important step for defined swirls! Chill it in the fridge for at least 1 hour, or in the freezer for 30 minutes. This firms up the log so when you slice it, you get clean, sharp spirals instead of smushed blobs.
- Slice & Bake: Preheat your oven to 350°F (175°C) and line your baking sheets with parchment paper. Take your log out and, using a sharp knife, slice it into 1/4-inch thick rounds. Place them about an inch apart on your baking sheets—they don’t spread a ton, but they need a little room to breathe. Bake for 8-10 minutes. You’re looking for the edges to be just set; the centers might still look a tiny bit soft. That’s perfect! They’ll firm up as they cool.
- The Cool Down: Let the cookies cool on the baking sheet for 5 minutes before transferring them to a wire rack to cool completely. This patience allows them to set up so they don’t break apart.
How to Serve These Festive Spirals
Okay, you’ve baked these gorgeous cookies. Now, how do you present them like the rockstars they are?
For a classic holiday cookie tray, pile them high on a beautiful platter. They look incredible next to dark chocolate crinkles and simple gingerbread men—the red and white really pops against darker cookies. If you’re going the gift route, stack them in a cellophane bag tied with a rustic piece of twine or a cute ribbon. They make for a heartfelt, homemade gift that says, “I put real thought into this.”
And for the ultimate experience? Serve them with a tall glass of cold milk, a rich hot chocolate, or even a festive peppermint mocha. The cool, creamy drink is the perfect partner for the buttery, minty cookie. It’s a cozy moment in a bite.
Mix It Up: Your Pinwheel, Your Rules!
Once you’ve mastered the classic, the “what if” fun begins! Here are a few of my favorite twists on this versatile recipe:
- The Chocolate Peppermint Dream: Substitute 1/4 cup of the flour in the red half with 1/4 cup of unsweetened cocoa powder. You’ll get a gorgeous chocolate and peppermint pinwheel that tastes like a holiday candy bar.
- Funfetti Festive: Skip the peppermint extract and add a handful of rainbow sprinkles to the white dough before you roll it out. It’s a birthday party in cookie form!
- Green & Red Christmas Swirl: Why stop at one color? Divide the dough into three parts. Leave one white, dye one red, and dye one green. Roll each color out into a smaller rectangle, layer them (red, white, green), and roll. You’ll get a stunning tri-color spiral.
- Almond Joy: Swap the peppermint extract for almond extract in both halves of the dough. It’s a wonderfully warm, nutty variation that feels super elegant.
- Gluten-Free Glow-Up: No problem! Use a 1:1 gluten-free all-purpose flour blend. The dough might be a tad more delicate, but the chilling steps will help it hold its shape perfectly.
Jackson’s Chef Notes & Kitchen Confessions
This recipe has seen a few evolutions in my kitchen. The first time I made it without my grandma, I was so impatient I skipped the final chill. Big mistake. I ended up with “abstract art” cookies instead of pretty pinwheels. The dough was too soft to slice, and I had to smoosh it all back into a ball and start the chilling process over. Lesson learned: the chill is non-negotiable for those perfect spirals!
Another fun tip? If you have extra dough logs, you can wrap them tightly and freeze them for up to 3 months. Then, whenever you need a last-minute cookie fix or an unexpected guest shows up, you can just slice and bake frozen cookies, adding a minute or two to the baking time. It’s my secret weapon for always having something homemade on hand.
Your Questions, Answered!
Q: My dough is too sticky to roll. What did I do wrong?
A: This usually means it’s a little too warm or you might have added a touch too much liquid (if you used liquid food coloring). No worries! Just pop the sticky ball of dough into the fridge for 15-20 minutes to firm up. When you roll it out between the parchment paper, it should be much more manageable.
Q: Why did my swirls get blurry or smushed when I sliced them?
A> This is almost always a chilling issue. The log wasn’t firm enough. Make sure you chill for the full hour in the fridge (or 30 min in the freezer). Also, using a sharp, thin-bladed knife (not a serrated one) and using a gentle sawing motion will give you the cleanest cuts.
Q: Can I make the dough ahead of time?
A> Absolutely! This is a great make-ahead recipe. You can keep the wrapped dough log in the fridge for up to 3 days before slicing and baking. Just let it sit at room temperature for about 5-10 minutes before slicing if it’s super hard.
Q: My cookies spread and lost their shape. Help!
A> A few culprits here: 1) Your butter might have been too soft or melted. 2) You might have over-mixed the dough after adding the flour. 3) Your baking powder might be old. And always, always make sure your oven is fully preheated!

Candy Cane Swirl Pinwheel Cookies
- Total Time: ~1 hr 30 mins
- Yield: 30 Cookies 1x
Description
Festive, fun, and fabulously swirled — the ultimate holiday cookie showstopper.
These red-and-white sugar cookies are buttery and soft with a cheerful peppermint twist. Rolled into pinwheels and sliced into perfect spirals, they bring bold holiday vibes to cookie trays, gift boxes, and cozy nights in.
Ingredients
1 cup unsalted butter, softened
1 cup granulated sugar
1 large egg
1 1/2 tsp vanilla extract
1/2 tsp peppermint extract (optional for candy cane flavor)
2 1/2 cups all-purpose flour
1/2 tsp baking powder
1/4 tsp salt
Red gel food coloring
Instructions
Cream butter and sugar until fluffy. Mix in egg, vanilla, and peppermint extract.
Whisk flour, baking powder, and salt. Gradually blend into the wet mixture until a soft dough forms.
Divide dough in half. Tint one half with red food coloring until vibrant.
Roll out each dough half between parchment sheets into equal rectangles (~1/4 inch thick). Chill 20 minutes.
Layer red dough over white, peel off top parchment, and roll tightly into a log. Wrap in plastic wrap and chill 1 hour (or freeze 30 mins).
Slice into 1/4-inch cookies and place on lined baking sheets.
Bake at 350°F (175°C) for 8–10 minutes. Cool on sheet for 5 mins before transferring to a rack.
- Prep Time: 30 mins (plus chill time)
- Cook Time: 10 minutes
Nutrition
- Calories: 100 / Cookie
- Sugar: 6g / Cookie
- Fat: 5g / Cookie
- Carbohydrates: 13g / Cookie
- Protein: 1g / Cookie
Nutritional Info (For Your Peace of Mind!)
Hey, we’re all about balance here at Food Meld! These are a treat, and it’s good to know what you’re enjoying. Here’s the rough breakdown per cookie (assuming you get about 30 cookies from the batch):
- Calories: ~100
- Fat: 5g
- Carbohydrates: 13g
- Sugar: 6g
- Protein: 1g
Remember, these are estimates and can vary based on the specific brands of ingredients you use and the exact size of your cookies. The main thing? Enjoy every delicious, festive bite without guilt!
You Did It! Now, Go Be a Holiday Hero.
Look at you! You’ve just created a tray of stunning, homemade cookies that are bursting with holiday spirit. From my kitchen to yours, I am so proud of you for taking on this fun baking project. These Candy Cane Swirl Pinwheels are more than just a cookie; they’re a conversation starter, a memory maker, and a delicious testament to the fact that you can make something truly unforgettable.
I hope this recipe brings as much joy to your kitchen as it has to mine over the years. Don’t forget to tag me on social @foodmeld if you make them—I love seeing your creations! Now, go forth, share them with people you love, and enjoy every single bite. Happy baking, friends!
Jackson


