Let’s Make Some Magic: Candy Cane Brownie Bark!
Hey there, friend! Jackson here from Food Meld. You know what I love most about the holidays? It’s not just the big feasts or the perfectly decorated trees—it’s those little, irresistible treats that show up on every cookie tray. The ones that make your eyes light up and your hand instinctively dart out to grab just one more piece. That’s the kind of magic I want to create with you today. We’re whipping up my absolutely addictive Candy Cane Brownie Bark, and let me tell you, this stuff is a straight-up holiday game-changer.
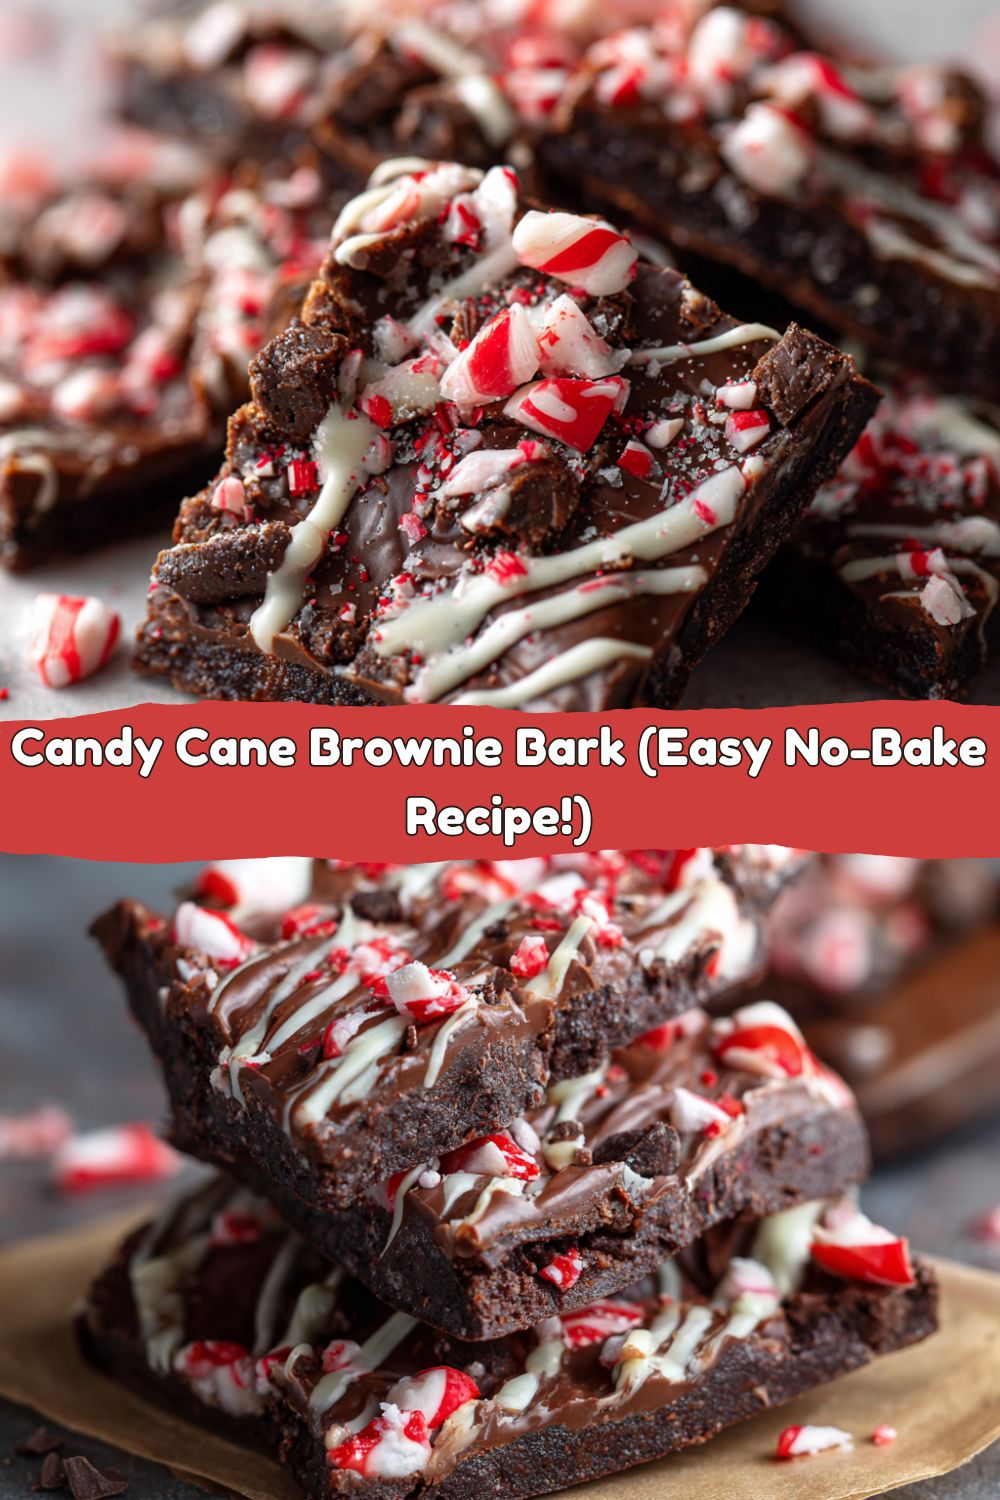
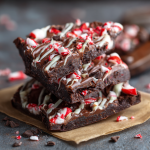
Imagine this: a solid layer of rich, decadent semi-sweet chocolate. It’s studded with soft, chewy bits of fudgy brownie and then showered with bright, crunchy, pepperminty candy cane pieces. It’s a textural dream and a flavor explosion all in one. The best part? This is a no-bake wonder. Seriously. If you can melt chocolate, you can make this bark. It’s the ultimate last-minute lifesaver for potlucks, the most requested item on my holiday gift list, and the secret weapon that will have everyone at your party asking, “Okay, who made *this*? I need the recipe!” So, grab your favorite bowl, let’s get a little messy, and cook something awesome together.
A Kitchen Disaster That Started It All
This recipe actually came from a happy little kitchen accident. One year, right before a big Christmas Eve party, I was attempting a fancy layered peppermint brownie situation. You know the one—with the perfect swirls of white chocolate and pristine stripes of candy cane. Well, let’s just say the swirls looked more like a mud puddle and the brownies came out drier than a reindeer’s nose. I was out of time and out of ingredients. In a panic, I stared at the disaster on my counter: a plate of crumbly brownies, a bag of leftover candy canes, and some chocolate chips. I thought, “What if we tried this?” I melted the chocolate, smashed everything together, and threw it in the fridge. When I broke it into jagged pieces, it looked… intentional. Rustic, even! And the taste? Unforgettable. It was better than my original plan ever could have been. Now, it’s a holiday tradition born from beautiful, delicious chaos.
Gathering Your Bark Building Blocks
This is where the fun begins. The ingredient list is short, sweet, and mighty. Here’s what you’ll need:
- 12 oz semi-sweet chocolate chips: This is our foundation. I love semi-sweet for its perfect balance—not too bitter, not too sweet. Chef’s Insight: The quality of your chocolate matters here! A good brand like Ghirardelli or Guittard will give you a much smoother melt and a richer flavor. You can absolutely swap in dark chocolate for a more intense, adult-friendly bark, or milk chocolate if you have a serious sweet tooth.
- 1 cup baked fudge brownie bits: This is the “chewy” in our texture trio. Pro Tip: Don’t stress about baking brownies from scratch for this! Use your favorite boxed mix, or grab a couple from the bakery section of your grocery store. Stale brownies actually work amazingly well here—they crumble like a dream. This is a brilliant way to give leftover brownies a glorious second act.
- ½ cup crushed candy canes: This brings the festive crunch and that classic holiday peppermint zing. How-to Hack: Unwrap your candy canes, place them in a zip-top bag, and use a rolling pin to crush them into pieces. You want a mix of fine powder and smaller chunks for the best texture and visual appeal.
- Optional: white chocolate drizzle for extra flair: This is purely for showmanship, and I am 100% here for it. A little zig-zag of melted white chocolate takes this bark from “homemade” to “artisan bakery.” It’s totally optional, but highly recommended for maximum wow factor.
Let’s Build Our Bark: A Step-by-Step Guide
Okay, team. Let’s do this. It’s so simple, but a few key moves will ensure your bark is absolutely perfect.
- Line a baking sheet with parchment paper. Do not skip this! Parchment paper is your best friend. It prevents sticking and makes cleanup a total breeze. I like to use a standard half-sheet (13×18 inch) pan, but any rimmed baking sheet will work. The rim is important—it keeps our molten chocolate contained!
- Melt the chocolate in a microwave-safe bowl, stirring until smooth. Here’s the most important chef hack: melt your chocolate in short bursts. Microwave it for 45 seconds, then take it out and stir. Another 30 seconds, stir again. Repeat in 15-second bursts until it’s almost all melted. The residual heat will melt the last few lumps as you stir. This prevents the chocolate from getting too hot and “seizing” (turning into a gritty, unworkable mess). We want it glossy and smooth!
- Pour and spread the melted chocolate into a rectangle on the parchment. Pour that beautiful, glossy chocolate right onto the center of your prepared pan. Use an offset spatula or the back of a spoon to spread it into a rough rectangle, about ¼ inch thick. It doesn’t need to be perfect—this is rustic, remember? We’re going for delicious, not precise.
- While still warm, scatter brownie bits and crushed candy cane over the top. Timing is everything! You want to add your toppings while the chocolate is still warm and soft so they stick. Sprinkle the brownie bits first, then follow with the crushed candy canes. Get your hands in there and make sure every inch gets some love.
- Press toppings in gently, then drizzle with melted white chocolate if using. Gently press all the toppings down into the chocolate with the palm of your hand. This ensures they’re embedded and won’t fall off when you break the bark. If you’re going for the white chocolate drizzle, melt a handful of white chips the same way you did the semi-sweet, then use a fork or a squeeze bottle to artfully drizzle it all over the top.
- Chill until firm (about 30 minutes), then break into bark-style pieces. Slide the entire pan into the refrigerator. Let it chill for at least 30 minutes, or until the chocolate is completely solid. Once it’s firm, simply lift the entire slab of bark off the parchment paper and use your hands to break it into beautiful, irregular, shard-like pieces. No knife required!
How to Serve This Holiday Showstopper
This bark is a star no matter how you present it. For a casual family snack, just pile the pieces high in a big, festive bowl and watch it disappear. If you’re building a next-level holiday cookie tray, this bark is your centerpiece. Arrange it alongside classic sugar cookies and gingerbread men for a stunning contrast. For gifting, it could not be easier. Grab some clear cellophane treat bags, tie them with a cute ribbon, and you’ve got a heartfelt, handmade gift that anyone would be thrilled to receive. I love serving this bark after a big holiday dinner with a round of strong coffee or a glass of cold milk—it’s the perfect sweet, light finish to a rich meal.
Mix It Up: Your Bark, Your Rules!
The beauty of this recipe is its versatility. Don’t be afraid to get creative and make it yours! Here are a few of my favorite twists:
- The Salted Dark Chocolate Dream: Swap the semi-sweet for dark chocolate and use salted, roasted almonds instead of brownie bits. Finish with a light sprinkle of flaky sea salt. Incredible.
- Cookies & Cream Explosion: Replace the brownie bits with chunks of your favorite chocolate sandwich cookies (Oreos are classic!) and use vanilla chips instead of semi-sweet for the base.
- Rocky Road Rendezvous: Keep the semi-sweet base but add in mini marshmallows and chopped walnuts along with the candy cane. It’s a chocolatey, crunchy, minty, marshmallowy party.
- Vegan Victory: Easily make this vegan by using dairy-free chocolate chips and ensuring your brownies are vegan (many boxed mixes are accidentally vegan!). Most candy canes are vegan, but always double-check the label for hidden dairy or gelatin.
- Orange Zest Zing: Add the zest of one orange to the melted chocolate for a Terry’s Chocolate Orange vibe. The combination of orange and peppermint is a surprisingly festive and delicious duo.
Jackson’s Chef Notes & Kitchen Stories
Over the years, this recipe has become a true Food Meld staple. I’ve learned that the “messier” it looks, the better. Perfect is boring! I once made a batch where I got a little overzealous with the crushing and turned the candy canes into almost pure dust. It created this gorgeous pink and white swirl on the chocolate that looked professionally done. My wife still asks me to try and replicate it every year. The moral of the story? Don’t fear the kitchen happy accidents. Embrace them! They often lead to the most memorable and delicious creations.
Your Questions, Answered!
Q: My chocolate got clumpy and grainy when I melted it. What happened?
A: Ah, your chocolate “seized.” This usually happens if a tiny bit of steam or water got into the melting chocolate. To fix it, try stirring in a teaspoon of neutral oil (like vegetable or coconut) at a time until it becomes smooth again. To prevent it, always ensure your bowl and utensils are completely dry.
Q: Can I use candy cane crumbs from the store?
A: You can, but I find the pre-crushed ones are often too powdery. You lose that satisfying crunch and the visual appeal of the red and white streaks. Taking two minutes to crush your own makes a big difference!
Q: How far in advance can I make this?
A: This bark is a fantastic make-ahead treat! Store it in an airtight container in the fridge for up to two weeks. The chocolate may develop a whitish “bloom” over time—this is just the cocoa butter separating and it’s perfectly safe to eat, though it might not look as pretty.
Q: The bark is too hard to break! Did I do something wrong?
A> If it’s rock solid, it’s probably just a bit too cold. Let it sit on the counter for 5-10 minutes before trying to break it. It should snap cleanly without shattering.
Candy Cane Brownie Bark
- Total Time: 40 minutes
- Yield: ~16 pieces
Description
This Candy Cane Brownie Bark is everything you want in a holiday treat—rich chocolate, crunchy peppermint, and chewy brownie bits all swirled into one addictive bark. It’s no-bake, festive, and perfect for gifting or serving up on your Christmas cookie tray.
Ingredients
12 oz semi-sweet chocolate chips
1 cup baked fudge brownie bits (chopped or crumbled)
½ cup crushed candy canes
Optional: white chocolate drizzle for extra flair
Instructions
Line a baking sheet with parchment paper.
Melt chocolate in a microwave-safe bowl, stirring until smooth.
Pour and spread chocolate into a rectangle on the parchment.
While still warm, scatter brownie bits and crushed candy cane over the top.
Press toppings in gently, then drizzle with melted white chocolate if using.
Chill until firm (about 30 minutes), then break into bark-style pieces.
- Prep Time: 10 minutes
- Chill Time: 30 minutes
Nutrition
- Calories: 160 /Piece
- Sugar: 16g /Piece
- Sodium: 60mg /Piece
- Fat: 9g /Piece
- Carbohydrates: 20g /Piece
- Protein: 1g /Piece
Nutritional Info (Because We’re Curious!)
Okay, let’s be real—this is a holiday treat, and it’s all about indulgence! But if you’re curious about the details, here’s a rough nutritional breakdown per piece (assuming you get about 16 pieces from the batch). Remember, these are estimates and can vary based on the specific brands of ingredients you use.
Per Piece (approx.):
Calories: 160 | Fat: 9g | Carbs: 20g | Sugar: 16g | Protein: 1g | Sodium: 60mg
The majority of the calories come from the chocolate and sugar, making this a decadent, energy-dense treat. Enjoy it mindfully as part of your holiday celebrations!
Final Thoughts
Well, that’s it, folks! My go-to, never-fail, always-impressive Candy Cane Brownie Bark. I hope this recipe brings as much joy and flavor to your kitchen as it has to mine. It’s proof that the best dishes don’t have to be complicated—they just have to be made with a little bit of fun and a whole lot of love. So from my kitchen to yours, happy holidays, happy baking (or not-baking!), and most importantly, happy eating.
I’d love to hear how your bark turns out! Tag me @FoodMeld on Instagram so I can see your beautiful creations. Let’s cook something awesome together!


