
Your New Go-To Party Starter: Blue Cheese & Pear Tartlets
Hey friends, Jackson from Food Meld here! Let’s talk about that moment. You know the one. You’re hosting a get-together, the doorbell’s about to ring, and you need something to come out of the kitchen that makes everyone’s eyes go wide. It needs to look like you fussed for hours, taste like a million bucks, but secretly be so simple you can whip it up without breaking a sweat. If that sounds like your current mission, my friend, you’ve landed in the right place.
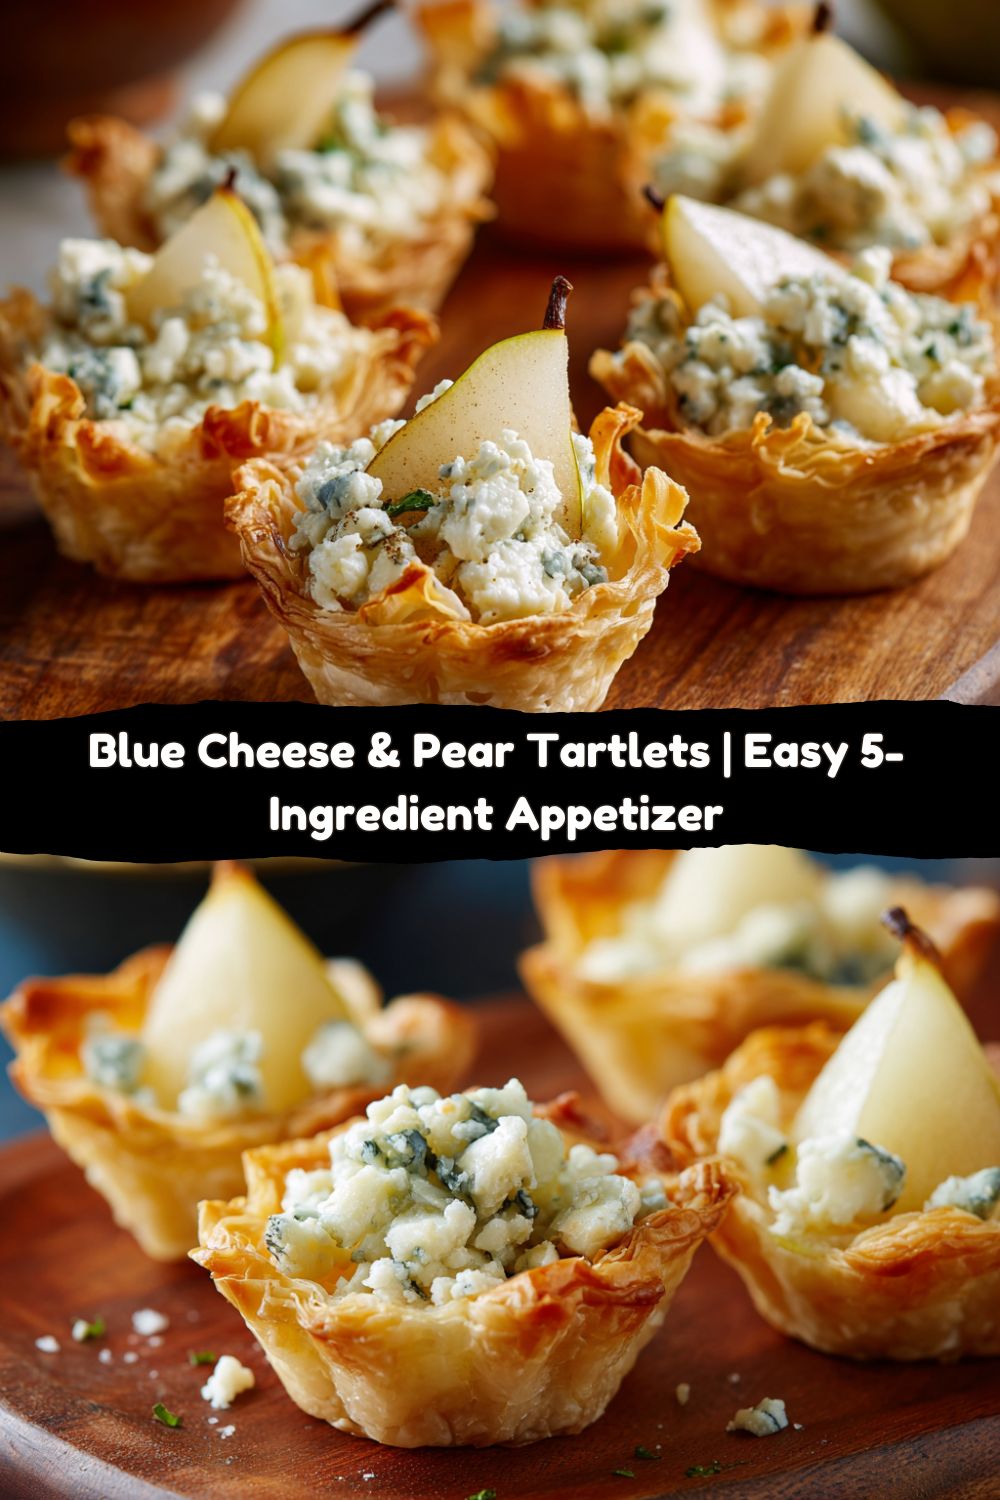
I’m talking about my incredibly delicious Blue Cheese and Pear Tartlets. Imagine this: a crisp, golden, flaky phyllo shell that shatters at the slightest touch. Inside, a warm, luxurious filling where sweet, juicy pear melts into a bold, tangy, and creamy blue cheese cloud. It’s that perfect bite of salty and sweet, rich and refreshing, all at once. These little flavor bombs are the undisputed champions of my holiday spread and my secret weapon for impromptu cocktail hours. They feel fancy and refined but are honestly a joy to make. So, preheat that oven, grab your favorite bowl, and let’s cook up some magic that’ll have your guests begging for the recipe.
A Happy Accident at a Holiday Potluck
This recipe, like a lot of the best things in my kitchen, started with a happy accident. A few years back, I was signed up for a last-minute holiday potluck. You know the drill—swinging by the store after work, scanning the aisles for inspiration. I grabbed a box of those pre-made phyllo shells thinking I’d do something with brie and jam (a classic for a reason!). But then I saw it: a beautiful, ripe pear sitting in my fruit bowl at home, and a forgotten wedge of incredible blue cheese in the back of my fridge.
I had one of those “what if we tried this?” moments I’m so known for. I mashed the blue cheese with a splash of cream, folded in the pear, and spooned it all into the shells. Twelve minutes later, my kitchen smelled insane. I showed up to the party with these warm, fragrant tartlets, and they were gone in literally sixty seconds. The combination was a revelation—the sharp cheese cut through by the sweet fruit, all held together by that buttery crunch. It was a reminder that the most unforgettable dishes often come from a little spontaneity and trusting your gut. Now, it’s a non-negotiable part of my entertaining playbook.
Gathering Your Flavor Arsenal
Part of what makes this recipe so brilliant is its simplicity. We’re working with just a handful of powerhouse ingredients, and each one plays a critical role. Here’s what you’ll need:
- 1 Ripe Pear, peeled, cored, and finely chopped – This is our sweet, juicy star. I love using a Bartlett or Anjou pear for this—they’re fragrant, hold their shape well, and have that classic pear flavor. The key word here is ripe. You want it to be slightly soft to the touch for maximum sweetness and juiciness. Chef’s Insight: No ripe pears? A finely chopped, sweet apple (like a Fuji or Honeycrisp) works in a pinch!
- 4 oz Blue Cheese, crumbled – This is where the magic happens. Don’t be shy! The bold, tangy flavor is what makes these tartlets so memorable. My personal favorite is a good Danish Blue or Gorgonzola Dolce—they’re creamy and pack a punch without being overly aggressive. Substitution Tip: If blue cheese isn’t your thing, a creamy goat cheese (chèvre) is a fantastic, slightly tangy alternative.
- 2 tbsp Light Cream – This is our binding agent and silky-smooth operator. It loosens up the crumbled cheese, making it spreadable and luxuriously creamy once baked. Substitution Tip: Half-and-half or even whole milk will work if that’s what you have on hand. The goal is just to achieve a mashable consistency.
- Ground Black Pepper, to taste – Trust me on this. A good crack of fresh black pepper is not optional! It adds a tiny bit of heat and a wonderful aromatic quality that makes the other flavors pop. It’s the secret weapon in this recipe.
- 1 (1.9 oz) package Mini Phyllo Tart Shells (about 15 shells) – Our edible, crispy vehicle! These are typically found in the freezer section near the desserts. I always keep a box or two in my freezer for emergency entertaining. They’re a total lifesaver and bake up perfectly golden every time. No need to thaw!
Building Your Bite-Sized Masterpieces
Alright, let’s get our hands dirty! This process is so straightforward and fun. I’m going to walk you through each step with a few of my favorite kitchen hacks to ensure perfect tartlets every single time.
Step 1: Preheat and Prep
First things first, get that oven preheating to 375°F (190°C). This gives it plenty of time to come to the perfect temperature for baking our tartlets to golden perfection. While that’s heating up, line a baking sheet with parchment paper. This isn’t just for easy cleanup (though that’s a huge bonus!); it also prevents the bottoms of the delicate phyllo shells from getting too dark.
Step 2: Create the Luxurious Filling
In a medium-sized bowl, add your crumbled blue cheese, light cream, and a generous few grinds of black pepper. Now, get in there with a fork and mash it all together! You’re looking for a relatively smooth, spreadable paste. A few small lumps of cheese are totally fine—they’ll melt into delicious pockets. This is where the flavor base is built.
Step 3: The Gentle Fold
Now, add your finely chopped pear to the cheese mixture. Here’s my pro tip: use a spatula and fold the pear in gently. We’re not stirring aggressively! We want to maintain those little pear pieces for texture and bursts of juice. Overmixing will turn the filling mushy.
Step 4: Fill ‘Er Up!
Arrange your frozen phyllo shells on the prepared baking sheet. Using a small spoon or even a mini cookie scoop, carefully divide the filling among the shells. Don’t be afraid to fill them right up to the top! They won’t overflow, I promise. You want a generous, hearty bite in every shell.
Step 5: Bake to Golden Perfection
Slide that baking sheet into your preheated oven and let the magic happen for 12-15 minutes. You’re waiting for two key signs: the cheese filling will be bubbly and melted, and the phyllo shells will turn a beautiful, light golden brown. Your kitchen is about to smell absolutely incredible.
How to Serve These Showstoppers
Presentation is part of the fun! You’ve made something gorgeous, so let’s show it off. I always serve these warm or at room temperature—they’re fantastic either way.
For a simple, elegant look, arrange them on a beautiful wooden board or a sleek white platter. Scatter a few extra fresh pear slices and a small cluster of red grapes around them. It adds color and tells your guests exactly what flavors to expect. For a little extra chef’s flair, right before serving, I love to drizzle a tiny bit of high-quality honey over the top and sprinkle with some chopped fresh thyme or walnuts. The honey adds another layer of sweetness that plays beautifully with the blue cheese, and the thyme gives a lovely herbal note.
What to serve them with? A crisp, chilled glass of Prosecco or a dry Riesling is a match made in heaven. The bubbles and acidity cut through the richness perfectly. For a non-alcoholic option, a sparkling apple cider is just as delightful.
Make It Your Own: Creative Twists
The beauty of a recipe like this is its versatility. Once you’ve mastered the base, feel free to get creative and make it yours! Here are a few of my favorite twists:
- The Sweet & Savory Upgrade: Add about a tablespoon of finely chopped candied walnuts or pecans to the filling. The crunch and caramelized sugar take the flavor profile to a whole new level.
- The Herbal Note: Fold one teaspoon of finely chopped fresh rosemary or thyme into the cheese mixture along with the pear. Herbs add a wonderful earthy fragrance that feels very gourmet.
- The Bacon Lover’s Dream: Crumble one or two strips of cooked, crispy bacon and sprinkle it on top of the filled tartlets before baking. Because, well… bacon.
- Fig & Blue Cheese: Swap the pear for an equal amount of finely chopped dried figs (just make sure they’re nice and soft). It’s a deeper, more decadent flavor that’s perfect for a winter party.
- Dairy-Free Delight: Use a high-quality vegan blue cheese alternative and a plain, unsweetened non-dairy creamer (like oat or almond cream). The method remains exactly the same!
Jackson’s Chef Notes
Over the years, I’ve made these tartlets more times than I can count, and they’ve never let me down. One of my favorite kitchen memories is of my niece, who claimed she “hated blue cheese,” sneaking three of them when she thought no one was looking. She’s now a certified blue cheese convert! That’s the power of this combo—it wins over even the skeptics.
I’ve learned that the filling can be mixed up to an hour in advance and kept in the fridge. Just give it a stir before filling the shells. And if you’re a mega-planner, you can fill the shells and keep the whole tray refrigerated for a few hours before baking. Just add a minute or two to the baking time since they’ll be going into the oven cold.
Your Questions, Answered
Q: My phyllo shells got soggy. What happened?
A: Sogginess is usually caused by two things: 1) The filling being too wet. Make sure your pear is ripe but not mushy or overly juicy. Pat the chopped pear pieces dry with a paper towel if they seem extra wet. 2) Letting the filled tartlets sit for too long before baking. Try to pop them in the oven within 30 minutes of filling them.
Q: Can I make these completely ahead of time?
A: You can definitely prep the filling ahead! Assemble the filling, cover it tightly, and store it in the fridge for up to a day. Fill the shells and bake them right before your guests arrive for the best texture. While you can bake them ahead and serve them at room temp, they are truly transcendent warm from the oven.
Q: I can’t find mini phyllo shells. What can I use instead?
A: No problem! You can use a sheet of puff pastry. Thaw it, cut it into small squares, and press them into the cups of a mini muffin tin to create your own shells. Bake them for about 10 minutes before adding the filling, then bake for another 10-12 minutes.
Q: My cheese mixture is really thick and crumbly, not smooth.
A: Easy fix! Just add another half tablespoon of cream and mash again. Different brands of cheese have different moisture levels, so adjust until it’s a spreadable consistency.

Blue Cheese and Pear Tartlets
- Total Time: 25 minutes
- Yield: 15 tartlets 1x
Description
Elegant, bite-sized, and bursting with flavor—these Blue Cheese and Pear Tartlets are a dream for entertaining. Sweet, juicy pear meets bold, creamy blue cheese in crisp, flaky phyllo shells. They’re rich, refined, and ready in under 30 minutes—perfect for cocktail hours or holiday spreads.
Ingredients
1 ripe pear, peeled, cored, and finely chopped
4 oz blue cheese, crumbled
2 tbsp light cream
Ground black pepper, to taste
1 (1.9 oz) package mini phyllo tart shells (about 15 shells)
Instructions
Preheat oven to 375°F (190°C).
In a bowl, mash together blue cheese, cream, and black pepper until smooth.
Fold in chopped pear gently to avoid crushing.
Spoon mixture into each phyllo shell, filling to the top.
Place filled tartlets on a baking sheet and bake for 12–15 minutes, or until cheese is melty and shells are golden.
Serve warm or at room temperature.
- Prep Time: 10 minutes
- Cook Time: 15 minutes
Nutrition
- Calories: 80 / tartlet
- Sugar: 1g / tartlet
- Fat: 6g / tartlet
- Carbohydrates: 4g / tartlet
- Protein: 2g / tartlet
Nutritional Information*
Okay, let’s talk nutrition real quick. While these are definitely an indulgent treat, it’s all about balance, right? Here’s a rough breakdown per tartlet (this is an estimate and can vary based on specific brands used):
- Calories: 80
- Protein: 2g
- Fat: 6g
- Carbohydrates: 4g
- Sugar: 1g
The blue cheese provides a good source of calcium, and the pear adds a bit of dietary fiber and vitamin C. Remember, enjoying delicious, flavorful food made with love is always good for the soul!
*Please note: This nutritional information is provided as a courtesy and is an estimate only. We recommend using a nutritional calculator with the exact ingredients and brands you use for the most accurate data.
Let’s Keep the Conversation Going!
And there you have it! Your new secret weapon for effortless, impressive entertaining. These Blue Cheese and Pear Tartlets are proof that you don’t need complicated techniques or a hundred ingredients to create something truly special. It’s about combining a few great flavors with confidence and a whole lot of heart.
I’d love to hear how your tartlet adventure goes! Did you add bacon? Try the honey drizzle? Win over a blue cheese skeptic? Tag me on social @FoodMeld with your creations—nothing makes me happier than seeing you guys in the kitchen having fun. Until next time, keep mixing it up, making it yours, and most importantly, enjoying every single bite.
Happy cooking,
Jackson


