Let’s Make a No-Bake Cherry Cheesecake That’ll Steal the Show!
Hey friends, Jackson from Food Meld here! Let’s be real for a second. Is there anything more classic, more crowd-pleasing, than a gorgeous slice of cherry cheesecake? That creamy, dreamy filling, the buttery-sweet crust, and that glossy, vibrant cherry topping… it’s a masterpiece. But sometimes, the idea of wrestling with a water bath, worrying about cracks, and heating up the whole kitchen with the oven just feels like way too much work. I get it. That’s exactly why this no-bake version is my absolute go-to for a dessert that delivers all the wow factor with none of the stress.
This isn’t just a simple recipe; it’s your ticket to dessert glory. We’re talking about a cheesecake that’s luxuriously creamy, perfectly set, and bursting with that iconic cherry flavor. It’s foolproof, friends. Whether you’re a kitchen newbie or a seasoned pro looking for a quick win, this recipe is for you. It’s the dessert I make when I need something impressive for a summer BBQ, a holiday potluck, or just because it’s Tuesday and I deserve a treat. So, grab your mixing bowl, and let’s cook something awesome together that requires exactly zero oven time. Let’s dive in!

The County Fair & My First Taste of Heaven
This recipe takes me right back to the sticky-sweet summers of my childhood in Georgia. The highlight of every year was the county fair—a whirlwind of bright lights, chaotic rides, and, most importantly, the food. The air was a magical mix of frying oil, powdered sugar, and grilled meat. But my destination was always the same: a little booth run by a woman named Miss Clara, who sold slices of cherry cheesecake from a massive, gleaming glass dome.
It was the most beautiful thing my eight-year-old eyes had ever seen. I’d hand over my crumpled dollar bills, and she’d slide a massive slice onto a paper plate. The first bite was always a revelation: cold, impossibly creamy, and so sweet it made my teeth ache in the best way possible. I’d sit on a hay bale, covered in dust and bliss, and think life couldn’t get any better. This no-bake version is my homage to Miss Clara and that perfect fairground bite. It captures all that joy and nostalgia, but it’s simple enough to make any day feel like a special occasion.
Gathering Your No-Bake Cheesecake A-Team
Here’s the beautiful part: you only need a handful of simple ingredients to create pure magic. Using high-quality stuff here makes a real difference, so let’s break it down.
For the Graham Cracker Crust:
- 1¼ cups graham cracker crumbs: You can buy these pre-crumbled or throw whole sheets into a zip-top bag and crush them with a rolling pin. It’s a great way to get out a little frustration! For a fun twist, try using ginger snaps or vanilla wafers instead.
- ¼ cup unsalted butter, melted: This is the glue that holds our crust together. Using unsalted lets us control the salt level. Make sure it’s properly melted so every crumb gets coated.
- ¼ cup white sugar: A little sweetness to balance the slight bitterness of the graham crackers. You can reduce this by a tablespoon if you prefer a less sweet crust.
For the Creamy Dreamy Filling:
- 1 (8 oz) package cream cheese, softened: This is non-negotiable. FULL FAT, and it MUST be softened to room temperature. This is the #1 secret to a lump-free, silky filling. Take it out a few hours before you start.
- 1 cup powdered sugar: Also called confectioner’s sugar. It dissolves instantly into the cream cheese, unlike granulated sugar which can stay gritty. It also helps stabilize our filling.
- 1 tsp vanilla extract: The flavor booster! Use the real stuff, not imitation. It adds a beautiful warmth and depth.
- 1 cup heavy whipping cream: Also known as heavy cream. Make sure it’s cold, straight from the fridge. This is what we’re going to whip into fluffy clouds to lighten up the whole filling.
For the Topping:
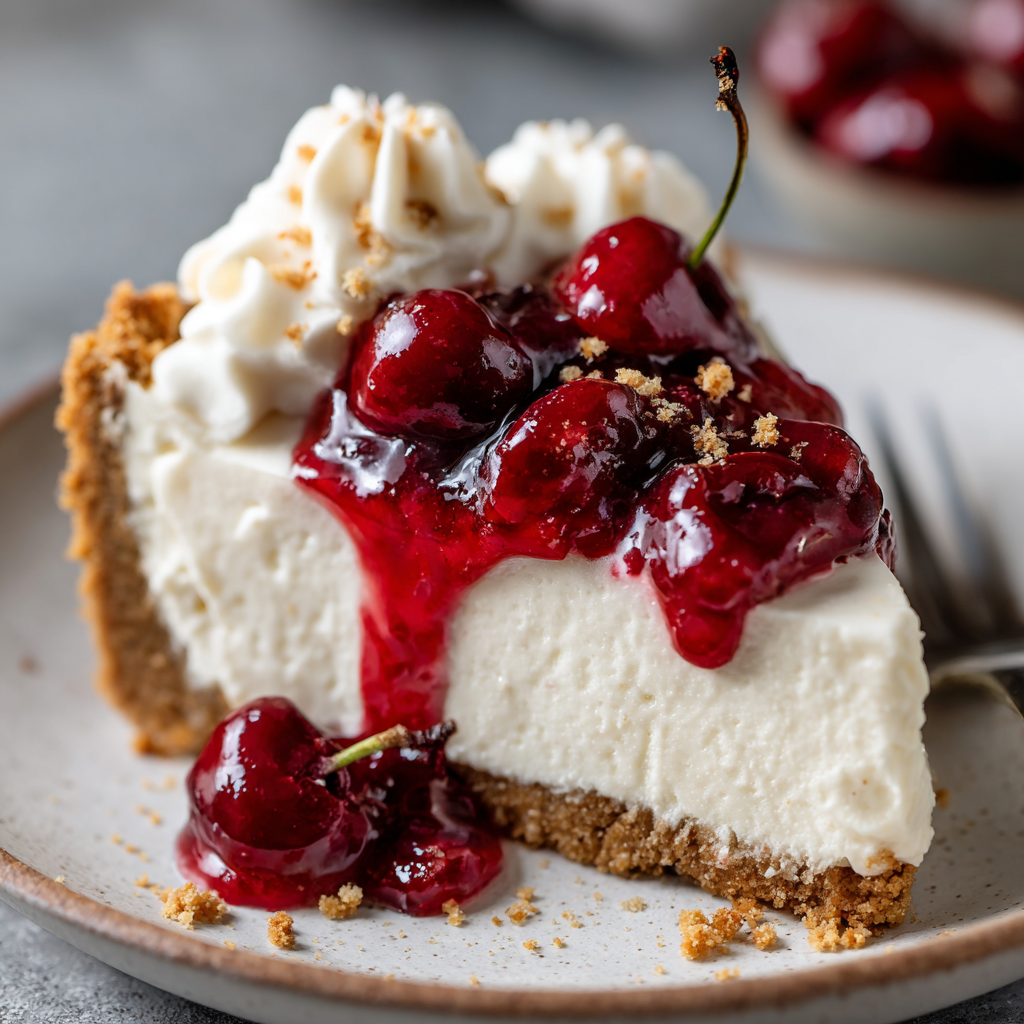
- 1 (12.5 oz) can cherry pie filling: The classic finish! I love the convenience and the nostalgic vibe. Feel free to swap for blueberry, strawberry, or apple pie filling. Or, if you’re feeling fancy, simmer fresh cherries with a little sugar and lemon juice until they break down into a saucy topping.
Building Your No-Bake Masterpiece: Step-by-Step
Okay, team. Let’s get mixing. This process is simple, but a few chef-style hacks will ensure your cheesecake is absolutely perfect.
- Create the Crust: In a medium bowl, combine your graham cracker crumbs, melted butter, and sugar. Mix it with a fork until it looks like wet sand and every crumb is moistened. Pour this mixture into a 9-inch pie plate or springform pan. Press it down firmly and evenly into the bottom and slightly up the sides. I like to use the bottom of a flat measuring cup to really pack it in—this prevents a crumbly crust later. Pop this in the fridge to chill and set while you make the filling.
- Whip the Cream Cheese Base: In a large bowl, beat your softened cream cheese with a hand mixer or stand mixer fitted with the paddle attachment. Beat it on medium speed for a good 1-2 minutes until it’s completely smooth and there are zero lumps. Scrape down the sides of the bowl. This is the most important step for texture! Now, add the powdered sugar and vanilla extract. Beat again on low until the sugar is incorporated, then turn it up to medium and mix for another minute until it’s silky smooth. Scrape the bowl again.
- Whip the Cream: Now, in a separate, clean, dry bowl, pour in your cold heavy cream. Using a whisk attachment (or a whisk and some serious elbow grease!), whip the cream on medium-high speed until stiff peaks form. You’ll know it’s ready when you lift the beaters out and the peaks stand straight up without flopping over. Don’t over-whip, or it’ll turn grainy and become butter!
- Fold it All Together: This is where we keep things light and airy. Add about a third of your whipped cream to the cream cheese mixture. Use a spatula to gently fold it in. This means cutting through the middle, sliding along the bottom of the bowl, and folding it over on top. Rotate the bowl as you go. Once that first bit is incorporated, add the remaining whipped cream and continue folding gently until no white streaks remain. Be patient—you want to keep all that air you whipped into the cream.
- Assemble and Chill: Take your chilled crust out of the fridge. Pour the beautiful, fluffy filling into the crust and spread it out evenly with your spatula. Smooth the top. Now, for the hardest part: patience. Carefully cover the cheesecake with plastic wrap and refrigerate it for at least 2 hours, but honestly, overnight is even better. This isn’t just to cool it down; it’s crucial for the cheesecake to fully set so you get clean, perfect slices.
- The Grand Finale: Right before you’re ready to serve, open that can of cherry pie filling and spoon it generously over the top, spreading it to the edges. Slice, serve, and get ready for the compliments to roll in!
How to Serve This Beauty
Presentation is part of the fun! For a gorgeous slice, take a sharp, thin knife and dip it in a glass of hot water. Wipe it dry, then make a clean cut. Repeat between each slice for picture-perfect edges. I love serving this on simple white plates to really let the red cherry topping pop.
While this cheesecake is a star all on its own, a little extra flair never hurts. A tiny dollop of extra whipped cream on the side is never a bad idea. For a hit of freshness, a few fresh mint leaves look beautiful. And if you really want to go all out, a little shaved dark chocolate or a drizzle of melted chocolate adds a fantastic flavor contrast to the sweet cherries.
Make It Your Own: Creative Twists
The best recipes are a launchpad for your own creativity. Here are a few of my favorite ways to mix it up:
- Chocolate Lover’s Dream: Add 1/2 cup of melted and cooled semi-sweet chocolate to the cream cheese mixture after step 2. Fold it in completely before adding the whipped cream. Use a chocolate cookie crust for double the chocolate impact.
- Lemon Berry Bliss: Add the zest of one lemon and a tablespoon of lemon juice to the cream cheese filling for a bright, zingy twist. Top with a homemade mixed berry compote (just frozen berries simmered with a little sugar) instead of cherries.
- Peanut Butter Cup: Swirl 1/2 cup of creamy peanut butter into the filling. Use an Oreo cookie crust (swap the graham crackers for Oreo crumbs) and top with a chocolate ganache and chopped peanuts.
- Tropical Vacation: Fold 1/2 cup of well-drained crushed pineapple into the finished filling. Use a vanilla wafer or coconut cookie crust, and top with a mango or passion fruit curd.
- Dairy-Free Delight: Use your favorite plant-based cream cheese and heavy cream alternative. Just make sure the cream alternative is specifically meant for whipping. The crust can be made with vegan butter or coconut oil.
Chef’s Notes: A Few Secrets from My Kitchen
This recipe has been my trusty sidekick for years, and it’s evolved a little along the way. I once, in a major rush, tried to whip cold cream into cream cheese that was still a bit chilly. Big mistake. It was a lumpy mess that I had to basically beat into submission. Lesson learned: patience with softening is everything!
I also highly recommend the overnight chill. The flavor deepens and the texture becomes absolutely sublime—firm enough to hold a perfect shape but still meltingly soft on the tongue. It’s worth the wait, I promise. This recipe is a testament to the idea that the simplest things, done with care, can be the most spectacular.
Your Questions, Answered!
Q: My filling is runny! What happened?
A: This usually boils down to two things: 1) The cream wasn’t whipped to stiff peaks, or 2) The cheesecake didn’t chill long enough. It needs a full 2+ hours to set properly. If it’s still runny after that, the bowl or cream might not have been cold enough during whipping.
Q: Can I freeze this cheesecake?
A: Absolutely! It freezes beautifully. Wrap the whole cheesecake (without the topping) tightly in plastic wrap and then aluminum foil. Freeze for up to 2 months. Thaw overnight in the fridge and add the cherry topping right before serving.
Q: Why is my cream cheese filling lumpy?
A: The cream cheese was likely too cold. Remember, room temperature is key! If you have small lumps, you can sometimes save it by pressing the filling through a fine-mesh sieve—a little extra work, but it’ll smooth it right out.
Q: Can I use a different pan?
A: A pie plate is easiest, but a 9-inch springform pan works great, too. It makes it easier to remove the slices for a super-clean presentation. Just make sure to press the crust up the sides a bit.
Nutritional Information*
*Please note: This is an estimated nutritional breakdown provided for informational purposes only. It is not a substitute for professional dietary advice.
Per Slice (based on 8 slices):
Calories: ~360 | Total Fat: 24g | Saturated Fat: 15g | Cholesterol: 75mg | Sodium: 180mg | Total Carbohydrates: 32g | Dietary Fiber: 0.5g | Sugars: 25g | Protein: 4g
This is a decadent dessert, and that’s okay! It’s all about balance and enjoying treats mindfully. You can lighten it up slightly by using a low-fat cream cheese and reduced-fat whipped topping, but for the best texture and flavor, I’m a firm believer in going for the full-fat goodness for a special occasion.
You’ve Got This!
And there you have it! Your guide to the easiest, creamiest, most show-stopping no-bake cherry cheesecake out there. This recipe is all about taking something that seems fancy and breaking it down into simple, fun, no-stress steps. It’s the kind of dessert that creates those “you’ve gotta try this” moments we live for at Food Meld.
I hope this recipe becomes a staple in your kitchen, just like it is in mine. It’s a reminder that you don’t need fancy equipment or complicated techniques to make something truly unforgettable. You just need a few good ingredients and a little bit of heart. Now, I’d love to hear from you! Tag me @FoodMeld on Instagram with a picture of your beautiful creation. Let’s cook awesome together, friends!


