Your New Go-To Showstopper: Berry Chantilly Cake
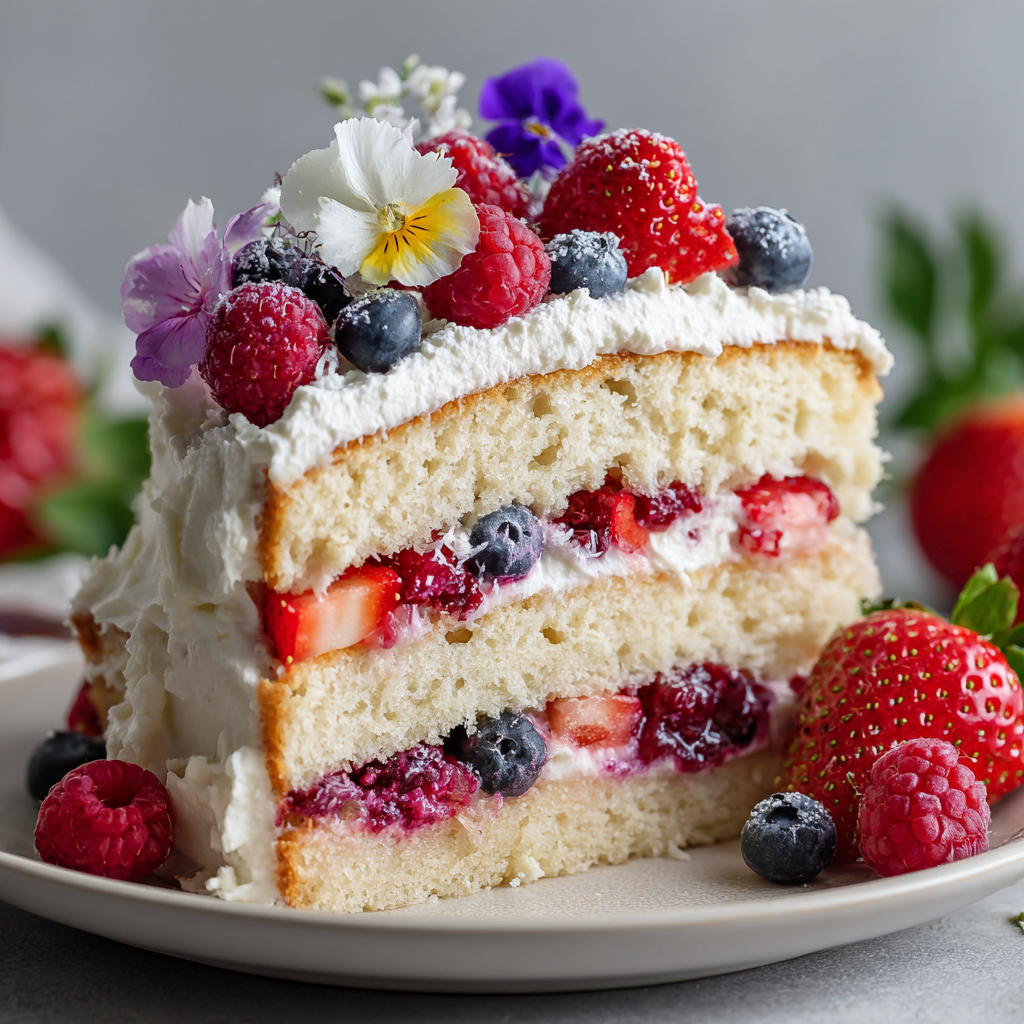
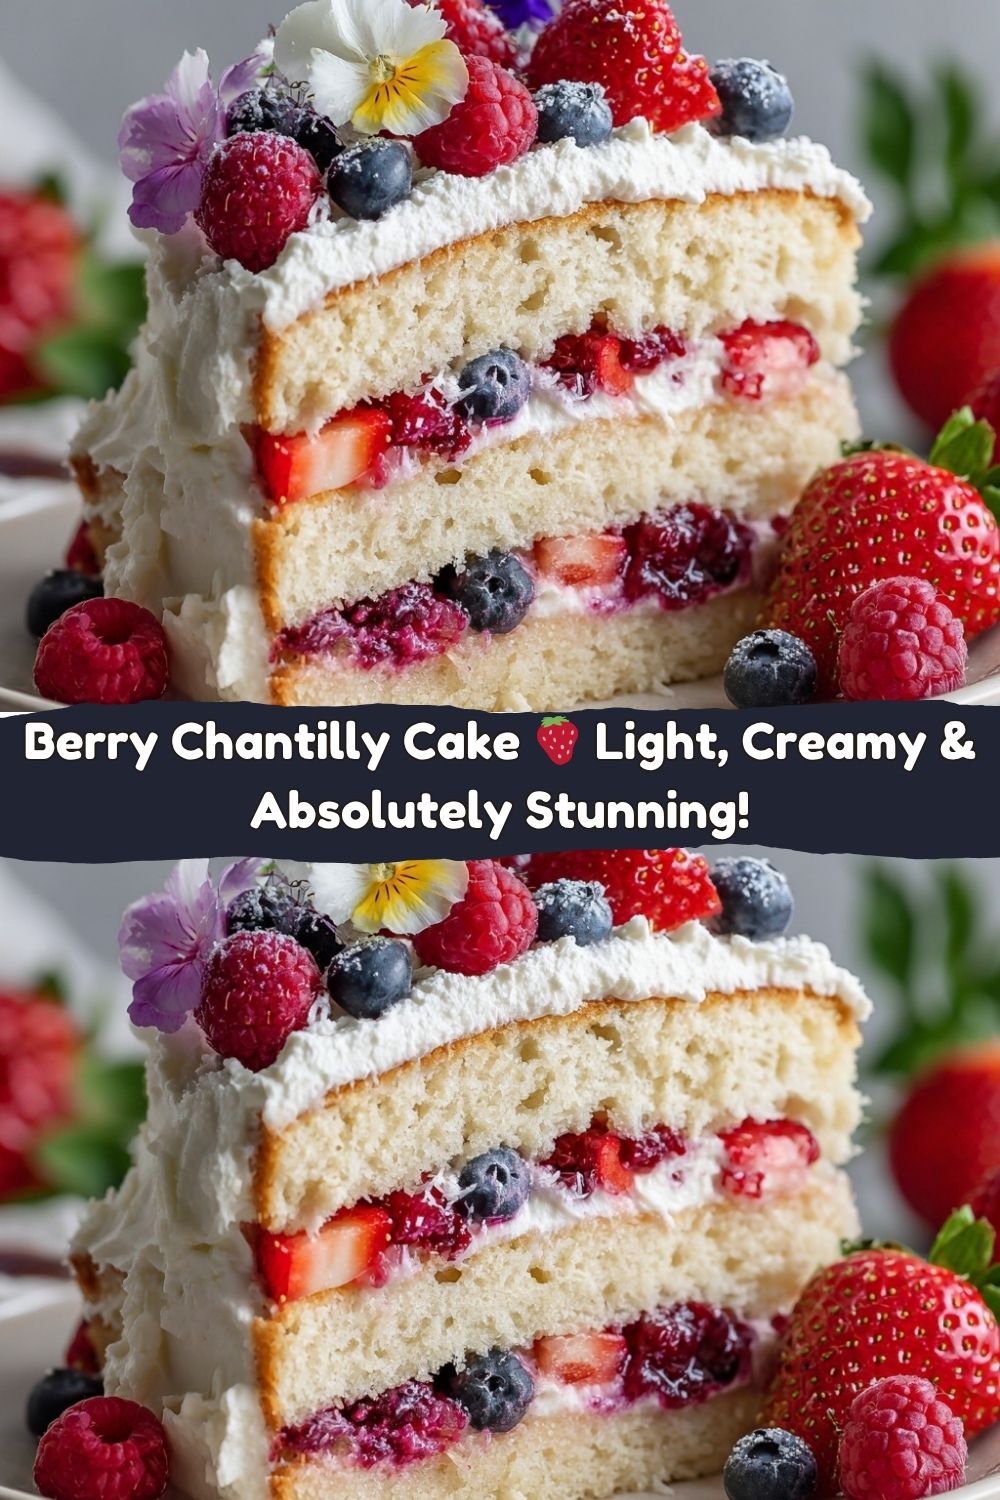
Hey friends, Jackson from Food Meld here. Let me paint you a picture: layers of cloud-soft vanilla sponge, a whipped mascarpone cream so light it practically floats, and the sweet, juicy burst of fresh berries in every single bite. That, my friends, is the magic of a Berry Chantilly Cake.
This isn’t one of those dense, heavy desserts that weighs you down. Nope. This cake is pure, elegant, feel-good deliciousness. It’s the dessert you make when you want to impress without the stress. It looks like it came from a fancy patisserie, but I promise you, the process is totally approachable. We’re talking simple ingredients, straightforward steps, and a whole lot of “wow” at the finish line.
I’m a firm believer that the best recipes are the ones that create moments. This Berry Chantilly Cake has been my secret weapon for birthdays, summer barbecues, and those “just because” days when you need a little extra sweetness. It’s refreshing, indulgent in the best way, and guaranteed to have everyone at your table asking for seconds (and the recipe). So, tie on your apron, grab your favorite mixing bowl, and let’s create something unforgettable together. Welcome to flavor meets fun, right in your own kitchen.
A Slice of Sunshine and a Southern Grandma
This cake always takes me right back to my grandma’s sun-drenched kitchen. She wasn’t a fancy baker, but she was a wizard with simple, good ingredients. Her version of a “fancy cake” was a simple vanilla layer cake piled high with freshly whipped cream and whatever berries my brother and I had managed to pick (or, let’s be real, buy from the farmer’s market without eating half on the way home).
I remember one sweltering July afternoon, she was assembling this towering, slightly lopsided masterpiece for a family reunion. My cousin, trying to be helpful, leaned in a little too close and got a dollop of whipped cream right on the tip of his nose. Instead of getting mad, Grandma just laughed that big, booming laugh of hers, dabbed a little more cream on his nose, and declared him the official “cake taster.” From that moment on, that cake wasn’t just about the taste; it was about the joy, the little messes, and the memory we all still talk about decades later. That’s the spirit I want you to bring to this recipe—don’t worry about perfection, just focus on the fun and the fantastic flavor.
Gathering Your Flavor All-Stars
Here’s the lineup for our Berry Chantilly masterpiece. A quick pro-tip before we start: having your dairy ingredients (eggs, milk, mascarpone, cream) at room temperature or chilled as specified is a game-changer for texture. Trust me on this one!
For the Vanilla Sponge Cake:
- 2 cups (260g) all-purpose flour: The sturdy-but-tender foundation of our cake. For a lighter crumb, make sure to spoon and level it into your measuring cup—don’t scoop!
- 2 tsp baking powder: Our leavening agent that gives the cake its beautiful rise and airy texture.
- ½ tsp salt: The ultimate flavor enhancer. It makes the sweet and vanilla notes pop, so don’t skip it!
- 4 large eggs, room temperature: Room temp eggs whip up much higher and give the sponge its signature light structure. If you forgot to take them out, just place them in a bowl of warm water for 5-10 minutes.
- 1 ½ cups (300g) granulated sugar: Sweetness and, when whipped with the eggs, it creates tiny air bubbles for that perfect cake crumb.
- ¾ cup (180ml) whole milk, warmed: Warm milk helps everything combine smoothly without deflating our airy egg mixture. Whole milk gives the best richness.
- ½ cup (113g) unsalted butter, melted: For that irresistible, buttery flavor and moist texture. Using unsalted lets you control the salt level.
- 1 tbsp vanilla extract: Go for the good stuff! This is the star flavor of the sponge, so use pure vanilla extract for the best taste.
For the Chantilly Cream:
- 1 cup (226g) mascarpone cheese, chilled: This is our secret weapon. It adds a subtle tang and incredible richness that stabilizes the cream, making it less likely to weep or deflate.
- 1 cup (240ml) heavy cream, chilled: Must be cold to whip up properly. This creates the light, billowy base of our frosting.
- ½ cup (60g) powdered sugar: Dissolves effortlessly into the cream and adds sweetness without any grittiness.
- 1 tsp vanilla extract: A little extra vanilla in the cream ties the whole cake together beautifully.
For the Filling & Topping:
- 2–3 cups mixed fresh berries: I love a mix of sliced strawberries, plump blueberries, and raspberries for color and flavor. Give them a gentle rinse and pat them completely dry before using—water is the enemy of whipped cream!
- Optional: berry jam or simple syrup: A thin brush of jam or syrup on the cake layers adds extra moisture and berry flavor. It’s a little chef’s hack for an even more decadent cake.
Let’s Build This Beautiful Cake: Step-by-Step
Okay, team. This is where the magic happens. Read through the steps once before you start, and remember: confidence is your best ingredient!
- Preheat & Prep: Fire up your oven to 350°F (175°C). Now, take your two 8-inch round pans and give them a good coating of butter or non-stick spray. Line the bottoms with a circle of parchment paper—this guarantees your cakes will release perfectly without a single crumb left behind. It’s my number one foolproof tip!
- Combine the Dry Goods: In a medium bowl, grab a whisk and sift together your flour, baking powder, and salt. Sifting might feel like an extra step, but it’s what ensures our sponge is incredibly light and lump-free. Set this bowl aside for its grand entrance later.
- Whip the Eggs & Sugar: Here’s the most crucial step for that airy texture! In your stand mixer or a large bowl with a hand mixer, beat the room-temp eggs and granulated sugar on medium-high speed for a solid 5-6 minutes. Don’t rush this! You’re looking for the mixture to become pale yellow, thick, and fluffy. When you lift the beaters, the ribbon of batter that falls back onto the surface should hold its shape for a few seconds. This incorporates air, which is our primary leavening agent.
- The Gentle Fold: Now, we switch from whipping to gentle folding. We don’t want to deflate all those beautiful air bubbles we just created. Pour in the warm milk, melted butter, and vanilla extract. Use a spatula and fold gently until it’s just combined. It might look a little curdled at first, but keep folding—it’ll come together.
- Incorporate the Flour: Sprinkle the sifted dry ingredients over the wet mixture in two or three batches. Fold gently after each addition until you no longer see streaks of flour. Do not overmix! A few small lumps are far better than a tough, dense cake.
- Bake to Perfection: Divide the batter evenly between your prepared pans. Give them a gentle tap on the counter to release any large air bubbles. Slide them into the preheated oven and bake for 25-30 minutes. You’ll know they’re done when the tops are golden and spring back lightly when touched, and a toothpick inserted into the center comes out clean.
- The Cool Down: Let the cakes cool in their pans for about 10 minutes. Then, run a knife around the edges, invert them onto a wire rack, and peel off the parchment paper. Let them cool completely, and I mean completely, before you even think about frosting. A warm cake will melt your beautiful cream. Patience is key!
- Make the Dreamy Chantilly Cream: While the cakes cool, let’s make the frosting. In a clean, chilled bowl, combine the chilled mascarpone, chilled heavy cream, powdered sugar, and vanilla. Whip on medium-high speed until soft peaks form. Soft peaks mean the cream holds its shape when you lift the beaters, but the tip gently curls over. Be careful not to over-whip, or it can become grainy.
- Assembly Time! Place one completely cooled cake layer on your serving plate. If you’re using it, give it a light brush with berry jam or simple syrup. Spread a generous layer of the Chantilly cream over the top. Now, artfully arrange a single layer of your fresh, dry berries on top of the cream. Gently place the second cake layer on top.
- Frost & Decorate: Use the remaining cream to frost the top and sides of the cake. You don’t need a thick layer—a “naked cake” style where you can see a little of the cake through the cream is gorgeous and rustic. Pile the rest of your berries on top in a beautiful, inviting mound. For the final touch, pop the whole cake in the fridge to chill for at least 30 minutes before slicing. This makes it easier to cut and lets the flavors meld together.
Serving Up the Sweetness
Presentation is part of the fun! I love serving this cake on a simple, elegant cake stand to really let its beauty shine. When it’s time to slice, use a long, thin knife. For the cleanest cuts, dip the knife in hot water and wipe it dry between each slice. This glides right through the berries and cream for a picture-perfect serving every time.
This cake is a star all on its own, but if you want to take it to the next level, here are a few ideas. A light dusting of powdered sugar just before serving adds a lovely touch. For a dinner party, serve each slice with a small side of extra berries and a sprig of fresh mint. And in the summer, a glass of chilled Prosecco or a sparkling Moscato alongside this cake is an absolute dream pairing.
Make It Your Own: Creative Twists
The beauty of this recipe is its versatility. Once you’ve mastered the classic, feel free to get creative and mix it up!
- Lemon Zest Delight: Add the zest of one lemon to the cake batter and a tablespoon of lemon juice to the Chantilly cream. The bright, citrusy flavor cuts through the richness and pairs amazingly with blueberries and raspberries.
- Tropical Meld: Swap the mixed berries for a combination of diced mango, toasted coconut flakes, and passionfruit pulp. It’s like a vacation in cake form!
- Chocolate Berry Fusion: For the chocolate lovers, replace ¼ cup of the flour in the cake with unsweetened cocoa powder. You can even add a handful of mini chocolate chips to the batter for extra pockets of chocolatey goodness.
- Dairy-Free & Gluten-Free Friendly: You can easily make this cake for almost any diet! Use a 1:1 gluten-free flour blend for the cake. For the cream, use chilled, full-fat coconut cream and a vegan cream cheese alternative. The result is just as delicious.
- Individual Trifles: No time to layer a whole cake? Make Berry Chantilly Trifles! Simply cube the cake, layer it in glasses with the cream and berries, and you’ve got portable, no-fuss perfection.
Jackson’s Chef’s Notes
This recipe has evolved so much in my kitchen. The first time I made it, I was so nervous about the sponge that I overmixed the batter and ended up with a cake that was more like a sweet brick. A delicious brick, but a brick nonetheless! It was a humbling reminder that gentle folding is non-negotiable.
Over the years, I’ve learned that the mascarpone in the cream is the real MVP. It not only adds a sophisticated flavor but also makes the frosting much more stable than whipped cream alone, so you can assemble the cake a few hours ahead of a party without it sagging. It’s my little insurance policy for a stress-free dessert.
Your Questions, Answered!
I’ve gotten a lot of questions about this cake over the years. Here are the answers to the most common ones.
Q: Can I make any part of this cake ahead of time?
A: Absolutely! The cake layers can be baked, cooled completely, wrapped tightly in plastic wrap, and stored at room temperature for a day or frozen for up to a month. The Chantilly cream is best made the day you plan to serve the cake. You can assemble the entire cake a few hours before serving and keep it chilled in the fridge.
Q: My cream is runny and won’t whip up. What happened?
A: This almost always comes down to temperature. Your bowl, beaters, mascarpone, and heavy cream all need to be thoroughly chilled. If your kitchen is warm, try placing your bowl and beaters in the freezer for 15 minutes before you start. Also, ensure you’re using heavy cream or heavy whipping cream (with a fat content of 36% or more), not half-and-half or light cream.
Q: Can I use frozen berries?
A: I don’t recommend using frozen berries in the layers or for the topping. They release too much water as they thaw, which will make your cake soggy and dilute your beautiful cream. If you’re desperate, you can use thawed and very well-drained frozen berries for a compote to brush between the layers, but stick with fresh for decorating.
Q: My cake layers are domed. How do I get them flat?
A: A slight dome is totally normal! If you want a perfectly flat top for stacking, you can gently slice off the dome with a long serrated knife once the cake is completely cool. (Chef’s snack: the cake scraps you just cut off are the cook’s reward!)
Nutritional Info (Because We’re All Friends Here)
Okay, let’s keep it real—this is a celebratory dessert, and it’s meant to be enjoyed! But I know many of you like to have a general idea, so here’s a rough breakdown per slice (based on 12 servings). Remember, these are estimates and can vary based on your specific ingredients and how generously you frost your cake.
- Calories: ~350
- Carbohydrates: ~30g
- Protein: ~5g
- Fat: ~22g
The beauty of this cake is that it’s lighter than most buttercream-frosted cakes. You’re getting energy from the carbs and fats, a little protein from the eggs and dairy, and a dose of antioxidants and vitamins from all those beautiful fresh berries. So, enjoy a slice, savor every bite, and share the rest with people you love.


