Homemade Bao Buns Recipe – Soft and Fluffy Chinese Steamed Buns
Hey friends, Jackson here from Food Meld! Let’s talk about one of my absolute favorite things to make (and eat): cloud-soft, pillowy bao buns. If you’ve ever bitten into a perfectly steamed bun, you know the magic—that slight sweetness, that feather-light texture that practically melts around a savory filling. It’s a total “you’ve gotta try this” moment waiting to happen in your kitchen.
I get it, the idea of making yeast dough and steaming might feel a little “next level.” But trust me, this isn’t some fussy, restaurant-only secret. It’s a simple, forgiving process that’s more about feeling the dough than following a rigid rulebook. We’re taking pantry staples—flour, yeast, sugar, water—and transforming them into edible clouds. Whether you stuff them with classic pork belly, crispy tofu, or even some pulled chicken with a twist, these buns are your blank canvas for flavor. So, tie on an apron, and let’s cook something awesome together. Welcome to the wonderfully satisfying world of homemade bao.
Why Your Kitchen Needs the Smell of Steaming Bao
There’s something almost alchemical about steaming bread. While the oven gives us glorious crusts and that hearty baked smell, the steamer delivers pure, unadulterated tenderness. Bao buns, or gua bao, are the ultimate street food treasure—a portable, delicious package that’s as fun to assemble as it is to eat. For too long, I thought these were strictly takeout fare. Then I tried making them at home, and the game changed completely.
The moment I lifted the lid on my first successful batch, and a puff of fragrant steam revealed rows of plump, shiny buns, I was hooked. It was a quiet little victory that felt huge. That’s the spirit of Food Meld right there: taking global inspiration (in this case, a Taiwanese street food classic), respecting its roots, and having a blast making it our own. This recipe is your ticket to that feeling. We’re keeping it simple, real, and packed with the kind of flavor that makes a regular Tuesday night feel like a celebration. No fancy equipment needed, just your hands, a few bowls, and a willingness to get a little flour on your nose. Ready to steam?
The Food Truck Line That Started It All
My bao journey didn’t start in some fancy culinary school. It started at 10:30 PM, halfway through a music festival, in a line that wrapped around a glowing food truck. My friends and I were exhausted, feet aching, but the smell was irresistible—ginger, star anise, and the sweet, warm scent of steaming dough. We finally got our order: soft, white buns cradling glistening chunks of pork belly, topped with crunchy peanuts, pickled mustard greens, and a flourish of cilantro.
That first bite was a revelation. The bun was so soft it almost collapsed under the weight of the rich filling, creating this perfect harmony of textures and temperatures. It was messy, saucy, and one of the most delicious things I’d ever eaten. I must have talked about those buns for weeks. Finally, I thought, “Why am I waiting for a festival to have this?” I wanted that magic on my own terms, in my own kitchen, maybe even in my sweatpants. The quest to crack the code of the perfect fluffy bun began, and after many (many) delicious experiments, I’m thrilled to share the formula with you. It’s easier than you think, and the payoff? Absolutely unforgettable.
Gathering Your Bao Toolkit: Simple Ingredients, Big Flavor
Here’s the beautiful part: the ingredient list is short and sweet. The magic happens in the technique. Let’s break down what you’ll need and why each one matters.
- 2 ¼ tsp (1 packet) Active Dry Yeast: This is our little engine of fluffiness! We’re activating it in warm water first to make sure it’s alive and kicking. If you only have instant yeast, you can mix it right in with the dry ingredients—just reduce the first rise by about 15 minutes.
- ¾ cup (180 ml) Warm Water: Not hot, not cold—think “baby bottle warm” or around 105-110°F. Too hot and you’ll kill the yeast; too cold and it’ll just take a nap. Getting this right is your first key step to success.
- 2 tbsp Sugar: This feeds the yeast and gives the buns their characteristic hint of sweetness. Don’t skip it! It balances savory fillings perfectly.
- 2 tbsp Neutral Oil (vegetable or canola): This adds tenderness and a slight richness to the dough, keeping the crumb soft. A chef’s insight: brushing a little on the dough before folding also creates layers that peel apart beautifully.
- 2 ½ cups (315 g) All-Purpose Flour: I use regular all-purpose here for accessibility and a great texture. For a slightly chewier, more traditional bun, you can swap out ½ cup for cake flour. Spoon and level your flour into the measuring cup to avoid a dense dough!
- ½ tsp Salt & ½ tsp Baking Powder: The salt flavors the dough, and the baking powder is our secret weapon for extra puff during steaming. It’s a hybrid technique that guarantees lift.
- Extra Oil & Parchment Paper Squares: For shaping and preventing sticky disasters. Cut the parchment into 3-inch squares—it’s a game-changer.
Let’s Make Some Clouds: Your Step-by-Step Guide
Step 1: Wake Up the Yeast
In a large mixing bowl, combine the warm water, yeast, and sugar. Give it a quick stir and walk away for 5-10 minutes. You’re looking for a frothy, creamy-looking layer on top—that’s your sign the yeast is active and happy. If nothing happens after 10 minutes, your yeast might be old or the water was too hot/cold. Start over; it’s worth it!
Step 2: Make & Knead the Dough
To the yeasty mixture, add the oil, flour, salt, and baking powder. Stir with a wooden spoon until a shaggy dough forms. Now, get your hands in there! Turn it out onto a lightly floured surface and knead for 8-10 minutes. You’re looking for a smooth, soft, and elastic dough that springs back slowly when you poke it. Chef’s Hack: Set a timer! It’s longer than you think, but this kneading develops the gluten for that perfect, tearable chew.
Step 3: The First Rise – Let It Rest
Place your beautiful smooth dough ball back in a lightly oiled bowl, cover it with a damp kitchen towel or plastic wrap, and let it rest in a warm, draft-free spot. I like to pop it in my (off) oven with the light on. Let it rise for 1 to 1.5 hours, until doubled in size. Don’t rush this—the flavor develops here too.
Step 4: Shape Your Buns
Punch down the dough (the best part!) to release the air. On a clean surface, roll it into a thick log and cut it into 10 equal pieces. Keep the pieces you’re not working with covered. Take one piece and roll it into a smooth ball, then use a rolling pin to roll it into an oval, about 4-5 inches long and 3 inches wide. Lightly brush the top surface with oil—this is crucial so the bun doesn’t stick to itself when folded. Fold it in half gently and place it on a parchment square. Repeat with the rest. They’ll look a little small; they plump up big time!
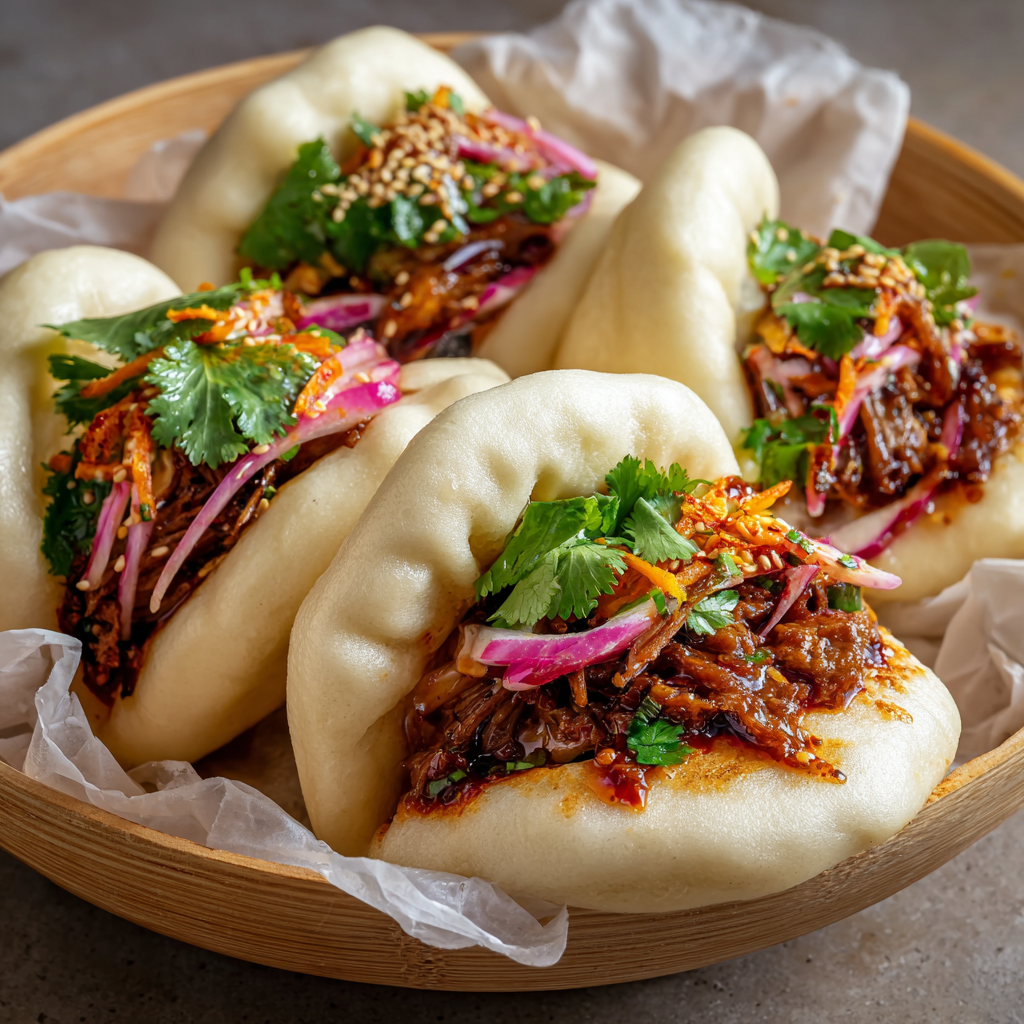
Step 5: The Final Rise & Steam Time!
Cover your shaped buns with that damp towel again and let them puff up for another 30 minutes. Meanwhile, get your steamer ready. Bring water to a vigorous boil in your wok or pot. Working in batches to avoid crowding, place the buns (on their parchment squares) into the steamer basket. Critical Tip: Put the lid on and DO NOT PEEK for 10 minutes. The steam is what cooks them; escaping heat leads to sad, collapsed buns. After 10 minutes, turn off the heat, wait 2 minutes, then gently lift the lid. Behold your fluffy masterpieces!
How to Serve Your Homemade Bao Buns
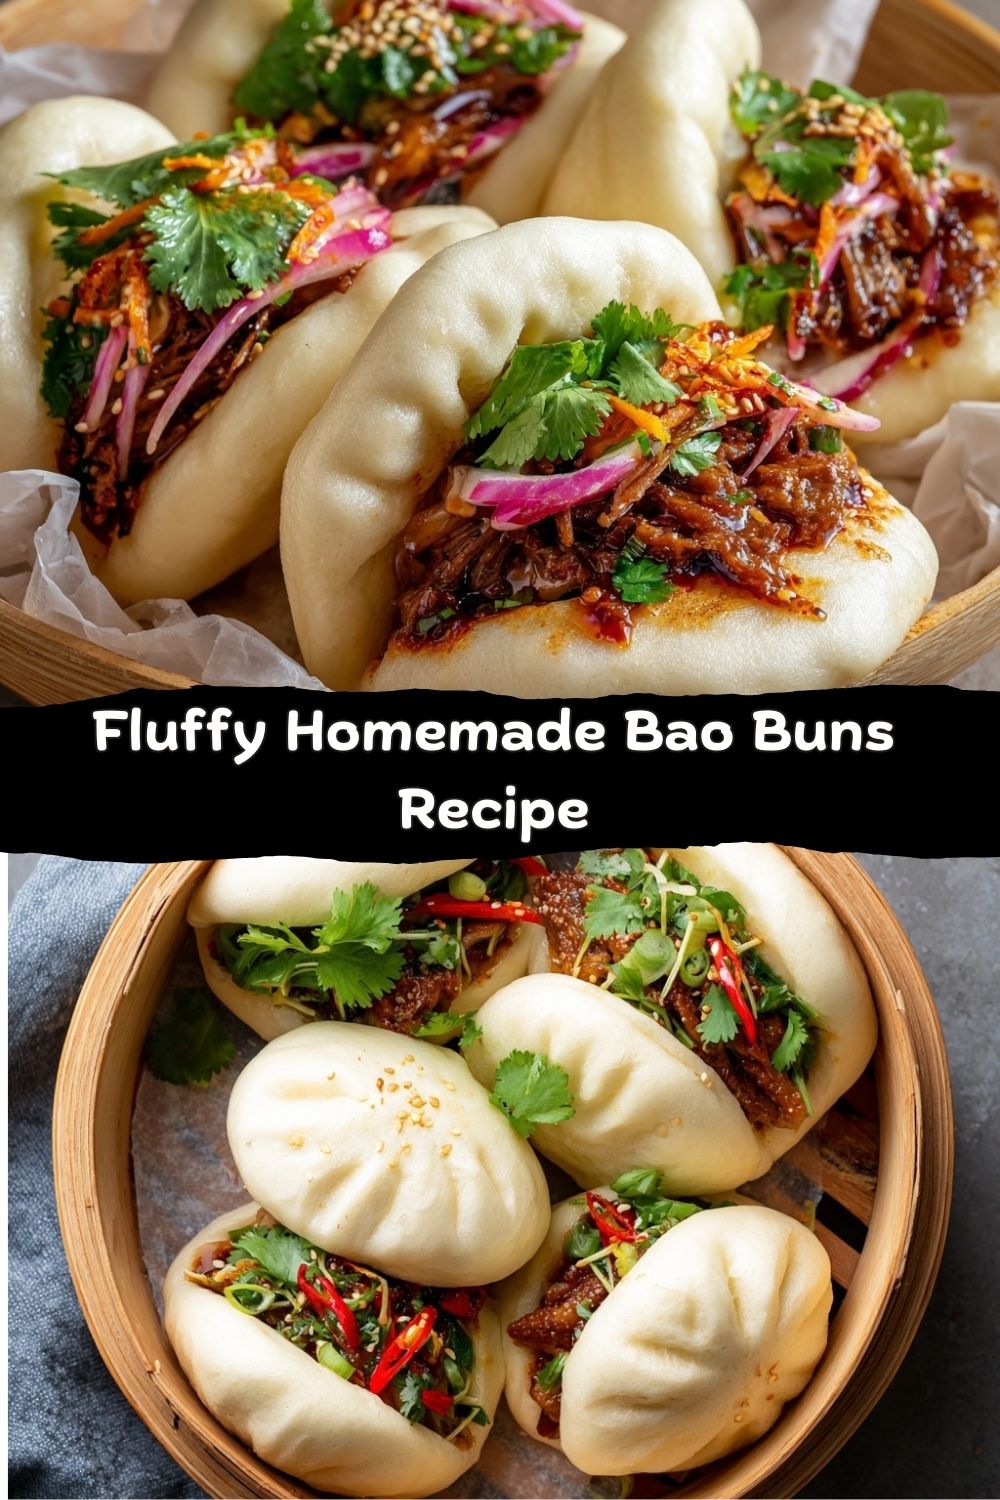
This is where the party starts! Transfer your steamed buns to a plate. The classic way is to gently open the fold and stuff them while they’re warm and pliable. I love setting up a “bao bar” for friends and family: a big platter of warm buns alongside bowls of different fillings and toppings. Let everyone build their own perfect bite.
Classic Fillings to Try:
- Braised Pork Belly (Dong Po Rou style): Slow-cooked until fall-apart tender.
- Quick-Pickled Veggies: Carrots, cucumbers, or radishes in rice vinegar, sugar, and salt.
- Fresh Herbs: Cilantro, Thai basil, or mint.
- Crispy Tofu or Mushrooms: For a fantastic veggie option.
- Sauces: Drizzle with hoisin, sriracha mayo, or a sprinkle of crushed peanuts.
The contrast of warm, soft bun, rich filling, cool pickle, and fresh herb is what makes each bite unforgettable.
Mix It Up! Creative Bao Twists
Once you’ve mastered the basic bun, the world is your oyster sauce. Here are a few of my favorite ways to play with the formula:
- Whole Wheat Hint: Substitute 1 cup of all-purpose flour with whole wheat flour for a nuttier, slightly heartier bun. The texture will be a tad denser but delicious.
- Flavored Buns: Add 1 tbsp of matcha powder to the dry ingredients for stunning green tea buns, or a swirl of beetroot powder for a vibrant pink hue. It’s a total wow factor for parties.
- Mini Slider Buns: Divide the dough into 15-20 smaller pieces for perfect party-sized sliders. Reduce steaming time to 7-8 minutes.
- Sweet Version: Fill them with sweet red bean paste, custard, or a dollop of Nutella and sliced bananas for a dessert bao. You can also add a touch more sugar to the dough.
- No-Fold “Open Face” Buns: Skip the folding step! Just roll the dough balls flat into small circles. Steam as directed, and use them like soft taco shells for even more filling room.
Jackson’s Kitchen Notes
This recipe has seen many iterations in the Food Meld test kitchen (aka my sometimes-messy home kitchen). I once forgot the baking powder entirely—the buns were still tasty but didn’t have that iconic, sky-high puff. Lesson learned! I also tried using milk instead of water for a richer dough; it works, but I found the water version yields a more authentic, lighter texture that better complements heavy fillings.
The biggest evolution was embracing the parchment squares. My first batch stuck to the bamboo steamer, and let’s just say we had “abstract art” buns instead of folded ones. Now, I cut a stack of squares before I even start the dough. It’s a little prep step that saves a world of frustration. Remember, cooking is fun, messy, and full of learning. If your first bun isn’t perfect, you’re still going to eat really, really well.
Bao Bun FAQs: Your Questions, Answered
Q: Can I make the dough ahead of time?
A: Absolutely! After the first rise, punch down the dough, wrap it tightly in plastic, and refrigerate for up to 24 hours. When ready, let it sit at room temp for 30 minutes, then shape, do the final 30-minute rise, and steam. You can also freeze the shaped, unsteamed buns on a tray, then transfer to a bag. Steam from frozen, adding 2-3 minutes to the cooking time.
Q: My buns collapsed or look wrinkly. What happened?
A: Two likely culprits: 1) You peeked while steaming! Resist the urge. 2) The dough was over-proofed (rose too long) during the final rise. They should look puffy but not gigantically bloated before steaming. 30 minutes is usually perfect.
Q: I don’t have a bamboo steamer. What can I use?
A: No problem! A metal steamer insert in a pot works great. You can also improvise by placing a heatproof plate on top of a canning ring or small bowl inside a large pot with a lid. Just make sure the buns aren’t sitting in water.
Q: Are the buns gluten-free or vegan?
A: This specific recipe is vegan but not gluten-free due to the wheat flour. For a gluten-free version, you’d need a specific GF flour blend designed for yeast breads, which can be tricky. I’d recommend searching for a dedicated GF bao recipe, as the chemistry is very different.
Nutritional Information (Per Bun, Approximate)
Let’s keep it real—these buns are a vehicle for deliciousness. On their own, they’re a relatively simple carbohydrate. One plain, un-filled bao bun (from this recipe) contains roughly:
- Calories: 120-150
- Carbohydrates: 22-25 g
- Fat: 2-3 g
- Protein: 3-4 g
- Sodium: 100-150 mg
Note: This is for the bun only. The total nutritional profile of your meal will depend entirely on your fillings and toppings. Loading up with veggies and lean protein like chicken or tofu makes for a balanced meal. Using rich pork belly and sauces will increase the calorie, fat, and sodium content. It’s all about your custom creation!
Your Fluffy Kitchen Victory Awaits
And there you have it—the journey from a simple packet of yeast to a steamer full of fluffy, homemade bao buns. This recipe is a testament to what I love most about cooking: starting with humble ingredients, adding a dash of patience and a whole lot of heart, and ending up with something that feels truly special. It’s not about perfection; it’s about the joy of the process and the shared “wow” around the table.
So go ahead, steam a batch, get creative with your fillings, and make this recipe yours. Tag me on social @FoodMeld with your bao creations—I love seeing what you come up with! Remember, in this kitchen, flavor always meets fun. Now, let’s eat.
Cheers,
Jackson


