Banana Bread English Muffins: The Toasty, Buttery Breakfast Game-Changer
Hey friends, Jackson here from Food Meld. Let’s talk about those sad, spotty bananas sitting on your counter right now. You know the ones. You bought them full of hope on Monday, and now… they’re staring you down, begging for a purpose beyond the compost bin. We’ve all been there. The classic move is banana bread, right? It’s a good move—a great move, even. But what if I told you we could take all that cozy, spiced, banana-packed goodness and turn it into something you can toast, slather with salty butter, and watch it melt into a thousand glorious nooks and crannies?
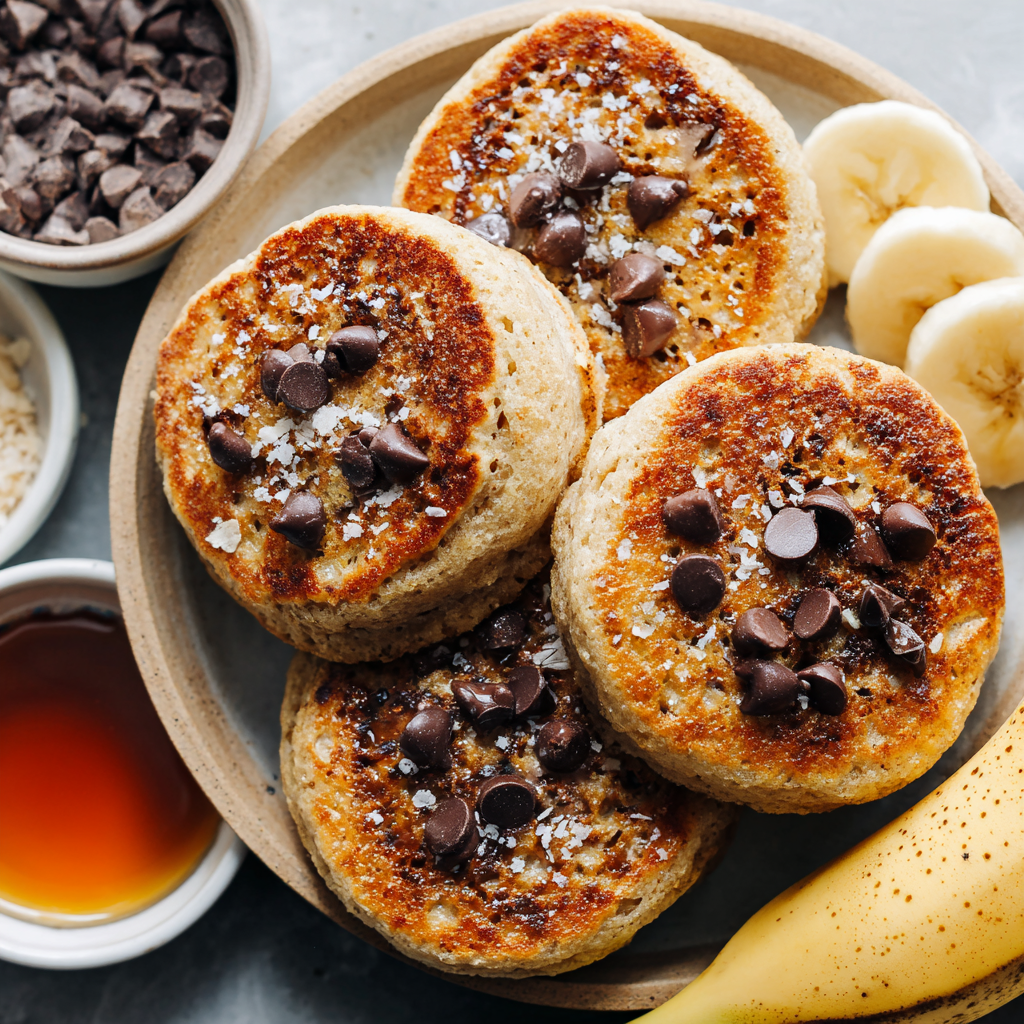
Welcome to my latest kitchen experiment gone wonderfully right: Banana Bread English Muffins with Chocolate Chips. This is where the comforting soul of homemade banana bread meets the humble, glorious English muffin. We’re talking soft, pillowy interiors, craggy golden-brown exteriors, and little pockets of melted chocolate in every single bite. They’re naturally sweetened with those ripe bananas and a kiss of maple syrup, making them feel wholesome, but let’s be real—the chocolate chips bring the party.
I live for these “why didn’t I think of that?” moments in the kitchen. It’s that “Food Meld” magic: taking familiar favorites and twisting them into something new and exciting. This recipe is simple, fun (yes, playing with dough is fun!), and the payoff is a batch of homemade muffins that will make your entire house smell like a bakery and your weekday breakfasts feel like a weekend celebration. So, grab those bananas, and let’s cook something awesome together.
The Muffin That Started It All: A Little Nostalgia
This recipe actually started with a memory. When I was a kid, my grandma had two breakfast specialties: her dense, nutty banana bread (no chocolate, she was a purist) and these giant, store-bought English muffins she’d fork-split and toast until they were almost *too* crispy. I’d sit at her formica table, carefully filling every single hole with grape jelly, thinking it was the height of culinary sophistication.
Years later, staring at my own overripe bananas, that memory just… clicked. What if I could combine the two? The moist, fragrant sweetness of her banana bread with the toasty, butter-absorbing texture of those muffins? The first batch was… interesting. Let’s just say “dense” is a kind word. But after a few tweaks (okay, several), nailing the rise, and realizing graham cracker crumbs make everything better, we landed here. It’s my little homage to those mornings at grandma’s, but with my own chocolate-chip-studded, “what-if-we-tried-this?” energy baked right in. Food memories are the best inspiration, aren’t they?
Gathering Your Flavor Crew: Ingredients & Insights
Here’s your lineup. Simple, real food that works hard for you. Don’t stress if you need to swap something—I’ve got you covered with tips.
- 1 cup warm water (about 110°F): This wakes up the yeast. Think “baby bathwater” warm, not hot. Too hot and you’ll send the yeast to an early retirement.
- 2 teaspoons dry active yeast: Our little fermentation powerhouse. It’s what gives these muffins their lift and light texture.
- 1 tablespoon honey (or sugar/maple syrup): A quick snack for the yeast to get it bubbly and happy. I use honey for a subtle floral note, but plain sugar works perfectly.
- 2 overripe large bananas, mashed: This is non-negotiable. The blacker, the better. They bring the sweetness, moisture, and that iconic banana bread flavor. No ripe yellows allowed here!
- 2 tablespoons real maple syrup: This adds a deeper, caramel-like sweetness than plain sugar. It’s the flavor backbone.
- 1 teaspoon vanilla bean paste or extract: Paste gives you those beautiful little specks and intense flavor, but extract is a fantastic workhorse. It rounds out all the sweet notes.
- 4 cups flour: I often use half whole wheat, half all-purpose for a nutty heartiness. All all-purpose is great for a lighter texture. Start with 3.5 cups and add more as needed—dough hydration can vary!
- 1 teaspoon salt: The flavor booster. It makes the sweet pop and balances everything.
- 1 cup chocolate chips: My “creative twist.” Use dark, milk, or semi-sweet. Or chop up a bar for uneven, melty pockets of joy.
- For griddling: ½ cup finely crushed graham crackers or cornmeal: Chef’s secret weapon! This gives the outside that classic, slightly crunchy “muffin” texture and prevents sticking. Graham crackers add a hint of honey and cinnamon—trust me on this.
Let’s Get Our Hands Doughy: The Step-by-Step
Don’t let the yeast scare you. We’re just giving it a cozy environment to do its thing. Put on some music, and let’s go.
- Wake Up the Yeast: In your largest mixing bowl, combine the warm water, yeast, and honey. Give it a quick stir and walk away for 5 minutes. You’re looking for a foamy, creamy layer on top. This is your sign that the yeast is alive and ready to party. If it doesn’t foam, your yeast might be old or the water was too hot/cold. Start over—it’s worth it.
- Banana Bliss: In a separate bowl, mash those bananas until mostly smooth (a few lumps are totally fine). Stir in the maple syrup and vanilla. Pour this beautiful, fragrant mess right into your foamy yeast mixture.
- Bring the Dough Together: Add 3.5 cups of the flour and the salt to the bowl. Stir with a sturdy spoon or your hands until a shaggy, sticky dough forms. It’ll seem messy! Now, turn it out onto a lightly floured surface. Knead for about 3-4 minutes, incorporating the remaining ½ cup of flour a bit at a time as needed, until you have a smooth, slightly tacky (but not sticky) dough. Chef’s Hack: Don’t over-knead! We’re not making bagels. Just until it’s cohesive and elastic.
- The First Rise: Drizzle a little oil in a clean bowl, plop your dough ball in, and turn it to coat. Cover the bowl with a damp kitchen towel or plastic wrap. Find a warm, draft-free spot (like an off oven) and let it rise for 1 hour, or until about doubled in size. This is your chance to do the dishes or, more likely, scroll through Food Meld for dessert ideas.
- Shape Your Muffins: Once puffy, punch the dough down (the best part). Turn it out and divide it into 8-9 equal pieces. Roll each piece into a smooth ball, then flatten it gently into a thick disc, about 1-inch high. Place them on a parchment-lined baking sheet, cover again, and let them rise for 30 more minutes. They’ll get nice and puffy.
- Griddle & Bake: Here’s where the magic happens! Preheat your oven to 350°F and a greased skillet or griddle over medium heat. Place your crushed graham crackers or cornmeal in a shallow dish. Carefully dip both sides of each dough disc in the crumbs to coat. Griddle them for 1-2 minutes per side, until you get a gorgeous golden-brown crust. Tip: Don’t crowd the pan, and adjust heat if they’re browning too fast.
- Finish in the Oven: Transfer the griddled muffins back to the baking sheet and pop them in the oven for 10-13 minutes. This ensures they cook all the way through without burning the outside. You’ll know they’re done when they sound slightly hollow if tapped on the bottom.
How to Serve These Beauties (Spoiler: It’s Easy & Delicious)
Okay, the hard part is over. Now for the reward. Let these cool on a wire rack for at least 15 minutes—I know, the wait is torture. Then, take a fork and split them open the traditional way (poking all around the edges) to reveal those incredible nooks and crannies.
Toast them until the edges are just crispy. Then, the world is your oyster. My top-tier serving suggestions:
- The Classic: A generous pat of good salted butter, melting into every hole.
- The Peanut Butter Paradise: Slather with creamy peanut butter. The banana-chocolate-PB trifecta is unbeatable.
- Fancy Brunch Mode: Top with a dollop of Greek yogurt, sliced fresh bananas, a drizzle of honey, and a sprinkle of cinnamon.
- Dessert Alert: Turn it into a mini sundae with a scoop of vanilla ice cream and caramel sauce.
They’re perfect with a big cup of coffee on a lazy morning or as an after-school snack that’ll make you the coolest person in the house.
Make It Yours: Fun Twists & Swaps
This recipe is a fantastic canvas. Play with it! Here are a few of my favorite spins:
- Nutty Professor: Fold in ¾ cup chopped toasted walnuts or pecans along with the chocolate chips (or instead of them, if you must).
- Vibrant & Vegan: Use maple syrup with the yeast instead of honey, and ensure your chocolate chips are dairy-free. The dough might need a touch more flour.
- Spice is Nice: Add 1 tsp cinnamon, ¼ tsp nutmeg, and a pinch of cloves to the dry ingredients for that warm, spiced banana bread vibe.
- Berry Blast: Swap chocolate chips for 1 cup of frozen blueberries or dried cranberries. Tart and sweet!
- “Everything” Savory-Sweet: Skip the chocolate. After griddling, top with everything bagel seasoning before baking. Incredible with cream cheese and smoked salmon.
Jackson’s Kitchen Notes: The Real Talk
This recipe has evolved from a dense, dubious experiment to a weekend staple in my house. The biggest lesson? Trust the process and your senses. Your dough might need more or less flour depending on your bananas’ size and your kitchen’s humidity. Go by feel—tacky, not a sticky mess. And the graham cracker crust? That was a happy accident when I was out of cornmeal. Now I won’t make them any other way. It adds this whisper of flavor that just works.
Also, a funny story: my first test batch rose so much it looked like an alien life form trying to escape the bowl. My wife walked in and just said, “What… is that?” We laughed, I reshaped them, and they were delicious. The kitchen is supposed to be messy and fun. If your muffins aren’t perfect circles, who cares? They’ll taste incredible.
FAQs & Quick Fixes
Q: My dough is super sticky and I’ve added all the flour. Help!
A: Don’t panic! Different flours absorb differently. Lightly oil your hands and your work surface instead of adding more flour. You can gently knead and shape it with oily hands. Adding too much extra flour can make the muffins dense.
Q: Can I make these the night before?
A: Absolutely! After shaping the discs on the baking sheet, cover them tightly and pop them in the fridge for a “slow rise” overnight. In the morning, let them sit at room temp for 30 minutes, then griddle and bake as directed. Easy fresh breakfast!
Q: Why do we griddle AND bake?
A: The griddle gives us that signature crispy, toasted exterior and beautiful color. The oven ensures the inside cooks through without burning the outside. It’s the classic English muffin method for a reason!
Q: My muffins are browning too fast on the skillet. What do I do?
A: Your heat is too high. Drop it to medium-low. You want a steady, gentle sizzle, not an aggressive sear. We’re toasting, not charring.
Nutritional Info (Because We’re Curious!)
Okay, let’s keep it real. This is a homemade treat, not a cardboard diet food. But because I know you might be wondering, here’s the approximate breakdown per muffin (based on 9 muffins, using all-purpose flour and semi-sweet chips). Remember, using whole wheat flour adds fiber, and you can reduce chocolate chips if you want.
Per Muffin:
Calories: 230 | Carbohydrates: 38g | Sugar: 10g | Fat: 6g | Protein: 5g
The natural sweetness comes from bananas and a touch of maple syrup, and you’re in control of everything that goes in—no weird preservatives. It’s a wholesome, satisfying upgrade from anything you’ll find in a plastic package at the store.
Final Thoughts: Your New Banana Bread Destiny
So there you have it. We took a problem (overripe bananas) and turned it into pure breakfast magic. These Banana Bread English Muffins are everything I love about cooking: creative, comforting, and downright delicious. They’re a conversation starter, a kitchen triumph, and the best way to use up those bananas, bar none.
I hope you bake them, share them, and make your own memories around them. Tag me @FoodMeld if you do—I love seeing your kitchen wins. Now go forth, grab those spotty bananas, and let’s cook something awesome together. Welcome to Food Meld, where flavor truly meets fun.
Happy baking,
Jackson


