Antipasto Cheese Ball: Your New Party Superpower
Hey friends, Jackson from Food Meld here. Let’s talk about the star of the party, the conversation starter, the dish that disappears faster than you can say “more crackers, please.” I’m talking about the mighty, the glorious, the utterly irresistible cheese ball. But we’re not making just any cheese ball today. Oh no. We’re taking a trip to Italy without leaving our kitchens and building an Antipasto Cheese Ball that’s literally bursting with all those classic flavors you love.
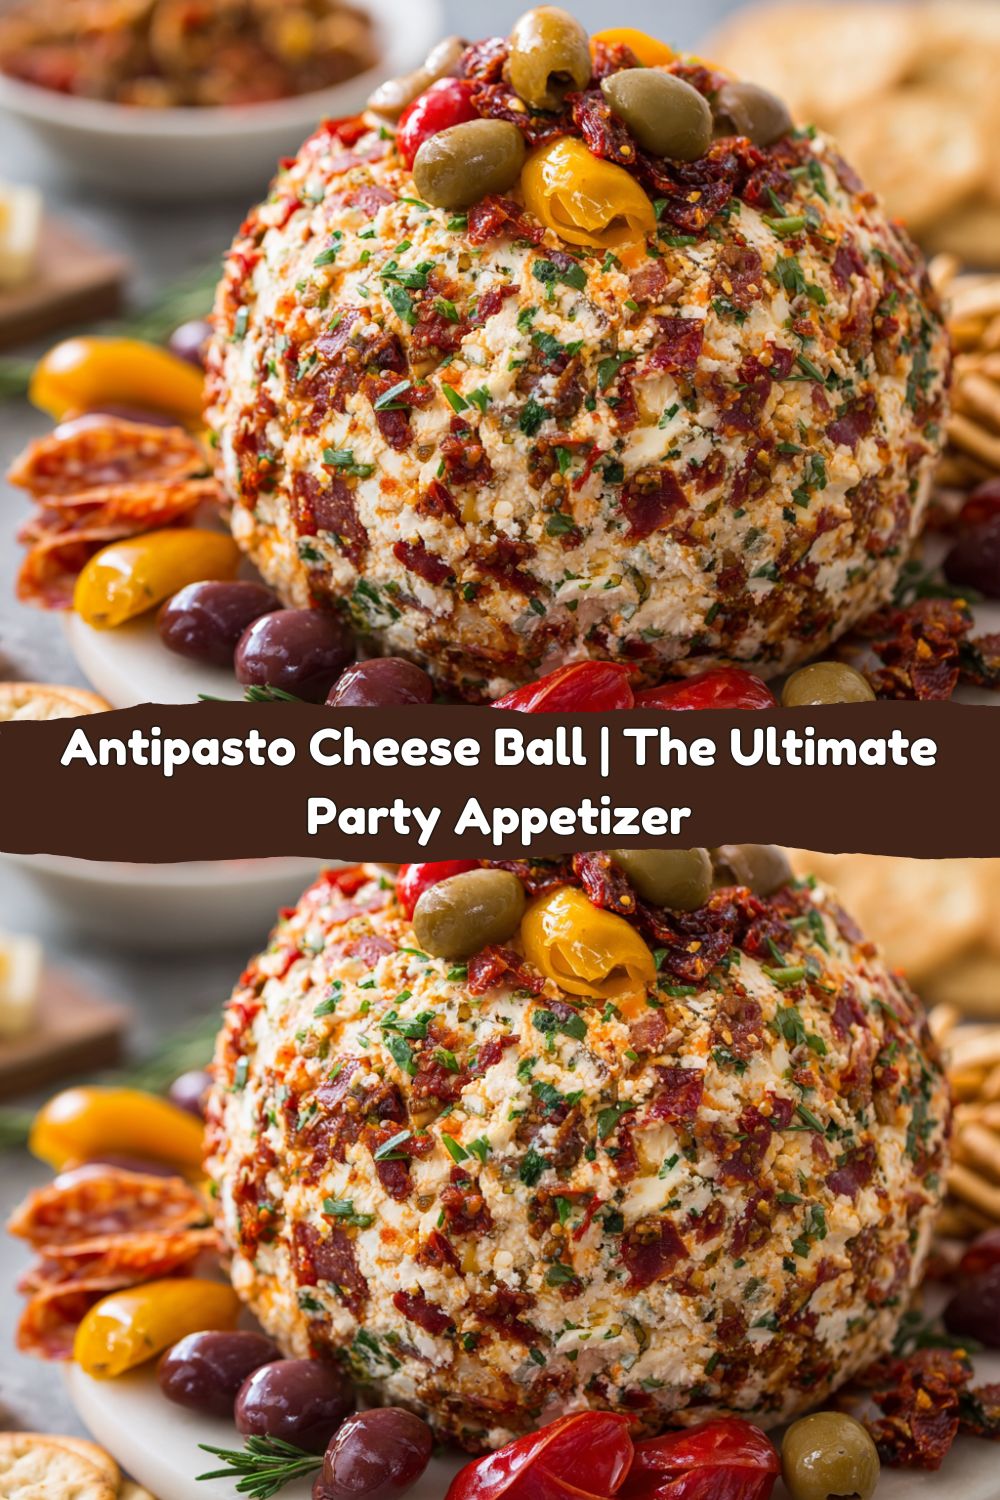
Imagine this: creamy, tangy cream cheese loaded with salty salami, sweet sun-dried tomatoes, crisp bell peppers, and a garden of fresh herbs. Then, we take that flavor bomb and roll it in a confetti of briny olives and more of those gorgeous tomatoes. It’s a flavor explosion in every single bite. This isn’t a shy, demure appetizer. This is the showstopping centerpiece that announces, “The party has officially started!” I designed this recipe as a double batch because, trust me, you’ll want leftovers (though I can’t promise they’ll last). It’s simple to make, packed with my signature “bold and comforting” vibe, and guaranteed to make you look like a kitchen rockstar. So, let’s ditch the boring snacks and cook something awesome together.
A Cheese Ball Worth Traveling For
This recipe was born from a serious craving and a very fond memory. A few years back, my wife and I were wandering through a tiny, sun-drenched Italian market, the kind where the air smells like oregano, aged cheese, and dreams. We ordered an antipasto platter, and it was a work of art—a sprawling landscape of meats, cheeses, pickled veggies, and olives. We must have sat there for two hours, just nibbling, talking, and soaking it all in.
On the flight home, all I could think was, “How do I get that experience into one bite? How do I bring that feeling to my next game night or family gathering?” The answer hit me while I was staring into my fridge: a cheese ball! But not just any cheese ball. One that had the entire spirit of that antipasto platter rolled right into it. After a few (very delicious) experiments, this beauty was created. It’s my edible souvenir, and now, it’s my go-to recipe for turning an ordinary Tuesday into a celebration. It’s that powerful.
Gathering Your Flavor Arsenal
Here’s the beautiful part: this recipe is incredibly forgiving and flexible. This is your canvas, so feel free to paint with the flavors you love most. Here’s what you’ll need to create this masterpiece.
For the Cheese Ball
- 48 oz (6 bricks) Cream Cheese, softened: This is our rich, creamy base. Pro Chef Tip: Full-fat is non-negotiable for the best texture and flavor. Let it sit on the counter for a good hour or two until it’s super soft. This makes mixing a breeze and ensures a silky-smooth ball, not a lumpy one.
- 1 cup Sun-Dried Tomatoes, chopped: They pack a powerful punch of sweet, tangy, concentrated tomato goodness. I use the ones packed in oil for extra moisture and flavor. If you only have dry-packed, just soak them in hot water for 10 minutes first to soften them up.
- 1 cup Red Bell Peppers, finely diced: This is our crunch factor and a pop of fresh sweetness that balances the salty meats. You could swap in some roasted red peppers from a jar for an even deeper, smokier flavor.
- 7 oz Salami, chopped: This brings the salty, savory, meaty heart of the antipasto platter right into the mix. I use a classic Genoa, but feel free to get creative with a spicy soppressata or even a finocchiona (fennel salami) for a different twist.
- 1/2 cup Chives, chopped & 1/2 cup Parsley, chopped: Fresh herbs are essential! They add a necessary brightness and cut through the richness. Please, please use fresh for this. It makes a world of difference.
- 2 tbsp Onion Powder & 4 tsp Garlic Powder: Why powder instead of fresh? Because we want that allium flavor without any unwanted moisture or crunchy bits. It distributes evenly and gives us a consistent flavor in every bite.
- Salt, to taste (start with a pinch): Go easy here! The salami, olives, and sun-dried tomatoes are already plenty salty. I always start with a small pinch, mix, then taste before adding any more.
For the Topping & Serving
- 4 cups Mixed Pitted Olives (green, black, Kalamata), halved and DRIED: The star of the show! The visual wow factor. The “dried” part is my biggest hack. After chopping, pat them like crazy with paper towels. A dry exterior means they’ll stick to the cheese ball perfectly instead of sliding right off.
- 1 cup chopped Sun-Dried Tomatoes, dried with paper towel: More of that amazing flavor and color for the outside. Same rule: dry them thoroughly!
- Assorted Crackers, Pretzels, Breadsticks: Choose sturdy vehicles that can scoop up a hearty bite without breaking.
- Salami & Prosciutto Slices (folded or rolled): We’re doubling down on the antipasto theme. Scattering these around the platter makes it look abundant and irresistible.
Building Your Flavor Masterpiece: Step-by-Step
Okay, team. Let’s get our hands dirty (figuratively, of course… mostly). This is where the fun begins.
- The Prep Work is Key. Before you even touch the cream cheese, get all your chopping done. Dice those bell peppers, chop the sun-dried tomatoes and salami into small, uniform pieces, and finely mince your fresh herbs. This “mise en place” (everything in its place) makes the assembly process smooth and fast. And don’t forget to pat your olives and extra sun-dried tomatoes for the coating bone dry with paper towels. This is the most crucial step for a gorgeous exterior!
- Mix It Up, Boldly. In your largest mixing bowl, plop in all six bricks of that beautifully softened cream cheese. Add your pre-chopped sun-dried tomatoes, red bell peppers, salami, chives, parsley, onion powder, garlic powder, and that initial pinch of salt. Now, get in there with a sturdy wooden spoon or, even better, clean hands! You want to mix until every single ingredient is perfectly and evenly distributed. No cream cheese streaks! Taste it. Does it need more salt? More herbs? This is your moment to adjust. Chef’s Hack: If you have a stand mixer with a paddle attachment, you can use it on low speed for about a minute. Just be careful not to overmix and turn the salami and veggies to mush.
- Shape & Chill (The Patience Pays Off Step). Now, onto a large piece of plastic wrap, dump your magnificent mixture. Using the wrap to help you, shape it into one giant, impressive sphere or two more manageable medium-sized balls. Wrap it up tightly. Now, this is important: refrigerate it for at least one hour, but overnight is even better. This firming-up step is non-negotiable. It makes the cheese ball much easier to handle and allows the flavors to meld together beautifully. Trying to roll a soft cheese ball in toppings is a recipe for a messy disaster!
- The Grand Finale: The Coating. Unwrap your now-firm cheese ball(s). On a large plate or another piece of parchment paper, spread out your thoroughly dried olive and sun-dried tomato mixture. Gently roll your cheese ball over the topping, pressing lightly to make sure every inch gets covered in that gorgeous, confetti-like coating. Don’t be afraid to pick up handfuls of the topping and press them onto any bare spots. You want maximum coverage!
- Plate Like a Pro. Place your finished Antipasto Cheese Ball on a serving platter. Artfully arrange your folded salami, rolled prosciutto, crackers, and breadsticks around it. For a final, professional touch, you can drizzle a little balsamic glaze over the top of the ball and the platter right before serving. It adds a beautiful shine and a hit of sweet acidity.
How to Serve This Showstopper
Presentation is part of the fun! You’ve created a masterpiece, so let it shine. I like to use a large wooden board or a sleek slate platter for a rustic yet chic look. Place the cheese ball right in the center as your anchor.
Surround it with an array of dippers: sturdy crostini, classic water crackers, crunchy pretzel thins, and thin breadsticks. Then, fill in the gaps with the folded meats—it makes the platter look abundant and inviting. Add a small bowl of extra balsamic glaze for dipping on the side. Take it out of the fridge about 15-20 minutes before serving. Letting it slightly come to room temperature will make it easier to spread and will really allow all the flavors to pop. Then, just step back and watch it disappear.
Make It Your Own: Creative Twists
The beauty of this recipe is its flexibility. Here are a few ways to mix it up and make it yours:
- Cheese Lover’s Dream: Mix in 1/2 cup of shredded sharp provolone or asiago cheese right into the cream cheese base for an extra punch of cheesy, salty flavor.
- Spice It Up: Add 1/2 to 1 teaspoon of crushed red pepper flakes to the mixture if your crowd likes a little heat. It’s the perfect contrast to the creamy base.
- Artichoke Twist: Not an olive fan? No problem! Swap the olive coating for finely chopped marinated artichoke hearts (again, patted VERY dry). It gives a fantastic mild, tangy flavor.
- The Supreme Supreme: Feel free to add a handful of finely chopped pepperoncini peppers or even some diced artichoke hearts right into the cheese mixture itself.
- Make It Leaner: You can use a reduced-fat cream cheese if you prefer, but be aware the texture will be slightly less rich and firm. It will still taste delicious!
Jackson’s Chef Notes & Kitchen Stories
This recipe has evolved from that first “what if?” idea in my kitchen. The first time I made it, I was so excited I tried to roll it in the toppings immediately. Big mistake. It turned into more of an “Antipasto Cheese Blob.” Lesson learned: patience and a firm chill are your best friends here.
I also learned that drying the toppings is the secret handshake of a perfect cheese ball. I’ve made it for countless parties now, and it never fails to get rave reviews. It’s the dish people ask me to bring, and the one that always, without fail, has someone hovering near it until the very last bite is gone. That’s the sign of a true winner.
FAQs & Troubleshooting: Your Questions, Answered
Q: Can I make this ahead of time?
A: Absolutely! This is the perfect make-ahead appetizer. You can prepare the cheese ball (through the shaping and wrapping step) up to 2 days in advance. I’d wait to roll it in the toppings until the day you’re serving it for the freshest look, but you can do that a few hours ahead, too. Just keep it wrapped and chilled.
Q: My cheese ball is too soft to coat! What do I do?
A: Don’t panic! This means it didn’t chill long enough. Just pop the un-coated ball back into the fridge, wrapped up, for another 30-60 minutes. If you’re in a serious time crunch, you can even stick it in the freezer for 15-20 minutes to flash-chill it. Just keep an eye on it so it doesn’t actually freeze solid.
Q: The toppings won’t stick. Help!
A: This almost always means your olives or tomatoes were too wet. For the already-rolled ball, gently pat it dry if you can, then try pressing on more topping. For next time, remember the paper towel pat-down is your best friend! A perfectly dry exterior on your toppings is the key to a flawless stick.
Q: How long will leftovers last?
A> Stored in an airtight container in the fridge, your cheese ball will stay delicious for up to 5 days. The texture might firm up a bit more, but the flavor will still be incredible.
Antipasto Cheese Ball
- Total Time: 30–90 minutes
- Yield: 28 1x
Description
This vibrant, savory cheese ball is bursting with antipasto flavor—inside and out. Packed with sun-dried tomatoes, peppers, salami, and herbs, then rolled in olives and more, it’s the perfect party centerpiece. This double batch ensures there’s plenty to go around, with some fresh flavor twists to wow your crowd.
Ingredients
For the Cheese Ball
48 oz (6 bricks) cream cheese, softened
1 cup sun-dried tomatoes, chopped
1 cup red bell peppers, finely diced
7 oz salami, chopped
1/2 cup chives, chopped
1/2 cup parsley, chopped
2 tbsp onion powder
4 tsp garlic powder
Salt, to taste (start with a pinch)
For the Topping & Serving
4 cups mixed pitted olives (green, black, Kalamata), halved and dried
1 cup chopped sun-dried tomatoes, dried with paper towel
Assorted crackers, pretzels, breadsticks
Salami & prosciutto slices (folded or rolled)
Optional Twists
Mix in 1/2 cup shredded provolone or asiago for added sharpness
Add 1/2 tsp crushed red pepper flakes for subtle heat
Drizzle with balsamic glaze just before serving for extra depth
Swap olives for marinated artichoke hearts for a milder bite
Instructions
In a large bowl, combine cream cheese, sun-dried tomatoes, red bell peppers, salami, chives, parsley, onion powder, garlic powder, and salt. Mix well until smooth.
Shape the mixture into one large or two medium balls. Wrap in plastic wrap and refrigerate for at least 1 hour to firm.
Roll chilled cheese ball in a mix of olives and extra sun-dried tomatoes to coat evenly.
Place on a platter, surround with folded salami, prosciutto, crackers, and pretzels. Serve chilled or at room temp.
- Prep Time: 30 minutes
- Chill Time: 1 hour
Nutrition
- Calories: 220 / Serving
- Fat: 19g / Serving
- Carbohydrates: 3g / Serving
- Protein: 6g / Serving
Nutritional Information (Approximate, Per Serving)
Alright, let’s keep it real. This is a party appetizer, meant to be enjoyed in celebration! It’s rich, flavorful, and satisfying. Here’s a rough breakdown per serving (assuming 28 servings):
- Calories: 220
- Fat: 19g
- Carbohydrates: 3g
- Protein: 6g
Heads up: The sodium content is moderate to high due to the salami, olives, and cheese, which is typical for antipasto flavors. If you are watching your sodium intake, you can look for lower-sodium versions of salami and olives, and be sure to skip adding extra salt to the mixture.
Final Thoughts: Let’s Get This Party Started
There you have it, friends. My ultimate, never-fail, always-impressive Antipasto Cheese Ball. It’s more than just a recipe; it’s a guaranteed good time on a platter. It embodies everything I love about cooking at Food Meld: big, comforting flavors, a creative twist on a classic, and a recipe that’s genuinely fun to make and share.
So the next time you’re tasked with bringing an app, hosting a get-together, or just want to treat yourself to something spectacular, I hope you give this a try. Remember, cooking is supposed to be fun, a little messy, and always, always full of flavor. Don’t be afraid to make it yours.
If you do make it, I’d love to hear about it! Tag me on social @FoodMeld so I can see your beautiful creations. Now, go forth and melt some flavors!
Until next time,
Jackson


