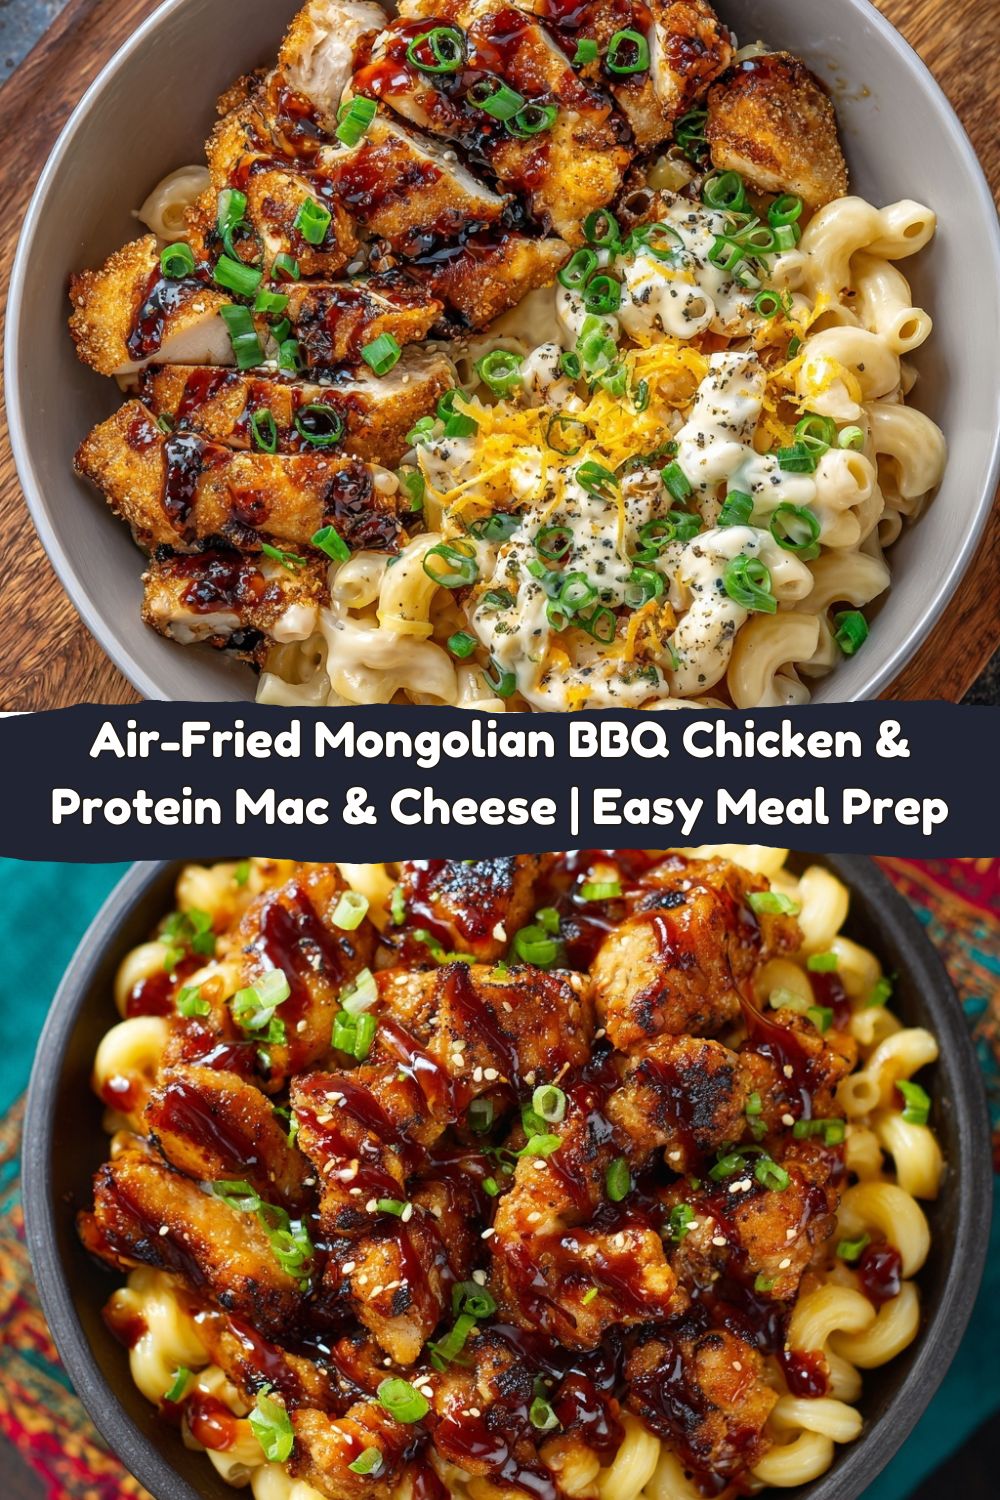
Air-Fried Mongolian BBQ Chicken with High-Protein Mac & Cheese – Easy Meal Prep Bowl
Hey there, Food Meld family! Jackson here. Let me paint you a picture: it’s been one of those days. You’re tired, you’re hungry, and your stomach is starting to have a serious debate with your brain. One part of you is screaming for something decadent, cheesy, and soul-warming—the kind of meal that feels like a high-five for your taste buds. The other part is whispering (or maybe yelling) about goals, protein, and not wanting to feel like a naptime candidate after dinner.
Sound familiar? I’ve been there more times than I can count. That exact tension is what inspired this knockout combo right here. We’re talking about Air-Fried Mongolian BBQ Chicken with a lusciously creamy, Protein-Packed Mac & Cheese. This isn’t about “healthy” food pretending to be something else. This is about real, bold, comforting food that just so happens to be stacked with smart fuel for your body.
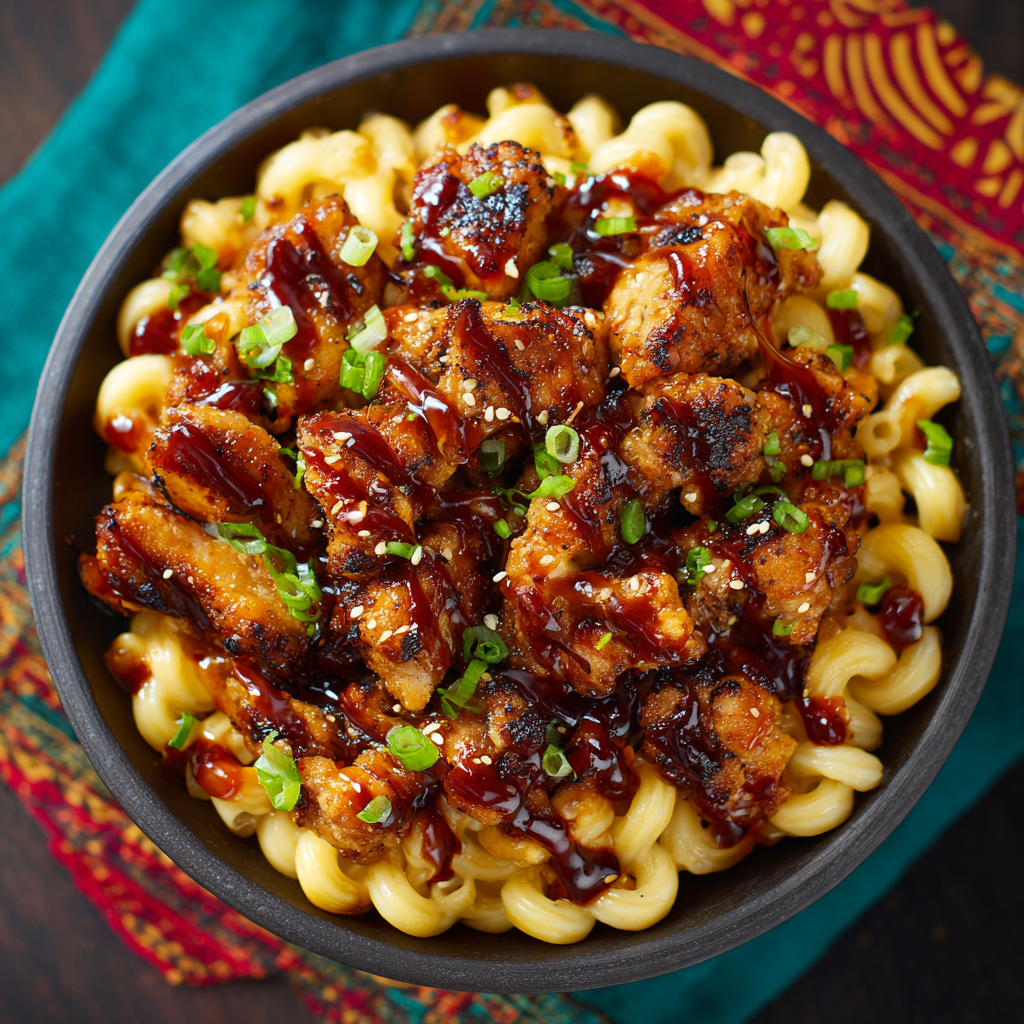
We’re taking juicy, crispy air-fried chicken and tossing it in a sticky, sweet, and savory Mongolian BBQ glaze that’s straight-up addictive. Then, we’re pairing it with a mac and cheese that’s so rich and velvety, you won’t believe it’s packed with protein and lightened-up ingredients. It’s the ultimate meal-prep power couple, ready to conquer your busy week and make your lunchbox the envy of the breakroom. So, let’s ditch the dinner dilemma and cook something awesome that satisfies every single craving.
The Night That Sparked a Flavor Revolution
This whole dish really took shape after a legendary, slightly chaotic night with my buddies. We’d just finished a big project and were craving celebration food. The vote was split right down the middle: half the crew wanted to order from our favorite Mongolian BBQ spot, and the other half was dead-set on the ultimate comfort food—a giant tray of baked mac and cheese.
Instead of choosing, we did what any reasonable, hungry group does: we ordered both. And as I sat there, taking a bite of the sweet-salty chicken followed by a forkful of that creamy mac, it hit me. This is it. This is the perfect flavor marriage. The bold, almost smoky-sweetness of the Mongolian sauce cuts through the rich, cheesy creaminess in a way that just sings. I knew right then I had to create a version you could make anytime, one that was weeknight-easy and felt as good as it tasted. This bowl is that “aha!” moment, perfected and packed for your prep day.
Gathering Your Flavor All-Stars
Don’t let the list intimidate you! We’re using a few smart shortcuts and powerhouse ingredients to build insane flavor and texture without a ton of work. Here’s your shopping list.
For the Sticky Mongolian BBQ Chicken:
- 24 oz Just Bare Lightly Breaded Chicken Bites: This is our secret weapon for that perfect crispy-on-the-outside, juicy-on-the-inside texture without any fuss. If you can’t find these, any lightly breaded chicken strips or chunks will work great.
- ½ cup light soy sauce: The salty, umami backbone of our sauce. For a gluten-free version, tamari or coconut aminos are perfect swaps.
- 6 tbsp brown sugar substitute (like Splenda): Gives us that classic caramel-like sweetness without the sugar spike. Regular brown sugar works too if you’re not watching macros closely.
- 2 tbsp hoisin sauce: The flavor MVP! It adds a complex, slightly sweet, and savory depth. It’s the “what is that amazing flavor?” ingredient.
- 2 tbsp sugar-free honey: Helps create that gorgeous, glossy, sticky glaze. Regular honey works perfectly here as well.
- 2 cloves garlic, minced & 2 tsp fresh ginger, minced: Non-negotiable for that aromatic punch! Please, please use fresh—it makes all the difference compared to the jarred stuff.
- 4 tbsp water & 2 tsp cornstarch: Our dynamic duo for thickening the sauce into a perfect, clingy glaze that coats every nook and cranny of the chicken.
For the Protein Mac & Cheese:
- 8 oz Carba Nada cavatappi or high-protein pasta: I love the swirls of cavatappi for holding onto the sauce, but any high-protein pasta shape you love will do the trick.
- 1½ cups low-fat cottage cheese: Don’t knock it ‘til you try it! When blended, it creates an unbelievably creamy, high-protein base with zero “cottage cheese” flavor.
- 1 cup unsweetened almond milk: Thins our sauce to the perfect consistency. Any milk you have on hand will work.
- 10 tbsp nutritional yeast: This is the magic dust! It gives a wonderfully cheesy, slightly nutty flavor and a boost of B-vitamins. It’s a game-changer for creamy sauces.
- 8 wedges White Cheddar Laughing Cow cheese & 6 slices Velveeta cheese: The ultimate creamy cheese team. Laughing Cow melts into silky perfection, and Velveeta gives us that classic, smooth melt we all crave.
- 1 cup shredded 3-cheese blend: For that final, gooey, cheesy pull. A blend of mozzarella, cheddar, and provolone is my go-to.
- 1 tbsp Dijon mustard (optional but highly recommended): A little chef’s secret! It doesn’t make it taste like mustard—it just sharpens and deepens all the cheesy flavors. Trust me on this one.
- 2 tsp white pepper & 2 tsp garlic powder: The essential seasoning squad for our cheese sauce. White pepper is milder than black pepper but adds a fantastic warmth.
Let’s Build Some Magic, Step-by-Step
Alright, team, aprons on! We’re going to multitask like pros here. I like to get the sauce going and the pasta water boiling while the chicken is in the air fryer. It all comes together faster than you think.
- Air-Fry the Chicken to Crispy Perfection: Grab your air fryer basket and spread those chicken bites out in a single layer. No overcrowding! This is the golden rule for getting them truly crispy instead of steaming. Use the rotisserie or crisp function and cook at 360°F for 12–14 minutes. You’re looking for a deep golden brown and an audible crunch. No air fryer? No sweat! A 400°F oven on a baking sheet will get you there in about 15-20 minutes.
- Whip Up the Magical Mongolian Glaze: While the chicken is doing its thing, let’s make the sauce. In a medium saucepan over medium heat, combine the soy sauce, brown sugar substitute, hoisin, sugar-free honey, garlic, ginger, and water. Give it a good whisk and let it come up to a bubble. In a small separate bowl, mix your cornstarch with just a splash of cold water to make a slurry (this prevents lumps!). Whisk this slurry into your bubbling sauce and let it simmer for just a minute or two. You’ll see it transform from thin and watery to thick and gloriously glossy. Take it off the heat.
- Toss the Chicken in Glory: Once your chicken is perfectly crispy, immediately dump it into the saucepan with your finished Mongolian glaze. Gently toss it until every single piece is coated in that sticky, shiny sauce. Set this beautiful mess aside.
- Create the Creamiest Protein-Packed Cheese Sauce: Now, for the main event! Get your pasta boiling in salted water to aldente according to the package directions. While it cooks, let’s make the sauce that will change your life. Add the cottage cheese, almond milk, nutritional yeast, white pepper, garlic powder, and that trusty Dijon mustard to a blender. Blitz it on high until it’s completely smooth and silky—no graininess in sight! Pour this creamy base into a saucepan over medium-low heat. Add the Laughing Cow wedges, Velveeta slices, and the shredded cheese blend. Stir gently and constantly until all the cheese has melted into a dreamy, velvety sauce.
- Bring It All Home: By now, your pasta should be perfectly cooked. Drain it well and then add it directly to your pot of cheese sauce. Stir it all together until every swirl of pasta is luxuriously coated. Take a sneaky taste—this is the chef’s privilege—and do a little happy dance because you just made magic from scratch.
Plating Up Your Masterpiece
How you serve this is part of the fun! For meal prep, I’m a sucker for the classic divided containers. A hearty scoop of that creamy mac and cheese in one side, and a generous pile of the glistening Mongolian chicken right next to it. Let it all cool completely before you snap on the lid to keep everything fresh.
If you’re serving it right away for dinner, let’s make it pretty. Grab a wide, shallow bowl. Make a bed of the mac and cheese, then artfully pile the chicken right on top. I love to finish it with a sprinkle of sliced green onions and a tiny drizzle of any leftover Mongolian sauce I have hanging out in the pan. For a pop of color and freshness, a little side of steamed broccoli or snap peas is absolutely killer with this.
Make It Your Own: Creative Twists & Swaps
The best recipes are launchpads for your own creativity. Here are a few ways to mix this one up!
- Spicy Szechuan Switch-Up: Add 1-2 tsp of Szechuan peppercorns (crushed) and a tablespoon of chili-garlic sauce to the Mongolian glaze for a tingly, fiery kick.
- Go Gluten-Free & Dairy-Free: Easy! Use tamari instead of soy sauce, and for the mac, swap the cheeses for your favorite vegan melty cheeses and use a gluten-free pasta. The blended cottage cheese base can be replaced with a cup of soaked raw cashews for a similar creamy effect.
- “Everything but the Kitchen Sink” Mac: Stir in some extra goodies to your mac and cheese! A cup of steamed cauliflower florets, some cooked lean ground turkey, or even a handful of spinach wilted in at the end boosts the nutrition even more.
- Pork or Beef Lover’s Delight: Not in a chicken mood? This sauce is incredible on air-fried pork bites or lean steak strips. The method stays exactly the same!
Jackson’s Kitchen Notes & Stories
This recipe has become a staple in my own weekly prep, and it’s evolved a bit from that first experimental batch. The first time I made the cheese sauce, I was skeptical about the cottage cheese—I’ll admit it. But the moment I took that first bite of the silky, cheesy pasta, I was a believer. My wife, who can spot a “healthy” swap from a mile away, took one bite and said, “Okay, you can make this every week.” That’s when I knew it was a winner.
My biggest tip? Don’t rush the sauce. Keep the heat on medium-low when you’re melting the cheeses into the blended base. Patience gives you a smooth, emulsified sauce, while high heat can sometimes make it a little grainy or separate. Low and slow is the way to go for creaminess you can literally pour.
Your Questions, Answered!
Q: My cheese sauce seems a little thin. How can I thicken it up?
A: No worries! This can happen. First, let it sit for a minute off the heat—it will often thicken as it cools slightly. If it’s still too thin, make a quick slurry with 1 tsp of cornstarch and 1 tbsp of cold water. Whisk it into the sauce over low heat and let it bubble for a minute. It’ll tighten right up.
Q: Can I bake this mac & cheese to get a crispy top?
A: Absolutely, and I love that idea! Pour the finished mac and cheese into a baking dish, top with a little extra shredded cheese and a sprinkle of panko breadcrumbs mixed with a touch of paprika. Broil for 2-3 minutes until golden and bubbly. Just be mindful that it might make the sauce a tad less “saucy” as it bakes.
Q: My air fryer chicken isn’t as crispy as I’d like. What did I do wrong?
A> The #1 culprit is almost always overcrowding the basket. The hot air needs space to circulate around each piece to create that perfect crunch. Cook in batches if you have to—it’s worth it! Also, giving the basket a good shake halfway through cooking helps immensely.
Q: How long does this meal prep last in the fridge?
A> Stored in airtight containers, this combo will be perfect for 3-4 days in the refrigerator. I don’t recommend freezing the mac and cheese, as the dairy-based sauce can separate and become grainy upon thawing.
The Smart Fuel Breakdown
Now, let’s talk about what’s powering you up! This isn’t just empty calories; it’s a balanced meal designed to keep you full, satisfied, and energized. The numbers below are per serving (that’s 1/4th of the whole recipe) and are estimates, but they give you a fantastic picture of why this bowl is such a win.
You’re looking at roughly 470 calories, with a powerhouse 32 grams of protein that’s essential for muscle repair and keeping you full. The carbs are smartly sourced from the high-protein pasta and the sauce ingredients, giving you energy without a major crash. We’ve also kept the fat content in a great range by using low-fat dairy and the magic of the air fryer. It’s a macro-friendly meal that truly proves you don’t have to sacrifice flavor for function.
You’ve Got This!
And there you have it! A meal that’s bold, comforting, smart, and—most importantly—absolutely delicious. This is what Food Meld is all about: taking those big, craveable flavors and finding clever, fun ways to bring them to your kitchen without the stress or the guilt.
I hope this recipe becomes a new favorite in your rotation, a trusty friend for your busy weeks, and a reminder that cooking awesome food is one of the most rewarding things you can do for yourself. You made this! So go ahead, dig in, and enjoy every single bite. And when your friends ask for the recipe, you know what to do—send them my way!
Let me know how it turned out for you in the comments below. Until next time, let’s keep cooking something awesome together.
– Jackson


