Forget Everything You Know About Holiday Cookies: These Italian Ricotta Cookies Are a Game-Changer
Hey friends, Jackson here from Food Meld. Let’s get real for a second. The holiday cookie spread is a beautiful thing, but it can also be… predictable. You’ve got your gingerbread folks, your sugar cookies begging to be decorated, and the classic chocolate chip. All amazing, no doubt. But what if I told you there’s a secret weapon, a cookie so impossibly soft, so delicately sweet, and so downright joyful that it might just steal the entire show? Enter my Nonna’s (well, my friend’s Nonna’s, but I’ve adopted the recipe like it’s my own) Italian Ricotta Cookies.
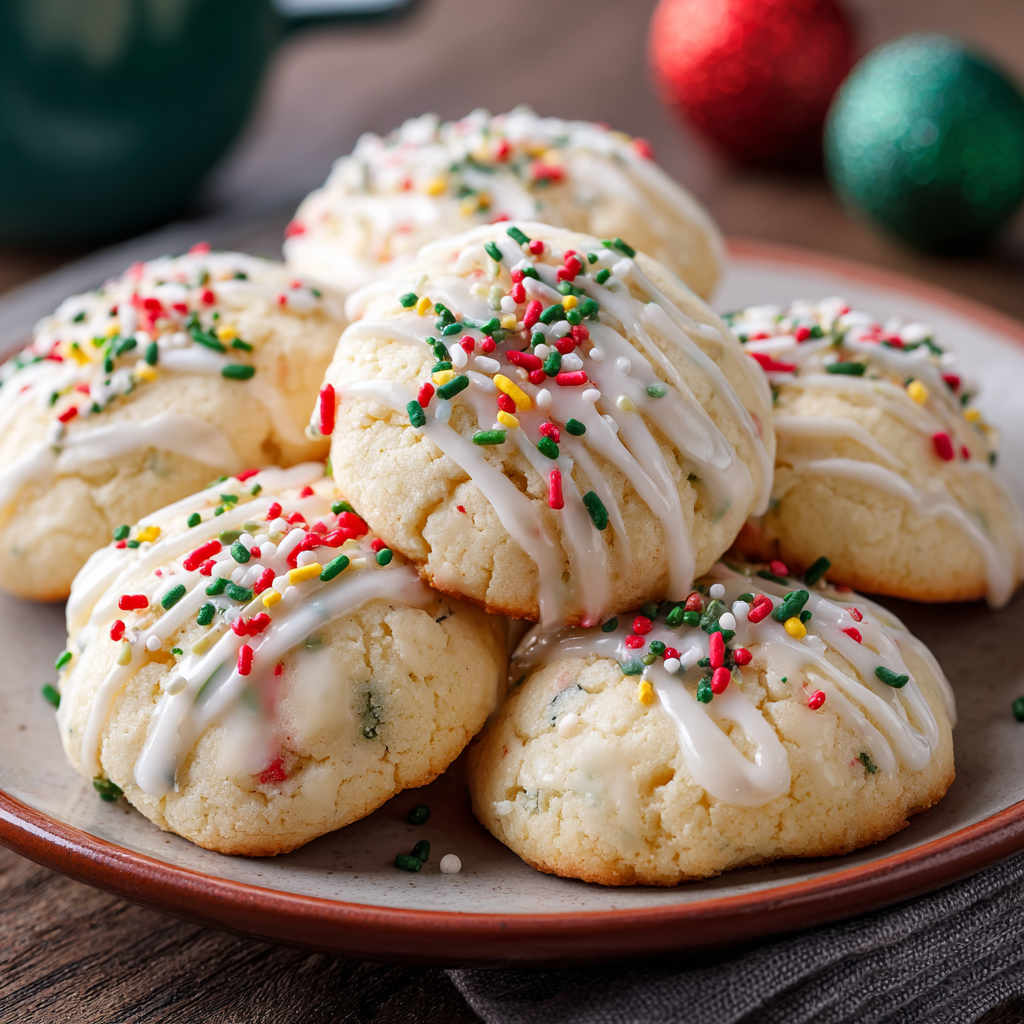
These aren’t your average, crunch-and-crumble cookies. Oh no. These are little puffs of cake-like heaven, moist and fluffy from the magic of ricotta cheese, with a delicate almond glaze that just sings. And the best part? They’re deceptively easy to make. I’m talking one-bowl-for-wet, one-bowl-for-dry, mix-and-scoop easy. No fancy equipment, no finicky techniques—just bold, comforting flavor that feels both classic and excitingly new. That’s the Food Meld way. We’re taking that Southern “more is more” attitude to baking and applying it to a timeless Italian classic. So, preheat that oven, grab your favorite mixing bowl, and let’s cook up a storm of these unforgettable treats together. Trust me, your cookie tray (and everyone who eats from it) will thank you.

A Cookie That Tastes Like Celebration
I’ll never forget the first time I bit into one of these. I was at my friend Gina’s massive, chaotic, and wonderfully loud family Christmas Eve party. The table was a mile long, covered in seven different kinds of fish (as tradition dictates), but my eyes were glued to the dessert spread. Amidst the cannoli and pignoli cookies was this plate of simple, sprinkle-topped cookies that looked… soft. Not crispy. I was intrigued. I grabbed one, and the second it hit my tongue, I was hooked. It was like a tiny, handheld almond-scented cake. It was pure joy.
I immediately found Gina’s Nonna in the kitchen (as you do) and, with my best charming smile, begged for the recipe. She laughed, patted my cheek, and scribbled it down on a napkin in a mix of Italian and English measurements. I’ve tweaked it over the years (doubling it was my first and best move—you always need more), but the soul of it, that incredible texture and flavor, remains the same. For me, these cookies now taste like friendship, family, and the beautiful mess of a holiday gathering. I hope they create a few delicious memories for you, too.
Gathering Your Flavor Arsenal: What You’ll Need
Here’s the lineup for our double batch—because sharing is caring, and leftovers are a myth with these around. Don’t be intimidated by the list; it’s mostly pantry staples! I’ve included my chef-y insights and swap-outs so you can make this recipe your own.
For the Cookies:
- 30 oz (about 3¾ cups) Ricotta Cheese: This is the STAR. It’s the secret to the super-moist, tender crumb. Use whole milk ricotta for the richest flavor and texture. If you only have part-skim, it’ll work, but your cookies won’t be quite as luxuriously soft.
- 3½ cups White Sugar: Sweetens the deal and helps create that perfect, light texture when creamed with the butter.
- 1 lb (2 cups) Unsalted Butter, softened: I always use unsalted so I can control the salt level. Pro Tip: Your butter is perfectly softened when you can press your thumb into it easily but it doesn’t look oily or melted. This is key for proper creaming!
- 4 Large Eggs: They bind everything together and add structure. Make sure they’re at room temperature to emulsify properly with the butter and sugar.
- 4 tablespoons Vanilla Extract: Yes, that’s four tablespoons! It seems like a lot, but trust me, it’s what gives these cookies their incredible depth of flavor. Use the real stuff, not imitation.
- 8 cups All-Purpose Flour (plus more if needed): The foundation. We’ll whisk it with the leaveners so everything is perfectly distributed. The “plus more” is because sometimes you need a dusting for your hands or if the dough is a tad sticky.
- 2 teaspoons Baking Powder & 2 teaspoons Baking Soda: Our dynamic leavening duo! The baking powder provides lift, and the baking soda helps with browning and spread. They work together to create that perfect cake-like puff.
For the Almond Glaze & Finish:
- 3 cups Confectioners’ Sugar: Also known as powdered sugar. It dissolves instantly into the smoothest, most gorgeous glaze.
- 10 tablespoons Milk: Whole milk is ideal for creaminess, but any milk you have works. You can even use a non-dairy alternative like almond or oat milk.
- 2 teaspoons Almond Extract: This is the flavor powerhouse of the glaze. That classic, nostalgic almond flavor pairs perfectly with the vanilla-kissed cookie.
- ½ cup Colored Candy Sprinkles: Non-negotiable for the festive factor! They add a delightful crunch and make these cookies an instant party.
Let’s Get Baking: The Fun Part!
Okay, team, apron on! This is where the magic happens. Follow these steps, and you’ll have a kitchen that smells like a Italian bakery in no time.
Step 1: Preheat & Prep. Fire up that oven to 350°F (175°C). This is our sweet spot for a perfectly baked cookie that’s cooked through without browning on top. While it’s heating, line your baking sheets with parchment paper. Chef Hack: If you don’t have parchment, you can use a silicone baking mat or even give the pan a very light spritz of cooking spray. Parchment is my MVP for no-stick, easy cleanup baking.
Step 2: Cream the Good Stuff. In a large bowl—and I mean large, this is a double batch!—cream together the softened butter and white sugar. Use a hand mixer or stand mixer with the paddle attachment on medium speed for a good 2-3 minutes. You’re looking for the mixture to become light in color and fluffy. This step incorporates air, which is crucial for that perfect texture. Don’t rush it!
Step 3: The Wet Team Assembles. Beat in the ricotta cheese until everything is smooth and well combined. It might look a little curdled at first, but keep mixing—it’ll come together. Then, add the eggs one at a time, beating well after each addition. Finally, mix in that glorious four tablespoons of vanilla. Stop and smell it. Amazing, right?
Step 4: Bring in the Dry Crew. In a separate bowl, whisk together your flour, baking powder, and baking soda. This ensures the leaveners are evenly distributed so every cookie rises perfectly. Now, gradually add the dry ingredients to the wet ingredients, mixing on low speed just until the flour disappears and a soft dough forms. Key Tip: Don’t overmix! Overworking the dough after the flour is added can lead to tough cookies. We want tender.
Step 5: Scoop & Bake. Using a rounded teaspoon (or a small cookie scoop for uniformity), drop mounds of dough onto your prepared baking sheets. They don’t spread a ton, but give them about an inch of space to puff up. Bake for 10-12 minutes. You’re looking for the tops to be set and the very bottoms to have just the faintest hint of golden brown. The tops should still be pale. Chef’s Secret: Under-baking slightly is better than over-baking here. They’ll continue to set as they cool, and we want that melt-in-your-mouth softness.
Step 6: The Patient Part. Let the cookies cool on the baking sheet for about 5 minutes before transferring them to a wire rack to cool completely. I know, it’s hard to wait! But glazing warm cookies is a messy disaster—the glaze will just melt and slide right off. Let’s avoid the puddle.
Step 7: Glaze & Celebrate! While the cookies cool, whisk together the confectioners’ sugar, milk, and almond extract in a medium bowl. You want a smooth, slightly thick but pourable consistency. If it’s too thick, add a teaspoon of milk at a time. Too thin? Add a tablespoon of confectioners’ sugar. Now for the fun part: dip the top of each completely cooled cookie into the glaze, give it a little twist, and place it back on the rack. Immediately shower it with colorful sprinkles before the glaze sets. Repeat until you have a army of beautiful, festive cookies.
How to Serve These Showstoppers
Presentation is part of the fun! Pile these glazed cookies high on a vintage cake stand or a simple rustic wooden board for that perfect “wow” factor. They are the ultimate holiday cookie plate addition, but honestly, they’re so good they deserve to be in the spotlight all on their own.
I love serving them with a hot cup of coffee for a morning treat (it’s basically a coffee cake cookie, right?) or with a glass of cold milk for the ultimate nostalgic experience. They also pair beautifully with a dessert wine like Moscato d’Asti or a cup of spiced tea. For a truly epic holiday dessert table, place them next to a platter of cannoli and chocolate-dipped biscotti. You’ll have everyone thinking you hired a professional pastry chef.
Make It Your Own: Creative Twists on a Classic
The basic recipe is perfection, but you know I love a good “what if we tried this?” moment. Here are a few ways to mix it up:
- Citrus Sunshine: Swap the almond extract in the glaze for an equal amount of lemon or orange extract. Even better, add a teaspoon of finely grated lemon or orange zest right into the cookie dough for a bright, zesty kick.
- Nutty Professor: Fold 1 cup of mini chocolate chips or finely chopped pistachios into the dough right after you mix in the flour. The chocolate is a classic crowd-pleaser, while the pistachios add a gorgeous color and sophisticated flavor.
- Berry Nice Twist: Add a few drops of natural red food coloring to the glaze and use freeze-dried raspberry or strawberry powder (blitzed in a blender until fine) instead of almond extract for a pretty-in-pink berry glaze.
- Spiced Version: Add a teaspoon of ground cardamom or a pinch of nutmeg to the dry ingredients for a warm, cozy spice note that sings of the holidays.
- Gluten-Free Friendly: You can try a 1:1 gluten-free all-purpose flour blend. The texture might be a *tiny* bit different, but you’ll still get a deliciously soft cookie!
Jackson’s Chef Notes & Kitchen Confessions
This recipe has evolved from that napkin scribble into my go-to holiday gift. I’ve learned a few things along the way. First, doubling the batch was the best decision I ever made. They freeze like a dream—just glaze them after they thaw! Second, the dough can be a bit sticky. Don’t be afraid to dust your hands with a little flour when scooping if it’s a particularly humid day.
One time, I was filming myself making these and I was talking to the camera, not paying attention, and I accidentally used salt instead of sugar. Yeah. Don’t do that. I had to trash the whole batch and start over. It was a salty, salty lesson in mise en place (that’s chef talk for having all your ingredients measured and set out before you start). Now I always taste a tiny pinch of my white sugar if I’m ever in doubt!
FAQs: Your Questions, Answered
Q: My dough is really sticky. What did I do wrong?
A: You probably didn’t do anything wrong! Humidity, the brand of ricotta, and even the size of your eggs can affect the dough’s consistency. Just add a tablespoon of flour at a time and mix until it’s just workable. Don’t add too much, or the cookies will be dry.
Q: Can I make the dough ahead of time?
A: Absolutely! You can cover the dough bowl tightly and refrigerate it for up to 2 days. Let it sit at room temperature for about 30 minutes before scooping and baking. You can also scoop the dough balls onto a sheet pan, freeze them solid, then transfer to a freezer bag for up to 3 months. Bake from frozen, adding a minute or two to the bake time.
Q: Why are my cookies flat?
A: This usually means your butter was too warm or your baking soda/powder might be old. Always make sure your butter is softened, not melted. And test your leaveners by dropping a little baking soda in vinegar (it should fizz vigorously) or baking powder in hot water (it should bubble).
Q: How do I store these?
A> Once the glaze is fully set, store them in a single layer or with parchment between layers in an airtight container at room temperature for up to 5 days. They also freeze beautifully for up to 2 months.

Italian Ricotta Cookies with Almond Glaze
- Total Time: ~1 hour
- Yield: 90 Cookies 1x
Description
These soft, cake-like Italian ricotta cookies are a holiday classic—moist, fluffy, and delicately sweet. The almond glaze adds just the right touch, and festive sprinkles make them look as joyful as they taste. Doubling the batch means plenty to share, and a few delicious twists make them even more memorable.
Ingredients
Cookies:
30 oz ricotta cheese (about 3¾ cups)
3½ cups white sugar
1 lb (2 cups) unsalted butter, softened
4 large eggs
4 tablespoons vanilla extract
8 cups all-purpose flour (plus more if needed)
2 teaspoons baking powder
2 teaspoons baking soda
Glaze:
3 cups confectioners’ sugar
10 tablespoons milk
2 teaspoons almond extract
½ cup colored candy sprinkles
Optional Twists:
Swap almond extract in the glaze for lemon or orange for a citrusy finish
Add 1 teaspoon citrus zest (lemon, orange, or lime) to the cookie dough
Stir in mini chocolate chips or chopped pistachios
Use natural food coloring in the glaze for festive flair
Instructions
Preheat oven to 350°F (175°C). Line baking sheets with parchment paper.
In a large bowl, cream butter and sugar until light. Beat in ricotta, eggs, and vanilla until smooth.
In another bowl, whisk together flour, baking powder, and baking soda. Gradually mix into wet ingredients to form a soft dough.
Drop by rounded teaspoons onto prepared sheets.
Bake 10–12 minutes, or until just set and lightly golden on the bottom. Cool completely.
Mix glaze ingredients until smooth. Dip tops of cooled cookies, then decorate with sprinkles. Let glaze set before storing.
- Prep Time: 25 minutes
- Cook Time: 10–12 minutes per batch
Nutrition
- Calories: 120/ Cookie
- Sugar: 10g/ Cookie
- Sodium: 65mg/ Cookie
- Fat: 5g/ Cookie
- Carbohydrates: 17g/ Cookie
- Protein: 2g/ Cookie
Nutritional Information (Because Knowledge is Power!)
Okay, let’s be real—these are a treat, through and through. But here’s the approximate nutritional breakdown per cookie (based on a yield of 90 cookies). This is just an estimate, as different brands of ingredients can vary.
- Calories: 120 kcal
- Fat: 5g
- Carbohydrates: 17g
- Sugar: 10g
- Protein: 2g
- Sodium: 65mg
The ricotta does add a bit of protein and calcium, so that’s a nice little bonus! The key, as with all good things, is to enjoy them in moderation. Or don’t. It’s the holidays, after all.
Final Thoughts: You’ve Got This!
There you have it, my foodie friends. My not-so-secret weapon for winning the holiday season, one soft, glazed cookie at a time. This recipe is built for fun, for sharing, and for creating those messy, flour-flying, sprinkle-covered moments in the kitchen that we remember forever.
Don’t stress about making them perfect. Embrace the slightly lopsided ones—they have character! The most important ingredient is the joy you put into making them. So crank up the holiday tunes, get your family or friends involved in the glazing and sprinkling, and make a double batch. Because the only thing better than one of these Italian Ricotta Cookies is having plenty to share.
I’d love to hear how yours turn out! Tag me on Instagram @FoodMeld with your creations. Now go on, let’s cook something awesome together!
With flavor and fun,
Jackson


