
Your New Favorite Holiday Bite: Eggnog Cheesecake Cups!
Hey friends, Jackson from Food Meld here! Is it just me, or does the holiday season have a magical way of making us all want to get a little more creative in the kitchen? We crave those classic, cozy flavors—the gingerbread, the eggnog, the warm spices—but sometimes, we also want to shake things up and create something that truly wows a crowd. If you’ve been nodding along, then my friend, you are in for the sweetest treat. Today, we’re merging two holiday heavyweight champions into one unforgettable, bite-sized dessert: Eggnog Cheesecake Cups.
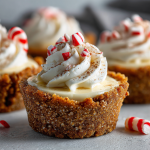
Imagine this: a crisp, warmly spiced gingerbread cookie, shaped into a perfect little edible cup. Now, picture it filled to the brim with the creamiest, dreamiest, no-bake eggnog cheesecake filling you’ve ever tasted. It’s finished with a fluffy cloud of whipped cream, a dusting of fresh nutmeg, and a cute mini candy cane for that perfect festive crunch. These little cups are not just a dessert; they’re a whole holiday experience. They’re perfect for party platters, cookie swaps, or just as a fun project to make with your favorite kitchen helpers. Best of all? They’re surprisingly simple. No water baths, no cracked tops, no stress—just pure, unadulterated holiday joy. So, grab your favorite mixing bowl and let’s cook something awesome together.
A Sweet Slice of Holiday Memory
This recipe takes me right back to my grandma’s kitchen, a place that always smelled like ginger and love, especially in December. She was a wizard with a rolling pin, and her gingerbread men were legendary—each one perfectly crisp with little raisin eyes. But my favorite part was always the “mistakes.” Sometimes, a cookie would break an arm or come out a little too… abstract. Rather than fret, Grandma would just crumble them up, mix them into a bowl with a little whipped cream and a splash of the “good” eggnog from the fridge (the one with the little red cap, you know the one), and let me have a sneak preview of dessert. It was our little secret: a messy, delicious, layered parfait of broken cookies and creamy goodness.
These Eggnog Cheesecake Cups are my grown-up, way-fancier homage to those stolen moments at the counter. They capture that same magical combination of spicy gingerbread and rich, custardy eggnog but in a form that’s perfect for sharing and celebrating. Every time I make them, I get a little flash of that memory, and it reminds me that the best recipes aren’t just about the ingredients; they’re about the stories and the people we make them with.
Gathering Your Flavor Squad
Here’s everything you’ll need to create these festive little wonders. Don’t sweat the details—this is a “meld,” so substitutions are not just okay, they’re encouraged!
- 1 package gingerbread cookie dough (or homemade): This is our edible vessel! Using pre-made dough is a huge time-saver and delivers consistent, delicious results. If you’re feeling ambitious, by all means, use your favorite from-scratch recipe! Chef’s Insight: The molasses and spice in the gingerbread are the perfect sturdy, flavorful base for the creamy filling.
- 8 oz cream cheese, softened: The cornerstone of any great no-bake cheesecake. Softening is non-negotiable here! Take it out of the fridge at least an hour before you start. This ensures your filling will be luxuriously smooth, not lumpy.
- ½ cup eggnog: The star of the show! Use full-fat for the richest flavor. If you’re using homemade, make sure it’s chilled. Substitution Tip: Not an eggnog fan? A rich vanilla custard or even a strong chai tea reduction would be incredible here.
- ¼ cup granulated sugar: This balances the tang of the cream cheese and the spices. Taste your filling before you add the whipped topping—if you like things sweeter, feel free to add another tablespoon.
- 1 tsp vanilla extract: The flavor booster. It enhances the eggnog and adds a warm, sweet aroma. For a next-level move, try using bourbon vanilla extract.
- ½ tsp nutmeg (plus extra for garnish): Freshly grated nutmeg is a game-changer. The pre-ground stuff works in a pinch, but if you have a whole nutmeg and a microplane, use it! The flavor is brighter and more complex.
- 1 cup whipped topping or whipped cream: This lightens the filling and gives it that classic cheesecake fluffiness. Using stabilized whipped cream from a can is great for piping and holds up well. If you whip your own, I suggest adding a tablespoon of powdered sugar to help stabilize it.
- Mini candy canes for garnish: The festive finisher! They add a gorgeous pop of red and white and a delightful minty crunch that plays so well with the other flavors.
Let’s Build Some Bites: Your Step-by-Step Guide
Okay, team, let’s get our hands dirty! Follow these steps, and you’ll have a tray of perfect little cups in no time.
Step 1: Preheat & Prep. Fire up that oven to a nice, toasty 350°F (175°C). While it’s heating, give your mini muffin tin a quick spritz with non-stick cooking spray. This is our insurance policy to make sure our cookie cups pop out perfectly after baking. Chef’s Hack: If you’re worried about sticking, you can also use those adorable mini muffin liners for an even easier release and a pretty ruffled edge.
Step 2: Form the Cups. Take your cookie dough and roll it into 24 small, even balls—about the size of a heaping teaspoon. Pop one ball into each prepared muffin cup. Now, here’s the fun part: use your fingers, a small jar, or a dedicated mini-tart shaper to press the dough down and up the sides, forming a little well. You want the bottom to be thin but not see-through. Pro Tip: I like to dip my fingers in a little flour to prevent the dough from sticking to me instead of the pan!
Step 3: Bake to Perfection. Slide that tin into your preheated oven and let the magic happen for 10-12 minutes. You’re looking for the edges to look set and dry. They might puff up in the center—that’s totally normal! The second you pull them out, take the back of a small, round spoon (a ½ teaspoon measure works perfectly) and gently press down into the center of each hot cookie to redefine the cup shape. This is the most important step for getting that perfect vessel for our filling! Let them cool completely in the pan before you try to remove them. Patience is a virtue here.
Step 4: Whip Up the Filling. While the cups are cooling, let’s make the good stuff. In a medium bowl, beat your softened cream cheese until it’s completely smooth and lump-free. This should take about 2 minutes with an electric mixer. Now, add in the eggnog, granulated sugar, vanilla extract, and that ½ teaspoon of nutmeg. Beat it again until everything is beautifully combined and silky. Chef’s Note: Scrape down the sides of the bowl halfway through to make sure no rogue cream cheese is hiding out.
Step 5: Fold & Lighten. Now, let’s be gentle. Grab a spatula and add your whipped topping or whipped cream to the bowl. Use a folding motion (go around the bowl and then cut through the middle) to incorporate it. You want to keep as much of that airy volume as possible. Stop as soon as no white streaks remain.
Step 6: Fill & Garnish. Your cooled cookie cups should pop out easily now. Time to fill them! You can spoon the mixture in, but for a really professional look, transfer the filling to a piping bag (or a zip-top bag with a corner snipped off). Pipe a generous swirl into each cup. Right before serving, give them a final dusting of nutmeg and top each one with a mini candy cane. Garnishing Hack: Wait to add the candy canes until right before serving so they stay crisp and don’t bleed color into the filling.
Step 7: Chill Out. Pop these beauties in the fridge for at least 30 minutes to let everything set up. This makes them easier to eat and allows the flavors to meld together perfectly.
How to Serve These Showstoppers
Presentation is part of the fun! For a holiday party, arrange these little cups on a beautiful tiered stand or a festive platter lined with parchment paper. They look incredible and make it easy for guests to grab one (or three!).
If you’re doing a cookie swap, these are your secret weapon. Package them in a cute holiday-themed box separated by little parchment liners. Trust me, you’ll be the most popular swapper there.
For a more decadent dessert at the dinner table, place one or two cups on a small plate next to a cup of coffee or hot cocoa. It’s the perfect elegant-yet-fun finish to a big holiday meal. The contrast of the cool, creamy filling with the spiced, crisp cookie is what makes these so special.
Mix It Up: Creative Twists on the Classic
The “meld” doesn’t stop here! This recipe is a fantastic base for your own creative ideas. Here are a few of my favorites:
- The Bourbon Bliss: Add a tablespoon of good bourbon or dark rum to the filling along with the eggnog. It deepens the flavor and gives it a wonderful, grown-up kick.
- Chocolate Dipped Delight: After the cookie cups have cooled, dip the rims in melted dark or white chocolate. Let the chocolate set before filling. It adds a gorgeous look and a fantastic textural contrast.
- Peppermint Patty: Not a fan of candy canes? Fold a ¼ cup of crushed peppermint candies or peppermint bark into the cheesecake filling for a burst of mint in every single bite.
- Dairy-Free Delight: You can absolutely make this work! Use a plant-based cream cheese and whipped topping, and look for a dairy-free eggnog (almond or oat milk nog works great). Check that your gingerbread dough is vegan-friendly.
- Gingerbread House Leftover Rescue: Have leftover gingerbread from a house-building extravaganza? Crumble it up and use it as a crunchy topping instead of, or in addition to, the candy cane!
Jackson’s Chef Notes & Kitchen Stories
This recipe has become a non-negotiable part of my holiday spread. It’s evolved from my first attempt, where I may or may not have over-filled the cups so much that the first bite was a delicious but comical mess. (Pro tip: don’t over-fill the cups!).
One of my favorite things about this recipe is how it gets everyone involved. My nephew loves shaping the cookie dough cups, and my sister is the official taste-tester of the filling. It’s become less about the perfect dessert and more about the laughter and flour fights that happen along the way. Remember, if a cookie cup breaks, it’s not a failure—it’s a chef’s snack. That’s the rule in my kitchen!
FAQs & Troubleshooting: Your Questions, Answered
Q: My cookie cups puffed up too much in the middle during baking. What did I do wrong?
A: You didn’t do anything wrong! Gingerbread dough naturally wants to puff. The key is to press the centers down *immediately* after they come out of the oven while they are still hot and pliable. That spoon press is your best friend.
Q: Can I make these ahead of time?
A: Absolutely! You can bake the cookie cups up to 2 days ahead and store them in an airtight container at room temperature. The filling can be made 1 day ahead and kept covered in the fridge. I recommend assembling them the day of your event for the best texture, but they will still be delicious if assembled a few hours ahead.
Q: My filling is a little runny. How can I thicken it?
A> If your filling seems too soft, it’s likely because the cream cheese wasn’t quite firm enough or the eggnog was warm. pop the whole bowl of filling into the fridge for 20-30 minutes to let it firm up before piping. You can also add a little more whipped topping to help stabilize it.
Q: I can’t find mini candy canes. What else can I use?
A> No problem! Get creative. A drizzle of caramel sauce, a sprinkle of toffee bits, a fresh raspberry, or even a single chocolate chip would be a beautiful and tasty garnish.
Eggnog Cheesecake Cups
- Total Time: 1 hour
- Yield: 24 mini cups 1x
Description
A festive bite-sized dessert that combines two holiday classics—gingerbread and eggnog. Crisp gingerbread cookie cups are filled with a creamy eggnog cheesecake filling, then finished with a sprinkle of nutmeg and a mini candy cane for garnish. Perfect for parties, cookie trays, or as a sweet holiday surprise.
Ingredients
1 package gingerbread cookie dough (or homemade)
8 oz cream cheese, softened
½ cup eggnog
¼ cup granulated sugar
1 tsp vanilla extract
½ tsp nutmeg (plus extra for garnish)
1 cup whipped topping or whipped cream
Mini candy canes for garnish
Instructions
Preheat oven to 350°F (175°C). Grease a mini muffin tin.
Press small scoops of gingerbread cookie dough into each cup, forming wells. Bake 10–12 minutes until golden.
While warm, press centers down with a spoon to maintain cup shape. Cool completely before removing.
In a bowl, beat cream cheese, eggnog, sugar, vanilla, and nutmeg until smooth. Fold in whipped topping.
Pipe or spoon filling into cooled cookie cups.
Garnish with a dusting of nutmeg and mini candy canes. Chill until ready to serve.
- Prep Time: 20 minutes
- Chill Time: 30 minutes
- Cook Time: 10 minutes
Nutrition
- Calories: 140 / cup
- Sugar: 12g / cup
- Fat: 7g / cup
- Carbohydrates: 18g / cup
- Protein: 2g / cup
Nutritional Info (Approximate)
Okay, let’s be real—this is a holiday dessert, and it’s all about indulgence! But for those who like to know, here’s a rough breakdown per mini cheesecake cup. Remember, values can vary based on the specific brands of ingredients you use.
Per serving (1 cup): Calories: 140 | Protein: 2g | Fat: 7g | Carbohydrates: 18g | Fiber: 0g | Sugar: 12g
These are definitely a treat, but because they’re portion-controlled, they’re a great way to satisfy your sweet tooth without overdoing it. The small size means you can enjoy one (or two!) guilt-free as part of the festive celebrations.
Final Thoughts: Let’s Keep the Fun Going!
And there you have it, friends! Your guide to creating the most festive, fun, and flavor-packed holiday bite around. These Eggnog Cheesecake Cups are everything I love about cooking: they’re creative, approachable, and guaranteed to create those “you’ve gotta try this!” moments we live for at Food Meld.
I hope this recipe brings as much joy to your kitchen as it does to mine. Remember, the best ingredient you can add is your own personality. Don’t be afraid to tweak, taste, and make it yours. If you do make them (and I really hope you do!), I’d love to see your creations. Tag me on social @foodmeld and use the hashtag #FoodMeld so I can share in your holiday baking victory.
From my kitchen to yours, happy holidays and happy baking! Let’s cook something awesome together.
— Jackson


