
Let’s Make Some Magic: The Ultimate DIY Hot Cocoa Bombs
Hey there, friends! Jackson from Food Meld here. Is there anything better on a crisp winter day than wrapping your hands around a steaming, ridiculously rich mug of hot cocoa? I’m talking about the kind that warms you up from the inside out, the kind that makes you forget about the frost on the windowpane and just live in that cozy, chocolatey moment. But what if I told you we could take that feeling and make it even more fun, more interactive, and downright magical? Enter: the legendary Hot Cocoa Bomb.
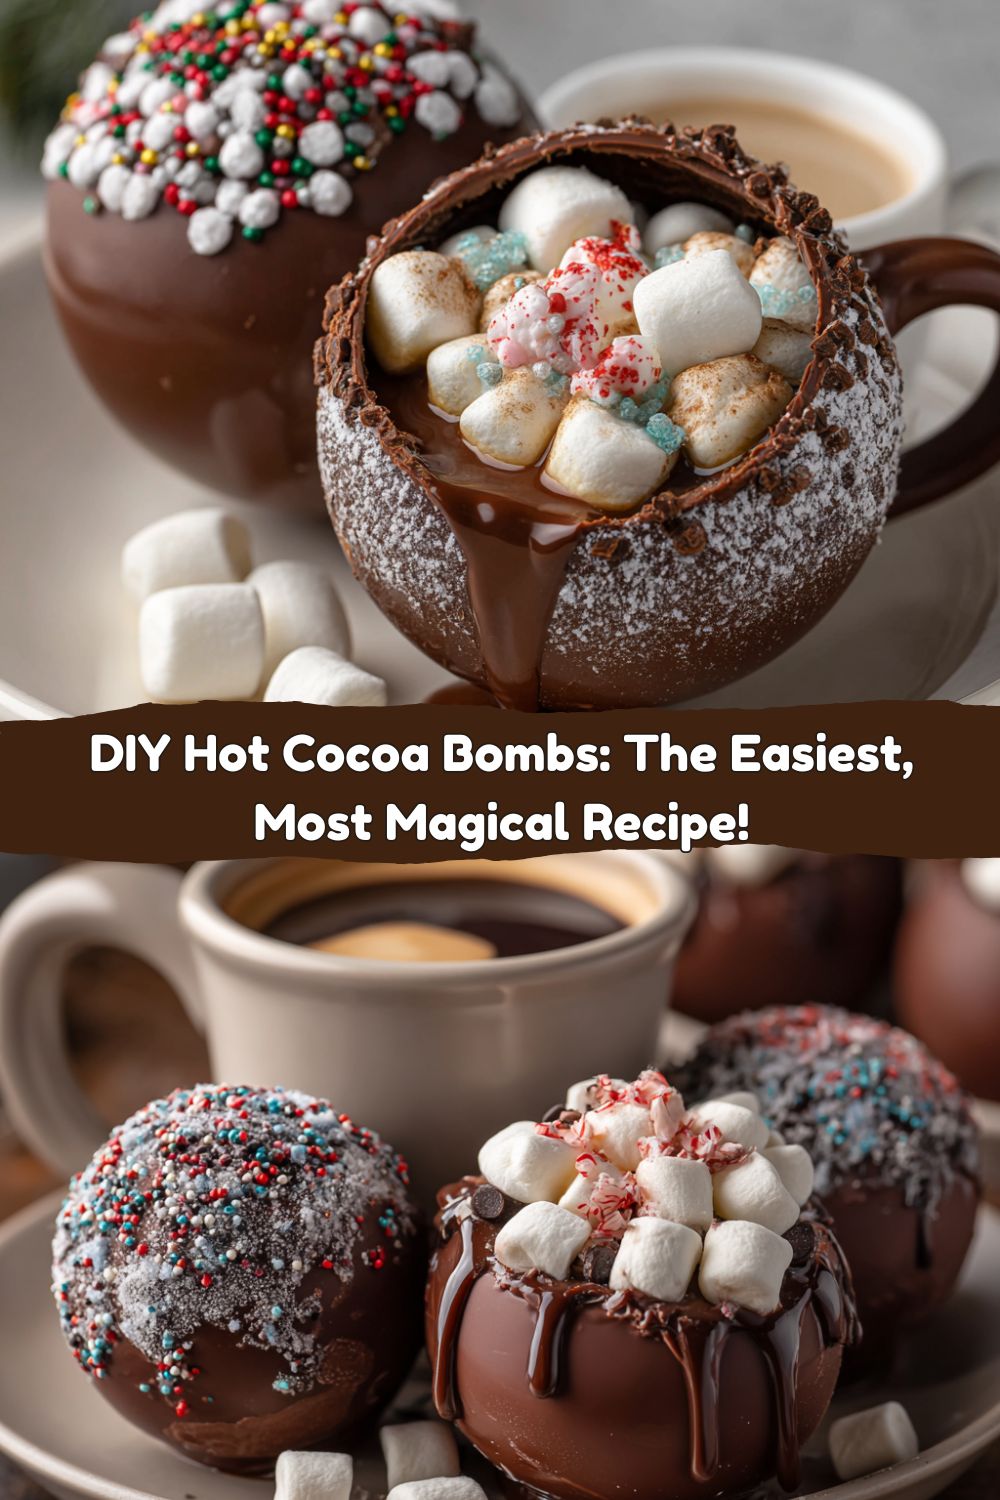
If you’ve spent any time on social media, you’ve seen these gorgeous, glossy chocolate spheres. They look like something from a professional chocolatier’s kitchen, but I’m here to let you in on a little secret: they are shockingly easy to make at home. And trust me, the look on someone’s face when you drop one of these babies into a mug and watch it erupt into a frothy, marshmallow-filled masterpiece? Priceless. This isn’t just a recipe; it’s an experience. It’s a chance to play with your food, to get a little messy, and to create a cup of pure joy. So, grab your favorite mixing bowl and let’s melt, mold, and make something unforgettable together. Welcome to your new favorite winter project!
A Sweet Discovery & A Happy Kitchen Mess
I’ll never forget the first time I saw a hot cocoa bomb. It was a few years back, deep in the heart of a particularly gray December. I was scrolling online, probably looking for inspiration for a new cookie recipe, when a video popped up. It showed this perfect, smooth chocolate orb being placed in a mug. Then, hot milk was poured over it, and it just… exploded. Not like a mess-explosion, but a beautiful, slow-motion unfurling of cocoa powder and mini marshmallows. It was pure alchemy. I was instantly hooked.
I knew I had to try making them myself. My first attempt, well, let’s just say it was more “rustic” than “refined.” I didn’t have the right molds, so I tried using plastic Christmas ornaments (thoroughly cleaned, of course!). The results were lopsided, too thick in some places and comically thin in others. When I went to seal them, I warmed the rims too much and ended up with more of a chocolate puddle than a sphere. But you know what? Even those failed, melty messes made a darn good cup of cocoa. That’s the beauty of cooking—it’s all about the “what if we tried this?” energy. That kitchen fail turned into a mission, and after a bit of practice (and investing in a simple silicone mold), I cracked the code. Now, it’s one of my favorite holiday traditions, and I’m so pumped to share the foolproof method with you.
Gathering Your Cocoa Bomb Toolkit
Here’s the beautiful part: you only need a few key ingredients to create this magic. Quality matters here, but don’t stress—this is about fun, not perfection!
- 10 oz High-Quality Chocolate: You can use semisweet, milk, or dark chocolate. I’m a semisweet guy—it gives that perfect balance of rich and sweet. Chef’s Insight: Use chocolate bars chopped up or high-quality chocolate chips. The coating ability (called “tempering”) is better with bars, but chips work in a pinch! Avoid cheap chocolate as it can be finicky to melt smoothly.
- ½ cup Hot Cocoa Mix: Use your favorite store-bought blend or go the extra mile and use a homemade mix. Substitution Tip: For a richer, from-scratch vibe, you can mix ¼ cup powdered sugar, ¼ cup cocoa powder, and a pinch of salt.
- ½ cup Mini Marshmallows: The classic. They’re small enough to pack inside without causing sealing issues. Chef’s Insight: If you’re feeling fancy, you can also use miniature peppermint marshmallows or even dehydrated marshmallows for a different texture.
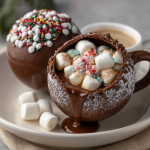
- Optional Toppings & Fillings: This is where you get to play! Think crushed candy canes for a minty kick, mini chocolate chips for extra decadence, sprinkles for a festive look, or a dusting of edible glitter for serious wow factor. A tiny pinch of flaky sea salt on the inside is my secret weapon for balancing the sweetness.
Crafting Your Chocolate Spheres: A Step-by-Step Guide
Alright, team, let’s get our hands chocolatey! Follow these steps, and you’ll be a cocoa bomb pro in no time.
- Melt the Chocolate Gently: Place your chocolate in a microwave-safe bowl. Heat it in 20-second bursts on medium power, stirring vigorously between each burst. Stop when it’s almost all melted, and just let the residual heat melt the last few lumps. This prevents it from burning and seizing. Chef’s Hack: If you’re nervous, use a double boiler! Just place the bowl over a pot of simmering water (make sure the bottom of the bowl doesn’t touch the water) and stir until smooth.
- Coat the Molds: Using a small spoon or a clean pastry brush, coat the inside of each cavity in your silicone sphere mold. You want a nice, even layer—not too thick, not too thin. Pro Tip: After your first coat, use a small offset spatula or the back of your spoon to scrape the very top rim of the mold clean. This will give you a much neater edge and make sealing way easier later on.
- Chill & Repeat: Pop the mold into the refrigerator for about 5-7 minutes, just until the chocolate is set to the touch. Pull it out and add a second, thinner coat of chocolate. This double-coating method ensures your bombs are strong enough to handle without cracking when you unmold them. Chill again for a full 10-15 minutes until rock solid.
- The Great Unmolding: This is the satisfying part! Carefully flex the silicone mold to pop the chocolate hemispheres out. They should release easily. If they’re sticking, they might need another minute or two in the fridge. Handle them by the edges to avoid fingerprint marks.
- The Fill-Up: Take half of your spheres—these will be the bottoms. To each one, add 1 tablespoon of your cocoa mix, a small handful of mini marshmallows, and any other fun fillings you’ve chosen.
- The Seal: Here’s the trick! Take an empty half (your top) and place it rim-down on a plate you’ve warmed slightly in the microwave (about 10-15 seconds). The gentle heat will barely melt the edges. Quickly and carefully press it onto a filled bottom half, gently twisting slightly to seal it shut. Chef’s Hack: You can also use a tiny amount of extra melted chocolate as “glue” around the rim of the bottom half before placing the top on.
- The Final Chill: Let your completed cocoa bombs set completely in the fridge for another 5-10 minutes to firm up that seal. And voilà! You’ve just created magic.
How to Serve Up the Spectacle
The grand finale! Place one beautiful cocoa bomb in the bottom of your favorite big mug. Heat up some milk (or your favorite milk alternative) until it’s steaming hot—but not boiling. The best show happens when you pour the milk directly over the top of the bomb. Watch as the chocolate shell cracks and melts, releasing the cocoa powder and marshmallows in a delicious whirlpool. Give it a good stir until everything is beautifully combined into a smooth, luxurious drink. I love serving these with an extra sprinkle of toppings on the whipped cream I inevitably add on top. It’s not just a drink; it’s a performance!
Get Creative: Mix It Up!
Once you’ve mastered the basic bomb, the flavor world is your oyster. Here are a few of my favorite twists:
- Peppermint Bark: Use white chocolate for the shell. Fill with cocoa mix and crushed candy canes. So festive!
- S’mores Galore: Use milk chocolate. Fill with cocoa mix, mini marshmallows, and a few crushed graham cracker pieces. Taste the campfire.
- Salty Caramel: Use dark chocolate. Before sealing, add a few soft caramel bits or a drizzle of store-bought caramel sauce inside along with a tiny pinch of flaky sea salt.
- Mocha Madness: Add 1-2 teaspoons of instant espresso powder or fine-ground coffee to your cocoa mix before filling. The ultimate adult pick-me-up.
- Dairy-Free Delight: Use dairy-free chocolate (check the label!) and fill with a dairy-free hot cocoa mix. It’s an inclusive treat everyone can enjoy.
Jackson’s Chef Notes & Kitchen Confessions
This recipe has evolved so much from my lopsided ornament days. My biggest lesson? Patience is key. Don’t rush the chilling steps. A fully set shell is a happy shell. Also, if a bomb cracks while you’re unmolding or sealing it, don’t you dare throw it away! That’s just an opportunity for “quality control.” Break it up over ice cream, or melt it down and start again. I also love using a small paintbrush to get a super even coat in the mold—it feels very artistic. Most importantly, have fun with it. Put on some music, enlist a kid (or a kid-at-heart) to help, and enjoy the process. The little imperfections are what make them homemade and full of love.
Hot Cocoa Bomb FAQs: Your Questions, Answered
Q: My chocolate got clumpy and gross when I melted it. What happened?
A: Ah, your chocolate “seized.” This usually happens if a tiny bit of steam or water got into it. Chocolate is notoriously fussy about water. To fix it, try stirring in a teaspoon of neutral oil (like vegetable or coconut) at a time until it becomes smooth again.
Q: My bombs keep cracking when I try to take them out of the mold. Help!
A: This typically means your chocolate layer is too thin. The double-coating method is crucial for structure. Make sure you’re applying two solid coats and chilling thoroughly between each. Also, ensure you’re using a flexible silicone mold—it makes all the difference.
Q: Can I use candy melts or almond bark instead of real chocolate?
A: Absolutely! Candy melts (or confectionery coating) are actually designed for this. They melt easily and set firmly, which can be more beginner-friendly as they don’t require tempering. The flavor is a bit different, but they work great and come in tons of colors.
Q: How far in advance can I make these, and how should I store them?
A: They are best enjoyed within 1-2 weeks. Store them in a single layer in an airtight container in a cool, dry place. Do not refrigerate long-term, as condensation can make them sticky. You can also freeze them for up to a month!
Hot Cocoa Bombs
- Total Time: 45 minutes
- Yield: 6 cocoa bombs 1x
Description
These Hot Cocoa Bombs are a magical winter treat and a fun DIY gift idea. Hollow chocolate spheres filled with cocoa mix and marshmallows melt into a rich, cozy drink when dropped into hot milk. Customize them with festive toppings or flavors for the ultimate cup of cheer.
Ingredients
10 oz semisweet or milk chocolate (chopped or chips)
½ cup hot cocoa mix
½ cup mini marshmallows
Optional: crushed candy canes, mini chocolate chips, sprinkles, edible glitter
Instructions
Melt chocolate gently in the microwave or a double boiler until smooth.
Use a spoon or brush to coat silicone sphere molds evenly with melted chocolate. Chill until firm, then add a second coat if needed.
Once fully set, carefully unmold the chocolate halves.
Fill half of the spheres with 1 tbsp cocoa mix and a few mini marshmallows. Add any extras.
Warm the edge of an empty half briefly on a warm plate and press onto a filled half to seal. Chill to set.
To serve, place a bomb in a mug and pour hot milk over it. Stir until fully melted.
- Prep Time: 30 minutes
- Chill Time: 15 minutes
Nutrition
- Calories: 220 / cocoa bomb
- Sugar: 22g / cocoa bomb
- Sodium: 25mg / cocoa bomb
- Fat: 12g / cocoa bomb
- Carbohydrates: 25g / cocoa bomb
- Protein: 2g / cocoa bomb
Nutritional Information*
*Please note: This is an approximate calculation based on the ingredients used and can vary significantly based on specific brands, optional toppings, and portion sizes.
Prep Time: 30 min | Chill Time: 15 min | Total Time: 45 min | Yield: 6 bombs
Per bomb (approximate):
Calories: 220 | Total Fat: 12g | Saturated Fat: 7g | Cholesterol: 5mg | Sodium: 25mg | Total Carbohydrates: 25g | Dietary Fiber: 2g | Sugars: 22g | Protein: 2g
Remember, this is a special treat, a moment of indulgence and joy. Savor it!
Your New Go-To Winter Wonder
And there you have it, friends! Your complete guide to creating show-stopping hot cocoa bombs right in your own kitchen. This is more than just a recipe; it’s a way to spread a little warmth and wonder. They make incredible homemade gifts for teachers, neighbors, friends, or honestly, just for yourself. You deserve it.
The best part about cooking is making it your own. So take this blueprint and run with it. Experiment with flavors, colors, and fillings. Embrace the messy, fun process. I hope this recipe brings you as much happiness making it as it does drinking it. Now, I’d love to hear from you! Tag me @FoodMeld on social media with your cocoa bomb creations. Let’s see what incredible, delicious magic you whip up. Until next time, keep melting, keep mixing, and keep enjoying every single bite.
Happy cooking,
Jackson


