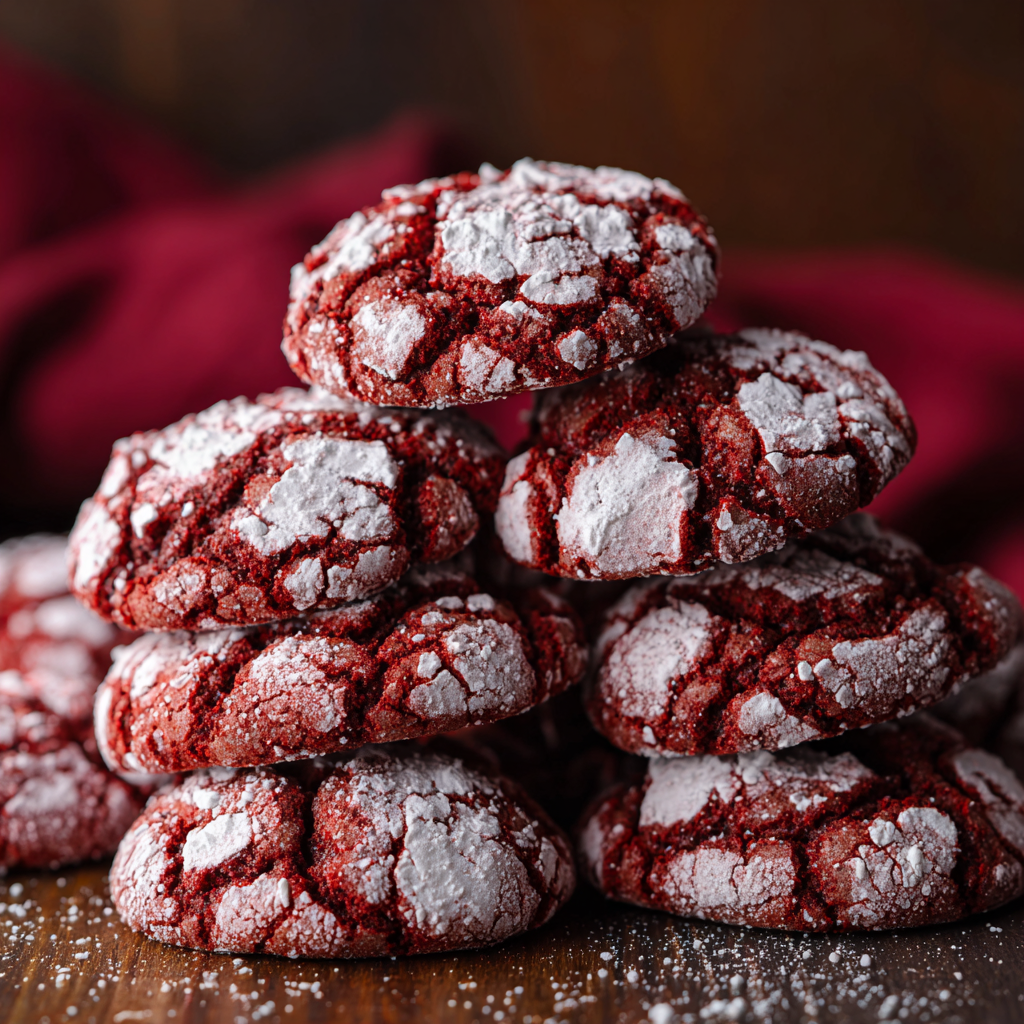
Red Velvet Crinkle Cookies: Your New Favorite Festive Bite
Hey friends, Jackson from Food Meld here! Let’s talk about that moment. You know the one. You walk into a holiday party, a cookie swap, or even just your own kitchen on a cozy December afternoon, and there they are: a plate of stunning, deep red cookies, dusted with a blizzard of snowy powdered sugar, looking like tiny, edible winter landscapes. They’re impossibly soft, perfectly fudgy, and they just scream celebration. I’m talking, of course, about Red Velvet Crinkle Cookies.
Now, I’m all about bold, comforting food that doesn’t require a culinary degree to pull off, and these cookies are the absolute epitome of that. They look like they came from a fancy bakery, but I promise you, they are 100% achievable in your own kitchen. That gorgeous crackled top? It’s a simple little science trick (that I’ll walk you through) and not some chef-level magic. We’re taking the iconic, beloved flavor of red velvet cake—that subtle cocoa richness, the slight tang, the vibrant color—and transforming it into a handheld, chewy, melt-in-your-mouth cookie experience. So, preheat your ovens, grab your favorite mixing bowl, and let’s cook something awesome together. We’re about to make a batch of cookies that are as fun to make as they are to eat.
A Cookie That Sparked a Tradition
This recipe takes me right back to my first winter in my first real apartment. The place was about 80% moving boxes and 20% enthusiasm, but I was determined to host a little holiday get-together. The problem? My cooking skills were… let’s call them ‘enthusiastically experimental’ at best. I needed a showstopper dessert that was foolproof. I landed on a version of these red velvet crinkle cookies.
I remember the kitchen was a glorious mess. There was a fine pinkish dusting of powdered sugar on literally every surface (and probably in my hair). But when I pulled that first tray out of the oven, seeing those perfect, fiery red cracks emerge through the white sugar, I knew I had something special. My friends devoured them, and it instantly became our thing. Now, every year, the text thread lights up: “Walker, when are you making the crinkles?” It’s more than a cookie; it’s a little edible holiday card for the people I love. That’s the power of a great recipe—it builds community, one delicious, messy, sugar-dusted bite at a time.
Gathering Your Flavor Arsenal
Here’s everything you’ll need to create these little pockets of joy. Remember, baking is part art, part science, so measuring your flour correctly (spoon and level, don’t scoop!) makes a big difference.
- 3 cups all-purpose flour: The backbone of our cookie. It gives them structure. For a slightly softer, more cake-like cookie, you can swap in ½ cup cake flour for ½ cup of the all-purpose.
- 1 cup unsweetened cocoa powder: This is where our deep, chocolatey flavor comes from. Use a good-quality natural cocoa powder for that classic red velvet taste. Chef’s Insight: Dutch-processed cocoa will work but will result in a darker, less vibrant red color and a deeper chocolate flavor.
- 2 tsp baking powder: Our leavening agent! This is the key to getting those beautiful, picturesque cracks and a soft, pillowy interior.
- ½ tsp salt: Never skip the salt! It’s the flavor enhancer that makes all the other ingredients sing and balances the sweetness perfectly.
- 1 cup unsalted butter, softened: “Softened” is the key word here. It should be cool to the touch but yield easily when you press it. This creams with the sugar to create a light, airy base for our dough. Pro Tip: If you forget to take your butter out, you can quickly soften it by cutting it into tablespoons and letting it sit for 10-15 minutes.
- 2 cups granulated sugar: Sweetness and, importantly, it helps create a chewy texture.
- 4 large eggs: They bind everything together and add richness. Make sure they’re at room temperature to emulsify properly with the butter and sugar.
- 2 tsp vanilla extract: Pure vanilla extract is always my go-to for the best flavor. It adds a warm, comforting note.
- 2 tbsp red food coloring (gel preferred): For that iconic, bold red color. Gel food coloring is more concentrated than liquid, so you get that vibrant hue without adding extra liquid to the dough, which could throw off the texture.
- 1 cup powdered sugar (for rolling): This creates our beautiful “winter snow” effect. Don’t be shy when rolling—a thick, generous coating is what gives you that stunning contrast.
Let’s Make Some Magic: The Step-by-Step
Alright, team, let’s get our hands dirty (probably literally, and definitely red). Follow these steps, and you’ll be a crinkle cookie pro in no time.
Step 1: Mix Dry Ingredients
In a medium bowl, whisk together your flour, cocoa powder, baking powder, and salt. I mean, really whisk it. You want to aerate the flour and ensure those leaveners are evenly distributed throughout. This prevents you from getting a bitter, salty bite and guarantees a uniform rise. Set this aside.
Step 2: Cream Butter & Sugar
In a large bowl, using a hand mixer or a stand mixer fitted with the paddle attachment, beat the softened butter and granulated sugar together on medium-high speed. We’re not just mixing; we’re creaming. Do this for a good 2-3 minutes, until the mixture becomes noticeably lighter in color and fluffy. This incorporates air, which is crucial for texture. Now, add your eggs one at a time, beating well after each addition. This allows the eggs to fully emulsify into the butter mixture. Finally, mix in the vanilla and that glorious red food coloring. Don’t be alarmed—the dough will be a shockingly vibrant red, and that’s exactly what we want!
Step 3: Combine Wet & Dry
With your mixer on low speed, gradually add the dry ingredients to the wet ingredients. Mix until just combined and no dry streaks of flour remain. Chef’s Hack: Overmixing at this stage is the enemy of a tender cookie! It develops gluten and can make them tough. A few tiny flour streaks are better than overmixing. The dough will be thick and slightly sticky—that’s perfect.
Step 4: CHILL!! (The Non-Negotiable Step)
This is the secret to perfect crinkles, so don’t even think about skipping it. Cover the bowl with plastic wrap and refrigerate the dough for at least 2 hours, or ideally, up to 4. Why? Chilling solidifies the fat in the dough. When the cold dough hits the hot oven, the butter takes longer to melt, which prevents the cookies from spreading too fast and flat. Meanwhile, the baking powder gets a chance to act, creating bubbles that push through the chilled surface, creating those iconic, beautiful cracks. It also allows the flavors to meld together beautifully.
Step 5: Roll & Coat
Preheat your oven to 350°F (175°C) and line your baking sheets with parchment paper. Place your powdered sugar in a shallow bowl. Using a cookie scoop (a #40 scoop, about 1.5 tablespoons, is perfect for consistency), portion out your dough. Roll each portion between your palms into a smooth ball. Now, roll each ball generously in the powdered sugar until it’s completely covered. I like to roll it once, let it sit for a second, and then roll it again for an extra-thick, snowy coat.
Step 6: Bake to Perfection
Place the sugared dough balls about 2 inches apart on your prepared baking sheets. They need room to spread! Bake for 10-12 minutes. They are done when the cookies have puffed up, the tops are crackled, and the edges are set. The centers will still look very soft—that’s what we want! They will continue to set as they cool. Chef’s Tip: For perfectly round cookies, if they spread a bit unevenly, you can take a round cookie cutter slightly larger than the cookie and gently swirl it around the warm cookie to nudge it into a perfect circle.
Step 7: Cool & Enjoy
Let the cookies cool on the baking sheet for at least 5 minutes before transferring them to a wire rack to cool completely. This allows them to set up so they don’t fall apart. Then, pour a glass of milk, call over your favorite people, and enjoy the fruits of your labor!
How to Serve These Showstoppers
These cookies are a star all on their own, but a little presentation goes a long way! For a simple, elegant look, stack them on a rustic wooden board or a beautiful cake stand. Drizzle them with a simple white chocolate glaze (just melted white chocolate chips with a tiny splash of oil) for an extra decadent touch. They are the ultimate cookie tray addition during the holidays, instantly elevating the whole spread.
For serving, I love to pair them with a cold glass of milk, a hot mug of coffee, or even a scoop of vanilla bean ice cream for the most epic ice cream sandwich of your life. Seriously, try it. The combination of the fudgy, slightly tangy cookie with the cold, creamy vanilla is a game-changer.
Mix It Up: Flavor Twists & Swaps
Once you’ve mastered the classic, it’s time to get creative and make it yours! Here are a few of my favorite twists:
- White Chocolate Chip Bliss: Fold in 1 cup of high-quality white chocolate chips into the dough after mixing. The creamy, sweet pops of white chocolate against the rich red velvet is a classic combo for a reason.
- Espresso Depth: Add ½ to 1 teaspoon of instant espresso powder to your dry ingredients. It won’t make the cookies taste like coffee; instead, it deepens and intensifies the chocolate flavor, making it even richer.
- Almond Bakery Twist: Swap the vanilla extract for pure almond extract. It gives the cookies a subtle, sophisticated flavor that tastes like it came from a professional bakery.
- Festive Sparkle: For extra holiday shimmer, mix ¼ cup of red or white sparkling sugar with your 1 cup of powdered sugar before rolling the dough balls. They’ll have a beautiful, subtle glitter.
- Gluten-Free Friendly: You can use a 1:1 gluten-free all-purpose flour blend in place of the regular flour. Just ensure your blend contains xanthan gum for binding.
Jackson’s Chef Notes
This recipe has been through a few evolutions in my kitchen. The first time I made them, I was impatient and only chilled the dough for 20 minutes. They spread into flat, red pancakes—still tasty, but zero crinkle. Lesson learned! The chill time is sacred. I’ve also learned that gel food coloring is a total game-changer. The first batch I made with liquid coloring was a sad, pale pink. We want bold, confident red! My other half still laughs about the time I was so covered in red powdered sugar that I looked like I’d lost a fight with a pixie stick. Totally worth it.
FAQs & Troubleshooting
Q: My cookies didn’t crinkle! What happened?
A: The number one culprit is not chilling the dough long enough. The dough needs to be thoroughly cold to create the tension that results in the crackled top. Another possibility is old baking powder. If your baking powder isn’t active, it won’t create the lift needed for the cracks. Test it by dropping a little in hot water—if it doesn’t bubble vigorously, it’s time for a new can.
Q: Can I make the dough ahead of time?
A: Absolutely! You can keep the dough, well-wrapped, in the refrigerator for up to 3 days. You can also scoop and roll the dough balls in sugar, then freeze them on a baking sheet before transferring to a freezer bag. Bake directly from frozen, adding 1-2 minutes to the bake time.
Q: My cookies are cakey, not fudgy. Why?
A: This usually points to over-measuring the flour. Always spoon your flour into the measuring cup and level it off with a knife. Scooping the measuring cup directly into the flour bag packs it in, leading to too much dry ingredient and a drier, cakier cookie.
Q: The red color faded after baking. How do I keep it vibrant?
A: This can happen with some food colorings. Using a gel-based food coloring is your best defense, as it’s more heat-stable and concentrated. Also, be careful not to over-bake them, as that can cause the color to darken and dull.
Nutritional Info (Per Cookie)
Alright, let’s keep it real. This is a dessert cookie, and it’s meant to be enjoyed as a treat! Here’s a rough breakdown per cookie (based on a yield of 24 cookies).
- Calories: ~210
- Fat: 9g
- Carbohydrates: 31g
- Sugar: 19g
- Protein: 3g
Remember, these are estimates and can vary based on specific ingredients used and exact portion sizes. The main takeaway? They’re totally worth it. Life’s too short not to enjoy a fantastic cookie.
Print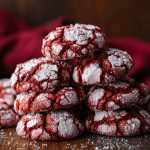
RED VELVET CRINKLE COOKIES
- Total Time: 55 minutes
- Yield: 24 Cookies
Description
Soft, fudgy, and dusted with snowy powdered sugar, these Red Velvet Crinkle Cookies are the perfect balance of cocoa richness and festive charm. They’re cozy enough for a night in and elegant enough for any holiday cookie tray.
Instructions
Mix dry ingredients: Whisk together flour, cocoa, baking powder, and salt. Set aside.
Cream butter & sugar: Beat butter and granulated sugar until fluffy. Add eggs one at a time, mixing well. Stir in vanilla and red food coloring.
Combine: Gradually mix dry ingredients into wet until just combined. Dough will be thick and slightly sticky.
Chill: Cover and refrigerate dough for at least 1–2 hours (important for those crinkles!).
Roll & coat: Scoop dough into 1–1½ inch balls. Roll generously in powdered sugar.
Bake: Place on parchment-lined baking sheets and bake at 350°F (175°C) for 10–12 minutes until crackled but soft in the center.
Cool & enjoy: Let rest 5 minutes before transferring to a rack.
- Prep Time: 45 minutes
- Cook Time: 10 minutes
Nutrition
- Calories: 130 / Cookie
- Sugar: 11g / Cookie
- Fat: 6g / Cookie
- Carbohydrates: 18g / Cookie
- Fiber: 18g / Cookie
- Protein: 2g / Cookie
Final Thoughts
There you have it, friends—my go-to recipe for cookies that are guaranteed to impress. They’re a testament to my Food Meld philosophy: taking iconic, beloved flavors (Southern red velvet! Global inspiration from classic crinkle cookies!) and making them simple, approachable, and ridiculously fun to make. Don’t be intimidated by their fancy appearance. Embrace the messy, red-dyed fingers and the cloud of powdered sugar. That’s where the real memories are made.
I hope this recipe becomes a staple in your kitchen, a reason to gather, and a treat that makes your people ask for seconds (and the recipe). If you make them, I’d love to see your creations! Tag me @FoodMeld on social media so I can share in your baking victory. Now go forth, mix it up, and enjoy every single delicious, fudgy, crackled bite. Happy baking!