
Forget Everything You Knew About Mac & Cheese: This Viral Recipe is a Game-Changer
Hey friends, Jackson here from Food Meld. Let’s have a real talk for a second. Is there any dish more deeply tied to comfort, to family gatherings, to that feeling of pure, unadulterated joy than a perfect, bubbling dish of mac and cheese? I don’t think so. It’s the culinary equivalent of a warm hug. But for so many home cooks, making that from-scratch, gloriously creamy macaroni and cheese feels… intimidating. The specter of the roux looms large—that tricky mixture of flour and fat that can turn lumpy or gritty in a heartbeat. And let’s not even get started on the anxiety of a cheese sauce breaking. I’ve been there, and I’ve had those kitchen fails. It’s enough to make anyone reach for the blue box.
Well, my friends, those days are over. I’m about to introduce you to the recipe that broke the internet for all the right reasons: the Viral No-Roux Mac & Cheese. This isn’t just a recipe; it’s a revelation. It’s creamy, it’s cheesy, and it is utterly, beautifully foolproof. No roux, no eggs, no complicated steps. It’s the kind of recipe that makes you look like a kitchen rockstar with minimal effort. This is the mac and cheese that will absolutely steal the show at your Thanksgiving table, become the star of your potluck, and solve your weeknight dinner dilemmas. It’s packed with flavor, baked to golden perfection, and guaranteed to deliver that “WOW” moment every single time. So, grab your favorite pasta pot and let’s cook something awesome together.

The Mac & Cheese That Started It All
This recipe takes me right back to my grandma’s kitchen in Georgia. Her mac and cheese was legendary, a required dish at every family function. It was a thing of beauty, with a crispy, almost burnt cheese top and a center so creamy it could make you weep. But she guarded her recipe like a state secret. As a kid desperate to learn, I’d sneak peeks while she cooked, and I distinctly remember the sheer panic I felt watching her make the roux. She’d whisk that butter and flour with the intensity of a concert pianist, and I just knew I’d never get it right.
Years later, while messing around in my own kitchen trying to recreate that memory, I had a “what if we tried this?” moment. What if I just… skipped the roux altogether? What if the pasta’s own starchy water and the magic of heavy cream could create the sauce for me? That first experiment was a messy, cheesy, glorious success. It wasn’t Grandma’s exact recipe, but it captured its spirit perfectly: bold, comforting, and made with love, not stress. It’s that fearless, fun energy that I built Food Meld on, and this dish embodies it completely.
Gathering Your Flavor All-Stars
The beauty of this recipe is in its simplicity. These are likely ingredients you already have in your fridge and pantry. Here’s what you’ll need and why each one is a key player:
- 1 lb elbow macaroni (or pasta of choice): Elbows are the classic for a reason—their little tubes are perfect for trapping all that cheesy goodness. Chef’s Insight: Don’t overcook it! We’re going for al dente because it will continue to cook in the oven. That starchy pasta water is liquid gold for helping the sauce cling.
- 4 tbsp unsalted butter: This is our rich, creamy base that gets melted into the hot pasta. Using unsalted lets you control the seasoning perfectly. Sub Tip: Salted butter works in a pinch, just taste before you add extra salt later.
- 2 cups heavy cream: This is the secret weapon! It creates a luxuriously rich and stable sauce without the need for a roux to thicken it. It’s the reason this recipe is so foolproof.
- 2 cups shredded sharp cheddar cheese: This is your flavor powerhouse. Sharp cheddar gives that classic, tangy bite that we all crave. Pro Tip: Always, always shred your own cheese! Pre-shredded bags contain anti-caking agents that can make your sauce grainy and less smooth.
- 1½ cups shredded mozzarella cheese: Mozzarella is our stretch maestro. It brings that incredible, Instagram-worthy cheese pull to the party.
- 1 cup shredded Colby Jack or Monterey Jack: These cheeses are melty, mild, and creamy, balancing the sharpness of the cheddar and complementing the stretch of the mozzarella. They’re the ultimate supporting cast.
- Salt & black pepper, to taste: The essential seasonings that make all the other flavors pop. Season in layers!
- Paprika or garlic powder (optional): My little “what if” twist. A teaspoon of either (or both!) adds a wonderful depth of flavor. Smoked paprika is my personal go-to for a subtle, smoky kick.
Let’s Build the Creamiest Mac & Cheese of Your Life
Ready to see how easy this is? Follow these steps, and you’ll have a perfect dish in no time. I’ve packed this section with all my best tips and hacks.
Step 1: Preheat that Oven!
Fire up your oven to 350°F (175°C). This gives it plenty of time to come to the right temperature while you prepare everything else. Nothing worse than a cold oven when your masterpiece is ready to bake!
Step 2: Cook the Pasta Perfectly
Bring a large pot of well-salted water to a rolling boil. Add your pasta and cook it according to the package directions, but shave off a minute or two. You want it al dente—it should still have a slight bite to it. Remember, it’s going to take a hot bath in the oven later, and we don’t want mushy mac! Drain it, but here’s a chef hack: don’t rinse it! That light coating of starch helps the sauce adhere beautifully.
Step 3: The Butter Melts In
Return the hot, drained pasta to the same pot you cooked it in (less dishes!). Immediately add the 4 tablespoons of butter and stir until it’s fully melted and coating every single piece of pasta. This buttery base is the first layer of our “no-sauce” sauce.
Step 4: The Creamy Cheesy Magic
Now, pour in that glorious heavy cream. Follow it up with all your gorgeous, freshly shredded cheeses. I’m talking the cheddar, the mozzarella, and the Colby Jack. Reserve a small handful of cheese for sprinkling on top later if you want an extra cheesy crust! Now, stir everything together over low heat until the cheeses are mostly melted and you have a pot of incredibly creamy, cheesy goodness. It will seem a bit loose—that’s perfect! It will thicken up magnificently in the oven.
Step 5: Season Like a Pro
This is where you make it yours. Season generously with salt and freshly ground black pepper. Now’s the time to add that optional paprika or garlic powder if you’re using it. Give it a taste! Does it need more pepper? More tang? Adjust until it sings.
Step 6: Into the Baking Dish
Transfer your cheesy pasta mixture into a 9×13 inch baking dish that you’ve lightly greased. Spread it out into an even layer. For an extra treat, you can top it with a handful of reserved cheese or a buttery breadcrumb mixture (mix 1/2 cup panko with 1 tbsp melted butter).
Step 7: Bake to Bubbly Perfection
Pop that dish into your preheated oven and bake, uncovered, for 20-25 minutes. You’re looking for the edges to be gently bubbling and the whole thing to be heated through.
Step 8: The Golden Brown Finish
Here’s the final pro move: switch your oven from Bake to Broil (keep the rack in the middle!). Let it broil for just 2-3 minutes. WATCH IT CLOSELY. This is what gives you that restaurant-quality, irresistible golden-brown crust. And WALAH! (as the kids say). You’re done.
How to Serve This Show-Stopping Side
This mac and cheese is the ultimate team player. For Thanksgiving, it’s the undeniable MVP alongside your turkey and stuffing. Scoop it out right from the baking dish onto plates—that crispy top and creamy center is a textural dream.
For a casual weeknight dinner, it’s a hearty main event. I love serving it right in the center of the table with a simple, bright arugula salad dressed with lemon vinaigrette to cut through the richness. It’s also a potluck superstar. If I’m taking it to a friend’s, I’ll sometimes sprinkle chopped fresh chives or parsley over the top right before serving for a pop of color and freshness. It’s all about making it yours!
Make It Your Own: 5 Flavorful Twists
The fun doesn’t stop with the classic version. This recipe is a blank canvas for your cravings. Here are a few of my favorite ways to mix it up:
1. The Buffalo Chicken Kick: Fold in 2 cups of shredded rotisserie chicken and 1/3 cup of your favorite buffalo sauce into the cheese mixture before baking. Top with crumbled blue cheese for the full experience.
2. The Lobster Luxe: Feeling fancy? Stir in 1-2 cups of chopped cooked lobster meat and a teaspoon of Old Bay seasoning. It’s an instant special occasion dish.
3. The Veggie-Packed Power-Up: Sauté some broccoli florets, diced onions, and mushrooms, then mix them in. It’s a great way to sneak in those veggies.
4. The Southwest Fiesta: Add a can of drained green chiles, a cup of corn, and swap half the cheddar for pepper jack cheese. Serve with a side of salsa and sour cream.
5. The Gourmet Four-Cheese: Change up the cheese blend! Try a combo of Gruyère, Fontina, white cheddar, and a few tablespoons of grated Parmesan for a more sophisticated, nutty flavor profile.
Jackson’s Chef Notes & Kitchen Stories
This recipe has evolved so much since that first “what if” moment. I’ve probably made it a hundred times. One time, I was filming a reel for Instagram and was talking to the camera so much I almost forgot to add the heavy cream! Luckily, I caught it just in time. Lesson learned: even for a “no-fuss” recipe, mise en place (prepping all your ingredients beforehand) is your best friend.
Another fun evolution? The broiler step. That was a total happy accident after I got distracted by a text message. I came back to a slightly more browned top, tried it, and realized it was the best mistake I’d ever made. Don’t be afraid to play and make mistakes in the kitchen—that’s where the best recipes are born.
Your Questions, Answered
Q: Can I make this mac and cheese ahead of time?
A: Absolutely! Assemble the entire dish right up to the point of baking. Cover it tightly and refrigerate for up to 24 hours. When you’re ready, let it sit on the counter for 20-30 minutes to take the chill off, then bake as directed. You might need to add 5-10 minutes to the baking time since it’s starting from cold.
Q: My sauce seems a bit dry/oily after baking. What happened?
A: Dryness usually means the pasta was slightly overcooked and absorbed too much liquid, or it baked for a tad too long. Next time, make sure your pasta is very al dente. If it looks oily, it can be a sign that the cheese broke. This is why we avoid pre-shredded cheese—the stabilizers can separate when heated. Always shred your own!
Q: Can I use a different type of milk instead of heavy cream?
A: I really don’t recommend it. The high fat content in heavy cream is what makes this sauce so stable and luxurious without curdling. Using a lower-fat milk will result in a much thinner, less rich sauce and could potentially separate in the oven.
Q: How do I store and reheat leftovers?
A: Store leftovers in an airtight container in the fridge for 3-4 days. The best way to reheat it is in the oven at 350°F until warm, or in a skillet on the stove with a tiny splash of milk or cream to bring back the creaminess. The microwave can make it a bit rubbery.
Nutritional Information*
Okay, let’s be real: this is a celebration dish, a comfort food masterpiece. It’s not meant to be a light salad. But it’s good to know what you’re enjoying! Here’s a rough breakdown per serving (assuming 8 servings):
Calories: ~630 | Protein: 22g | Fat: 36g | Carbohydrates: 48g | Saturated Fat: 22g | Cholesterol: 115mg | Sodium: 480mg | Fiber: 2g | Sugar: 3g
*Please note: This is an estimate provided by an online nutrition calculator. Values can vary significantly based on the specific brands of ingredients you use and any modifications you make.
Print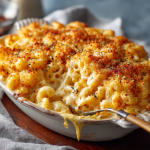
Viral No-Roux Mac & Cheese
- Total Time: 40 minutes
- Yield: 6 - 8 1x
Description
Creamy, cheesy, and totally foolproof—this viral mac & cheese is the real Thanksgiving MVP. No roux, no eggs, no fuss. Just pure cheesy comfort baked to golden perfection. Whether it’s your first time making it or your hundredth, this recipe delivers that WOW every single time.
Ingredients
1 lb elbow macaroni or pasta of choice
4 tbsp unsalted butter
2 cups heavy cream
2 cups shredded sharp cheddar cheese
1½ cups shredded mozzarella cheese
1 cup shredded Colby Jack or Monterey Jack (for stretch!)
Salt & black pepper, to taste
Paprika or garlic powder (optional, for extra flavor)
Instructions
Preheat oven to 350°F (175°C).
Cook pasta until al dente. Drain and return to pot.
Add butter to hot pasta and stir until melted.
Pour in heavy cream and all the cheeses. Stir until everything is creamy and combined.
Season to taste with salt, pepper, and optional spices.
Transfer to baking dish, spreading evenly.
Bake uncovered for 20–25 minutes until bubbly.
Broil for 2–3 minutes for that golden cheese top. WALAH! Done.
Optional: Top with breadcrumbs mixed in butter for a crunchy finish.
- Prep Time: 15 minutes
- Cook Time: 25 minutes
Nutrition
- Calories: 430 / Serving
- Fat: 26g / Serving
- Carbohydrates: 35g / Serving
- Protein: 14g / Serving
Let’s Keep the Fun Going!
And there you have it, my friends. The viral no-roux mac and cheese that will forever change your comfort food game. It’s simple, it’s reliable, and it’s packed with more flavor and fun than you can imagine. I hope this recipe becomes a new staple in your home, creating its own messy, joyful, and delicious memories.
I’d love to hear how it turns out for you! Did you add your own twist? Did it become the hit of your Thanksgiving table? Tag me on Instagram @FoodMeld so I can see your creations. And if you have any questions, drop them in the comments below—I’m always here to help. Now go forth, cook fearlessly, and enjoy every single cheesy, creamy, unforgettable bite.
Until next time,
Jackson


