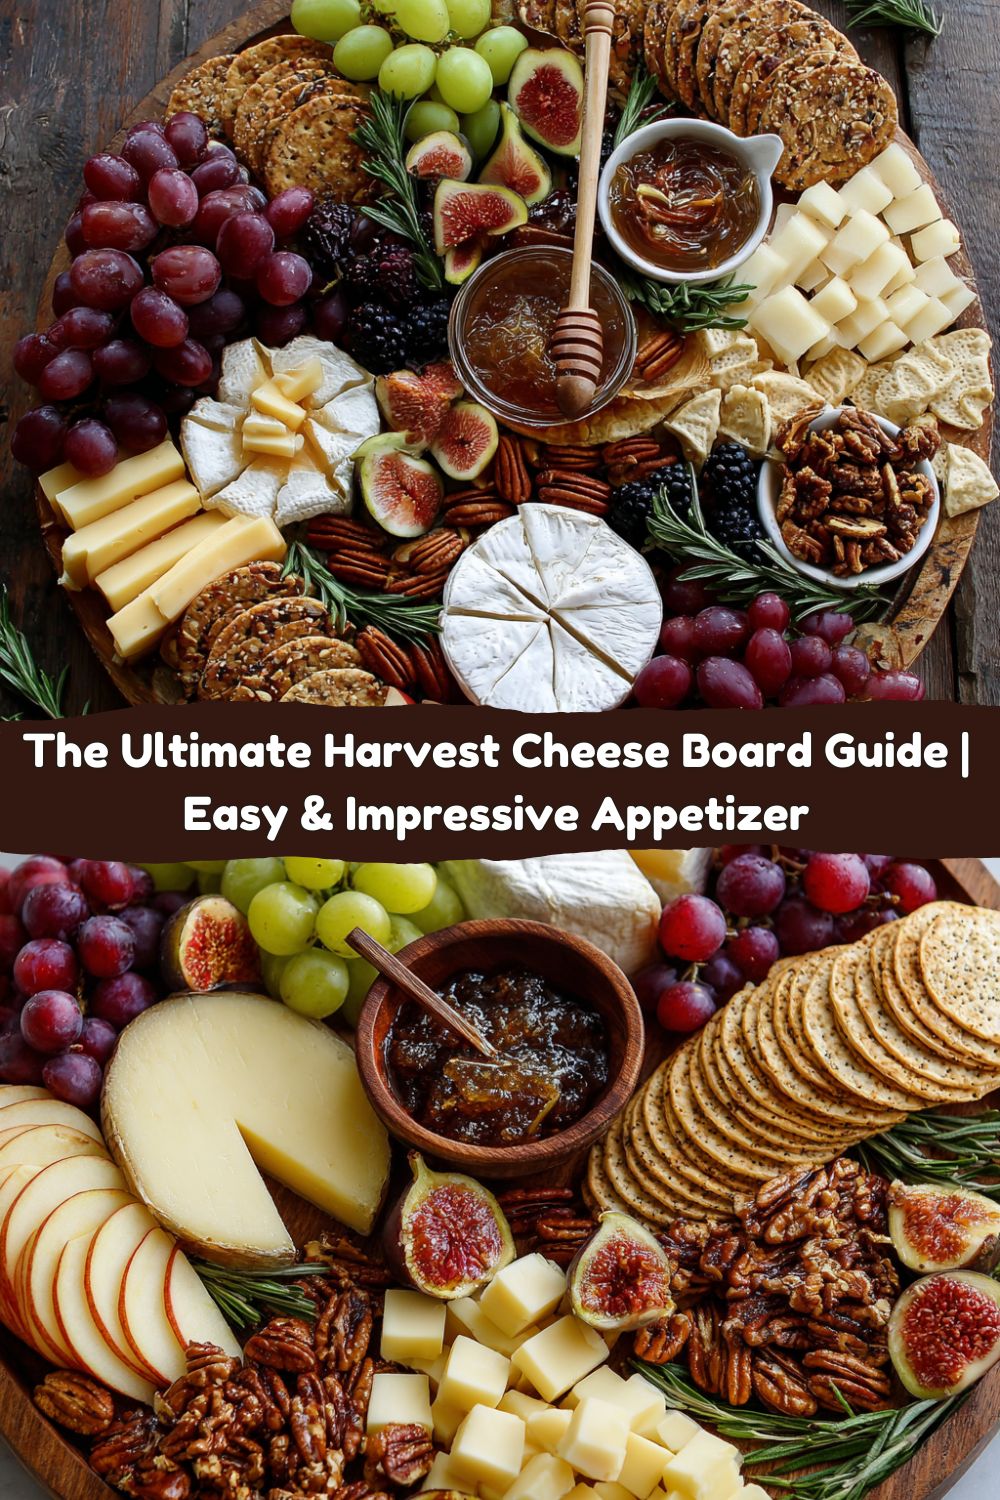
Your New Go-To Autumn Showstopper: The Ultimate Harvest Cheese Board
Hey friends, Jackson from Food Meld here! Let’s be real: is there anything better than gathering around a beautifully loaded cheese board with your favorite people? The laughter, the clinking glasses, the sheer joy of discovering a perfect bite of creamy cheese, a sweet fig, and a spicy nut all at once… it’s pure magic. It’s my absolute favorite way to kick off a cozy dinner party or just enjoy a lazy Sunday afternoon. But I know what you might be thinking: “Jackson, that looks gorgeous, but it seems complicated!” I’m here to tell you, from my kitchen to yours, that creating an unforgettable, jaw-dropping harvest cheese board is one of the easiest, most fun things you can do. It’s less about strict rules and more about playing with flavors and textures you love. Think of it as your edible canvas. Today, I’m walking you through my ultimate guide to building a cheese board that’s bursting with autumn vibes. We’re talking creamy brie, sharp cheddar, sweet fruits, and nuts with a little kick. It’s bold, comforting, and has that creative twist I’m always chasing. So grab a board, and let’s cook—or, well, arrange—something awesome together.
A Board Built on Memories
This whole cheese board obsession of mine? It started at my grandma’s house. Every Thanksgiving, before the turkey even had a chance to rest, her table would be covered with what she called her “hors d’oeuvres platter.” It was a glorious, chaotic mix of whatever she had on hand—a block of sharp cheddar cut into jagged cubes, some Ritz crackers, those bright orange circus peanuts (bless her heart), and a bowl of pecans from the tree in her backyard. It wasn’t fancy, but it was the heart of the party. Everyone would crowd around, nibbling and talking, and that’s where the real connecting happened. My version is a slight upgrade (sorry, Grandma, no circus peanuts this time), but the spirit is exactly the same. It’s not about perfection; it’s about bringing people together over seriously good food. Every time I build one now, I get a little flash of that memory—the sound of her laughter, the warmth of her kitchen. That’s the real secret ingredient.
Gathering Your Flavor Crew: The Ingredients
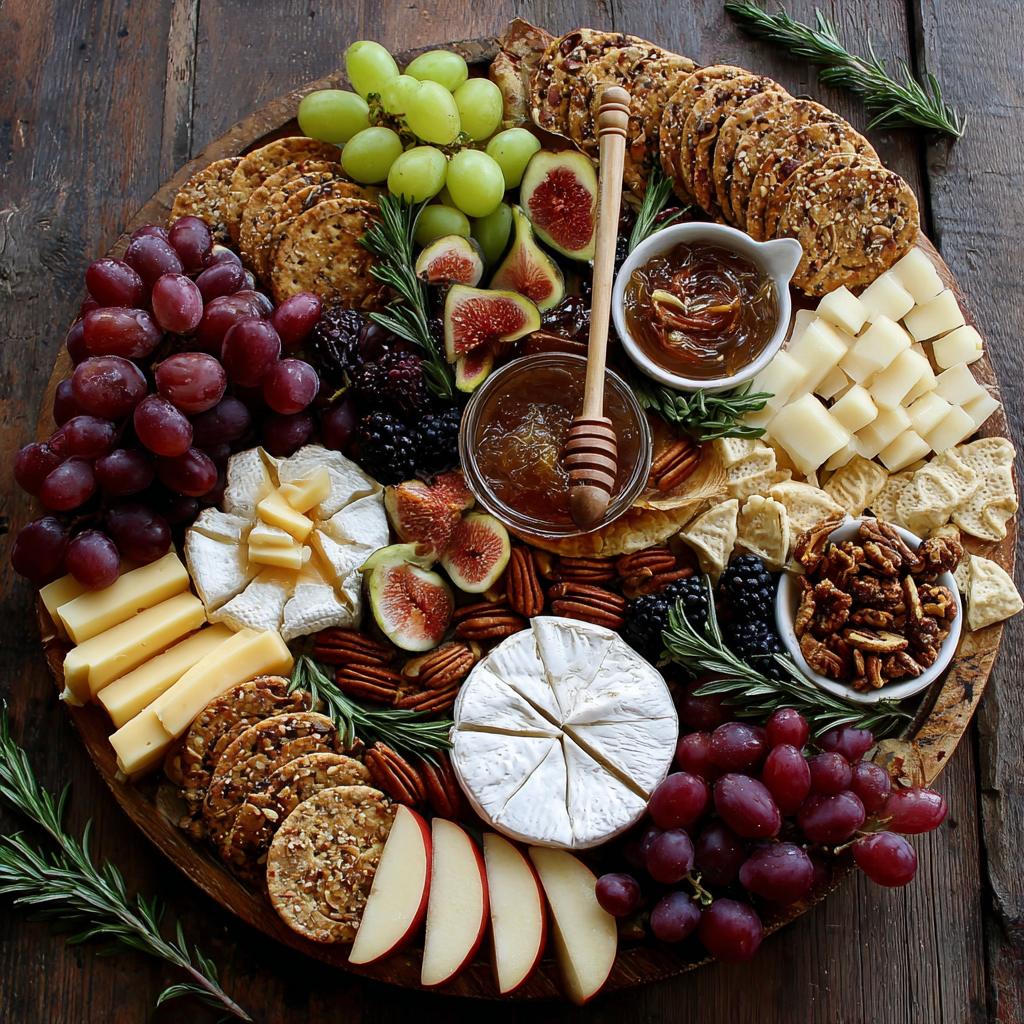
Here’s the lineup for our autumnal masterpiece. Remember, these are suggestions! The best cheese board is one that reflects your tastes.
- Brie: Our creamy, mild superstar. It’s like the welcoming committee of the cheese world. Chef’s Insight: Let it sit out for about 30 minutes before serving. A room-temp brie is soft, spreadable, and its flavors are wide awake. If you’re feeling fancy, you can quickly bake it with a drizzle of honey and some thyme for a warm, gooey situation that’s absolutely irresistible.
- Sharp Cheddar (Aged): This is our tangy, bold flavor punch. I look for one with those delicious calcium crystals that give it a little crunch. Substitution Tip: No aged cheddar? A good Gruyère or even a Manchego would bring a fantastic salty, sharp character to the party.
- Gouda: Hello, nutty and smooth! A smoked gouda can also add an amazing, campfire-like depth that plays so well with autumn spices. Chef’s Insight: Shave it with a vegetable peeler for elegant, delicate curls that look gorgeous on the board.
- Red or Green Grapes: A classic for a reason. They provide a juicy, sweet burst that cuts through the richness of the cheese. I use clusters for a beautiful, abundant look.
- Fresh Figs, Halved: These are the jewels of the harvest board. Their unique texture and honeyed flavor are a match made in heaven for creamy brie and salty nuts.
- Apple Slices (tossed with lemon juice): The crisp, fresh crunch we need. Pro Hack: Tossing them in a tiny bit of lemon juice is a game-changer—it keeps them from turning brown and sad-looking, so your board stays vibrant for hours.
- Spiced Nuts (Pecans or Almonds): The textural MVP. Toasting them with warm spices like cinnamon, nutmeg, or a pinch of cayenne pepper adds a warm, cozy element and a bit of heat. Substitution Tip: Candied nuts or even simple roasted, salted nuts work perfectly here too!
- Crackers, Baguette Slices, or Flatbreads: The vehicles for all that goodness. I always use a mix of textures—a crispy water cracker, a hearty seeded cracker, and some soft baguette slices. Variety is key!
- Honey or Fig Jam (optional): The “wow” factor. A small bowl of either for drizzling or dipping adds a luxurious sweetness that ties every single element together. Trust me on this.
- Fresh Rosemary or Thyme Sprigs: Don’t just think of these as garnish! They add a fantastic aroma and a little sprinkle of herby flavor that makes the whole board smell like the holidays.
Building Your Masterpiece: Step-by-Step
Okay, let’s get our hands dirty! Or, not dirty. You know what I mean. This is where the fun begins.
- Start with Your Cheeses. Grab your largest wooden board, slate board, or even a big platter. Place your three cheeses on the board first, spacing them out to form a rough triangle. This creates anchor points for everything else. Chef’s Hack: I like to cut a few slices or break off a piece of each cheese to make it look inviting and show people it’s okay to dig in! Leave the cheese knives right next to each one.
- Anchor Your Bowls. If you’re using a small bowl for honey or jam, place that on the board now. This acts as another anchor point and helps you visualize the space. It also keeps a runny ingredient contained—a very good thing.
- Cluster Your Fruits. Time for color! Place your grape clusters near the cheeses. Arrange the halved figs and lemon-kissed apple slices in little groups around the board. I like to tuck the apples near the cheddar (a classic combo) and the figs near the brie (a match made in heaven). Don’t be afraid to let some grapes spill over the edge—it looks abundant and inviting.
- Fill Every Gap (The Fun Part!). Now, take your spiced nuts and start filling in any obvious empty spaces. Then, add your crackers and breads. Stack some, fan out others, and scatter a few in different areas. The goal is to create little pathways of discovery across the board. You want your guests to see a new delicious combination with every glance.
- The Final Garnish. Take your fresh rosemary or thyme sprigs and tuck them strategically around the board. Not only does it look incredibly festive and seasonal, but the aroma will subtly infuse the other ingredients. It’s a tiny detail that makes a huge difference.
- Step Back and Admire! You did it! Take a picture (tag me @FoodMeld if you do!), and then get ready for the compliments to roll in. The best part? It only took you 15 minutes to look like an absolute entertaining pro.
How to Serve & Savor It
Presentation is part of the experience! I like to place the board right in the center of the coffee table or dining table so everyone can easily reach it. Make sure you have enough small plates, napkins, and cocktail forks (for those sticky figs and honey) for everyone. Now, for the drinks! This harvest board is a social butterfly—it pairs with so much. For a non-alcoholic option, a sparkling apple cider is fantastic. The bubbles cut through the fat beautifully. For wine lovers, you can’t go wrong with a fruit-forward Pinot Noir or a robust Cabernet Sauvignon to stand up to the sharp cheddar. And for a real Southern twist from my roots? A little glass of smooth bourbon alongside this is an unexpectedly perfect pairing. The caramel notes in the bourbon love the cheese and nuts. Seriously, try it!
Mix It Up: Recipe Variations
The beauty of a cheese board is its flexibility. Here are a few ways to make it your own:
- The Sweet Tooth Board: Add dark chocolate chunks, dried apricots or cranberries, and a drizzle of caramel sauce instead of honey. A blue cheese would be an amazing bold addition here alongside the cheddar.
- The Savory & Salty Board: Incorporate some cured meats like prosciutto or salami (roll them into little rosettes for a pro look), cornichons (tiny pickles), and a grainy mustard. The salty, briny elements are incredible with the cheese.
- The Breakfast Board: Yes, for breakfast! Swap in a soft goat cheese, include some yogurt cups, granola, fresh berries, and a variety of toast points. Drizzle everything with honey. It’s the ultimate brunch centerpiece.
- Dietary Swaps (Gluten-Free & Vegan): For a gluten-free board, just ensure your crackers and bread are GF—there are so many great options now! For a vegan board, the world of nut-based cheeses is amazing now. Look for vegan brie and cheddar styles. Load up on roasted chickpeas, lots of fruits, nuts, and vegan-friendly dips like hummus or olive tapenade.
Jackson’s Chef Notes
This recipe has evolved so much from my grandma’s “hors d’oeuvres platter.” I’ve learned a lot through (delicious) trial and error. One time, I went overboard with super runny baked brie and it created a cheesy lava flow across the entire board! It was a delicious mess, but a mess nonetheless. Lesson learned: sometimes, keep the brie separate if you’re baking it. The other thing I’ve learned is to not stress about quantity. A good rule of thumb is to plan for about 3 ounces of cheese per person if it’s an appetizer. But honestly, it’s better to have leftovers than to not have enough. Leftover cheese board for breakfast is one of life’s great pleasures. You heard it here first.
FAQs & Troubleshooting
Q: How far in advance can I assemble my cheese board?
A: You can prep all your components 1-2 hours ahead. Keep the cheeses wrapped and the apple slices tossed in lemon juice in separate containers in the fridge. Assemble the full board about 30 minutes before your guests arrive. This lets the cheeses come to the perfect temperature and ensures your crackers don’t get stale.
Q: My board looks a little empty. How can I make it look more abundant?
A: This is a common fear! The trick is to fill every single nook and cranny. Use bunches of grapes and clusters of nuts to create volume. Don’t just lay crackers flat—stack some, fan others out. You can also add more “fillers” like bunches of fresh herbs or even edible flowers.
Q: What’s the best way to cut the different cheeses?
A: Great question! For a soft cheese like brie, a small knife is fine—just let people spread it. For hard cheeses like aged cheddar, pre-cutting a few slices or cubes encourages people to dig in. For a semi-hard cheese like gouda, shaving it with a peeler or cutting it into small wedges works beautifully.
Q: I’m on a budget. Any tips?
A> Absolutely! You don’t need expensive imported cheeses to make a great board. A great domestic cheddar and brie are totally affordable. Load up on in-season fruits and nuts from the bulk bin to keep costs down. It’s about the combination, not the price tag.

Harvest Cheese Board
- Total Time: 15 minutes
- Yield: 6 - 8
Description
A cozy autumn cheese board featuring a mix of creamy, sharp, and nutty cheeses paired with fresh fruit and spiced nuts. Perfect for entertaining, holidays, or a simple yet impressive appetizer.
Ingredients
Cheeses:
Brie (creamy and mild)
Sharp cheddar (aged, tangy bite)
Gouda (nutty and smooth)
Fruits:
Red or green grapes
Fresh figs, halved
Apple slices (tossed with lemon juice to prevent browning)
Extras:
Spiced nuts (pecans or almonds with cinnamon, nutmeg, or cayenne)
Crackers, baguette slices, or flatbreads
Honey or fig jam (optional for drizzling/dipping)
Instructions
Arrange cheeses on a large wooden board or platter, spacing them apart.
Add fruits in clusters around the cheeses for color and balance.
Fill gaps with spiced nuts, crackers, or bread.
If desired, serve with small bowls of honey or jam for sweetness.
Garnish with fresh rosemary or thyme sprigs for a seasonal touch.
- Prep Time: 15 minutes
Nutritional Info (A General Guide)
While a cheese board is all about balance and enjoyment, here’s a general look at what you’re enjoying. Cheeses provide a great source of calcium and protein. The nuts add healthy fats, fiber, and more protein. The fruits bring vitamins, antioxidants, and natural sweetness to the party. Together, they create a satisfying snack that balances fat, protein, and carbs. As with all good things, the key is mindful enjoyment! Portion control is easy with a board because you can just take a little bit of everything you love.
Final Thoughts
Well, that’s it, friends! My complete, no-stress guide to building a harvest cheese board that’s guaranteed to impress. Remember, at the end of the day, it’s not about creating a Pinterest-perfect image (though yours will be gorgeous!). It’s about the experience. It’s about the conversations that happen around that board, the combinations you discover, and the simple joy of sharing fantastic food with people you love. So don’t save this just for a fancy party. Make a small one for a cozy night in, just because. You deserve it. Now I’d love to hear from you! What’s your must-have cheese board ingredient? Tag me on social @FoodMeld with your creations. Let’s cook together!


