Forget Everything You Thought You Knew About Green Beans
Hey friends, Jackson from Food Meld here. Let’s be real for a second. When you hear “green beans,” what’s the first thing that comes to mind? Maybe it’s that classic, albeit sometimes mushy, Thanksgiving casserole. Or maybe it’s a simple, steamed side that feels more like a duty than a delight. I get it. For the longest time, green beans were the reliable, if slightly boring, friend on my dinner plate—always there, but never really stealing the show.
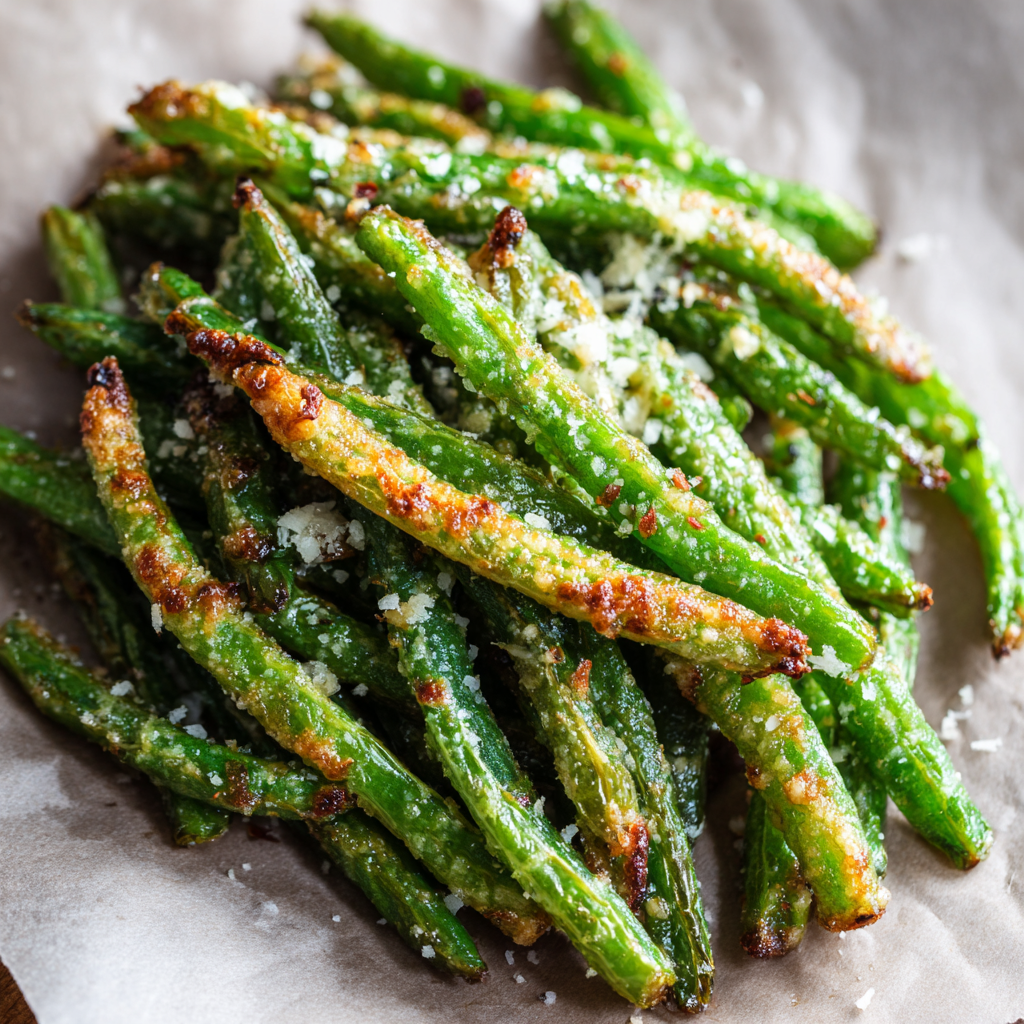
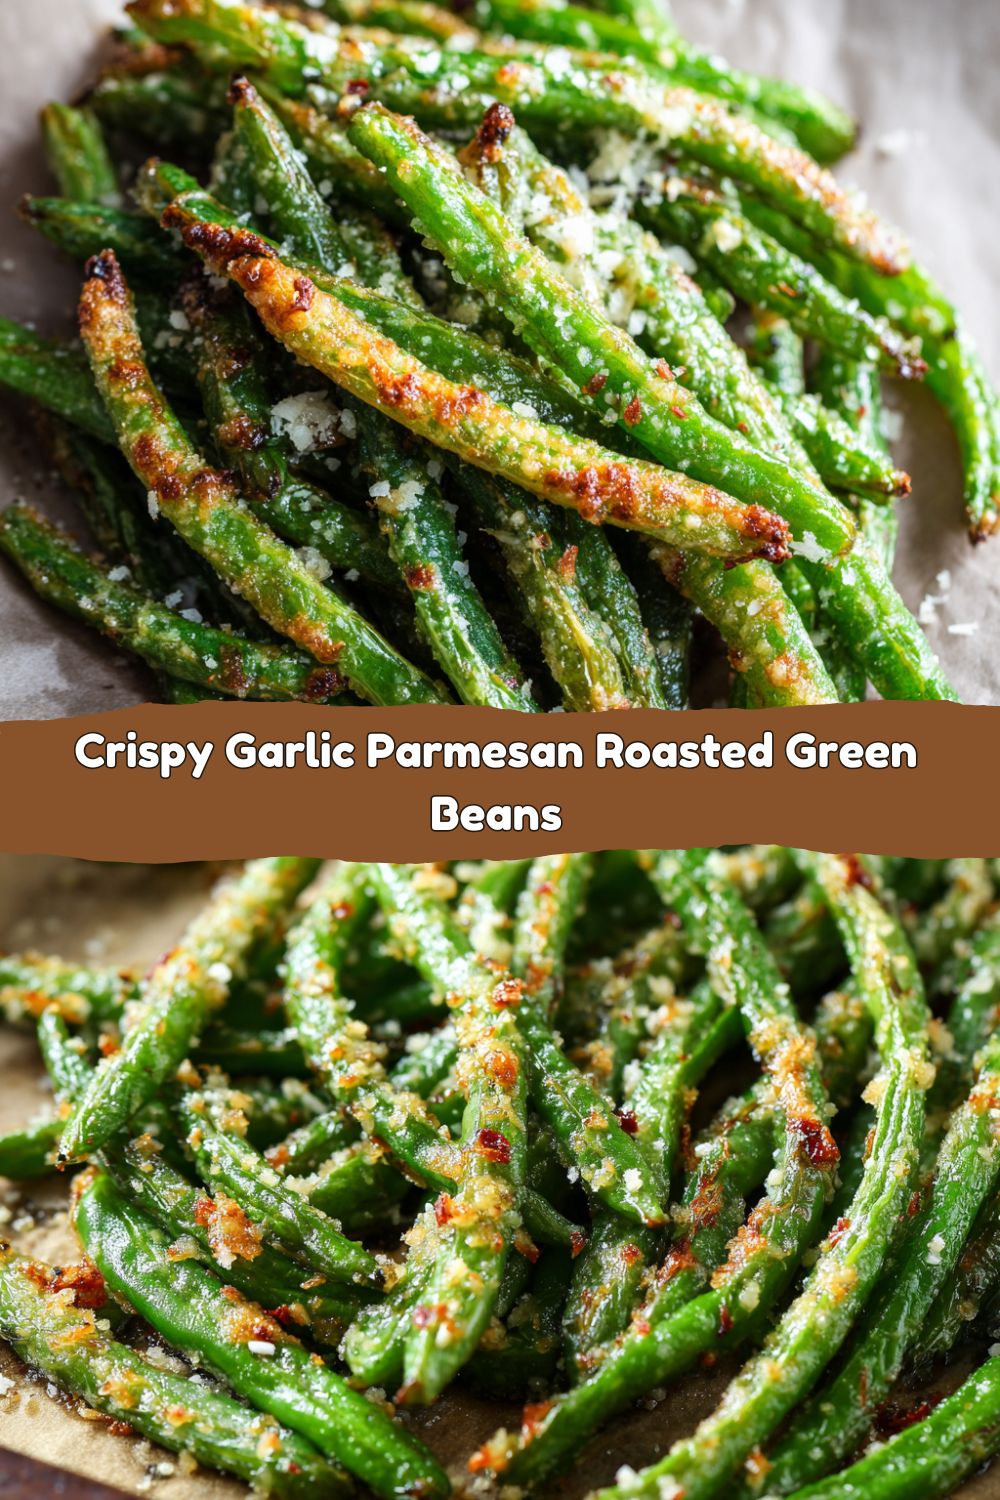
Well, my fellow foodies, it’s time for a green bean revolution. I’m talking about a side dish so ridiculously easy and packed with flavor that it might just upstage the main course. We’re transforming those humble, crisp beans into a crispy, garlicky, cheesy masterpiece with golden, crunchy edges and a tender bite. This isn’t just a recipe; it’s a total kitchen glow-up. With just a handful of ingredients and one sheet pan, we’re about to create something unforgettable. So, preheat that oven, grab your favorite mixing bowl, and let’s turn those boring beans into the star of the show. Welcome to the new era of easy, flavor-packed sides. Let’s get roasting!
The Little Side Dish That Could
This recipe has a special place in my heart because it was born from a near-disaster. Picture this: It’s a few years back, and I’m hosting a big, chaotic friendsgiving at my place. The turkey is threatening to dry out, the gravy is a separate entity entirely, and I’ve completely forgotten to plan a vegetable. I’m frantically digging through the fridge and find a giant bag of green beans my mom had dropped off from her garden. Panic mode.
I didn’t have time for anything fancy. I tossed them in what I had—olive oil, a ton of garlic from the counter, salt, pepper, and a generous shower of Parm. I threw them in the oven next to the pies that were warming up and basically forgot about them. The smell that wafted out 20 minutes later was pure magic. They came out blistered, crispy, and utterly irresistible. My friends descended on that sheet pan like vultures, and the green beans were gone before the turkey was even carved. That “what if we tried this?” moment of desperation became an instant classic. It proved that the best recipes aren’t always complicated—they’re just made with a little love and a lot of flavor.
Gathering Your Flavor Arsenal
This is where the magic starts. The beauty of this dish is in its simplicity. Each ingredient plays a crucial role in building layers of flavor and texture. Here’s what you’ll need to make your kitchen smell like an Italian grandmother’s dream.
- 1½ lbs fresh green beans, trimmed – This is your star. Look for beans that are bright green, firm, and snap easily. Avoid any that are limp or have brown spots. Chef’s Insight: Trimming them is a snap (literally)! Just line up a handful and slice off the woody stem ends with a knife. No need to do them one-by-one.
- 2 tbsp olive oil – This is our flavor conductor and crisping agent. A good extra virgin olive oil will add a beautiful fruitiness. Sub Tip: Avocado oil works great too if you want a higher smoke point and more neutral flavor.
- 3 cloves garlic, minced – Do not, I repeat, DO NOT use the jarred stuff here. Fresh garlic is non-negotiable for that pungent, aromatic kick that mellows into sweetness in the oven. Chef’s Hack: Use a microplane to grate the garlic instead of mincing. It creates a paste that coats the beans more evenly and won’t burn as easily.
- ½ tsp salt – Kosher salt is my go-to. It helps to draw out a bit of moisture from the beans, aiding in that crispy texture we crave.
- ¼ tsp black pepper – Freshly cracked is always best for the most vibrant flavor.
- ½ cup grated Parmesan cheese – The savory, salty, umami bomb. Crucial Note: For the love of crispy cheese, please grate your own from a block! The pre-shredded stuff in bags is coated with anti-caking agents that prevent it from melting into those beautiful, crispy lacy bits. Trust me on this.
- Optional: ¼ tsp red pepper flakes, lemon zest, or a squeeze of lemon juice – This is your “creative twist.” The red pepper flakes add a gentle heat, while the lemon provides a hit of bright acidity that cuts through the richness of the cheese beautifully.
Let’s Build Some Flavor, Step-by-Step
Ready to make some magic? This process is foolproof, but a few chef-approved tips will take your beans from great to “can I have the recipe?!” level amazing.
Step 1: Preheat & Prep
Preheat your oven to 425°F (220°C). This high heat is the secret to getting those beans crispy instead of steamed. While it’s heating, line a large, rimmed baking sheet with parchment paper. Why parchment? It makes cleanup an absolute dream and helps prevent any cheesy goodness from sticking permanently to your pan.
Step 2: The Flavor Toss
In a large bowl, combine the trimmed green beans, olive oil, minced (or grated!) garlic, salt, and pepper. Now, get your hands in there! Toss everything together until every single bean is glistening and evenly coated. Using your hands is the best way to ensure there are no dry spots. Chef’s Hack: If you’re adding red pepper flakes, toss them in now so the heat infuses the oil.
Step 3: Single Layer is Key
Dump the beans onto your prepared baking sheet and spread them out into a single, even layer. This is the most important step for crispiness. If the beans are crowded or piled on top of each other, they’ll steam and get soggy. We want hot air circulating around every bean! If your sheet pan seems crowded, use two. It’s worth it.
Step 4: The First Roast
Slide that pan into your preheated oven and roast for 15-20 minutes. We’re going to give them a good stir halfway through. This promotes even cooking and prevents the garlic from burning on one side. You’re looking for the beans to be tender-crisp and starting to develop some beautiful caramelized, slightly shriveled spots.
Step 5: The Cheesy Finale
Pull the pan out of the oven (carefully, it’s hot!). Now, sprinkle your freshly grated Parmesan cheese evenly over the top. Don’t just dump it in one spot—make it rain Parmesan! Pop the pan back in for just 3-5 more minutes. This is just enough time for the cheese to melt, get golden, and fuse onto the beans, creating those irresistible crispy-chewy bits.
Plating Your Masterpiece
These beans are best served immediately, straight from the oven while they’re still sizzling and crispy. Transfer them to a serving platter. If you’re using the lemon zest or a squeeze of fresh lemon juice, now’s the time to add it. That little hit of acidity right at the end makes all the flavors pop.
This is the ultimate versatile sidekick. They are phenomenal next to a perfectly seared steak or a juicy roasted chicken. They hold their own alongside pasta dishes like a hearty Bolognese or a creamy fettuccine Alfredo. For a lighter meal, I love them piled on top of a grain bowl with some quinoa, a soft-boiled egg, and a drizzle of tahini. Honestly, they’re so good you might just find yourself eating them straight off the pan with your fingers (no judgment here).
Make It Your Own: Flavor Twists & Swaps
The fun doesn’t stop here! This recipe is a perfect canvas for your own culinary experiments. Here are a few of my favorite ways to mix it up:
- “Everything Bagel” Style: After roasting, toss the beans with everything bagel seasoning along with the Parmesan. The sesame seeds, garlic, and onion add an incredible savory crunch.
- Balsamic Glaze Drizzle: Right before serving, drizzle the beans with a thick, syrupy balsamic glaze. The sweet and tangy contrast with the salty cheese is out-of-this-world good.
- Herbaceous Bliss: Add a tablespoon of finely chopped fresh herbs to the mix. Rosemary or thyme are robust enough to stand up to the roasting, while fresh parsley or chives are fantastic sprinkled on at the end.
- Bacon Lover’s Dream: Cook 4 slices of chopped bacon until crispy. Remove the bacon and toss the beans in the rendered bacon fat instead of olive oil. Sprinkle the crispy bacon bits on top with the cheese. You’re welcome.
- Vegan/Dairy-Free Swap: No problem! Use nutritional yeast in place of the Parmesan. It gives you that same savory, cheesy flavor without the dairy. You might need a touch more salt.
Jackson’s Kitchen Notes
This recipe has evolved so much since that first frantic Friendsgiving. I’ve learned that grating the garlic is a total game-changer—no more burnt bitter bits! I’ve also found that letting the beans sit for a minute or two after adding the hot cheese helps it “set” into a delicious, crispy shell. One time, I got a little overzealous and added the cheese at the beginning. Big mistake. It just burned and stuck to the pan. Lesson learned: patience is a virtue, especially when crispy cheese is involved. The high heat is your best friend here; it’s what gives you that perfect texture. Don’t be afraid of a few dark, blistered spots—that’s where the flavor lives!
FAQs: Your Questions, Answered
Q: Can I use frozen green beans?
A: You can, but you won’t get the same crispy result. Frozen beans have a much higher water content, so they’ll release a lot of steam as they cook and will end up softer. If it’s your only option, thaw them completely and pat them extremely dry with paper towels before tossing with oil.
Q: My cheese burned! What happened?
A: This usually means your oven is running hot, your rack is too high, or you left the cheese in for too long. Parmesan is fatty and can go from golden to burnt quickly. Keep a close eye on it during those last 3-5 minutes. If you’re nervous, you can even broil for just 1-2 minutes instead for a quicker, more controlled melt.
Q: My beans came out soggy instead of crispy. How do I fix that?
A: The two most common culprits are overcrowding the pan and not using a hot enough oven. Make sure your beans are in a single layer with space between them. Also, ensure your oven is fully preheated—wait for that beep! Lastly, make sure your beans are completely dry after washing before you toss them in oil.
Q: Can I make these ahead of time?
A: They are truly best fresh. However, you can prep the beans ahead by washing, trimming, and drying them. Keep them in a container in the fridge. You can also mix the oil, garlic, salt, and pepper in a separate bowl. When ready to cook, just toss everything together and roast!
Nutritional Info (Because We Care!)
Here’s the best part: this dish isn’t just delicious, it’s also pretty darn good for you! Green beans are a fantastic source of vitamins C, K, and A, and they’re packed with fiber, which is great for gut health. The olive oil provides healthy fats, and the Parmesan offers a boost of calcium and protein. This is comfort food that loves you back.
Print
Crispy Garlic Parmesan Roasted Green Beans
- Total Time: ~30 min
- Yield: 4 - 6 1x
Description
This simple side dish turns fresh green beans into crispy, garlicky, cheesy bites that are anything but boring. A quick roast with olive oil, garlic, and Parmesan gives them a golden edge and irresistible crunch.
Ingredients
1½ lbs fresh green beans, trimmed
2 tbsp olive oil
3 cloves garlic, minced
½ tsp salt
¼ tsp black pepper
½ cup grated Parmesan cheese
Optional: ¼ tsp red pepper flakes, lemon zest, or a squeeze of lemon juice for brightness
Instructions
Preheat oven to 425°F (220°C). Line a large baking sheet with parchment.
In a bowl, toss green beans with olive oil, garlic, salt, and pepper. Spread in a single layer on the sheet.
Roast for 15–20 minutes, stirring halfway, until beans are tender and lightly crisp.
Sprinkle with Parmesan and roast for 3–5 more minutes until cheese is golden.
Serve immediately with optional lemon zest or red pepper flakes.
- Prep Time: 10 minutes
- Cook Time: 20–25 min
Nutrition
- Calories: 120 / Serving
- Fat: 7g / Serving
- Carbohydrates: 10g / Serving
- Fiber: 4g / Serving
- Protein: 4g / Serving
Per Serving (estimates based on 4 servings):
Calories: ~120 kcal
Carbohydrates: 10g
Fat: 7g
Protein: 4g
Fiber: 4g
Your New Go-To Side is Served
And there you have it! What was once a simple, often-overlooked vegetable is now a crispy, flavor-packed superstar. This recipe is everything I love about cooking: it’s easy, approachable, and delivers a massive payoff for very little effort. It’s the kind of dish that makes you feel like a kitchen rockstar without any of the stress.
I hope this recipe becomes a regular in your rotation, the side dish you bring to potlucks that has everyone asking for the recipe. Most of all, I hope it inspires you to look at every ingredient in your kitchen with a little “what if we tried this?” energy. That’s where the real magic happens.
So, did you give it a try? Tag me on social @foodmeld with your creations! I love seeing your kitchen wins. Now go forth, roast those beans, and enjoy every single crispy, garlicky, cheesy bite. Until next time, happy cooking!
Jackson


