
Spooktacular Bites: Your New Favorite Halloween Party Trick!
Hey there, Food Meld fam! Jackson here. Okay, let’s be real for a second. Is there any party appetizer more classic, more reliable, or more universally loved than a deviled egg? I don’t think so. They’re the first thing to disappear from the platter at every family gathering, potluck, and game day spread I’ve ever been to. There’s just something about that creamy, tangy, savory filling nestled in a tender egg white that feels like a little hug for your taste buds.
But what happens when this beloved classic crashes into the spookiest, most fun-filled holiday of the year? Magic, that’s what. We’re taking those trusty deviled eggs and giving them a full Halloween makeover. We’re talking creepy, kooky, mysterious, and spooky—all while being ridiculously delicious. These aren’t just snacks; they’re a conversation starter, a centerpiece for your Halloween spread, and a seriously fun project to make, especially if you’ve got little helpers in the kitchen eager to get their hands dirty.
I’m all about recipes that are big on flavor but don’t require a degree in culinary arts to pull off. These Halloween Deviled Eggs are exactly that. With a few drops of food coloring and some simple garnishes, we’re transforming the humble egg into a plate of edible artwork. So, put on your favorite spooky playlist, grab your apron, and let’s cook up something awesomely eerie together. Get ready to watch these disappear faster than a ghost in the night!

A Spooky Kitchen Memory: The Birth of a Tradition
This recipe takes me right back to my first Halloween party in my first real apartment. The place was… let’s call it “cozy.” I had about three pots to my name and a kitchen table that was really just a door on top of two sawhorses (a true chef’s setup, right?). But I wanted to throw a party that my friends would remember. I was determined to make everything from scratch, and of course, deviled eggs were on the menu.
I’ll never forget the moment of panic when I realized my perfectly boiled eggs decided they did NOT want to peel nicely. We’re talking craters and moon surfaces instead of smooth, elegant ovals. My first thought was, “Well, there goes the plan.” But then, a little “what if we tried this?” energy kicked in. What if I leaned into the mess? I mashed those yolks with extra gusto, dyed the filling a deep, bloody red with paprika and a touch of food coloring, and roughly spooned it back into the jagged egg whites. I scattered some torn black olive pieces on top and called them “Zombie Brains.”
And you know what? They were the hit of the party. Not in spite of their messy look, but because of it! That night taught me a valuable lesson that’s become a core part of Food Meld: cooking isn’t about perfection. It’s about creativity, fun, and sharing something you made with love (even if it’s love with a side of gory decorations). These Halloween Deviled Eggs are my polished-up version of that happy kitchen accident, and I hope they become a fun, messy tradition in your home, too.
Gathering Your Spooky Squad: The Ingredients
Here’s the beautiful part: the base of this recipe is pure simplicity. It’s all about the festive flair you add at the end. Here’s what you’ll need to summon these tasty treats.
- 6 large eggs: The canvas for our masterpiece! Older eggs actually peel a bit easier than super fresh ones, so if you can plan a few days ahead, do it. If not, no worries—we’ve got peeling tips coming up!
- 3 tbsp mayonnaise: This is the key to that luxuriously creamy, rich texture. Use a good-quality mayo you love—it makes a difference. For a tangier twist, you can swap in Greek yogurt, but the flavor will be less classic.
- 1 tsp mustard: I’m a yellow mustard guy for that authentic deviled egg flavor, but Dijon or a whole-grain mustard would add a fantastic, more sophisticated kick. Choose your own adventure!
- 1/2 tsp vinegar or lemon juice: This is our bright, tangy secret weapon. It cuts through the richness and makes the flavors pop. White vinegar is classic, but apple cider vinegar is great, and lemon juice adds a lovely fresh zing.
- Salt and pepper, to taste: Don’t you dare forget to season your filling! Taste as you go. You’d be surprised how a little extra pinch of salt can wake the whole thing up.
- Food coloring (green, orange, or purple): The fun begins! Gel food coloring gives you more vibrant, bold colors without thinning out your filling. Liquid works just fine too; you’ll just need a few more drops.
For the Garnishes (The Real Stars of the Show):
- Black olives: These are perfect for creating our little olive spiders. You’ll want pitted black olives, either sliced or whole, to get creative.
- Paprika or cayenne pepper: This gives that “bloody” or “dirty” dusting effect. Smoked paprika adds a nice flavor, while cayenne will add a bit of heat for a devilish kick!
- Chives or scallions: Finely sliced, these make for fantastic “witch hair” or “monster fur.” They add a nice little oniony bite, too.
Conjuring the Creepiness: Step-by-Step Instructions
Alright, team, let’s get cooking. Follow these steps, and you’ll have a platter of spooky goodness in no time. I’ve packed this section with all my best tips and hacks to make the process smooth and fun.
Step 1: The Perfect Hard Boil
Place your eggs in a single layer in a saucepan. Cover them with cold water by about an inch. This is crucial—starting with cold water helps ensure even cooking and prevents cracked shells. Bring the pot to a rolling boil over high heat. The second it hits a full boil, put a lid on it and remove it from the heat. Let it sit, covered, for exactly 10 minutes. This “passive cooking” method is my absolute favorite for preventing that nasty green ring around the yolk and getting a perfect, tender yellow center every time. While they’re sitting, prepare an ice bath—a big bowl filled with ice and water.
Step 2: The Great Peel
After the 10 minutes are up, immediately transfer the hot eggs to the ice bath using a slotted spoon. Let them chill out for at least 5-10 minutes. This rapid cooling stops the cooking process and, more importantly, contracts the egg inside the shell, making it a thousand times easier to peel. Once they’re cool, gently tap each egg on the counter to crackle the shell all over, then roll it gently between your hands. Start peeling from the wider end, where there’s usually a small air pocket—this gives you a little head start. Peeling under a slow trickle of cool running water can also help wash away any stubborn shell bits.
Step 3: Slice and Scoop
Pat your perfectly peeled eggs dry. Using a sharp knife, slice each egg in half lengthwise. I like to wipe my knife clean between cuts for a neat presentation. Gently pop the yolks out into a medium-sized bowl. Arrange your empty egg white halves on your serving platter. If they’re wobbling, you can slice a tiny bit off the bottom of each white to create a flat, stable base. No one wants a runaway egg at a party!
Step 4: The Magical Filling
Now, to the yolks! Mash them up thoroughly with a fork until you have a fine crumble. Add your mayonnaise, mustard, vinegar (or lemon juice), salt, and pepper. Now, mash and stir until it’s incredibly smooth and creamy. I sometimes use a small whisk for this to get it extra lump-free. This is your base. Taste it! Does it need more tang? Add a touch more vinegar. More creaminess? A bit more mayo. You’re the boss of your deviled eggs.
Step 5: A Splash of Color
This is where the Halloween magic happens. Divide your filling into separate small bowls if you want multiple colors. Now, add your food coloring a few drops at a time, stirring well until you achieve your desired spooky shade. Want a slimy green monster egg? Go for it. A bloody red? Perfect. A deep, mysterious purple? Amazing. Remember, the color will intensify just a tiny bit as it sits, so go bold!
Step 6: Pipe or Spoon
You can simply spoon the filling back into the egg white cavities for a rustic, homey look. But for a real pro finish, piping is the way to go. Spoon your colored filling into a plastic zip-top bag, push it down into one corner, and snip the tip off that corner. Instant piping bag! Squeeze the filling into the eggs in a swirl motion. It looks fantastic and feels extra fancy.
Step 7: The Grand Garnish
Time for the final transformations!
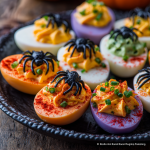
- Spider Eggs: Take a half of a black olive and place it in the center of the filling for the spider’s body. Take another olive, slice it into super thin slivers (like 8-10 per olive), and carefully arrange four on each side to create the legs. They look impressively creepy!
- Bloody/Dusty Eggs: Simply sprinkle a generous amount of paprika or cayenne pepper over the top. You can dust the whole thing or just one side for a more ominous look.
- Witchy Eggs: Take a few strands of fresh chives and slice them lengthwise to make them extra thin and hair-like. Pile them on top of the filling for a wild, witchy hair effect.
Once they’re all garnished, cover the platter loosely with plastic wrap and pop them in the fridge to chill for at least 30 minutes before serving. This helps the flavors meld and makes them refreshingly cool to eat.
Plating Your Spooky Masterpiece
Presentation is everything with these guys! Don’t just use any old white plate. Lean into the theme. A slate board, a black ceramic platter, or even a rustic wood board makes the colors of the eggs really pop. You can scatter a few fake spider webs, plastic spiders, or autumn leaves around the platter for extra atmosphere. Arrange them in a circle like a wreath or in rows—just make sure there’s enough space between them so your gorgeous garnishes don’t get smushed. Place them right in the center of your Halloween spread and watch your guests gather around!
Mix It Up: Spooky Variations
Feel like experimenting? Here are a few twists to keep your Halloween spread exciting:
- Avocado Green Monsters: Mash half a ripe avocado into the yolk mixture. It adds a fantastic creaminess and a natural, vibrant green color! A squeeze of lime juice will keep it from browning.
- “Bacon Bone” Brigade: Mix finely crumbled cooked bacon into the filling. Pipe the filling into the eggs in a long, thin line to look like a bone and place a small piece of bacon at each end.
- Spicy Sriracha Bloodshot Eyes: Substitute the mayo with Sriracha mayo and add an extra teaspoon of Sriracha for a kick. The filling will be a natural red-orange color. Draw little blood veins on the top with a toothpick dipped in regular Sriracha.
- Everything-Bagel Skeletons: Skip the food coloring. Mix everything bagel seasoning into the classic filling and pipe it into the whites. Use thin strips of black olive to create little skeleton faces on top.
Jackson’s Chef Notes & Kitchen Stories
This recipe is a living thing in my kitchen. It changes a little every year. One time, I tried using beet juice for a natural red color—it worked, but it definitely made the eggs taste… earthy. Let’s just say it was a learning experience! Another year, my niece decided the spiders needed little eyes, so we used the tiniest dots of cream cheese to stick capers on the olive bodies. It was adorable.
The biggest lesson? Don’t stress. So your first egg peels terribly? Chop it up, mix it with the filling, and call it “Monster Egg Salad” with some crackers on the side. No black olives? Use thin slices of cucumber with a dot of filling for a googly eye. Cooking, especially holiday cooking, is supposed to be fun. Embrace the happy accidents. Laugh when an olive spider loses a leg. The best food is food made with joy, even if it’s a little lopsided.
FAQs & Troubleshooting Your Spooky Eggs
Q: My eggs are impossible to peel! They’re a torn-up mess. What did I do wrong?
A: I feel your pain! This is the #1 deviled egg problem. The most common culprit is using very fresh eggs. As eggs age, the air pocket inside enlarges, making them easier to peel. If you can, try to use eggs that have been in your fridge for 7-10 days. The ice bath shock method is also non-negotiable—it’s a game-changer. And finally, peel them under that slow trickle of water; it helps get between the shell and the white.
Q: Can I make these ahead of time?
A: Absolutely! You can hard-boil and peel the eggs up to 2 days in advance—keep them sealed in a container in the fridge. You can also make the filling (without the food coloring) up to a day ahead. Store it in a separate airtight container. Wait to color, fill, and garnish until a few hours before your party for the freshest look and best texture.
Q: My filling is too runny! How can I thicken it up?
A> No worries! This usually happens if the yolks are still a bit warm or if you’ve been a little heavy-handed with the mayo/vinegar. Pop the filling into the fridge for 20-30 minutes to firm up. You can also add a tiny pinch of something dry, like a smidge of mustard powder or even a finely grated cooked yolk from another egg.
Q: Are there natural alternatives to food coloring?
A> You bet! For purple, try mashing a few blueberries and straining the juice. For orange, a little paprika or turmeric mixed with water can work (though it will add flavor). For green, spinach juice (from blended and strained fresh spinach) is a great option. Just note that natural colors will be more muted than the vibrant artificial ones.
HALLOWEEN DEVILED EGGS
- Total Time: 30 minutes
- Yield: 12 Deviled Eggs 1x
Description
These Halloween Deviled Eggs take the classic appetizer and give it a festive twist. With bold colors and eerie decorations, they’re perfect for adding a little frightful fun to your Halloween spread.
Ingredients
6 large eggs
3 tbsp mayonnaise
1 tsp mustard
1/2 tsp vinegar or lemon juice
Salt and pepper, to taste
Food coloring (green, orange, or purple for spooky yolk filling)
Garnishes:
Black olives (for spider toppings)
Paprika (for “bloody” dusting)
Chives (for “witch hair” effect)
Instructions
Hard-boil the eggs: place in a pot, cover with water, bring to a boil, then simmer 10 minutes. Cool in ice water, peel, and slice in half lengthwise.
Remove yolks and mash them with mayonnaise, mustard, vinegar, salt, and pepper until smooth.
Add a few drops of food coloring to tint the filling a spooky shade.
Spoon or pipe the filling back into the egg whites.
Garnish:
Spider Eggs: Top with black olive “spiders” (1 half for the body, sliced olives for legs).
Bloody Eggs: Sprinkle paprika or cayenne for a gory effect.
Witch Eggs: Add chive strands for a creepy hair look.
Chill until ready to serve.
- Prep Time: 10 minutes
- Cook Time: 20 minutes
Nutrition
- Calories: 70 / Egg
- Sodium: 70mg / Egg
- Fat: 6g / Egg
- Protein: 3g / Egg
- Cholesterol: 95mg / Egg
Nutritional Information (Per Deviled Egg)
Calories: ~70 | Protein: 3g | Carbohydrates: 1g | Fat: 6g | Saturated Fat: 1.5g | Cholesterol: 95mg | Sodium: 70mg
Note: Nutritional info is an estimate and will vary based on specific ingredients and portion sizes used.
Prep Time: 20 minutes | Cook Time: 10 minutes | Chill Time: 30 minutes | Total Time: 1 hour | Servings: 12 deviled eggs
Final Thoughts
Halloween Deviled Eggs are the perfect reminder that food should be fun, festive, and a little bit mischievous. They take the beloved, crowd-pleasing classic and give it a spooky twist that feels right at home on any Halloween party spread. With just a splash of color, some playful garnishes, and a dash of creativity, you’ve suddenly got a platter that’s not just delicious, but also a total conversation starter.
What I love most about this recipe is how flexible it is. You can go all-out creepy with olive spiders and “bloody” paprika dust, keep it lighthearted with witchy chive hair, or even let the kids take charge of decorating. No two eggs ever look exactly alike, and that’s part of the charm. The flavors stay classic—creamy, tangy, and savory—but the presentation is pure Halloween magic.
So this year, when you’re setting up your spooky snacks, skip the store-bought candy overload and make something that’s equal parts tasty and terrifying. These Halloween Deviled Eggs will disappear faster than a trick-or-treater’s candy stash—and you just might start a new October tradition in your kitchen. 🎃👻🥚


