Black Velvet Cake: The Spookiest, Most Elegant Dessert You’ll Ever Make
Hey friends, Jackson here from Food Meld. Let’s talk about a showstopper. I’m not talking about your average chocolate cake. I’m talking about a cake so dark, so deeply chocolatey, and so dramatically gorgeous that it looks like you pulled it straight out of a moonlit sky. This Black Velvet Cake with its tangy blackberry compote and impossibly rich black cocoa frosting isn’t just a dessert; it’s an experience.
I know what you might be thinking: “Jackson, that looks incredible, but also… intimidating.” I get it! But trust me, we’re going to break it down together. This is one of those recipes that looks like a million bucks but is built on simple, solid baking techniques. We’re using a few clever tricks (hello, hot coffee and balsamic vinegar!) to create a moist, tender crumb that practically melts in your mouth. The blackberry compote cuts through the richness with a bright, fruity zing, and the frosting? Oh, the frosting. It’s creamy, it’s silky, and it’s blacker than a starless night.
Whether you’re hosting a Halloween bash, celebrating a milestone, or just want to conquer a baking project that’ll have everyone begging for the recipe, you’re in the right place. So, preheat those ovens, grab your favorite mixing bowl, and let’s cook something awesome together. This is the kind of baking adventure I live for—let’s dive in.
A Midnight Snack That Inspired a Masterpiece
This cake’s origin story starts not in a fancy kitchen, but in my Nana’s pantry around midnight. I was about ten, supposed to be asleep, but I was caught red-handed (or rather, purple-handed) sneaking a bowl of the blackberry cobbler she’d made that evening. She didn’t get mad. Instead, she pulled out two spoons, sat with me on the linoleum floor, and we shared it straight from the baking dish. Between bites, she told me about the wild blackberry bushes behind her childhood home and how her mother would simmer them into the most tart, jammy compote for their biscuits.
That memory—the sweet-and-tart burst of warm berries, the deep, comforting sweetness of the cobbler, and the pure joy of a shared midnight snack—stuck with me. Years later, when I was playing with black cocoa for the first time, I knew its intense, almost Oreo-like flavor needed a fruity counterpoint. Nana’s blackberries immediately came to mind. This cake is my homage to that moment: the profound darkness of the chocolate representing that late night, and the vibrant compote shining through like the sweet memory itself. It’s a taste of nostalgia, with a seriously dramatic twist.

Gathering Your Dark & Dreamy Ingredients
Here’s everything you’ll need to bring this gothic beauty to life. Don’t be scared by the list—a lot of it is pantry staples! Read through the notes for my chef-y insights and easy swaps.
For the Black Velvet Cake:
- 4 cups sugar: We’re using a good amount for structure and that tender crumb. For a deeper flavor, you can swap 1 cup for dark brown sugar.
- 4 cups flour (sifted): Sifting is key here! It incorporates air, preventing a dense cake. All-purpose works perfectly.
- 1½ cups black cocoa powder: This is the STAR. Black cocoa is alkalized (Dutched) to the extreme, giving it that intense color and smooth, less bitter flavor. You can find it online or in specialty stores. In a pinch, use regular Dutch-process cocoa, but the color won’t be as dramatic.
- 4 tsp baking soda & 2 tsp baking powder: Our leavening dream team. They give this dense batter a serious lift.
- 2 tsp salt: Crucial for balancing all that sweetness and enhancing the chocolate flavor.
- 4 eggs: Bring them to room temperature! They incorporate into the batter much more evenly, giving you a uniform texture.
- 2 cups buttermilk: The acidity tenderizes the gluten and reacts with the baking soda for lift. No buttermilk? Make a DIY version by adding 2 tbsp of lemon juice or vinegar to 2 cups of regular milk and let it sit for 5 minutes.
- 2 cups hot coffee: This is my secret weapon! The hot coffee blooms the cocoa powder, intensifying its flavor. Don’t worry—you won’t taste coffee, just richer chocolate. Just use hot water if you must.
- 1 cup canola oil: Oil keeps the cake incredibly moist for days, far better than butter would in this recipe.
- 4 tsp vanilla extract: The classic flavor enhancer. Use the good stuff!
- Optional: 2 tsp balsamic vinegar: My favorite hack! A touch of acid enhances the chocolate’s complexity even more and helps with the deep color.
For the Blackberry Compote:
- 4 cups blackberries: Fresh or frozen both work beautifully. Frozen berries will release more liquid, so you might need to simmer a few minutes longer.
- 4 tbsp sugar: We’re keeping it lightly sweet to let the berries’ natural tartness shine.
- 2 tbsp lemon juice & 2 tsp zest: Brightness is key to cutting through the rich cake and frosting.
- 2 cinnamon sticks: Adds a warm, subtle spice note that pairs magically with berries and chocolate. You can use ½ tsp of ground cinnamon if that’s all you have.
- ½ cup water + 2 tbsp cornstarch: Our thickening agent. Mix the cornstarch with a few tablespoons of cold water first to make a slurry to avoid lumps.
- Optional: 1 tbsp crème de cassis (blackcurrant liqueur): This is a fun, adult upgrade that amplifies the berry flavor. Totally optional but highly recommended!
For the Black Cocoa Frosting:
- 16 oz cream cheese & 1 cup butter: Both must be softened to room temperature! This is non-negotiable for a smooth, lump-free, spreadable frosting.
- 6 cups powdered sugar: Sift it! This prevents a gritty texture in your otherwise silky frosting.
- 2 cups black cocoa powder: Sift this too! It loves to clump.
- ½ tsp salt: Cuts the sweetness and makes the chocolate pop.
- 2 tsp vanilla extract: The perfect flavor pairing.
- Optional: ½ tsp espresso powder: Just like in the cake, it deepens the chocolate flavor without adding a coffee taste.
Let’s Build This Beautiful Beast: Step-by-Step
Okay, team! Let’s get mixing. Read through these steps first—I’ve packed them with all my best tips to ensure your success.
1. Bake the Black Velvet Cake Layers
Preheat your oven to 350°F (175°C). Grease and line three 8-inch round cake pans with parchment paper. Greasing the parchment too is my best hack for flawless release!
In a very large bowl, whisk together all your dry ingredients: the sifted flour, sugar, black cocoa, baking soda, baking powder, and salt. Get them really well combined. This ensures the leavening agents are evenly distributed for a perfect rise.
In another large bowl, whisk the wet ingredients: the eggs, buttermilk, canola oil, vanilla, and optional balsamic vinegar. Now, here’s the fun part: slowly whisk in the hot coffee. You want to add it in a steady stream while whisking constantly to gently cook the eggs without scrambling them.
Now, pour the wet ingredients into the dry ingredients. Use a whisk to combine them. My #1 tip here: do not overmix! Whisk just until the last streak of flour disappears. The batter will be very thin—that’s exactly how it should be! This thin batter is what gives us that incredible velvet texture.
Divide the batter evenly between your three prepared pans. I use a kitchen scale for precision, but if you don’t have one, just eyeball it. Tap the pans firmly on the counter a few times to release any large air bubbles.
Bake for 30-35 minutes, or until a wooden skewer inserted into the center comes out with just a few moist crumbs attached. Let the cakes cool in their pans for 15 minutes before turning them out onto a wire rack to cool completely. They must be completely cool before you frost them, or you’ll have a melted, slippery mess!
2. Whip Up the Blackberry Compote
While the cakes are cooling, make your compote. In a medium saucepan, combine the blackberries, sugar, lemon juice, lemon zest, and cinnamon sticks. Give it a good stir and cook over medium heat for about 10-15 minutes, until the berries break down and become juicy.
In a small bowl, make a slurry by mixing the cornstarch with 2 tablespoons of COLD water until it’s smooth. Slowly stir this slurry into the simmering berry mixture. Keep stirring and cooking for another 2-3 minutes, until the compote thickens nicely and becomes glossy.
Remove it from the heat, fish out the cinnamon sticks, and stir in the crème de cassis if you’re using it. Let it cool completely. It will thicken even more as it sits.
3. Create the Silky Black Cocoa Frosting
This part is easy, but patience is key! In the bowl of a stand mixer fitted with a paddle attachment (or using a hand mixer), beat the softened cream cheese and butter together on medium speed until it’s completely smooth, creamy, and lump-free. This could take 3-4 minutes. Scrape down the bowl halfway through.
With the mixer on low, gradually add the sifted powdered sugar and black cocoa powder. I add it one cup at a time to avoid a powdered sugar snowstorm in my kitchen! Once it’s mostly incorporated, add the salt and vanilla. Turn the mixer up to medium-high and beat for a full 2-3 minutes. This whips air into it, making it light, fluffy, and dreamily spreadable.
4. The Grand Finale: Assembly
Place one cooled cake layer on your serving plate or cake stand. Spread a thin, even layer of frosting over the top. Then, pipe a thick “dam” or border of frosting around the outer edge of the cake layer. This is our barrier to hold in the compote! Spread half of the cooled compote inside this dam. Top with the next cake layer and repeat. Place the final cake layer on top, bottom-side up for an extra-flat surface.
Now, apply a thin crumb coat of frosting over the entire cake. This is a light layer that traps any loose crumbs. Pop the whole cake in the fridge for 15-20 minutes to set this coat. This step makes the final frosting so much easier and cleaner!
Finally, frost the entire cake with the remaining black cocoa frosting. Use an offset spatula or a bench scraper to get those beautifully smooth sides. Don’t stress about it being perfect—a slightly rustic look is totally chic with this cake.
How to Serve This Showstopper
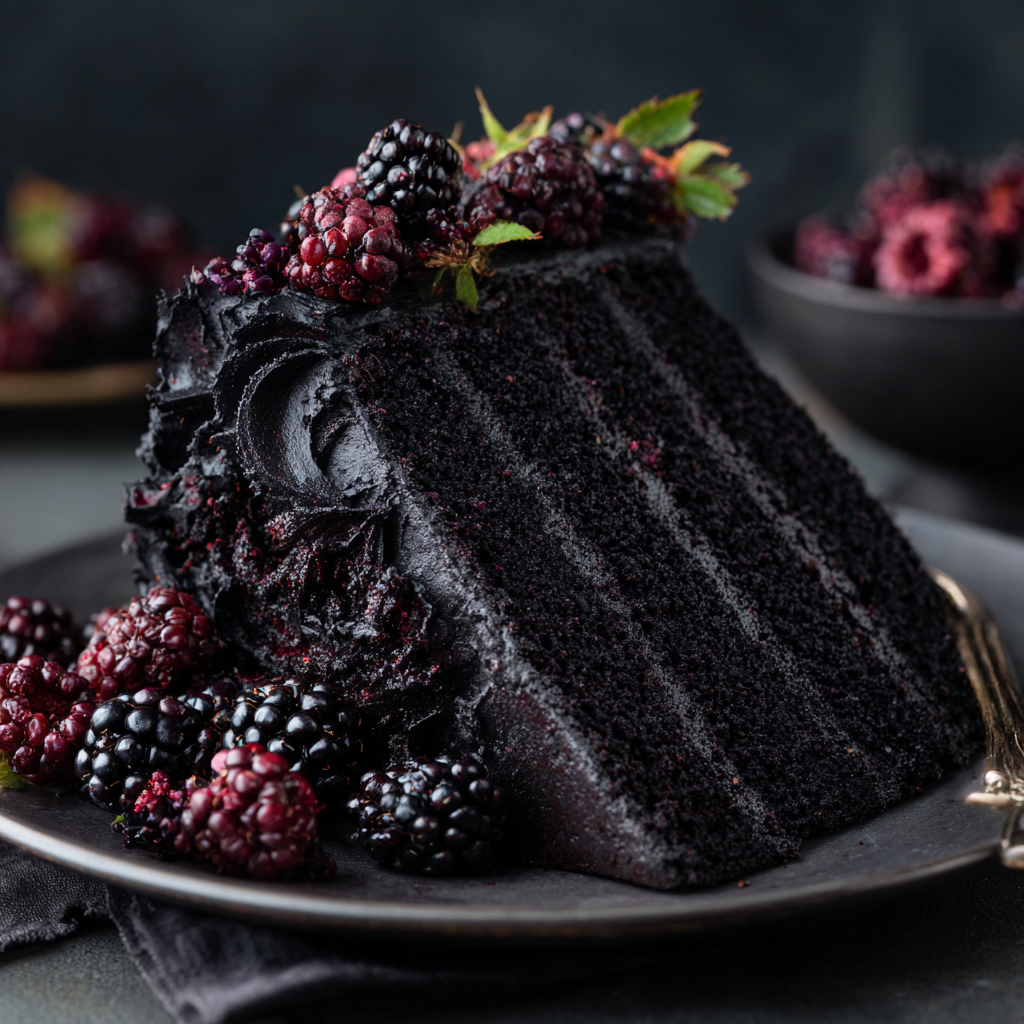
This cake is a drama queen and deserves a stage! I love serving it on a simple, stark white cake stand to really make that black color pop. For the final touch, garnish the top with a handful of fresh blackberries, a drizzle of any leftover compote, and maybe even a light dusting of edible gold glitter for a touch of Halloween magic. Use a sharp knife dipped in hot water and wiped dry for the cleanest slices. This ensures you cut through that gorgeous frosting without dragging it.
Print
Black Velvet Cake with Blackberry Compote
- Total Time: 1 hour 35 minutes
- Yield: 16 - 20 1x
Description
Dark, dramatic, and decadently fruity—this Black Velvet Cake is Halloween elegance on a plate. Layers of rich chocolate cake, tangy blackberry compote, and lush black cocoa frosting make every bite hauntingly unforgettable.
Ingredients
Black Velvet Cake:
4 cups sugar
4 cups flour (sifted)
1½ cups black cocoa powder
4 tsp baking soda
2 tsp baking powder
2 tsp salt
4 eggs
2 cups buttermilk
2 cups hot coffee
1 cup canola oil
4 tsp vanilla
Optional: 2 tsp balsamic vinegar
Blackberry Compote:
4 cups blackberries
4 tbsp sugar
2 tbsp lemon juice
2 tsp zest
2 cinnamon sticks
½ cup water + 2 tbsp cornstarch
Optional: 1 tbsp crème de cassis
Black Cocoa Frosting:
16 oz cream cheese
1 cup butter
6 cups powdered sugar
2 cups black cocoa powder
½ tsp salt
2 tsp vanilla
Optional: ½ tsp espresso powder
Instructions
1. Bake Cake: Preheat oven to 350°F. Mix dry ingredients. In another bowl, whisk eggs, buttermilk, oil, coffee, vanilla. Combine wet and dry. Divide into 3 greased 8” pans. Bake 30–35 mins. Cool.
2. Make Compote: Simmer berries, sugar, lemon juice/zest, cinnamon, water. Stir in cornstarch until thick. Cool.
3. Make Frosting: Beat cream cheese & butter. Add vanilla, salt, sugar, and cocoa until smooth.
4. Assemble: Layer cake with frosting and compote. Cover with frosting.
Decorate: Top with blackberries, glitter, or berry drizzle.
- Prep Time: 40 minutes
- Assemble Time: 20 minutes
- Cook Time: 35 minutes
Nutrition
- Calories: 520 / Slice
- Sugar: 45g / Slice
- Fat: 28g / Slice
- Carbohydrates: 64g / Slice
- Protein: 6g / Slice
Mix It Up: Your Cake, Your Rules
This recipe is a fantastic canvas for your creativity! Here are a few twists to try:
- Raspberry Rendezvous: Swap the blackberries for raspberries in the compote for a slightly tarter, equally delicious vibe.
- Orange Zest Twist: Add the zest of one orange to the cake batter and replace the lemon zest in the compote with orange zest for a chocolate-orange dream.
- Minty Fresh: Add ½ tsp of peppermint extract (not mint extract!) to the frosting for a cool, grown-up Andes mint flavor.
- Dairy-Free Delight: Use vegan butter and plant-based cream cheese for the frosting, and swap the buttermilk for a DIY version with soy or oat milk + lemon juice.
- Cupcake Conversion: Turn this into 24-30 spectacular cupcakes! Fill the liners ⅔ full and bake for 18-22 minutes. Frost and add a small dollop of compote on top.
Jackson’s Chef Notes & Kitchen Stories
The first time I tested this recipe, I was so excited I tried to frost the cake layers while they were still slightly warm. Big mistake. Huge. The frosting slid right off, the compote bled everywhere, and I nearly had a chocolate avalanche on my counter. I learned the hard way so you don’t have to! Patience is the most important ingredient here.
This recipe has evolved so much. I started with a standard red velvet recipe and just kept deepening the chocolate, playing with the acids, and tweaking the ratios until I landed on this Goth masterpiece. The addition of the balsamic vinegar was a total “what if we tried this?” moment that paid off big time. It’s my little secret for making chocolate taste… more like itself. Don’t skip it!
Your Questions, Answered
Q: My cake layers turned out dry. What did I do wrong?
A: Dryness usually comes from overbaking or using too much flour. Make sure to spoon and level your flour (don’t scoop from the bag) and pull the cakes from the oven as soon as a skewer comes out with a few moist crumbs. The coffee and oil should keep the crumb nice and moist.
Q: Can I use regular cocoa powder instead of black cocoa?
A: Yes, but the flavor and color will be different. Dutch-process cocoa is the best substitute—it’ll give you a deep, rich brown cake. If you want that dramatic black finish, add a touch of black gel food coloring to the batter and frosting.
Q: My frosting looks grey, not black! How do I fix it?
A: That’s common at first. The key is patience—black cocoa plus gel coloring deepens as it sits. If it’s still too grey, add a tiny bit of navy blue or purple gel coloring to push it into true black.
Q: Can I make the cake in advance?
A: Definitely. The layers can be baked 1–2 days ahead and wrapped tightly in plastic at room temp. The compote can be made up to 3 days in advance and refrigerated. Frosting can also be prepped 1–2 days ahead—just re-whip before using. Fully assembled, the cake keeps in the fridge for 3 days.
Q: Can I freeze it?
A: Yes! Wrap unfrosted cake layers in plastic and foil, and freeze for up to 3 months. Thaw overnight in the fridge before assembling. Frosted cakes don’t freeze as beautifully, but individual slices can be wrapped and frozen for up to a month.
Q: Can this be made into cupcakes?
A: Absolutely! This recipe makes about 24–30 cupcakes. Bake at 350°F (175°C) for 18–22 minutes. Frost and add a spoonful of compote on top or pipe it into the center for a hidden surprise.
Final Touches & Wrap-Up
This Black Velvet Cake isn’t just dessert—it’s drama, nostalgia, and a little bit of magic all baked into one. The richness of black cocoa, the tang of buttermilk, the lush berry filling, and the silky frosting all come together to create something that feels both timeless and thrillingly new.
It’s the kind of cake that makes people pause, lean in, and say, “Whoa… what is that?” And then, once they taste it, you’re guaranteed repeat requests. The fact that it also ties back to Nana’s cobbler memory gives it that perfect Food Meld touch: food that connects past and present in a single, unforgettable bite.
So whether you’re baking this beauty for Halloween, a milestone, or just because you want to tackle a project that’ll leave people speechless, this is it. Take your time, savor the process, and most of all—enjoy every slice of this spookily elegant masterpiece.


