Hey Cheesecake Lovers! Your Guilt-Free Dream Just Came True
Picture this: It’s 3 PM. Your energy’s crashing, but your sweet tooth is screaming. Or maybe dinner’s done, and you’re eyeing that sad store-bought dessert knowing it’ll leave you feeling blah tomorrow. Sound familiar? Friend, I’ve been there too—stuck between craving something lusciously creamy and wanting to fuel my body right. That’s exactly why I became obsessed with creating these High-Protein Cheesecake Jars. They’re not just “healthy” swaps; they’re straight-up celebrations in a jar! Imagine velvety cheesecake filling layered with crunchy graham crackers and juicy berries… except this version packs 20+ grams of protein, comes together in 10 minutes flat, and tastes like you fussed for hours. No baking, no fancy equipment—just pure, spoonable joy. I live for recipes that smash the “healthy vs. indulgent” debate, and this one? It’s a total knockout. Whether you’re meal-prepping like a boss, needing a post-workout win, or just deserve a sweet hug after a long day, these jars are your new best friend. Let’s ditch the guilt and dive into flavor town—your taste buds (and muscles) will thank you!
That One Time Cheesecake Saved My Sanity (No Oven Required!)
Okay, real talk: My first attempt at traditional baked cheesecake years ago was… a comedy of errors. Picture me, a hungry college kid, determined to impress my roommates. I meticulously followed a recipe, waited hours for it to bake and cool, only to pull out a cracked, sunken mess that tasted like sweetened cardboard. Deflated doesn’t even cover it! Fast forward to my early Food Meld days. I was testing recipes non-stop, often forgetting to eat actual meals. One desperate, hangry afternoon, I stared at my fridge: a tub of Greek yogurt, leftover cottage cheese, and some sad berries. “What if…?” I thought. I threw it all in the blender with a glug of maple syrup, layered it with crackers, and took a bite. BAM. Instant cheesecake vibes! No baking, no stress—just creamy, protein-packed magic. My wife walked in, saw me grinning like a fool with berry juice on my chin, tried a spoonful, and declared, “This is it. Blog this NOW.” That scrappy kitchen experiment became our go-to snack, proving that sometimes the best recipes aren’t fussy showstoppers, but the quick, real-life wins that make busy days brighter. That’s the spirit we’re bringing today!
Gather Your Flavor Crew: Ingredients & Smart Swaps
Here’s your simple lineup! Don’t stress if you need swaps—I’ve got your back. This is about working with what you’ve got and still making magic.
- 2 cups 2% Cottage Cheese: The protein powerhouse! 2% gives the best balance of creaminess without excess fat. Chef’s Tip: Blend it FIRST for 30 seconds solo to avoid graininess. Swap: Low-fat ricotta works, but it’ll be denser. For dairy-free? Try silken tofu (drained well).
- 3 cups Full-Fat Plain Greek Yogurt: Full-fat = ultra-creamy texture and satiating richness. It also tangs like traditional cheesecake! Chef’s Tip: Non-fat works, but it’ll be slightly less luscious. Swap: Skyr for even more protein, or coconut yogurt (unsweetened) for vegan.
- 4 Tbsp Pure Maple Syrup: Our natural sweetener! It adds depth. Chef’s Tip: Taste after blending—add 1 extra Tbsp if you like it sweeter. Swap: Honey, agave, or 2-3 pitted dates blended in.
- 2 cups Crushed Graham Crackers: The classic crunchy base! Chef’s Tip: Smash ’em in a bag with a rolling pin for therapy. Swap: Gluten-free grahams, digestive biscuits, or even 1 cup rolled oats + 1/4 cup melted butter (or nut butter) mixed with 1 Tbsp syrup for a no-bake oat crust.
- 1+ cup Fresh Berries: Bursting with freshness and antioxidants! Use what’s in season. Chef’s Tip: Frozen berries work great too—just thaw and drain excess juice to prevent sogginess. Swap: Sliced mango, peaches, or even a swirl of sugar-free jam!
Optional Boosters: Add 1 tsp vanilla extract or lemon zest to the filling while blending! A pinch of salt makes flavors pop.
Building Your Jar of Joy: Let’s Layer It Up!
Grab your blender and let’s get messy! This isn’t rocket science—it’s fun, fast, and foolproof. Follow these steps for jar perfection:
- Blend It Silky Smooth: Toss the cottage cheese into your blender or food processor. Blend for 30 seconds alone until it’s completely smooth (no lumps allowed!). Scrape down the sides. Add the Greek yogurt and maple syrup. Blend again for 45-60 seconds until it’s thick, creamy, and dreamy. Chef’s Hack: No blender? Use an immersion blender in a deep bowl or whisk vigorously—just ensure cottage cheese is super smooth first!
- Crush & Conquer Your Base: While the filling chills out for a sec (it thickens slightly!), smash those graham crackers. Aim for crumbs with a few small chunks for texture. Chef’s Tip: Use a zip-top bag and crush with a rolling pin, mug, or… channel some stress? Therapeutic AND delicious!
- Jar Assembly Line: Grab 4-6 clean jars, glasses, or even reusable containers. Start with a generous layer of graham crumbs (about 2 Tbsp per jar)—press lightly with a spoon. Next, spoon or pipe in the cheesecake filling (roughly 1/3 cup). Top with a handful of berries. Chef’s Hack: Want Instagram-worthy layers? Use a piping bag or spoon filling carefully against the jar side to see distinct stripes!
- Repeat & Crown Your Creation: If your jar has room, repeat the layers! Finish with a flourish: a dollop of extra Greek yogurt, a few perfect berries, and a sprinkle of leftover crumbs or granola for crunch. Chef’s Tip: A drizzle of melted dark chocolate or a tiny mint leaf? Chef’s kiss!
- The (Optional) Chill Factor: Pop the lids on and refrigerate for 30+ minutes if you can wait. This firms up the filling and melds the flavors beautifully. BUT… if that sweet craving hits hard? Eat one straight away—I won’t judge! The texture will just be softer.
Serving Up Smiles: How to Enjoy Your Masterpiece
These jars are superstars because they’re ready whenever you are! Serve them chilled straight from the fridge for maximum refreshment. They’re perfect solo, but feel free to dress them up: Add a side of extra berries for bursting freshness, or a tiny sprig of mint for a pop of color. I love grabbing one as a mid-afternoon power snack, a post-gym refuel, or a light yet satisfying dessert after dinner. Pack them for picnics or lunches—just keep ’em cool! The best part? Seeing someone’s eyes light up when you hand them their own personal jar of happiness.
Shake Things Up: 5 Flavor Adventures to Try
Got the basic vibe down? Awesome! Now let’s play. Mix and match these twists to make it YOUR signature jar:
- Tropical Escape: Swap berries for diced mango + pineapple. Add 1 Tbsp coconut cream to the filling blend and use crushed vanilla wafers or macadamia nuts for the base!
- Chocolate Peanut Butter Cup: Blend 2 Tbsp cocoa powder + 2 Tbsp PB2 (or real peanut butter) into the filling. Layer with crushed chocolate grahams or Oreos. Top with mini chocolate chips.
- Lemon Berry Bliss: Add 2 Tbsp fresh lemon juice and 1 tsp zest to the filling. Use gingersnap crumbs for the base and layer with blueberries + raspberries.
- Pumpkin Spice (Yes, Year-Round!): Blend in 1/2 cup canned pumpkin puree + 1 tsp pumpkin pie spice. Use speculoos or biscoff crumbs. Top with pecans.
- Vegan Berry Delight: Use silken tofu (drained) instead of cottage cheese + coconut yogurt. Sweeten with agave. Base = gluten-free crumbs or oats mixed with maple syrup and coconut oil.
Behind the Blender: My Cheesecake Jar Confessions
This recipe is my kitchen workhorse! It’s evolved from that hangry fridge raid into a weekly staple. My biggest “aha!” moment? Realizing cottage cheese must be blended solo first—game-changer for smoothness! We’ve tested it with everything from farmers market peaches to frozen cherries mid-winter. One hilarious fail? Trying to add spinach for “green” protein. Let’s just say… it tasted like a salad pretending to be dessert. Stick to berries! Now, my kids love customizing their own jars on Sunday afternoons (crushed Oreos are their fave “crust”). It’s messy, fun, and gets them excited about real ingredients. The beauty is in its flexibility—no two batches are ever exactly alike, and that’s the point! Make it yours, play with flavors, and remember: Good food shouldn’t be complicated. It should just make you happy.
Cheesecake Jar SOS: Fixing Common Hiccups
Got questions? I’ve got answers! Here’s how to tackle the usual suspects:
- “My filling is runny! Help!” Don’t panic! Two fixes: 1) Chill it longer! Overnight is ideal. 2) Next time, use THICK full-fat Greek yogurt (drain any liquid on top first) and ensure your cottage cheese is well-drained. Adding 1/4 cup powdered peanut butter or a scoop of vanilla protein powder also thickens it nicely.
- “Can I make this dairy-free?” Absolutely! Swap cottage cheese for 1.5 cups silken tofu (patted dry) and Greek yogurt for plain, unsweetened coconut yogurt (look for a thick one). Use vegan grahams or the oat crust option. Sweeten with agave.
- “How long do these last?” They’re best fresh, but store airtight in the fridge for up to 3 days. The crust will soften over time (still tasty!). Freezing isn’t recommended—the texture gets icy.
- “Can I skip the cottage cheese? The texture weirds me out!” Totally get it! Use extra Greek yogurt (4 cups total) instead. It’ll be tangier and slightly less thick, but still delicious. Or try blended silken tofu or low-fat ricotta as mentioned earlier.
HIGH PROTEIN CHEESECAKE JARS
- Total Time: 40 minutes
- Yield: 3 - 6 jars 1x
Description
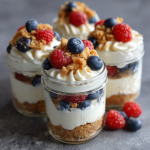
Craving cheesecake without the guilt? These high-protein cheesecake jars are creamy, fruity, and layered with goodness. Packed with Greek yogurt and cottage cheese, they deliver all the flavor and the fuel your body craves. Ready in minutes—perfect for meal prep, snacks, or when you just need a sweet win!
Ingredients
2 cups 2% MF cottage cheese
4 tablespoons maple syrup
3 cups full-fat plain Greek yogurt
2 cups crushed graham crackers
1 cup berries (or more, as desired)
Instructions
Blend Base: In a blender or food processor, blend cottage cheese, Greek yogurt, and maple syrup until smooth and creamy.
Layer Up: In small jars or cups, start with a layer of crushed graham crackers. Add a layer of the cheesecake mix, then a layer of berries. Repeat the layers if your jar allows.
Top It Off: Finish with a swirl of yogurt, a few fresh berries, and a sprinkle of crushed crackers or granola for texture.
Chill & Serve: Let it chill for at least 30 minutes or enjoy it right away if you can’t wait!
- Prep Time: 10 minutes
- Chill Time: 30 minutes
Nutrition
- Calories: 250-300 per Jar
- Fat: 10g per Jar
- Carbohydrates: 25g per Jar
- Protein: 20g per Jar
Fueling Your Fun: Nutritional Breakdown (Estimate Per Jar)
Based on recipe yielding 5 jars, using 2% cottage cheese, full-fat yogurt, and 1 cup berries.
- Calories: ~275
- Protein: 22g (Heck yeah!)
- Carbs: 28g (Includes natural sugars from fruit & syrup)
- Fat: 9g (Mostly healthy fats from dairy)
- Fiber: ~2g (Boost it with chia seeds in the crust!)
Note: Values vary slightly based on brands, exact fruit, and jar size. This is a high-protein, balanced snack!
Final Thoughts: Cheesecake Happiness, No Guilt Attached 🍓🍯
These High-Protein Cheesecake Jars prove that dessert can be both dreamy and nourishing. They’re quick to whip up, endlessly customizable, and sneak 20+ grams of protein into every jar without anyone suspecting a thing. Whether you’re meal-prepping for busy weekdays, looking for a post-gym treat, or just craving something creamy and cozy after dinner, these little jars check all the boxes.
What I love most? They don’t ask for perfection—just a blender, a few simple ingredients, and a willingness to play with flavors. Each jar feels like a gift to yourself (or whoever’s lucky enough to snag one before they’re gone). And honestly, nothing beats pulling one from the fridge at 3 PM, spoon in hand, knowing you’ve got indulgence and fuel in one bite.
So go ahead—layer, swirl, sprinkle, repeat. Because cheesecake should never come with guilt… only joy. 🥄✨