Mason Jar Ramen Pods: Your 5-Minute Ticket to Flavor Town (No Sad Noodles Allowed!)
Hey there, flavor adventurers! Jackson here from Food Meld. Raise your hand if you’ve ever stared into the depths of a sad, styrofoam cup of instant noodles, wishing it tasted… well, alive. 🙋♂️ Been there, survived that (barely). What if I told you we could transform that bland, salty emergency meal into something actually exciting? Something you’d crave? Enter the Mason Jar Ramen Pod: your new superhero for busy days, late-night study sessions, or “I just can’t adult today” moments.
Imagine this: You’ve got 5 minutes. You grab a gorgeous jar filled with colorful layers – golden noodles, vibrant freeze-dried veggies, savory miso paste, and little flavor bombs like sesame seeds and chili flakes. You pour boiling water over it, give it a stir, and BAM! In minutes, you’re slurping a steaming, deeply satisfying bowl of ramen that tastes like it took hours, not seconds. No weird chemical aftertaste. No mush. Just pure, comforting, real flavor that hugs you from the inside out.
This isn’t just meal prep; it’s your edible emergency kit. I designed these pods because I remember those days – rushing between classes, burning the midnight oil, or crashing after a hike. Real food shouldn’t be a luxury when time is tight. It’s about bringing together my love of bold, global flavors (hello, miso magic!) and making it stupidly simple. We’re talking pantry staples, a mason jar, and boiling water. That’s it. Ready to banish bland noodles forever? Let’s build some flavor-packed jars!
My Ramen Revelation: From Dorm Disaster to “Dang, That’s Good!”
Alright, story time! Picture this: College finals week. Me, buried under textbooks, surviving on cheap instant ramen and regret. One night, desperation (and hunger) hit hard. I stared at my sad noodle brick and thought, “What if I… jazz this up?” I raided my tiny dorm fridge. Found some leftover miso paste from a sushi night, a sad little scallion, half a packet of sesame seeds from who-knows-when, and some frozen peas (hey, it counts as a veggie!).
I dumped it all into my least chipped mug, added hot water, and prayed. What emerged wasn’t gourmet… but it wasn’t despair in a cup either! That weird little concoction had depth. The miso added umami richness the salty powder could only dream of. The peas popped with sweetness. The sesame seeds brought nutty crunch. It was a messy, glorious lightbulb moment!
That crazy dorm experiment sparked the idea for these pods years later. I wanted to capture that feeling of instant satisfaction without the instant regret – but make it reliable, portable, and actually delicious. It’s my ode to every student, every busy parent, every adventurer who needs real comfort, fast. No more settling. Just pure, slurpable joy, born from a midnight cram session and a rebellious dash of miso.
Building Your Flavor Bomb: What Goes Inside the Magic Jar
Here’s the beauty – it’s customizable! This is the base blueprint for one glorious jar. Feel like a mad scientist? Swap away! (See variations below!).
- 1/2 pack Ramen Noodles (uncooked, broken to fit): Skip the flavor packet! Look for plain ramen bricks (Asian markets are goldmines). Breaking them helps them hydrate evenly. Chef Hack: Snip them with kitchen shears right in the pack for less mess!
- 1 tsp Miso Paste (white or yellow): Your umami powerhouse! This fermented soybean paste is the secret to rich, savory broth. Find it near tofu/refrigerated sushi items. Sub: 1 tsp bouillon paste (chicken, veggie, or beef) in a pinch, or 1/2 tsp soy sauce powder mixed with 1/2 tsp nutritional yeast for depth.
- 1/2 tsp Soy Sauce Powder or 1 tsp Liquid Aminos (in a tiny sealed container): Salty, savory punch! Powder keeps things dry in the jar. Find soy sauce powder online or at well-stocked grocers. Sub: Pack 1 tsp liquid soy sauce/tamari/liquid aminos separately in a mini container or baggie stuck to the jar lid.
- 1/4 cup Freeze-Dried Vegetables: Color, texture, nutrients! Look for blends with carrots, corn, peas, spinach, mushrooms. They rehydrate beautifully. Chef Insight: Avoid fresh veggies here – they’ll spoil! Freeze-dried is the only way for shelf-stable pods.
- 1 tsp Sesame Seeds: Essential nutty crunch & aroma! Toast them lightly beforehand for even more flavor (just cool before adding).
- Pinch of Garlic Powder & Chili Flakes (Optional but HIGHLY recommended): Flavor layers! Garlic adds depth, chili flakes bring adjustable heat. Start small, you can add more later!
- Optional Flavor Boosters: Go wild!
- Dehydrated Tofu Cubes: Adds plant-based protein. Find them or make your own!
- Nori Flakes or a small square of dried seaweed: Classic ramen ocean flavor.
- Dried Scallions or Chives: Fresh oniony kick after hydrating.
- Pinch of Ginger Powder: Warm, bright note.
- 1/4 tsp Toasted Sesame Oil (packed separately): Drizzle on top AFTER cooking for incredible aroma.
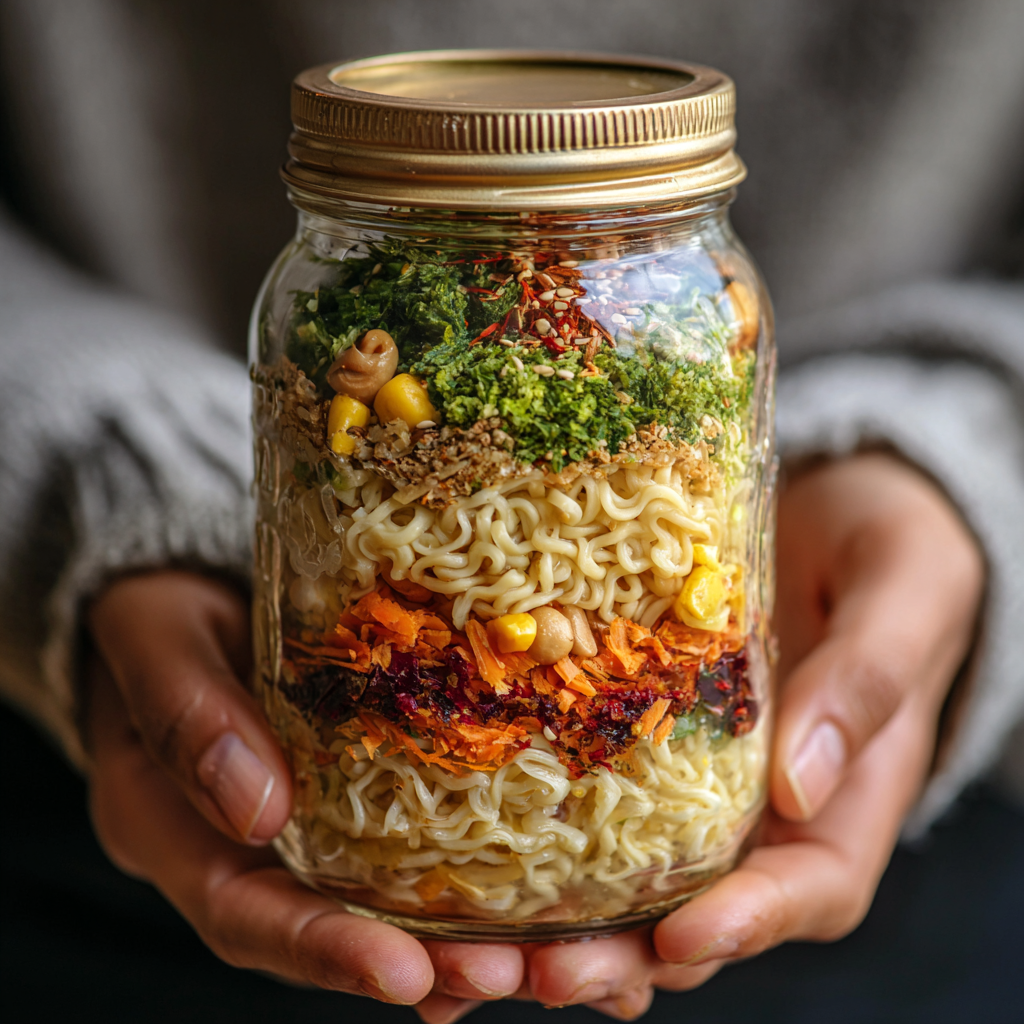
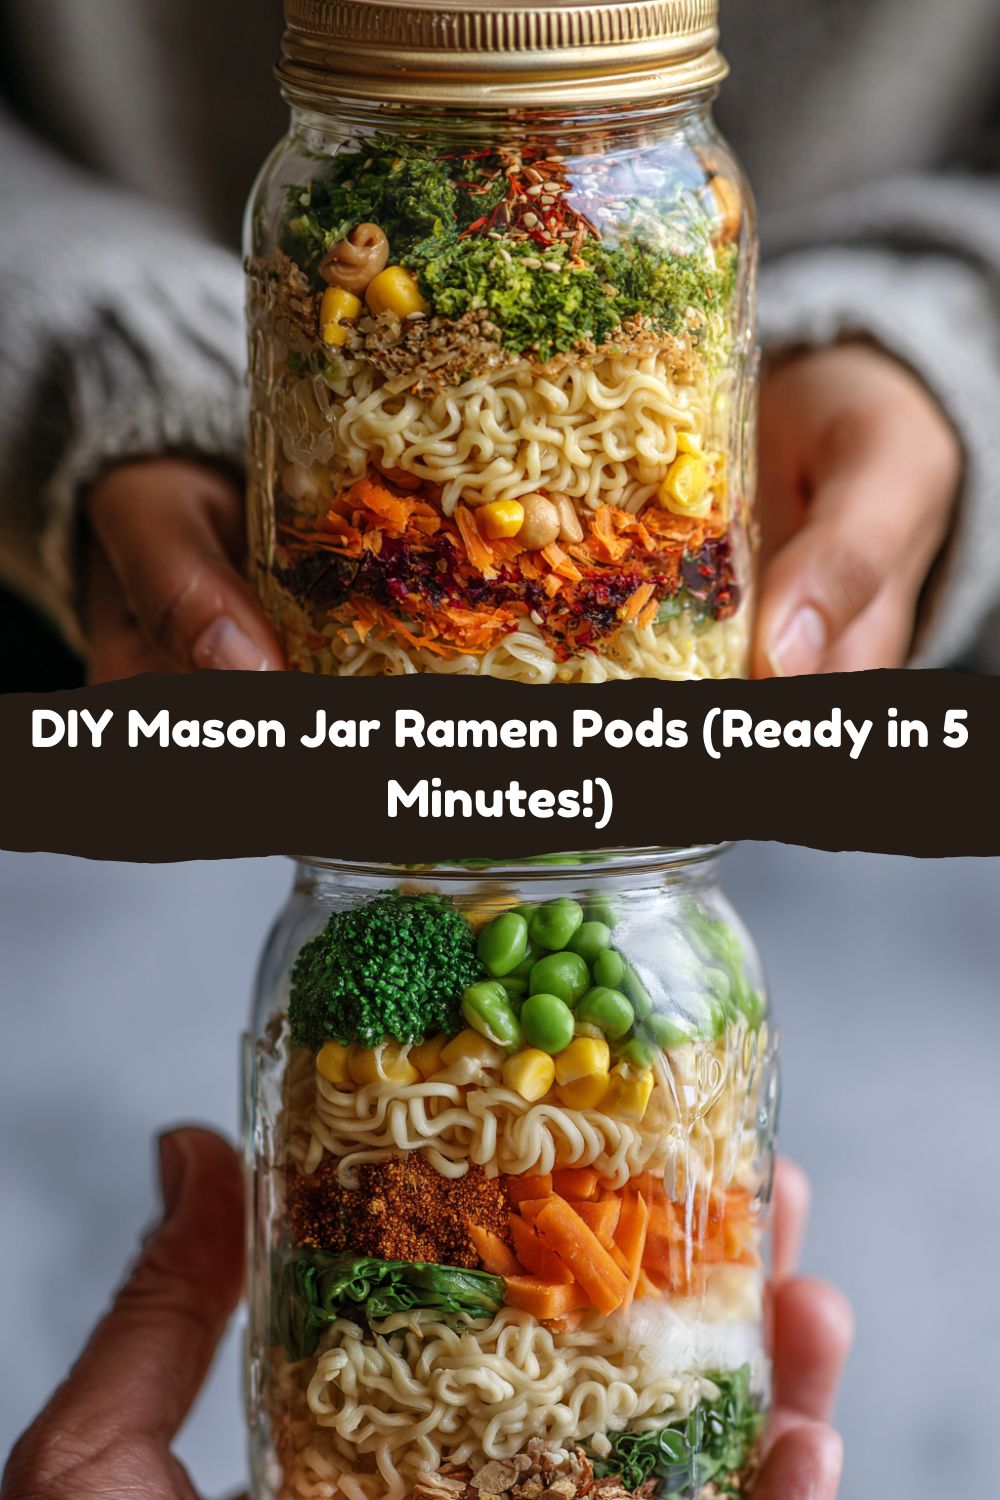
Assembly Line Fun: Building & Brewing Your Ramen Pods
This is where the magic happens! Grab some wide-mouth pint-sized (16oz) mason jars – the wide mouth is KEY for easy layering and eating. Let’s build:
- Start with the Base (The Flavor Foundation): Spoon the miso paste (or bouillon paste) directly into the bottom of the clean, dry jar. Add the soy sauce powder (if using) right on top. Why? The boiling water hits this first, dissolving it instantly into a flavorful broth base. If using liquid aminos/soy sauce, DON’T put it in the jar now. Pack it separately!
- Layer the Seasonings (The Aroma Squad): Sprinkle the garlic powder and chili flakes (if using) over the miso. Add any powdered ginger or other dry spices here too. They mingle with the base and infuse the broth.
- Add the Noodles (The Star of the Show): Break the ramen noodles into smaller pieces (aim for chunks roughly 1-2 inches). Carefully place them over the seasonings, creating a relatively even layer. Try not to crush them too much! Pro Tip: Pushing them down gently helps them stay submerged later.
- Top with Veggies & Seeds (The Color & Crunch Crew): Now, pile on the freeze-dried veggies. Sprinkle the sesame seeds generously over the veggies. Add any dehydrated tofu, nori flakes, or dried scallions now too. Why here? This keeps the veggies and delicate toppings from sinking into the broth too early, helping them hydrate perfectly and stay visually appealing. The sesame seeds toast slightly from the steam!
- Seal & Store (Your Future Self Says Thanks!): Screw the lid on tightly! Label if you’re making different flavors. Store at room temperature in a cool, dark pantry for up to 2 weeks, or refrigerate for up to 5 days for maximum freshness. Chef Hack: Add a tiny oxygen absorber packet under the lid for even longer shelf life (find them online for canning).
- The Grand Reveal (Eating Time!): When hunger strikes, remove the lid. If you have separate liquid aminos/soy sauce or sesame oil, have it ready. Carefully fill the jar with freshly boiled water to just below the rim (about 1 1/2 cups). Immediately stir vigorously with a fork or chopstick, scraping the bottom to dissolve all that miso goodness. CRITICAL STEP: Put the lid back on loosely (don’t screw it tight!) or cover the jar with a small plate. Let it steam and hydrate for 3-5 minutes (3 for al dente, 5 for softer).
- Final Flair & Devour: Remove the lid/cover. Stir everything again thoroughly. Taste! Add your reserved liquid aminos/soy sauce or a drizzle of sesame oil if you like. Adjust with extra chili flakes or a splash of water if too strong. Grab your fork or chopsticks, and enjoy right from the jar – the ultimate minimalist bowl!
Slurp in Style: Serving Your Mason Jar Masterpiece
The beauty? The jar IS the bowl! Embrace the rustic charm. For maximum enjoyment:
- Garnish Galore (Optional but Fun): If you packed extras like nori or scallions, they’re already in there! Feeling fancy post-hydration? Add a sprinkle of fresh chopped cilantro, a squeeze of lime, or a soft-boiled egg (if you have one handy!).
- Hold the Heat: The jar gets HOT! Use a towel, cozy, or sleeve to hold it comfortably while eating. Safety First!
- Chopsticks or Fork? Whatever floats your boat! I love chopsticks for the authentic ramen experience, but a fork works perfectly for fishing out every last noodle and veggie.
That’s it! No dishes (just rinse the jar!), no fuss, just steaming, satisfying ramen wherever you are.
Make It Your Own: Flavor Twists & Dietary Swaps
Don’t stop at basic! These pods are your canvas. Get creative:
- Spicy Miso Kick: Add 1/4 tsp gochujang (Korean chili paste) with the miso + extra chili flakes. Top with dehydrated kimchi bits if you have them!
- Lemongrass-Ginger Zing: Swap miso for 1 tsp Thai yellow curry paste. Add 1/4 tsp lemongrass powder and 1/4 tsp ginger powder with the seasonings. Top with freeze-dried bell peppers.
- Creamy Coconut Dream (Vegan!): Replace miso with 1 tsp vegan bouillon paste. Add 1 tbsp full-fat coconut milk powder with the seasonings. Use freeze-dried mushrooms and edamame. Heavenly!
- Chicken Noodle Comfort (Gluten-Free Option): Use gluten-free ramen noodles. Swap miso for 1 tsp concentrated chicken broth paste. Add freeze-dried peas, carrots, and corn. Include dehydrated shredded chicken if available.
- Peanut Satay Surprise: Add 1 tbsp powdered peanut butter with the seasonings. Use a veggie bouillon base. Top with chopped peanuts (add AFTER hydrating for crunch).
Jackson’s Kitchen Confidential: Ramen Pod Wisdom
Okay, real talk. The first time I tested these, I got cocky. I layered the noodles on the BOTTOM. Big mistake! They soaked up all the miso paste before the water even hit it, creating a weird, gloppy mess underneath. Lesson learned: Miso goes first, noodles go in the middle! It’s all about the order, folks.
I also learned freeze-dried corn rehydrates like a dream, but broccoli? Not so much – it stays weirdly tough. Stick to carrots, peas, corn, spinach, mushrooms. Trust me.
These pods have become my go-to gift for college-bound nieces/nephews and busy friends. I make big batches, tie a ribbon around the jar with cooking instructions, and boom – instant hero status. Watching someone’s skeptical face transform into pure delight after that first slurp? Priceless. It’s why I do this – making real flavor accessible and fun.
Pro-Tip Evolution: I started adding that pinch of garlic powder on a whim during testing. It seemed insignificant, but WOW did it round out the flavor. Never underestimate the tiny touches!
Ramen Pod Rescue: Your Questions Answered
Q: Why does my broth taste weak or watery?
A: Flavor fail? Likely culprits:
-
You didn’t stir well enough—miso/bouillon hides at the bottom!
-
Your water wasn’t boiling hot (crucial for full flavor extraction).
-
You added too much water. Stick to 1½ cups max for a pint jar.
Fix: Next time, stir harder, use fresh-boiled water, and don’t overfill the jar. Still too mild? Add an extra ½ tsp miso or bouillon next round!
Q: My noodles are still hard after 5 minutes. What gives?
A: Noodle drama? Here’s why:
-
Noodles were too big or thick.
-
Water wasn’t hot enough or cooled too quickly.
-
Some brands (like udon or whole wheat) take longer.
Fix: Break noodles into smaller pieces before packing. Try letting the sealed jar sit for 7–8 minutes. Still firm? Microwave (lid off!) in 20-second bursts.
Q: Can I use fresh vegetables instead of freeze-dried?
A: Unfortunately, no—for storage safety, you need freeze-dried or dehydrated veggies. Fresh veggies = excess moisture + spoilage risk.
Workaround: Add fresh toppings (like scallions, sprouts, lime) after you’ve poured the hot water in.
Q: My noodles got mushy and weird!
A: You might’ve:
-
Used thin or quick-cooking noodles (like rice noodles).
-
Let the jar sit too long before eating (overhydrated).
Fix: Use sturdier ramen-style noodles and enjoy within 5–7 minutes after hydrating. Try instant soba or yakisoba for a firmer bite!
Q: How can I make it less salty?
A: Totally doable!
-
Use low-sodium miso or bouillon.
-
Skip the soy sauce powder or aminos.
-
Add a squeeze of lime or rice vinegar for flavor without salt.
Q: Can I meal prep these for more than a few days?
A: Absolutely! Use dry, shelf-stable ingredients only (no fresh items inside). Store sealed pods:
-
In a cool, dry pantry for up to 2 weeks.
-
In the fridge (for extra safety) up to 5 days if using slightly perishable ingredients like sesame oil or tofu powder.
Pro Tip: Add a small oxygen absorber under the lid if gifting or storing long-term!
Q: Is this safe to eat if I packed it last week?
A: If all ingredients were dry (miso, powders, freeze-dried items), yes! Do a quick check:
-
No unusual smell?
-
No moisture inside?
-
No bloating lid or off-colors?
Then you’re good to go!
Q: Can I gift these?
A: YES! They make awesome gifts for college students, coworkers, campers, or new parents.
Wrap the jar with:
-
Instructions: “Add 1½ cups boiling water. Stir. Cover. Wait 5 mins. Stir again. Enjoy!”
-
A ribbon and a cute tag with the flavor name.
-
Bonus: Add a pair of disposable chopsticks and a packet of sesame oil or sriracha!
Nutrition Info (Per 1 Mason Jar Ramen Pod)
-
Calories: ~220
-
Protein: ~6g
-
Carbohydrates: ~30g
-
Fiber: ~3g
-
Sugar: ~2g
-
-
Fat: ~7g
-
Saturated Fat: ~1g
-
-
Sodium: ~750–950mg
(depending on miso and soy sauce powder brand)
🥢 Want to Customize?
Here’s how different add-ins affect nutrition:
-
+1 tsp sesame oil: +40 calories, +4.5g fat
-
+1 tbsp powdered peanut butter: +25 calories, +1g protein, +1g fat
-
+¼ cup dehydrated tofu: +40 calories, +4g protein, +2g fat
-
+soft-boiled egg (optional garnish): +70 calories, +6g protein, +5g fat
💡 Lower sodium tips:
-
Use low-sodium miso or broth paste
-
Skip soy sauce powder and add a squeeze of fresh lime instead
-
Go easy on bouillon bases—many are salt bombs!

Mason Jar Ramen Pods
- Total Time: 5 minutes
- Yield: 1 jar 1x
Description
Say goodbye to bland instant noodles! These DIY ramen pods stack dried noodles, savory miso paste, freeze-dried veggies, and bold seasonings in a stylish mason jar—just add hot water and stir for a warm, slurp-worthy lunch. Made for busy students who want fast comfort food with real flavor.
Ingredients
1/2 pack ramen noodles (uncooked and broken to fit)
1 tsp miso paste or bouillon base
1/2 tsp soy sauce powder or liquid aminos (in a tiny container)
1/4 cup freeze-dried vegetables (carrots, corn, peas, spinach)
1 tsp sesame seeds
Pinch of garlic powder and chili flakes (optional)
Optional toppings: dehydrated tofu, nori flakes, or scallions
Instructions
Layer ingredients in a wide-mouth mason jar: start with miso paste, then seasonings, noodles, and top with veggies and seeds.
Seal and store at room temp or refrigerate for up to 5 days.
To eat, fill jar with boiling water, stir well, and cover for 3–5 minutes.
Stir again, and enjoy straight from the jar!
- Prep Time: 5 minutes
Nutrition
- Calories: 280/ Jar
- Carbohydrates: 35g/ Jar
- Protein: 7g/ Jar
Final Thoughts: Slurp-Worthy Flavor Without the Fuss 🍜✨
Let’s be real—life moves fast, but that doesn’t mean your meals have to taste like it. These Mason Jar Ramen Pods are your delicious rebellion against bland, boring instant noodles. They’re thoughtful, flexible, ridiculously easy, and packed with real-deal flavor that meets you wherever you are—work, school, the great outdoors, or your cozy kitchen.
What started as a dorm-room experiment turned into a little love letter to flavor seekers everywhere. And whether you’re stacking a dozen in your pantry or gifting a few to friends, you’re not just prepping food—you’re crafting little jars of edible joy.
So go on, boil that water, give it a stir, and savor the heck out of those five minutes. Because dinner doesn’t have to be fancy—it just has to make you feel good. And this? This is ramen that hugs back.
— Jackson
Food Meld | Stir. Slurp. Smile.


