# Indulge in Guilt-Free Heaven: Healthy Twix Bars Recipe
## Introduction
Hello, food lovers! It’s Jackson Walker here, the mastermind behind Food Meld. Today, I’m so excited to share a recipe that’ll not only satisfy your sweet tooth but also make you feel good about indulging—Healthy Twix Bars! Now, I know what you might be thinking: "How can a dessert be healthy and taste amazing?" Well, my friends, today I'm here to prove just that. With a perfect crunch, creamy filling, and rich chocolate coating, these bars bring a delightful twist to a classic favorite—all while being gluten-free and made with wholesome ingredients.
Back when I was in college, late-night snack cravings were a frequent and fundamental part of my routine. I remember discovering that sweet and salty combo—my go-to snack was always something chocolatey. Whether it was tearing into a fun-sized Twix bar or sinking my teeth into rich chocolate fudge, these treats were instant happiness in a wrapper! But alas, as my cooking journey evolved, I realized I could take the flavors I loved and elevate them into something healthier. Thus, the quest for the ultimate guilt-free dessert began.
In today’s recipe, we're mixing the nostalgia of those candy bars with wholesome ingredients that your body will thank you for. You won’t have to feel guilty about licking the bowl clean (I do it all the time, and I don’t regret a thing!). So, grab your apron, preheat your oven, and let’s create some delicious Healthy Twix Bars together. Your friends and family won't believe these are gluten-free—trust me!
## Personal Story
Before we get into the nitty-gritty of making these delightful bars, let me take you back to my childhood. I was probably around six years old, sitting on my grandma’s kitchen counter, watching her whip up her famous homemade chocolate treat. The smell of melted chocolates cascading off her stovetop into perfectly tempered forms was enough to get any kid’s heart racing! I still remember her cheeky smile as she’d say, "If you can imagine it, you can create it!"
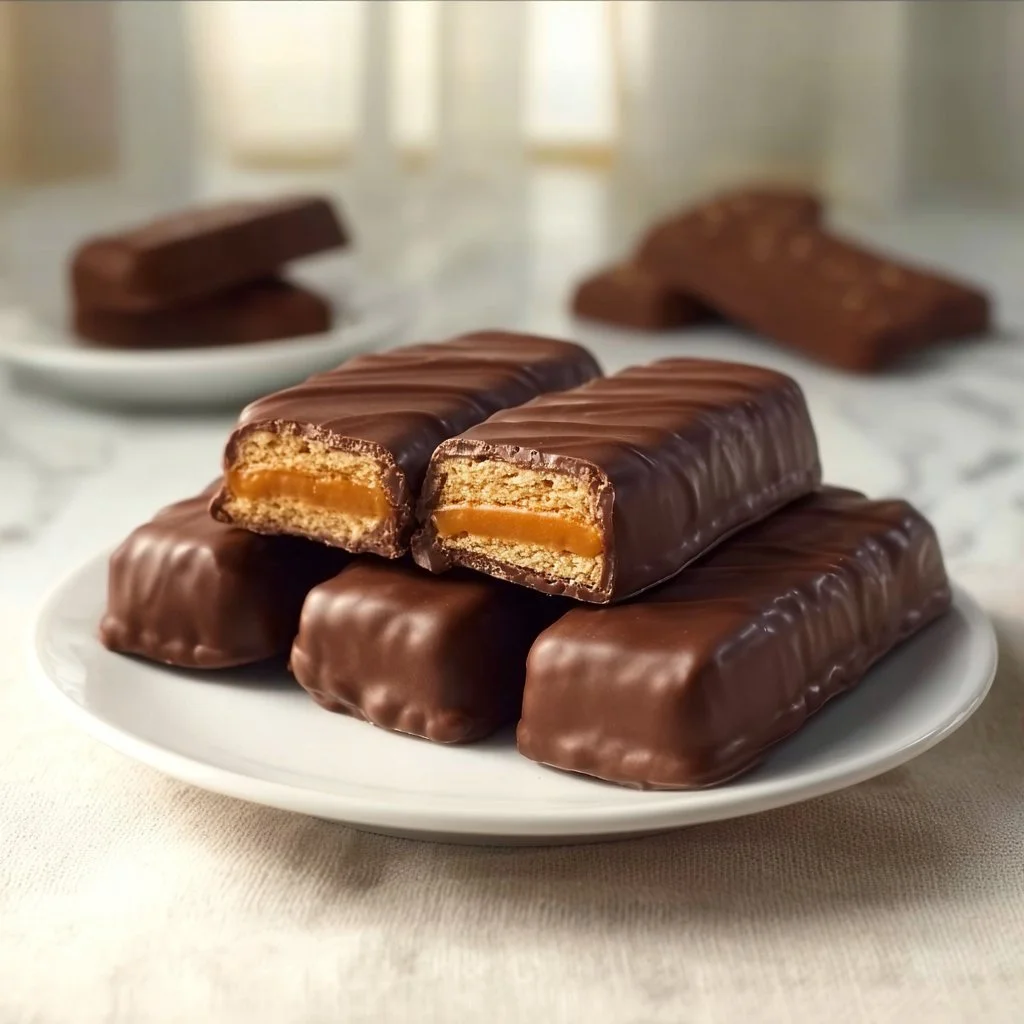
One day, as a fun surprise, she made me a version of Twix bars at home. I was hooked! Crunchy biscuit bases drizzled with silky chocolate and a gooey caramel layer—what more could a kid want? Well, fast forward to today, and that experience has stuck with me. Now, I aim to capture that same joy while sneaking in healthier alternatives. What’s even better is that I can share it with all of you! When cooking, it's those beautiful memories that inspire creativity and drive my passion to show everyone that cooking can heal, connect, and, most importantly, please the palate.
## Ingredients
Now, let’s dive into the ingredients that will shape our Healthy Twix Bars. You'll love how simple and wholesome these items are!
- **1 ½ cups Almond Flour**: This low-carb flour gives our base that satisfying crunch. If you’d like to switch things up, feel free to use coconut flour; just be cautious with the quantity—coconut flour absorbs more moisture.
- **3 tbsp Butter (melted)**: We use butter here to add richness to our bar. For a dairy-free version, try using coconut oil or a vegan butter substitute.
- **1 ½ tbsp Maple Syrup**: This natural sweetener brings just the right amount of sweetness! If you don’t have maple syrup on hand, honey or agave can step in, but note that they may alter the flavor slightly.
- **½ tsp Vanilla Extract**: Who doesn’t love a splash of vanilla? It enhances all the flavors in our bars! Feel free to experiment with almond extract for a nutty twist.
- **¼ tsp Salt**: A little salt elevates the sweetness, balancing the flavors beautifully.
- **1 cup Creamy Peanut Butter**: This is the heart of our filling! Go for a natural peanut butter to keep things wholesome. If you’re allergic to nuts, sunflower seed butter or cashew butter work too!
- **1/3 cup Maple Syrup**: To sweeten the filling perfectly. Remember, it’s all about finding that balance—too much and it can get overly sweet.
- **1 tsp Vanilla Extract**: This lovely touch complements peanut butter like a match made in heaven.
- **¼ cup Almond Flour**: Just a bit to bind our fillings together.
- **1 cup Chocolate Chips**: Chocolate makes everything better! Semi-sweet or dark chocolate adds richness. Want to make it dairy-free? Choose vegan chocolate chips!
- **1 ½ tbsp Coconut Oil**: This adds a silky texture when melting your chocolate. Plus, it helps with the chocolate coating.
## Step-by-Step Instructions
Alright, it’s time to bring all these ingredients together! Here are your step-by-step instructions to create your Healthy Twix Bars.
### Step 1: Preheat and Prepare
Preheat your oven to 350°F (175°C). Line an 8x8 inch baking dish with parchment paper, letting the edges hang over for easy removal later. This is a little chef hack for easy clean-up—go for parchment over foil; it won’t stick!
### Step 2: Make the Base
In a mixing bowl, combine 1 ½ cups of almond flour, melted butter, 1 ½ tbsp maple syrup, ½ tsp vanilla extract, and ¼ tsp salt. Use a fork or a spatula to mix these until well combined. It should resemble dough—hold it firmly and press it into the bottom of your prepared baking dish. This is where the crust forms, so make sure it’s snug and evenly spread out.
### Step 3: Bake the Base
Slide the baking dish into the oven and let it bake for about 10-12 minutes until it's slightly golden. This step will give you that crunchy texture reminiscent of a Twix, so keep an eye on it!
### Step 4: Create the Filling
While the base cools, let’s whip up that dreamy gooey filling! In another bowl, mix together the creamy peanut butter, 1/3 cup maple syrup, 1 tsp vanilla extract, and ¼ cup almond flour. Stir the mixture until it’s fully combined. It should be thick and spreadable; if it’s not, give it a little more elbow grease. Taste and adjust the sweetness if needed—you control the flavor!
### Step 5: Layer the Peanut Butter
Spread the peanut butter filling evenly over the cooled crust layer. Use a spatula to press it down gently. It’s a delicious sight already—don’t be shy; taste a smidge!
### Step 6: Melt the Chocolate
Next up, let’s create the chocolate bliss. In a microwave-safe bowl, combine the chocolate chips and coconut oil. Microwave in short bursts (around 30 seconds) and stir in between until smooth. Alternatively, use a double boiler if you want to go all-out gourmet!
### Step 7: Coat the Bars
Pour or drizzle the melted chocolate over the peanut butter layer. Make sure to cover it entirely; the chocolate is the crown on this delicious creation! Once coated, set the dish in the refrigerator for about 30 minutes or until the chocolate has fully set.
### Step 8: Slice and Serve
Once set, remove your Healthy Twix Bars from the baking dish using the parchment paper. Slice it into bars or squares, depending on your preferred serving size. I like to serve them chilled, but they’re delightful at room temperature too!
## Serving Suggestions
To plate your Healthy Twix Bars beautifully, consider serving them on a striking platter next to fresh fruit like strawberries or a scoop of dairy-free ice cream if you're in the mood for some extra decadence. Drizzle caramel or chocolate sauce (make sure it’s vegan if needed) over the top for an extra flair. And don't forget to garnish with a few sea salt flakes for that fancy touch!
## Recipe Variations
Here are some creative twists to make your Healthy Twix Bars your own:
1. **Nut-Free Alternative**: Swap out the peanut butter for sunflower seed butter or tahini for a nut-free version.
2. **Spicy Kick**: Add a pinch of cayenne pepper to the peanut butter filling for a surprising twist that packs a punch!
3. **Add some Crunch**: Fold in chopped nuts like almonds or pecans into the peanut butter filling for added texture.
4. **Caramel Swirl**: Drizzle some homemade date caramel over the peanut butter layer before adding the chocolate topping for an added layer of flavor.
5. **Minty Fresh**: Add a few drops of peppermint extract to the chocolate for a refreshing mint flavor—think Thin Mints but in bar form!
## Chef’s Notes
Cooking is as much about the journey as it is about the final product. These Healthy Twix Bars have gone through quite an evolution in my kitchen. It started as a simple craving for something sweet, and through various trials and taste tests, they’ve evolved into a go-to treat for family get-togethers or late-night snack attacks. I remember the first time I brought them to a gathering, and people kept asking for more. I couldn’t help but grin as I let them in on the secret that these bars were actually good for them.
Pulling it all together, cooking is a reminder we can create joy in the kitchen, share it with others, and enjoy composing delicious symphonies of flavor.
## FAQs and Troubleshooting
1. **Can I use a different flour?**
Absolutely. While almond flour provides excellent flavor and texture, you can also experiment with oat flour to maintain that gluten-free aspect. However, results may vary.
2. **What if my chocolate doesn’t melt smoothly?**
Don’t stress! If it seizes or clumps, add a tiny splash more coconut oil and gently reheat it in short bursts. Be patient; chocolate can be temperamental!
3. **How do I store the bars?**
Keep your bars in an airtight container in the fridge. They’ll last for about a week—if they last that long!
4. **Can I freeze them?**
Absolutely! Wrap individual bars in parchment paper and store them in an airtight container or freezer bag. They freeze beautifully for up to three months—perfect for those cravings!
## Nutritional Info
These Healthy Twix Bars aren’t just guilt-free; they’re a healthier alternative packed with nutrients! Here’s a rough nutritional breakdown for each bar (based on cutting 12 bars from this recipe):
- **Calories**: 180
- **Protein**: 4g
- **Carbohydrates**: 12g (net carbs 8g)
- **Fat**: 14g
- **Fiber**: 2g
- **Sugar**: 4g
Note that these values can vary based on the specific brands and ingredients you use, so it’s always a good idea to adjust according to your lifestyle and dietary needs.
## Final Thoughts
Cooking shouldn’t be something that intimidates you—it should be a joyful adventure! With these Healthy Twix Bars, I hope you've found inspiration to experiment and create delicious memories in your own kitchen. Just remember: a little creativity, love, and some solid ingredients can come together to produce something utterly delightful.
So the next time you’re feeling a bit of that sweet tooth tugging at you, just whip up a batch of these bars and settle in for a slice of happiness. If you try this recipe, share your creations and thoughts with me. I absolutely love connecting with you and hearing about your culinary experiences. Until next time, keep cooking awesome food and enjoy every bite!

Healthy Twix Bars
- Total Time: 45 minutes
- Yield: 12 servings 1x
- Diet: Gluten-Free
Description
Indulge in these guilt-free Healthy Twix Bars that combine crunchy almond flour, creamy peanut butter, and rich chocolate for a wholesome treat.
Ingredients
Scale
- 1 ½ cups Almond Flour
- 3 tbsp Butter (melted)
- 1 ½ tbsp Maple Syrup
- ½ tsp Vanilla Extract
- ¼ tsp Salt
- 1 cup Creamy Peanut Butter
- 1/3 cup Maple Syrup
- 1 tsp Vanilla Extract
- ¼ cup Almond Flour
- 1 cup Chocolate Chips
- 1 ½ tbsp Coconut Oil
Instructions
- Preheat your oven to 350°F (175°C). Line an 8×8 inch baking dish with parchment paper.
- In a mixing bowl, combine almond flour, melted butter, maple syrup, vanilla extract, and salt until well combined and resembles dough.
- Bake for 10-12 minutes until slightly golden.
- While the base cools, mix together peanut butter, maple syrup, vanilla extract, and almond flour until fully combined.
- Spread the peanut butter filling evenly over the cooled crust.
- Combine chocolate chips and coconut oil in a microwave-safe bowl and melt until smooth.
- Pour or drizzle the melted chocolate over the peanut butter layer.
- Refrigerate for about 30 minutes until chocolate is set. Slice into bars and serve.
Notes
For a dairy-free version, swap butter for coconut oil. Store bars in an airtight container in the fridge for up to a week or freeze for up to three months.
- Prep Time: 15 minutes
- Cook Time: 12 minutes
- Category: Dessert
- Method: Baking
- Cuisine: American
Nutrition
- Serving Size: 1 bar
- Calories: 180
- Sugar: 4g
- Sodium: 50mg
- Fat: 14g
- Saturated Fat: 4g
- Unsaturated Fat: 8g
- Trans Fat: 0g
- Carbohydrates: 12g
- Fiber: 2g
- Protein: 4g
- Cholesterol: 15mg
Keywords: Healthy Twix Bars, gluten-free dessert, guilt-free candy


