Easter Egg Nest Tarts: A Sweet Celebration with Kataifi Pastry
Spring is in the air, and Easter is around the corner, bringing along a tide of colorful eggs, family gatherings, and bountiful feasts. It’s that time of year when we gather around the table with loved ones, sharing laughter and creating sweet memories. Among the myriad of delightful treats that grace our tables, there’s one that always steals the show and has a special place in my heart: Easter Egg Nest Tarts made with delicate Kataifi pastry.
When I think of this dessert, I am transported back to my childhood, helping my grandma in the kitchen, her hands expertly twisting and turning the thin, shredded dough of Kataifi as she shared stories and family traditions. Those moments were filled with the warm scents of sweet, baked goodness, and the excitement of decorating nests with speckled chocolate eggs! I remember the joy of creating something with my own hands and the pride of seeing the smiles on everyone’s faces when it was time for dessert.
This Easter, join me in making these irresistible Easter Egg Nest Tarts that not only taste fantastic but also bring back that heartfelt nostalgia. These tarts showcase flaky Kataifi pastry, rich Nutella, and vibrant mini speckled chocolate eggs, all coiled into one delicious bite. So, whether you’re hosting a grand Easter brunch or enjoying a quiet holiday with loved ones, let’s make something unforgettable together.
Personal Story
When I was around seven, my grandma decided that I was finally old enough to help her in the kitchen. That Easter, she taught me how to make her famous Easter Egg Nest Tarts. I’ll never forget the look on her face when I successfully twisted the Kataifi dough into those charming nests. I felt like a kitchen rockstar!
The best moment, though, was decorating the nests. We would lay out a rainbow of mini chocolate eggs, and I would take my sweet time, carefully placing each one. My grandma would chuckle and point out that there’s no right or wrong way to decorate them; it’s all about letting my creativity flow. It was such a liberating feeling to transform something simple into something special, and it made me fall in love with cooking all over again.
Years later, I still hear my grandma’s laughter and feel her encouragement every time I make these Easter Egg Nest Tarts. It’s not just about the dessert; it’s about sharing love and tradition, and creating sweet memories that we carry forward. Let’s dive into this delightful recipe that’s sure to become a cherished part of your family’s Easter celebration, adding a sprinkle of joy to your table!
Ingredients
To create these gorgeous Easter Egg Nest Tarts, you’ll need the following ingredients:
-
Kataifi Pastry (1 package)
- Chef’s Insight: Kataifi pastry is a shredded, delicate dough that crisps up beautifully when baked. If you can’t find it, phyllo pastry is a good substitute, but it’ll require a different method of assembly.
-
Unsalted Butter (1/2 cup, melted)
- Substitution Tip: If you’re looking for a dairy-free option, coconut oil can work well here, giving a subtle flavor that complements the chocolate nicely.
-
Nutella (1 cup)
- Quick Insight: You can swap Nutella for any thick chocolate spread or even a homemade chocolate ganache if you’re feeling adventurous.
-
Mini Speckled Chocolate Eggs (1 cup)
- Flavor Options: Variety is the spice of life. Use dark chocolate, milk chocolate, or even pastel-colored candy-coated chocolate eggs to enhance the festive vibe!
-
Powdered Sugar (for dusting)
- Tip: This adds a lovely finish to your tart nests. Happy presentation always enhances the eating experience!
Step-by-Step Instructions
Now that we’ve gathered our ingredients let’s whip up these delightful Easter Egg Nest Tarts. Follow these steps, and you’ll have a kitchen full of sweet aromas and a heart full of joy!
Step 1: Preheat the Oven
Preheat your oven to 375°F (190°C). This ensures that your tarts bake evenly and achieve that golden brown finish we all adore.
Step 2: Prepare the Kataifi Pastry
Take the Kataifi pastry out of the package and gently separate the strands. It may seem a bit tricky at first, but I promise it’s a fun process! If you find any very long strands, you can easily snip them with kitchen scissors.
Step 3: Create the Tart Shells
Next, take a muffin tin and lightly grease it with cooking spray or butter to prevent sticking. Begin to grab small handfuls of the Kataifi strands and nestle them into the muffin cups, forming a cup shape by pressing lightly on the sides and bottom.
- Chef Hack: For a crispier texture, toss the strands in the melted butter before pressing them into the muffin tin. This will not only help them hold their shape but also give that beautiful golden finish when baked.
Step 4: Bake the Nests
Once your tart shells are ready, pop them in the oven and bake for about 15–20 minutes, or until they are golden brown and crispy. Keep a watchful eye, as oven times may vary. The smell will begin to waft through your kitchen—such a rewarding moment!
Step 5: Let Them Cool
After baking, remove the tart shells from the oven and allow them to cool in the muffin tin for about 10 minutes before gently transferring them to a wire rack to cool completely.
Step 6: Fill with Nutella
Once your nests are cooled, it’s time for the fun part: filling them with Nutella! Use a piping bag or a spoon to generously add Nutella to each nest.
- Tip: Warm up the Nutella slightly in the microwave for about 15 seconds to make it easier to spread. You could also sprinkle a touch of sea salt on top for a sweet-salty twist!
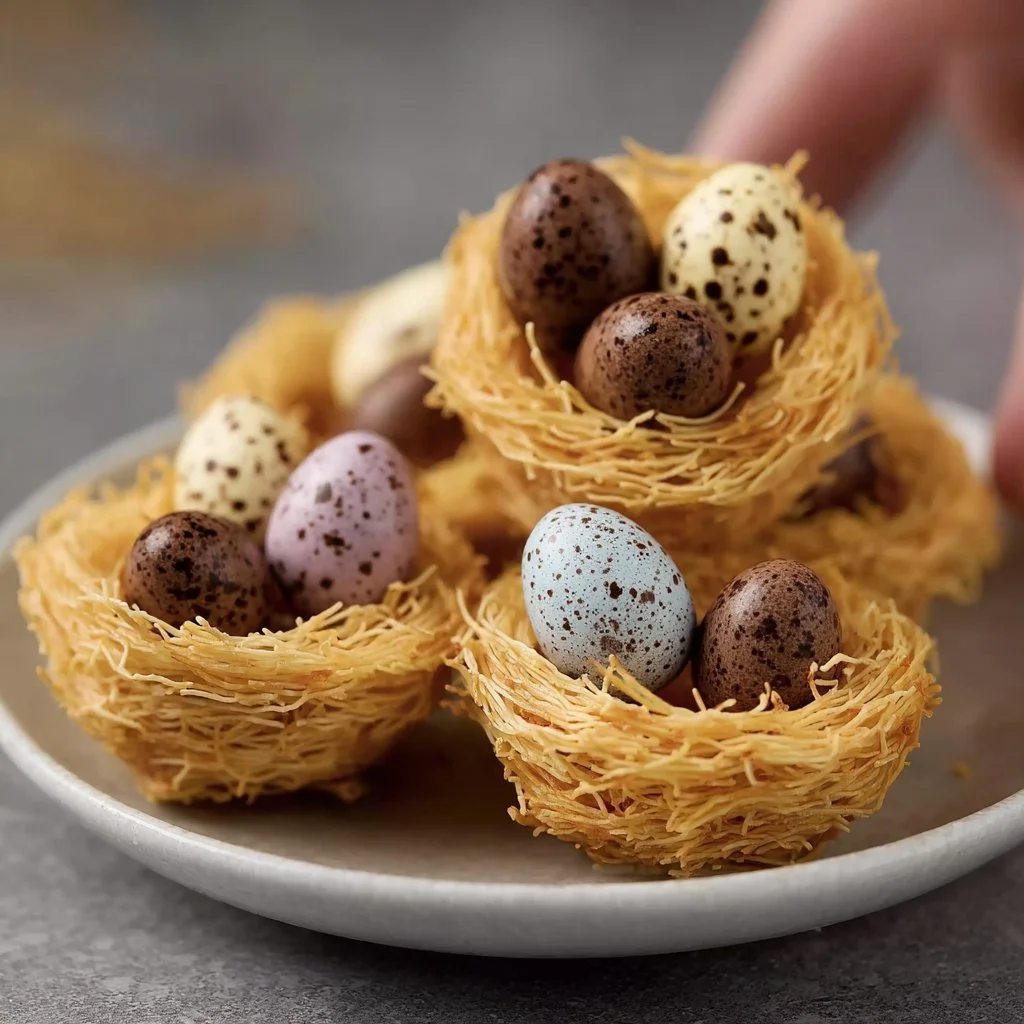
Step 7: Decorate with Chocolate Eggs
Now, it’s decoration time! Place 3–4 mini speckled chocolate eggs into each Nutella-filled nest.
- Chef Insight: Don’t be shy—mix and match colors and flavors of the eggs! Your creativity here will elevate the visual appeal of your tarts.
Step 8: Dust with Powdered Sugar
Before serving, lightly dust the tarts with powdered sugar for that charming, final touch. It adds an extra layer of sweetness and a beautiful presentation!
Serving Suggestions
When it comes to presentation, remember that first impressions matter in the culinary world! Serve your Easter Egg Nest Tarts on a vibrant, spring-themed platter or cake stand for a festive touch. To elevate the experience, consider garnishing with some fresh mint leaves or edible flowers for that pop of color and freshness.
For an added touch, pair these tarts with a rich vanilla ice cream or a dollop of whipped cream on the side. This delightful combination will surely become a crowd-pleaser, enticing everyone to linger at the table just a little bit longer.
Recipe Variations
Feeling adventurous? Here are some exciting twists you could try to customize your Easter Egg Nest Tarts:
-
Peanut Butter Chocolate Swirl: Instead of just Nutella, swirl in some smooth peanut butter for that delicious chocolate-peanut butter combination.
-
Fruit Infusion: Layer a few slices of fresh strawberries or raspberries beneath the Nutella for a fresh, fruity bite that balances the sweetness.
-
Lemon Zest: For a zesty twist, mix in some lemon zest with your Nutella. The tangy hint will take your flavor profile up a notch!
-
Nutty Delight: Sprinkle in some chopped nuts, like pistachios or hazelnuts, into the Nutella before adding the chocolate eggs for that crunchy texture.
-
Vegan Option: Use a vegan chocolate spread and replace the butter with coconut oil along with dairy-free chocolate eggs for an entire plant-based treat!
Chef’s Notes
These Easter Egg Nest Tarts have become a staple in my holiday repertoire! Over the years, I’ve adapted this recipe, experimenting with different fillings and flavors. One day, I even dared to add a splash of orange zest to the Nutella, and the burst of citrus took it to an entirely new level.
Honestly, the best part about this recipe is its flexibility. Each year, I incorporate new ideas and flavors; it’s an ongoing adventure that keeps it fresh and exciting. Plus, there’s nothing quite like the smiles on people’s faces as they bite into these delectable treats.
FAQs and Troubleshooting
1. Can I make the Kataifi nests ahead of time?
Absolutely! You can prepare and bake the Kataifi nests a day ahead. Just store them in an airtight container at room temperature. Then, fill them with Nutella and top with chocolate eggs just before serving.
2. What if my Kataifi pastry is dry?
If your Kataifi pastry feels a bit dry, mist it lightly with water or butter before assembling. It’ll become more pliable and easier to work with.
3. Can I freeze these tarts?
I wouldn’t recommend freezing them fully assembled since the chocolate and crispy pastry don’t hold up well together after thawing. However, you can freeze the baked nests and fill them with Nutella and eggs when you’re ready to serve.
4. My tarts fell apart when removed from the pan. What can I do?
Ensure that you greased your muffin tins well and let the nests cool completely before attempting to remove them. If they still fall apart, don’t sweat it—serve them as delicious deconstructed nests!
Nutritional Info (per serving)
- Calories: 200
- Carbohydrates: 22g
- Protein: 2g
- Fat: 12g
- Saturated Fat: 7g
- Sugar: 10g
- Fiber: 1g
(Note: Nutritional values will vary based on ingredient brands and measurements.)
Final Thoughts
As we approach Easter, let’s take a moment to embrace the spirit of joy, creativity, and togetherness that cooking brings. These Easter Egg Nest Tarts are more than just treats; they weave together memories of laughter, family, and the joy of creating something special right in our kitchens.
So gather your loved ones, put on your apron, and dive into the beautiful chaos that comes with cooking. I can’t wait to see how your Easter Egg Nest Tarts turn out—don’t forget to share your creations and stories! Here’s to celebrating food, family, and those unforgettable flavors that unite us. Happy Easter from all of us at Food Meld! Let’s make something awesome together!
Print
Easter Egg Nest Tarts
- Total Time: 35 minutes
- Yield: 12 servings
- Diet: Vegetarian
Description
Delicious tarts made with flaky Kataifi pastry, filled with Nutella and decorated with colorful mini chocolate eggs, perfect for Easter celebrations.
Ingredients
- Kataifi Pastry (1 package)
- Unsalted Butter (1/2 cup, melted)
- Nutella (1 cup)
- Mini Speckled Chocolate Eggs (1 cup)
- Powdered Sugar (for dusting)
Instructions
- Preheat your oven to 375°F (190°C).
- Gently separate the Kataifi pastry strands.
- Grease a muffin tin and form the Kataifi into cup shapes.
- Bake for 15–20 minutes until golden brown and crispy.
- Allow to cool in the tin for about 10 minutes.
- Fill each nest with Nutella.
- Decorate with mini chocolate eggs.
- Dust with powdered sugar before serving.
Notes
For a creamy filling, warm Nutella slightly in the microwave before adding to nests. You can also experiment with different flavors and fillings.
- Prep Time: 15 minutes
- Cook Time: 20 minutes
- Category: Dessert
- Method: Baking
- Cuisine: American
Nutrition
- Serving Size: 1 tart
- Calories: 200
- Sugar: 10g
- Sodium: 60mg
- Fat: 12g
- Saturated Fat: 7g
- Unsaturated Fat: 4g
- Trans Fat: 0g
- Carbohydrates: 22g
- Fiber: 1g
- Protein: 2g
- Cholesterol: 20mg
Keywords: Easter, dessert, tarts, Kataifi, Nutella, chocolate eggs, festive treats


