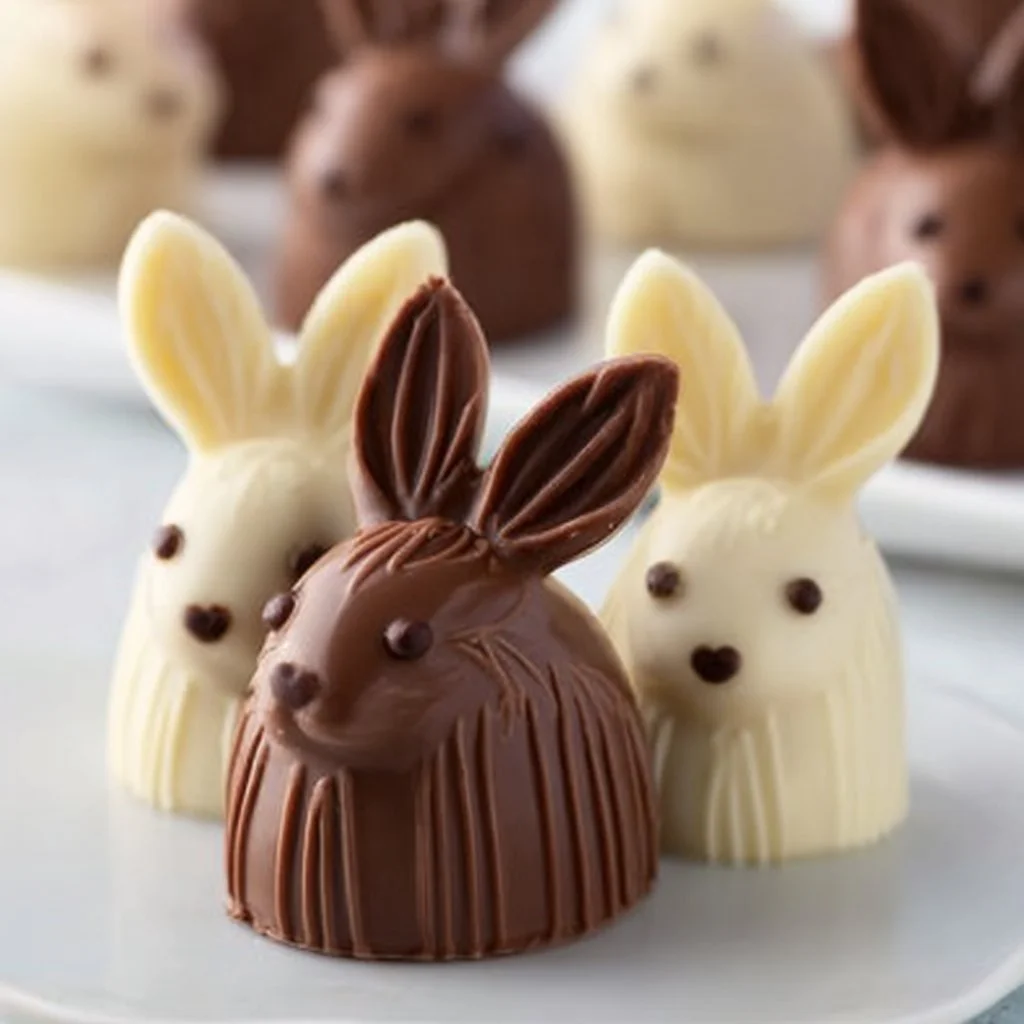
Bunny-Shaped Chocolate Truffles: Sweetness in Every Bite
Hey there, fellow foodies! 🐰 It’s Jackson Walker here, and I’m beyond excited to share a delightful treat that’s sure to hop straight into your heart—Bunny-Shaped Chocolate Truffles! Whether you’re celebrating Easter, throwing a quirky Halloween party, or just looking for a fun way to impress friends and family, these adorable little confections will steal the show.
Picture this: soft, velvety chocolate truffles taking on the charming form of bunnies, each one a bite-sized explosion of flavor. My inspiration for these sweet treats comes from the joyful times spent in the kitchen with loved ones during the holiday season. There’s something truly magical about creating desserts that not only taste incredible but also bring a smile to everyone’s faces. And let’s be honest, who can resist a chocolate bunny?
In this blog post, you’ll find everything you need to create these scrumptious, bunny-shaped morsels from scratch. We’ll dive into some kitchen stories, go through the ingredients step-by-step, and explore various ways to personalize your truffles. I want to ensure that cooking these delights is as much fun for you as it was for me. So, grab your apron and let’s hop into it!
Personal Story
Growing up in the South, holiday traditions often revolved around the kitchen, and desserts were the crown jewels of our feasts. I vividly remember the first time my grandma decided to decorate chocolate truffles with colorful sprinkles for Easter. She had this amazing knack for turning the kitchen into a whimsical zone of laughter and creativity.
With each truffle we made, she taught me how to bring joy to every stage of the process—from melting chocolate to rolling them up and decorating them with glee. If I closed my eyes right now, I could picture her sweet face laughing as I clumsily tried to shape them into perfect little bunnies. We ended up with an array of shapes that were more abstract than authentic, but they tasted heavenly nonetheless! From that day on, making bunny-shaped truffles became a staple in our home.
When you make these truffles, I hope you feel that same kind of joy. This recipe isn’t just about the end product; it’s about the memories we create along the way. So roll up your sleeves, and let’s make some sweet nostalgia together!
Ingredients
Before we get cooking, let’s gather our ingredients! Here’s what you’ll need for these delightful Bunny-Shaped Chocolate Truffles:
For the Truffle Filling
-
8 oz (225g) high-quality milk or dark chocolate, chopped
- Chef Insight: Always use chocolate that you’d enjoy eating on its own! Quality chocolate can elevate your truffles from good to downright exceptional.
-
1/2 cup heavy cream
- Substitution Tip: You can swap this with coconut cream if you’re going for a dairy-free option.
-
2 tbsp unsalted butter (softened)
- Chef Insight: Butter adds a rich creaminess to the ganache; don’t skip it! If you’re needing a vegan option, use a plant-based butter.
-
1 tsp vanilla extract (optional)
- Substitution Tip: Feel free to swap with almond extract for a more unique flavor profile.
-
Pinch of salt
- Chef Insight: A little salt helps to enhance the sweetness of the chocolate—believe me, it makes a difference!
For the Bunny Coating
-
12 oz (340g) milk or dark chocolate, melted (for dipping)
- Chef Insight: You can mix different chocolates for a fun flavor combination!
-
1/4 cup white chocolate (optional for decorative bunny details)
- Substitution Tip: Consider using colored candy melts for some pizzazz.
-
Edible decorations like colored sprinkles or sugar eyes (optional)
- Chef Insight: These little touches turn your truffles into adorable little bunny friends—don’t hold back on the creativity!
Step-by-Step Instructions
Ready to dive in? Let’s craft these truffles!
Step 1: Prepare the Truffle Filling
- Chop the Chocolate: Start by finely chopping your high-quality chocolate and placing it into a medium mixing bowl.
- Heat the Cream: In a small saucepan over medium heat, bring the heavy cream just to a simmer—don’t let it boil!
- Combine: Pour the hot cream over the chopped chocolate and let it sit for a minute. This step is essential for melting the chocolate evenly.
- Stir Until Smooth: After a minute, stir the mixture gently until it’s smooth and glossy. This is called ganache. If you’re adding vanilla, blend it in now.
- Add Butter and Salt: Stir in the softened butter and pinch of salt, mixing thoroughly until well combined.
- Chill Out: Cover the bowl with plastic wrap and place it in the fridge for about 2 hours, or until the mixture is firm enough to scoop.
Step 2: Shape the Bunnies
- Scoop and Roll: Once the ganache has firmed up, use a melon baller or small scoop to grab portions of the mixture. Roll them into smooth balls in your hands, about 1 inch in diameter.
- Shape the Bunny Ears: For each ball, create a slight oval shape, then gently pinch the top to form bunny ears. You can adjust the length and shape based on your preferences.
Step 3: Coat the Bunnies
- Melt the Coating Chocolate: In a microwave-safe bowl, melt the 12 oz of chocolate until smooth, in 30-second increments, stirring in between.
- Dip Each Bunny: Using a fork, dip each bunny into the melted chocolate. Gently tap the fork on the side of the bowl to remove excess chocolate.
- Place on a Baking Sheet: Line a baking sheet with parchment paper and place the dipped bunnies on it.
Step 4: Decorate!
- Add Bunny Faces: If you’re using white chocolate for details, melt it and use a piping bag to draw bunny eyes and noses.
- Sprinkle Fun: While the chocolate coating is still wet, sprinkle on your colored sprinkles for a fun touch.
Step 5: Let Them Set
- Fridge Time: Let the bunnies chill in the fridge for about 30 minutes to let the coating harden.
With these delightful steps, you’re on your way to a basket full of adorable bunny-shaped chocolate truffles!
Serving Suggestions
To present your delightful creations, place the truffles in a decorative dish or basket lined with colorful tissue paper. This makes them not only delicious but also a visual treat.
If you’re planning a gathering, consider creating a dessert platter with these bunny truffles alongside some fresh fruit, mini cupcakes, or even a scoop of ice cream. If you want a more whimsical vibe, you can add edible grass around them made from shredded coconut dyed with food coloring to give that lively Easter feel.
Recipe Variations
Want to get creative? Here are a few variations to personalize your bunny truffles:
- Flavored Truffles: Add citrus zest (like orange or lemon) to the ganache for a refreshing twist.
- Nutty Bunnies: Fold in some finely chopped nuts or crushed cookies into the ganache for added texture.
- Spiced Up: Try adding a touch of cinnamon, chili powder, or espresso powder for a flavor kick!
- Vegan Option: Use dairy-free chocolate, coconut cream, and plant-based butter to make these truffles vegan-friendly.
- Fun Colors: Use colored chocolate melts to dip the bunnies instead of traditional chocolate—this opens up a whole new spectrum of fun!
Chef’s Notes
Making bunny truffles has always been a way for me to channel creativity and joy. Over time, I’ve refined the process, adding flavorings and tweaking the ganache recipe until it was just right. There’s something special about shaping those fluffy little bunnies that keeps me coming back to this recipe year after year. And let’s just say, I may have indulged in a few too many “practice runs” while perfecting the truffle shape.
Remember, don’t stress about making them perfect; each one is unique in its own cute way, just like the memories created while making them!
FAQs and Troubleshooting
Q: What if my ganache isn’t setting?
A: Ensure that your cream was hot enough when mixed with the chocolate. If it doesn’t set after cooling, you can reheat it gently and add more chocolate.
Q: Can I make these truffles in advance?
A: Absolutely! These truffles keep well in the fridge for up to a week, and they also freeze beautifully for up to three months.
Q: How do I prevent the chocolate coating from cracking?
A: Make sure your chocolate is at the right temperature—not too hot. A gentle stirring while melting helps maintain the right consistency.
Q: Can I use other shapes besides bunnies?
A: Definitely! Feel free to shape them into any adorable form that sparks your creativity!
Nutritional Info (per truffle)
- Calories: 120
- Total Fat: 8g
- Saturated Fat: 5g
- Cholesterol: 15mg
- Sodium: 15mg
- Total Carbohydrates: 10g
- Dietary Fiber: 1g
- Sugars: 8g
- Protein: 1g
This makes for an indulgent treat but be sure to enjoy them in moderation—they’re definitely worth every bite!
Final Thoughts
Bunny-Shaped Chocolate Truffles are not just a dessert; they’re a celebration of creativity, love, and the sweet moments we share in the kitchen. So, gather your family or friends and whip up a batch that’s not only visually stunning but deliciously unforgettable.
I can’t wait to hear how your truffles turn out and what fun twists you decide to embrace. After all, cooking should be an adventure filled with “what if we tried this?” energy! So, let’s keep those good eats coming, and as always, welcome to Food Meld—where flavor meets fun! Happy cooking! 🍫🐇
Print
Bunny-Shaped Chocolate Truffles
- Total Time: 60 minutes
- Yield: 24 servings 1x
- Diet: Vegetarian
Description
Delightful bunny-shaped chocolate truffles that are perfect for celebrations and special occasions.
Ingredients
- 8 oz (225g) high-quality milk or dark chocolate, chopped
- 1/2 cup heavy cream
- 2 tbsp unsalted butter (softened)
- 1 tsp vanilla extract (optional)
- Pinch of salt
- 12 oz (340g) milk or dark chocolate, melted (for dipping)
- 1/4 cup white chocolate (optional for decorative bunny details)
- Edible decorations like colored sprinkles or sugar eyes (optional)
Instructions
- Chop the chocolate and place it into a medium mixing bowl.
- In a small saucepan, bring the heavy cream just to a simmer.
- Pour the hot cream over the chopped chocolate and let sit for 1 minute.
- Stir the mixture until smooth and glossy, adding vanilla if desired.
- Stir in the softened butter and salt, mixing thoroughly.
- Cover and chill the ganache for about 2 hours until firm.
- Use a melon baller to scoop portions and roll into smooth balls.
- Pinch the top to form bunny ears.
- Melt the coating chocolate in a microwave-safe bowl.
- Dip each bunny into the melted chocolate and place on a lined baking sheet.
- Melt white chocolate for details and use it to decorate bunny faces.
- Sprinkle colored sprinkles while the coating is still wet.
- Chill for about 30 minutes to let the coating harden.
Notes
These truffles keep well in the fridge for up to a week and freeze beautifully for up to three months. Enjoy with creativity and joy!
- Prep Time: 30 minutes
- Cook Time: 30 minutes
- Category: Dessert
- Method: Chilling
- Cuisine: American
Nutrition
- Serving Size: 1 truffle
- Calories: 120
- Sugar: 8g
- Sodium: 15mg
- Fat: 8g
- Saturated Fat: 5g
- Unsaturated Fat: 2g
- Trans Fat: 0g
- Carbohydrates: 10g
- Fiber: 1g
- Protein: 1g
- Cholesterol: 15mg
Keywords: chocolate, truffles, dessert, Easter, holiday, fun food


