Easy Easter Trifle Parfaits: Your New No-Bake Spring Secret
Hey friends, Jackson here from Food Meld. Let’s get real for a second. Easter is about family, fun, and… let’s be honest, a whole lot of kitchen chaos. Between the glazed ham, the deviled eggs, and trying to figure out if that potato salad is *actually* your aunt’s secret recipe, the last thing you need is a fussy dessert stressing you out.
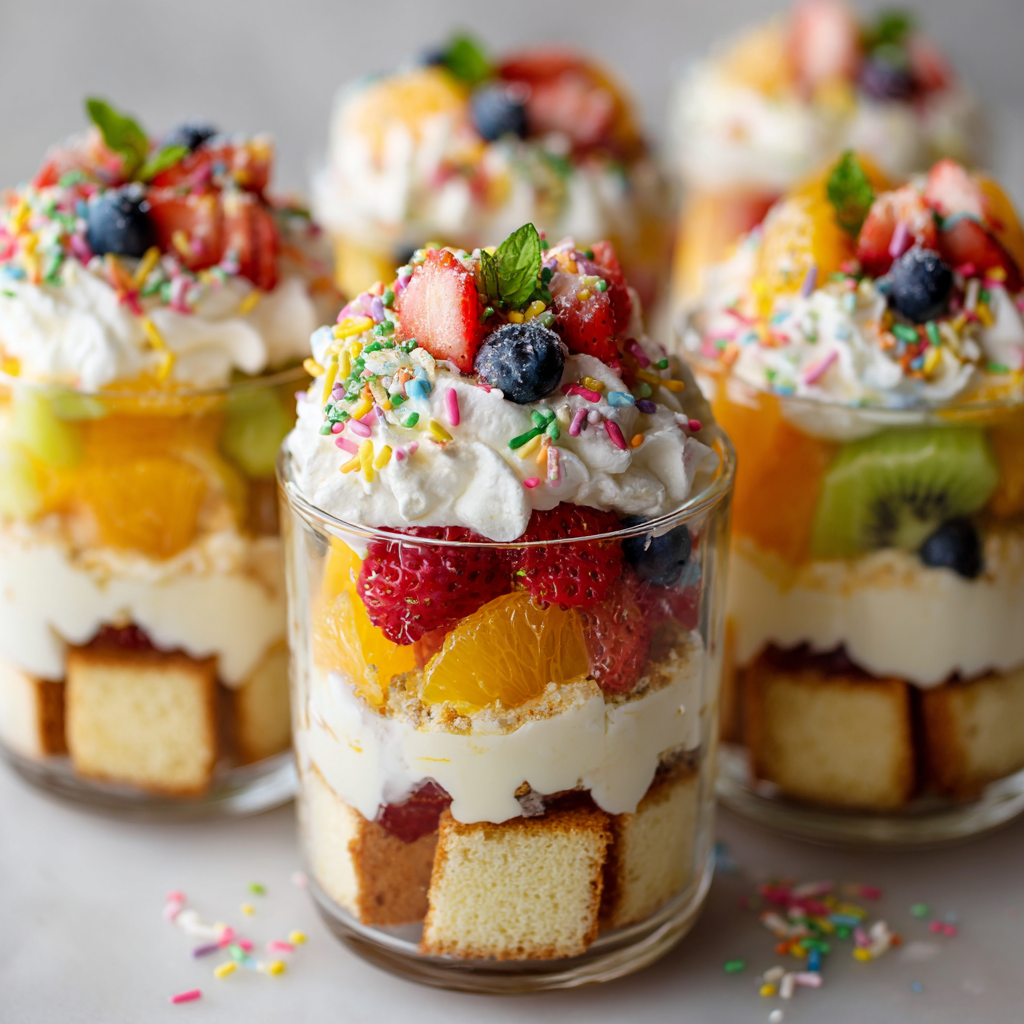
That’s exactly why I’m obsessed with these Easy Easter Trifle Parfaits. We’re talking about a dessert that looks like you spent hours on it, but secretly comes together in about 15 minutes, with zero baking required. It’s all about layering soft, sweet cake, luscious creamy filling, and pops of fresh, colorful fruit in a clear glass. The result? A beautiful, customizable, and downright delicious treat that screams spring.
This isn’t about strict rules or fancy techniques. It’s about grabbing what you love, stacking it up, and creating those “wow” moments at the table. Whether you’re hosting a big brunch, need a last-minute potluck hero, or just want to make a Tuesday feel special, these parfaits are your ticket. They’re forgiving, fun to make with kids, and absolutely packed with the kind of flavor that makes people ask, “Wait, YOU made this?” So, let’s ditch the stress and cook (or, well, *assemble*) something awesome together.

The Trifle That Started It All: A Story of Sprinkles and Swaps
My love for layered desserts goes way back to my grandma’s house. She wasn’t a “fussy” baker, but she was a genius at making magic with what she had. One Easter, she was set to make her famous giant trifle, a towering spectacle in her best glass bowl. Disaster struck when my cousin (bless him) tripped and… well, let’s just say the bowl met its fate.
Instead of panicking, Grandma just laughed, gathered every juice glass, mason jar, and even some cute teacups from the cabinet. “We’re just changing the presentation, boys!” she said. We all got to help layer the salvaged cake, pudding, and berries into these individual cups. It turned out even better! Everyone had their own personal dessert masterpiece, and we got to customize them with extra berries or a mountain of whipped cream. That day taught me a huge lesson: great food isn’t about perfection; it’s about joy, adaptability, and sharing something delicious. These parfaits are my ode to Grandma’s quick thinking and that wonderful, messy, happy Easter.
Gathering Your Parfait Party: Ingredients & Smart Swaps
Here’s the beautiful part: this recipe is more of a template. Think of this list as your playground. I’ll give you the classics and then all my favorite twists and swaps.
- 1 store-bought pound cake, angel food cake, or vanilla cake (about 10-12 oz): This is our time-saving hero! Pound cake gives a rich, buttery base, angel food is lovely and light, and vanilla sponge is a classic. Chef’s Insight: Stale cake is actually PERFECT here—it soaks up the creamy layers beautifully. Got leftover homemade cake? Even better!
- 2 cups vanilla pudding or 3 cups stabilized whipped cream: The creamy dream layer. Use instant pudding for super speed, or my easy homemade vanilla pastry cream for next-level richness. For whipped cream, I stabilize it with a bit of mascarpone or cream cheese so it holds up. Sub Tip: Lemon curd, chocolate pudding, or even coconut cream make incredible alternatives.
- 3-4 cups fresh, colorful fruit: This is where your parfaits get their spring vibe. I love a mix of strawberries (hulled and sliced), blueberries, and raspberries. Chef’s Insight: Pat your fruit dry with a paper towel to keep things from getting soggy. Kiwi, mango, or mandarin oranges are fantastic additions too!
- Optional Boosters & Garnishes: This is the “make it yours” zone!
- Fruit compote or lemon curd: Swirl a spoonful between layers for a burst of intense flavor.
- Toppings: Pastel sprinkles, mini chocolate eggs, toasted coconut flakes, crushed cookies (like shortbread or vanilla wafers), or a fresh mint leaf. Go wild!
Building Your Edible Rainbows: Step-by-Step
Okay, let’s build! Grab 6-8 clear glasses, jars, or even wide champagne flutes. Seeing the layers is half the fun.
- Prep Your Components. Cube your cake into 1-inch bites. Whip your cream or prepare your pudding according to package directions. Wash and slice your fruit. Doing this first (your *mise en place*, as we say) makes assembly a breeze. Chef Hack: If using whipped cream, fold a couple tablespoons of room-temperature mascarpone into it before whipping. It adds a subtle tang and keeps the cream firm for hours.
- The Foundation Layer. Start with a layer of cake cubes at the bottom of each glass. Don’t just drop them in—give them a very gentle press to create an even base. This helps everything else sit pretty. Pro Tip: For extra flavor, you can lightly brush the cake layers with a simple syrup (equal parts water and sugar, heated until dissolved) or even a touch of fruit juice.
- Add the Creamy Dream. Spoon or pipe a layer of your pudding or whipped cream over the cake. Get it right to the edges so you can see the distinct stripe of color. This is where a piping bag comes in handy for a neat look, but a spoon works just fine—we’re going for tasty, not tense!
- The Fruit Fiesta. Now, add a generous layer of your fresh fruit. Try to distribute colors evenly. If you’re using a compote or curd, you can dollop it here and swirl it slightly into the cream layer.
- Repeat and Conquer. Keep going! Add another layer of cake, then cream, then fruit. I usually do 2-3 sets of layers, depending on your glass size. The key is to leave a little space at the top for your final flourish.
- The Grand Finale. Finish with a beautiful dollop of cream and artfully arrange a few pieces of your prettiest fruit on top. Now, shower it with your chosen garnishes—sprinkles, a mint sprig, a few mini eggs. This top layer is what everyone sees first, so have fun with it!
- Chill and Serve. You can serve these immediately, but if you have 30 minutes, pop them in the fridge. This lets the cake soften just a touch and the flavors really… well, meld.
Serving Up the Sweetness: Presentation Ideas
Presentation turns these from a simple dessert into a centerpiece. I love setting up a “Parfait Bar” for gatherings. Put all the components (different cakes, creams, fruits, toppings) in separate bowls and let everyone build their own. It’s interactive and a total crowd-pleaser.
For your Easter table, line them up down the center as a runner alternative, or cluster a few on a cake stand surrounded by fresh flowers. The vibrant layers do all the decorating for you! Serve with a long-handled parfait spoon or even a small teaspoon—anything that lets folks dig down to get every single layer in one perfect bite.
Mix It Up! 5 Flavor Twists to Try
Once you master the basic formula, the world is your parfait oyster. Here are some of my favorite spins:
- Lemon Berry Bliss: Use lemon pound cake, layer with lemon curd mixed into the whipped cream, and use only raspberries and blueberries. Top with a thin slice of lemon.
- Tropical Escape: Swap in coconut cream for the pudding, use mango and pineapple for the fruit, and garnish with toasted coconut and a dusting of chili-lime salt for a surprising kick.
- Cookies & Cream Delight: Replace the cake with crumbled chocolate sandwich cookies (Oreos). Use chocolate pudding and whipped cream layers, and garnish with more cookie crumbs. A dream for chocolate lovers!
- PB&J Remix: Use vanilla cake. Make a creamy layer by folding peanut butter powder into whipped cream. Layer with a quick strawberry compote or whole raspberries.
- Dairy-Free/Vegan Friendly: Use a vegan pound cake or angel food cake. For the cream, chill full-fat coconut milk overnight, scoop out the solid cream, and whip it with a little powdered sugar and vanilla. Pair with all your favorite fruits!
Chef’s Notes: The “No-Fail” Philosophy
This recipe has become my go-for-broke, need-something-impressive-fast dessert. Over the years, I’ve made it with everything from day-old croissants to leftover brownies (the brownie version is dangerously good). The only “rule” I have is to taste as you go. Love more cream? Add it! Want a tangy punch? Add a layer of passionfruit curd. The first time I made these for my now-wife, I was so nervous I accidentally used salt instead of sugar in the whipped cream. Let’s just say we had pizza for dessert that night, and I learned to always label my jars. The point is, roll with it. Cooking—and assembling—should be fun. If your layers are a little messy, it just adds to the homemade charm.
FAQs & Quick Fixes
Q: Can I make these parfaits the night before?
A: You can, but with one trick: assemble everything EXCEPT the final cream and fruit garnish on top. Cover tightly and fridge overnight. Right before serving, add your fresh top layer. This keeps the garnish from wilting and the top cake layer from drying out.
Q: My fruit made everything watery. How do I prevent that?
A: This is common! First, always pat fruit dry after washing. For super juicy berries, you can macerate them first: toss with a teaspoon of sugar, let sit for 10 minutes, then drain the liquid before using. It intensifies the flavor, too!
Q: What’s the best way to cut the cake into neat cubes?
A: Use a serrated knife and a gentle sawing motion. For pound cake, a slightly chilled cake cuts cleaner. And remember, perfect cubes aren’t the goal—bite-sized pieces are!
Q: I don’t have clear glasses. What else can I use?
A: Get creative! Mason jars, ceramic mugs, wine glasses, or even a large, clear bowl to make one big trifle. The layers are the magic, no matter the vessel.
Nutritional Info (A General Guide)
Please note: This is a general estimate based on using pound cake, vanilla pudding, and mixed berries. Values will change dramatically with your customizations.
Per Parfait (assuming recipe makes 8): Approximately 280-320 calories, 12-15g fat, 40-45g carbohydrates, 3-4g protein, 2-3g fiber, 25-30g sugar.
To lighten things up: opt for angel food cake, use a sugar-free pudding mix with low-fat milk, load up on more fruit, and go light on the sweet garnishes. To make it richer: hello, homemade pastry cream, full-fat whipped cream, and extra cake! It’s all about balance and what makes your celebration feel special.
Final Thoughts: Let’s Make Some Memories
At the end of the day, these Easy Easter Trifle Parfaits are more than just a dessert. They’re a conversation starter, a memory maker, and a delicious reminder that awesome food doesn’t have to be complicated. They carry the spirit of my grandma’s kitchen—resourceful, joyful, and focused on bringing people together.
So this spring, give yourself the gift of a stress-free, show-stopping dessert. Grab your favorite flavors, stack them high, and watch those smiles appear. Don’t forget to tag @FoodMeld if you make them—I absolutely love seeing your creations. Now, go forth and build something beautiful (and then eat it!). Happy Easter, and happy cooking, friends.
– Jackson


