The Undefeated Champion of Cozy Kitchens: Your New Favorite Roast Chicken
Hey friends, Jackson here. Let’s talk about a smell that feels like a hug. You know the one. It’s the moment you open your oven door and a wave of buttery, herby, golden-brown perfection hits you. It’s the aroma of a perfectly roasted whole chicken. It’s Sunday dinners, meal-prep wins, and impressing-your-in-laws confidence, all on one platter. For too long, roasting a whole bird has been stuck in the “intimidating” or “special occasion” category. I’m here to bust that myth wide open.
This recipe isn’t about fussy techniques or a dozen dishes to wash. It’s about a few powerhouse ingredients, one trusty pan, and the magic of high heat. We’re going for the holy grail: skin so crispy it shatters, and meat so juicy it practically sighs when you carve it. This is the blueprint, the foundation, the go-to recipe you’ll come back to again and again. It’s simple, real, and packed with the kind of flavor that makes you close your eyes and just savor the moment. So, preheat your oven and grab your favorite sheet pan. We’re about to cook something awesome together.

Grandma’s Kitchen & The Chicken That Started It All
My love affair with roast chicken started not in a restaurant, but in my Grandma Eleanor’s kitchen. It was a tiny room, always warm, and smelled perpetually of thyme and black pepper. Her chicken wasn’t fancy. She used a speckled blue enamel roaster, a lump of butter, and the herbs from the little pot on her windowsill. But to me, it was everything. The sound of the crackling skin as she brought it to the table was our dinner bell. My job was to “test” a piece of the skin from the back—the chef’s reward, she’d say with a wink.
She never used a thermometer; she just knew. “Listen to the sizzle, Jack,” she’d say. That lesson—to trust your senses, to find joy in the simple, transformative act of roasting—stuck with me. This recipe is my homage to hers. It’s that same “wow” feeling, but with a few of my own “what if we tried this?” twists (hello, paprika and garlic powder dry-brine!). It’s comfort food with roots, and I can’t wait for you to make it a part of your own story.
Gathering Your Flavor Arsenal
Here’s the beautiful part: the ingredient list is short and sweet. Quality over quantity, every time. Let’s break it down.
- 1 whole chicken (4 to 5 lbs): This is your canvas. Look for one that’s plump and, if you can, air-chilled. Air-chilled birds tend to have crispier skin because they aren’t waterlogged. Chef’s Insight: Don’t stress over organic/free-range if it’s not in the budget. A standard roasting chicken will give you incredible results with this method.
- 2 tablespoons olive oil or melted butter: Our flavor conductor and crisping agent. Butter gives incredible richness, while olive oil offers a cleaner, fruitier note. I often use half and half for the best of both worlds!
- 1 teaspoon salt, ½ teaspoon black pepper: The non-negotiable foundation. We’re seasoning aggressively here, inside and out. Kosher salt is my MVP because it sticks to the skin so well.
- 1 teaspoon garlic powder, 1 teaspoon paprika: My dynamic duo. Garlic powder sticks and browns beautifully. Paprika (smoked or sweet) adds a deep color and a subtle, sweet earthiness that’s just *chef’s kiss*.
- ½ teaspoon dried thyme or rosemary: Dried herbs are perfect here—they won’t burn like fresh ones can on the hot skin. Thyme is classic; rosemary is bold. Choose your adventure.
- 1 lemon, halved: This is our secret moisture weapon. As it roasts, it steams from the inside, perfuming the meat and keeping it unbelievably juicy.
- 4 garlic cloves, smashed: No need to peel! Just give them a whack with your knife. They’ll mellow and sweeten inside the bird.
- Fresh herbs (thyme, rosemary, parsley – optional): If you have ‘em, throw a few sprigs in the cavity with the lemon and garlic. It’s like a little aromatic steam room in there.
- 1 onion, quartered (optional for roasting bed): If you don’t have a roasting rack, this is your hack. The onion lifts the chicken, allows heat to circulate, and becomes a delicious, caramelized bonus side dish.
Let’s Build Some Magic: Step-by-Step
Ready? Put on some tunes, and let’s get messy. This is where the fun happens.
Step 1: Preheat & Prep. Crank that oven to 425°F (220°C). High heat is non-negotiable for crispy skin. While it heats, take your chicken out of its packaging. Remove any giblets (usually in a bag in the cavity—save them for stock if you like!). Pro Tip: Let the chicken sit out for 20-30 minutes to take the chill off. A room-temp bird roasts more evenly.
Step 2: The Dry-Down (This is CRUCIAL). Use a fistful of paper towels and pat that bird DRY. Seriously, get every nook and cranny—inside the cavity, under the wings, everywhere. Moisture is the enemy of crispiness. A dry chicken equals a crackling, golden skin. This is your number one tip for success.
Step 3: Season Like You Mean It. Drizzle your oil or melted butter all over the bird. Use your hands to massage it in like it’s lotion. Now, mix your salt, pepper, garlic powder, paprika, and dried herbs in a small bowl. Sprinkle this magic dust all over the outside, and don’t be shy! Get some inside the cavity too. You are flavoring from the inside out.
Step 4: Stuff & Truss (The Easy Way). Stuff the cavity with the lemon halves, smashed garlic cloves, and any fresh herbs. As for trussing (tying the legs), you can keep it simple: just use a short piece of kitchen twine to tie the drumstick ends together. Or, skip it entirely! I often do. It might not look as “chefy,” but it still tastes incredible.
Step 5: The Set-Up. Place the chicken breast-side up on a wire rack set inside a roasting pan, sheet pan, or skillet. No rack? No problem! Scatter those quartered onions on the pan and place the chicken right on top. This lifts it and creates amazing fond (browned bits) underneath.
Step 6: Roast & Trust the Process. Pop it in the hot oven. Now, walk away. Don’t peek for at least 45 minutes! Roast for about 1 hour to 1 hour 15 minutes. The real key? A meat thermometer. Insert it into the thickest part of the thigh (not touching bone). When it reads 165°F (74°C), you’re golden. If the skin is browning too fast, tent it loosely with foil.
Step 7: The Most Important Step: REST. Once out of the oven, transfer the chicken to a cutting board and LET IT REST for 10-15 minutes. I know it’s tempting to dive in, but this allows the frantic juices to redistribute back into the meat. If you carve now, all that amazing juice will just run out onto the board. Patience, my friend. It’s worth it.
Plating Up Your Masterpiece
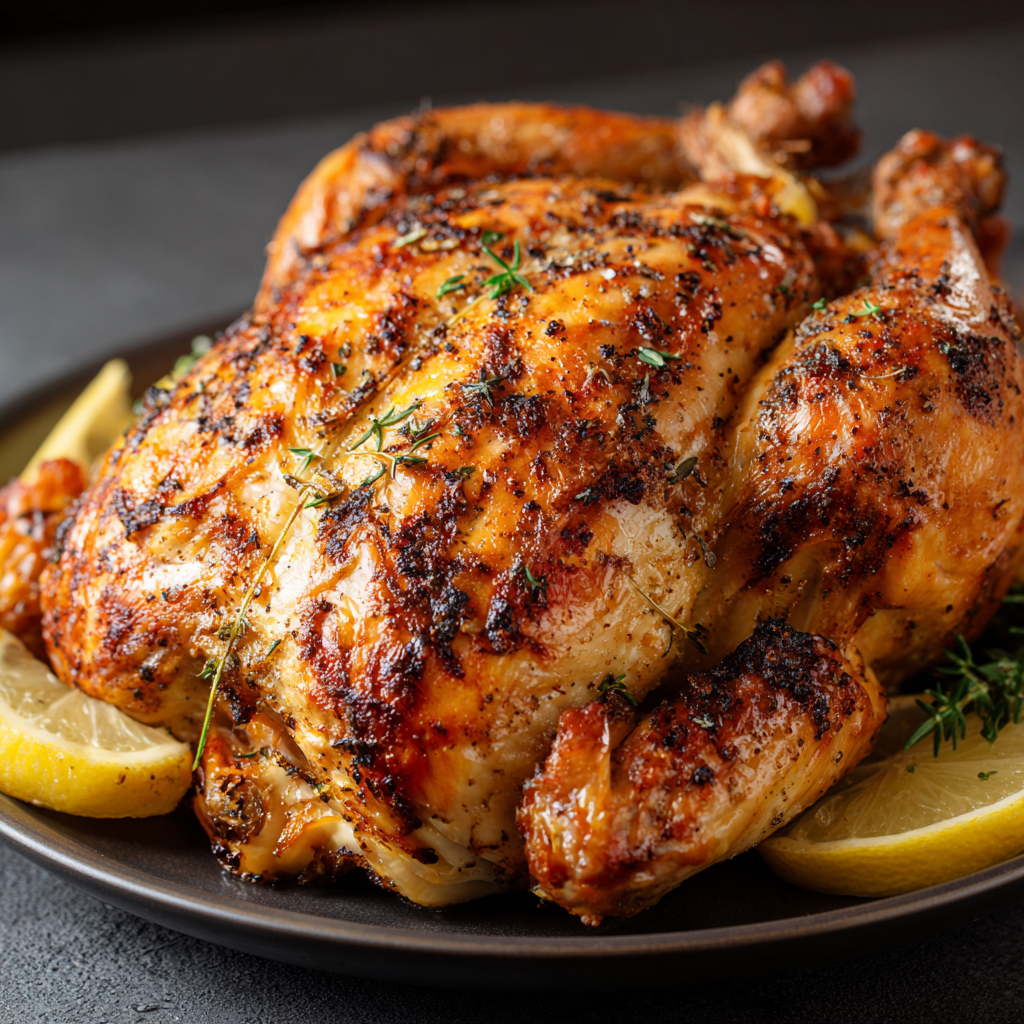
This is the victory lap. After resting, carve your chicken: remove the legs and wings, then slice the breast meat against the grain. Arrange it all on a big, warm platter. Don’t forget to pour any of those incredible juices from the carving board and the bottom of the roasting pan over the meat—that’s liquid gold!
What to serve it with? The world is your oyster. Those roasted onions from the pan are a must. For a classic vibe, go with creamy mashed potatoes and roasted carrots or broccoli to soak up the juices. Feeling a “meld”? Spoon the pan juices over some crusty bread or polenta. For a lighter touch, a big, bright arugula salad with a lemony vinaigrette cuts through the richness perfectly. There are no wrong answers here.
Make It Yours: 5 Flavor Twists
The basic method is your launchpad. Here’s where we get creative and mix it up!
- Lemon-Herb Butter Under the Skin: Mix softened butter with lemon zest, chopped fresh parsley, and thyme. Gently loosen the skin over the breast with your fingers and smear the butter directly onto the meat. This bastes it from the inside for insane flavor and moisture.
- Spicy Buffalo Dry Rub: Swap the paprika for a mix of 2 tsp cayenne pepper and 1 tsp smoked paprika. After roasting, brush the chicken with a mix of melted butter and hot sauce. Serve with celery sticks and blue cheese dressing on the side for a fun twist.
- Mediterranean Sunshine: Use olive oil. Season with salt, pepper, dried oregano, and sumac. Stuff the cavity with a whole lemon and a handful of Kalamata olives. Serve with tomatoes, cucumbers, and feta.
- Simple Crispy Salt & Pepper: Sometimes less is more. Use only kosher salt and coarsely ground black pepper. The pure, clean flavor of the chicken and that crispy skin truly shines.
- Veggie-Packed Roast: Turn it into a complete one-pan meal! Surround the chicken on the pan with chopped potatoes, carrots, and whole garlic cloves 30 minutes into the cooking time. They’ll roast in the chicken drippings—heaven.
Jackson’s Kitchen Notes
This recipe has evolved in my kitchen from a “sometimes” dish to a weekly ritual. The biggest game-changer for me was the dry-brine: just salting the bird heavily and leaving it uncovered in the fridge for a few hours (or even overnight). It seasons the meat deeply and dries the skin out even more for ultimate crispiness. Try it next time!
And a funny story: I once was so excited to cook for a date that I forgot to take the giblet bag out of the cavity. We discovered it at the table. Mortifying then, hilarious now. We still laugh about the “bonus bag of mystery.” Always double-check the cavity, folks! It’s a rite of passage.
Your Questions, Answered
Q: My skin is still soggy. What did I do wrong?
A: The culprit is almost always moisture. Did you pat it bone-dry? Was the oven fully preheated? Also, avoid adding any liquid (like wine or broth) to the bottom of the pan—that creates steam. Crank the heat and ensure a dry start!
Q: Can I use this method for a smaller or larger chicken?
A: Absolutely! The rule of thumb is about 15 minutes per pound at 425°F, but always, ALWAYS trust your thermometer. A 3-lb bird might be done in 45-50 mins; a 6-pounder might take 1.5 hours. Temp is truth.
Q: What do I do with all the leftovers?
A> This is the best part! Shred the meat for epic chicken salad, quesadillas, pot pie, or soups. Throw the carcass (skin and all) into a pot with water, onion, and celery to make the most flavorful stock you’ve ever had. Zero waste, maximum flavor.
Q: Is it safe to cook to 165°F? I’ve heard 180°F.
A> 165°F in the thigh is the USDA-safe temperature for poultry. Cooking to 180°F often leads to dry breast meat. The chicken will continue to cook (carryover cooking) as it rests, rising another 5-10 degrees, so pulling it at 165°F is perfect for safety and juiciness.
Nutritional Info (A Quick Note)
Let’s keep it real: a roasted chicken is a fantastic, balanced protein source. The breakdown per serving (about ⅙ of a 5lb chicken, meat with skin) is roughly: 450 calories | 35g protein | 30g fat | 2g carbs. Most of the fat is in the skin (the best part!), so if you’re watching fat intake, you can simply remove it after cooking. The chicken itself is packed with protein and essential nutrients like B vitamins and selenium. Paired with a mountain of veggies, it’s a wholesome, satisfying meal that fuels you right.
Your New Kitchen Superpower
And that’s it, friends. You now hold the keys to one of the most rewarding, delicious, and humble dishes in the culinary world. This isn’t just a recipe; it’s a skill, a confidence-builder, and a guaranteed way to make your house smell like a home. The beauty of this roasted chicken is in its simplicity and its power to bring people together. So go forth, get that skin crispy, keep that meat juicy, and don’t forget to steal a piece of skin right off the back—the chef’s reward. I’d love to hear how it turns out for you! Tag me over on Instagram @FoodMeld with your golden-brown beauties. Until next time, keep cooking boldly and enjoying every bite.
Jackson


