The Magic Trick in Your Oven: My Perfect Roast Chicken
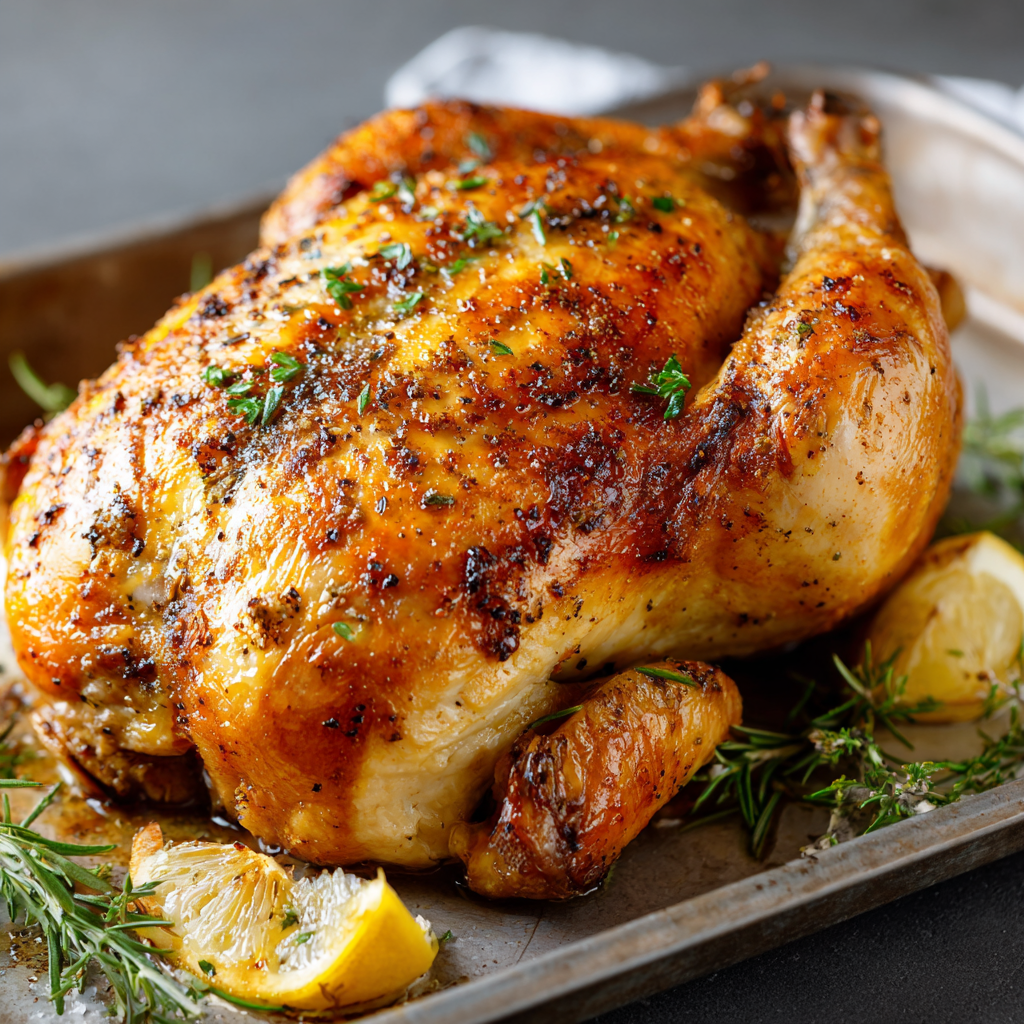
Hey friends, Jackson here. Let’s talk about a truth we all know but sometimes forget: there is nothing—and I mean nothing—more deeply satisfying to cook and serve than a perfect roast chicken. It’s the ultimate kitchen flex that’s secretly the easiest thing in the world. That moment you pull it from the oven, all golden-brown and glistening, filling your whole house with the smell of garlic, herbs, and promise… it’s pure, edible joy.
But I get it. The fear is real. Dry breast meat? Flabby skin? Under-seasoned? We’ve all been there. That’s why I’ve spent years (and eaten a lot of chicken) dialing in this method. This isn’t just a recipe; it’s your new foolproof blueprint. We’re going for maximum flavor with minimal fuss, combining simple techniques that guarantee crispy, salty, crackly skin and meat so juicy it’ll make you do a little happy dance. No fancy tools, no complicated steps—just you, a chicken, and your oven, about to become best friends. This is the kind of foundational, soul-warming cooking that Food Meld is all about. So, tie on your apron, and let’s turn a humble bird into the star of the table.

Why This Chicken? A Little Story…
My love for roast chicken is rooted in pure, messy nostalgia. Picture a young Jackson, perched on a stool in my grandma’s kitchen in Georgia, watching her work her Sunday magic. She never used a thermometer. She’d just wiggle a leg, peer into the cavity, and just know. To me, it was a superpower. The ritual was everything: the sound of the crisp skin cracking as she carved, the way she’d sneak me the “oyster” (that golden nugget of meat on the back) with a wink, and how a simple chicken could gather our whole loud, laughing family around one table.
Years later, in my first tiny apartment, I tried to recreate that feeling. My attempt was… well, let’s call it a learning experience. Pale skin, timid seasoning, and meat drier than my humor on a Monday morning. That “failure” sparked my obsession. I became a man on a mission, roasting chickens almost weekly, tweaking temperatures, testing brines, and learning the science behind the succulence. This recipe is the beautiful “meld” of my grandma’s intuitive, love-driven cooking and my own “what if we tried this?” kitchen experiments. It’s the taste of home, upgraded with a few can’t-miss tricks I wish I’d known back then.
Your Flavor Toolkit: Simple Ingredients, Big Impact
Here’s the beautiful part: the ingredient list is short and sweet. Quality and technique are the real stars here. Let’s break it down.
- 1 whole chicken (3.5–4.5 lbs): This is your canvas. Don’t stress over organic or free-range if it’s not in the budget, but if it is, you’ll often taste a deeper flavor. The size is key—too big, and the breast dries before the thighs cook; this range is our sweet spot.
- 2 tbsp olive oil or melted butter: Our flavor conductor and crisping agent. Butter gives incredible richness (hello, Southern roots!), while olive oil offers a cleaner, herb-friendly base. Feeling decadent? Use duck fat. You can thank me later.
- 1 tbsp kosher salt: This is non-negotiable. We use a good amount because we’re seasoning the entire bird, inside and out. Kosher salt adheres better and seasons more evenly than table salt. This is the #1 secret to well-seasoned meat.
- 1 tsp black pepper: Freshly ground if you can! It adds a gentle, aromatic heat that builds flavor.
- 1 tsp garlic powder: “But Jackson, we have fresh garlic!” I know, I know. Trust me. Garlic powder forms a savory crust on the skin that fresh garlic can’t. We use both for layers of flavor.
- 1 tsp paprika: Sweet or smoked—your choice! This isn’t just for color (though it gives a gorgeous hue); it adds a subtle sweetness and earthiness to the skin.
- 1 lemon, halved: The steam from the lemon perfumes the meat from the inside out and keeps things incredibly moist. It cuts through the richness perfectly.
- 4 garlic cloves, smashed: Smash them with the side of your knife to release their oils. They’ll infuse the chicken with a mellow, roasted garlic essence.
- 2–3 sprigs each: rosemary, thyme, parsley (optional): The aromatic dream team. Use what you have! Even just one type of herb works wonders. Stuff them in, and let the heat work its magic.
- 1 onion, quartered: This isn’t just for serving. Placing the chicken on the onion lifts it slightly, allows for airflow, and the onions caramelize in the drippings, creating a built-in side dish of incredible flavor.
- Optional: carrots or potatoes for roasting alongside: The ultimate one-pan wonder hack. Toss them in a bit of oil and salt and scatter them around the chicken. They’ll roast in the savory drippings—the best potatoes you’ll ever eat.
Let’s Get Cooking: Your Foolproof Roadmap to Golden Perfection
Ready? This is where the fun begins. I’ll walk you through each step with the little hacks that make all the difference.
- Preheat & Prep Your Pan: Crank that oven to 425°F (220°C). We start hot for a reason—it’s the key to crispy skin. While it heats, toss your quartered onion into the bottom of a roasting pan, cast-iron skillet, or any oven-safe pan with sides. This is your chicken’s throne. If you’re adding root veggies, scatter them around now.
- The Critical Dry-Down: Take your chicken out of its packaging and pat it obsessively dry with paper towels, inside and out. I’m talking Sahara Desert dry. This is the single most important step for crispy skin. Moisture is the enemy of crispiness. Get in there!
- Season Like You Mean It: Drizzle your oil or melted butter all over the bird. Massage it into every nook and cranny. Now, mix your salt, pepper, garlic powder, and paprika in a small bowl. Sprinkle this seasoning mix EVERYWHERE—over the breasts, legs, wings, back, and don’t be shy about seasoning inside the cavity too. This ensures every bite is flavorful.
- Stuff the Cavity: Take your halved lemon and give it a good squeeze into the chicken’s cavity before stuffing it in. Follow with the smashed garlic cloves and herb sprigs. You’re basically creating a little flavor bomb that will steam and perfume the meat from the inside as it roasts.
- Truss (It’s Easier Than You Think!): If you have kitchen twine, tie the legs together. This isn’t just for looks; it helps the bird cook evenly so the breast and thighs finish at the same time. No twine? No panic. Tuck the wingtips under the body to prevent burning—that’s my go-to quick fix.
- Roast to Glory: Place your chicken breast-side up on top of the onion throne. Slide it into the preheated oven and DO NOT PEEK for the first 45 minutes. Let the magic happen. Roast for 1 hour to 1 hour 20 minutes. We’re not guessing—use a meat thermometer! Insert it into the thickest part of the thigh (without touching bone). It should read 165°F (74°C). The juices should also run clear.
- The Sacred Rest: When it’s perfect, pull it out. Now, here’s the test of your willpower: let it rest for 10-15 minutes on a cutting board. This allows the frantic juices to redistribute throughout the meat. If you carve immediately, all those gorgeous juices will end up on the board, not in your chicken. Trust the process!
Plating Up: How to Serve Your Masterpiece
Presentation is part of the fun! First, I like to transfer the rested chicken to a clean cutting board or a rustic serving platter. Garnish with a few fresh herb sprigs for a pop of color. Now, for carving: remove the twine, then use a sharp knife to separate the legs and wings at the joints. Slice down either side of the breastbone to remove the whole breast, then slice it crosswise into beautiful, juicy pieces.
Don’t forget those incredible roasted onions (and any other veggies) from the pan! Scoop them up and arrange them around the chicken. They’re soaked in flavor. For a simple sauce, skim a bit of fat from the pan drippings, add a splash of chicken broth or white wine, and simmer for a minute. Pour that liquid gold over everything. Serve it family-style right in the middle of the table and watch it disappear.
Make It Yours: 5 Flavorful Twists
Once you’ve mastered the basic blueprint, the world is your oyster (the chicken oyster, that is). Here are some of my favorite “Food Meld” spins:
- Lemon-Herb Butter Under the Skin: Mix softened butter with lemon zest, chopped herbs, salt, and pepper. Gently loosen the skin over the breast and thighs with your fingers and spread this mixture directly onto the meat. This bastes the chicken from the inside for insane flavor and moisture.
- Spicy Harissa & Honey Glaze: For the last 15 minutes of roasting, brush the chicken with a mix of harissa paste and honey. It creates a sticky, sweet, and spicy crust that’s absolutely addictive.
- Garlic & Herb Dry Brine (Next Level!): The day before, season the chicken all over with the salt and herbs, then leave it uncovered on a rack in the fridge. This draws out moisture, which then gets reabsorbed, seasoning the meat deeply and drying the skin for ultimate crispiness.
- Root Beer or Coke Brine: Sounds wild, right? Brine the chicken overnight in a mix of root beer or cola, water, and salt. The sugars and spices caramelize on the skin, giving a subtly sweet, complex flavor that’s a total conversation starter.
- Dairy-Free & Whole30: Easy! Use olive or avocado oil instead of butter. Ensure your spices and broth (for a pan sauce) are compliant. The method stays exactly the same for a clean, flavorful result.
Jackson’s Kitchen Notes
This recipe has been my kitchen workhorse for years, and it’s evolved with every roast. The biggest game-changer was learning to PAT. THE CHICKEN. DRY. I can’t shout it enough. Another funny lesson? Oven thermometers are your friend! My old apartment oven ran 25 degrees cool, and I couldn’t figure out why my chicken took forever. A $5 oven thermometer solved the mystery. Now, I always recommend checking your oven’s true temperature.
Also, save the carcass! After dinner, toss it in a freezer bag. Once you have a couple, simmer them with water, onion, celery, and herbs for the most incredible homemade chicken stock. It’s the gift that keeps on giving.
Your Questions, Answered
Q: My skin is still not crispy. What did I do wrong?
A: 99% of the time, it’s because the chicken wasn’t dry enough before oiling and seasoning. Pat it like it owes you money! Also, ensure your oven is fully preheated and you’re roasting at a high temp (425°F). No steam or liquid in the pan (aside from the veggies).
Q: Can I use this method for chicken pieces (like just legs or breasts)?
A: Absolutely! The principle is the same: dry, season, roast hot. Bone-in, skin-on pieces will work best. Adjust the time down—pieces will cook in 35-45 minutes depending on size. Still use that thermometer!
Q: How do I prevent the breast from drying out before the thighs are done?
A: Trussing helps, but the best trick is starting the chicken breast-side down for the first 20-25 minutes, then flipping it breast-side up for the remainder. This protects the delicate white meat from the most intense direct heat initially.
Q: Is it safe to cook to 165°F? I’ve heard you can pull it at 155°F.
A: 165°F in the thickest part of the thigh is the USDA guideline for safety and what I recommend for everyone. At this temp, carried over during resting, the meat is perfectly juicy. If you’re comfortable and using a highly accurate thermometer, pulling the breast at 155-160°F will yield a very juicy result, as it will continue to rise.
Nutritional Information (A General Guide)
Here’s a rough breakdown per serving (based on 6 servings from a 4lb chicken, meat only, without skin or pan drippings). Remember, actual values can vary based on the exact bird and what you eat.
- Calories: ~250-300
- Protein: ~35g (An excellent source!)
- Fat: ~12-15g
- Saturated Fat: ~3-4g
- Carbohydrates: ~0-2g (from herbs/aromatics)
- Sodium: ~600-800mg (primarily from the salt we use to season)
Note: This is a fantastic source of lean protein, B vitamins (especially B6 and niacin), and minerals like selenium and phosphorus. The skin, while delicious, contains the majority of the fat and calories. Enjoying it in moderation is part of the fun!
You’ve Got This!
And there you have it—my heart, soul, and all my crispy-skinned secrets in one recipe. This roast chicken is more than just dinner; it’s a confidence-builder. It’s the proof that incredible, impressive food doesn’t have to be complicated. It’s about respecting a few simple steps and letting quality ingredients shine.
I hope this becomes your go-to, your Sunday staple, your “I-need-to-impress-someone” secret weapon. Make it, share it, tweak it, and make it yours. That’s what cooking is all about. Now, I’d love to hear from you! Tag me @FoodMeld when you make yours, or leave a comment below telling me which flavor twist you’re trying first. Let’s keep the conversation—and the good food—rolling. Until next time, keep cooking with curiosity and eating with joy.
Your friend in the kitchen,
Jackson


