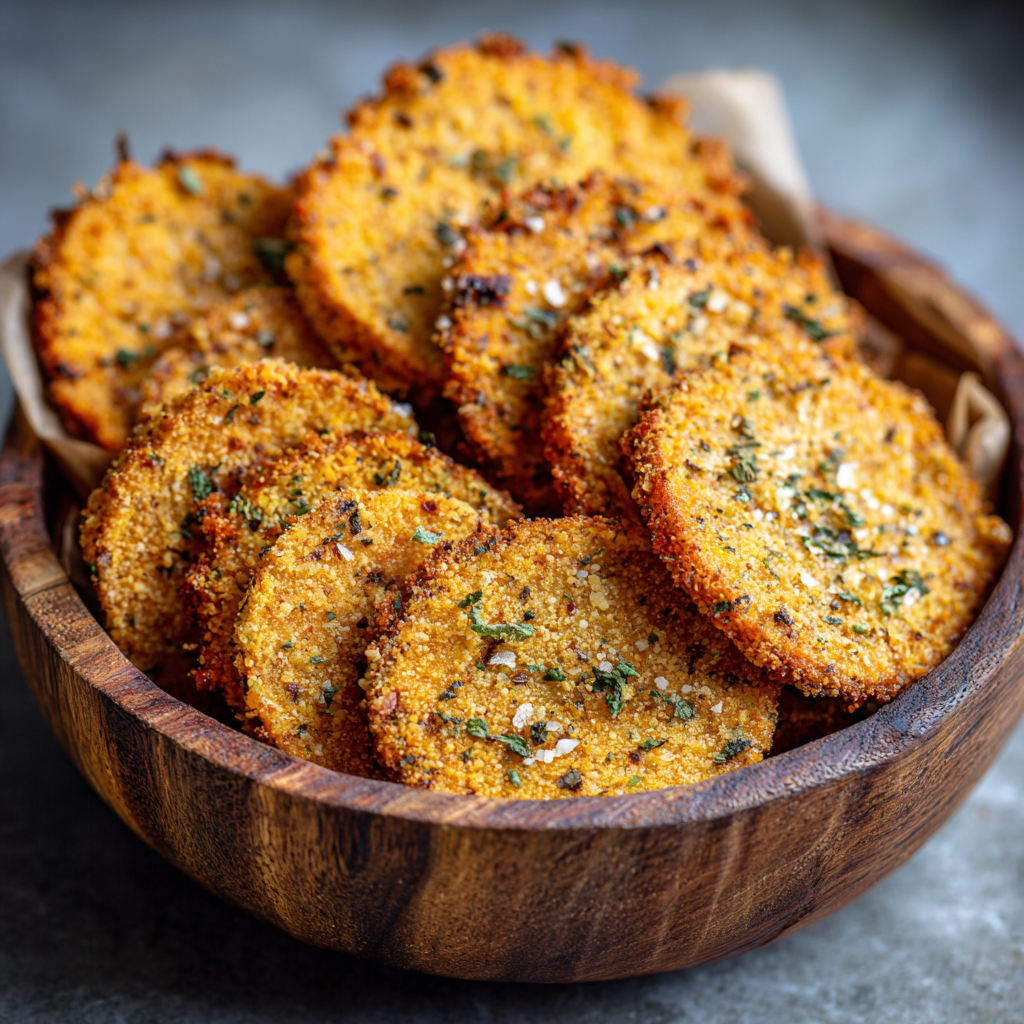
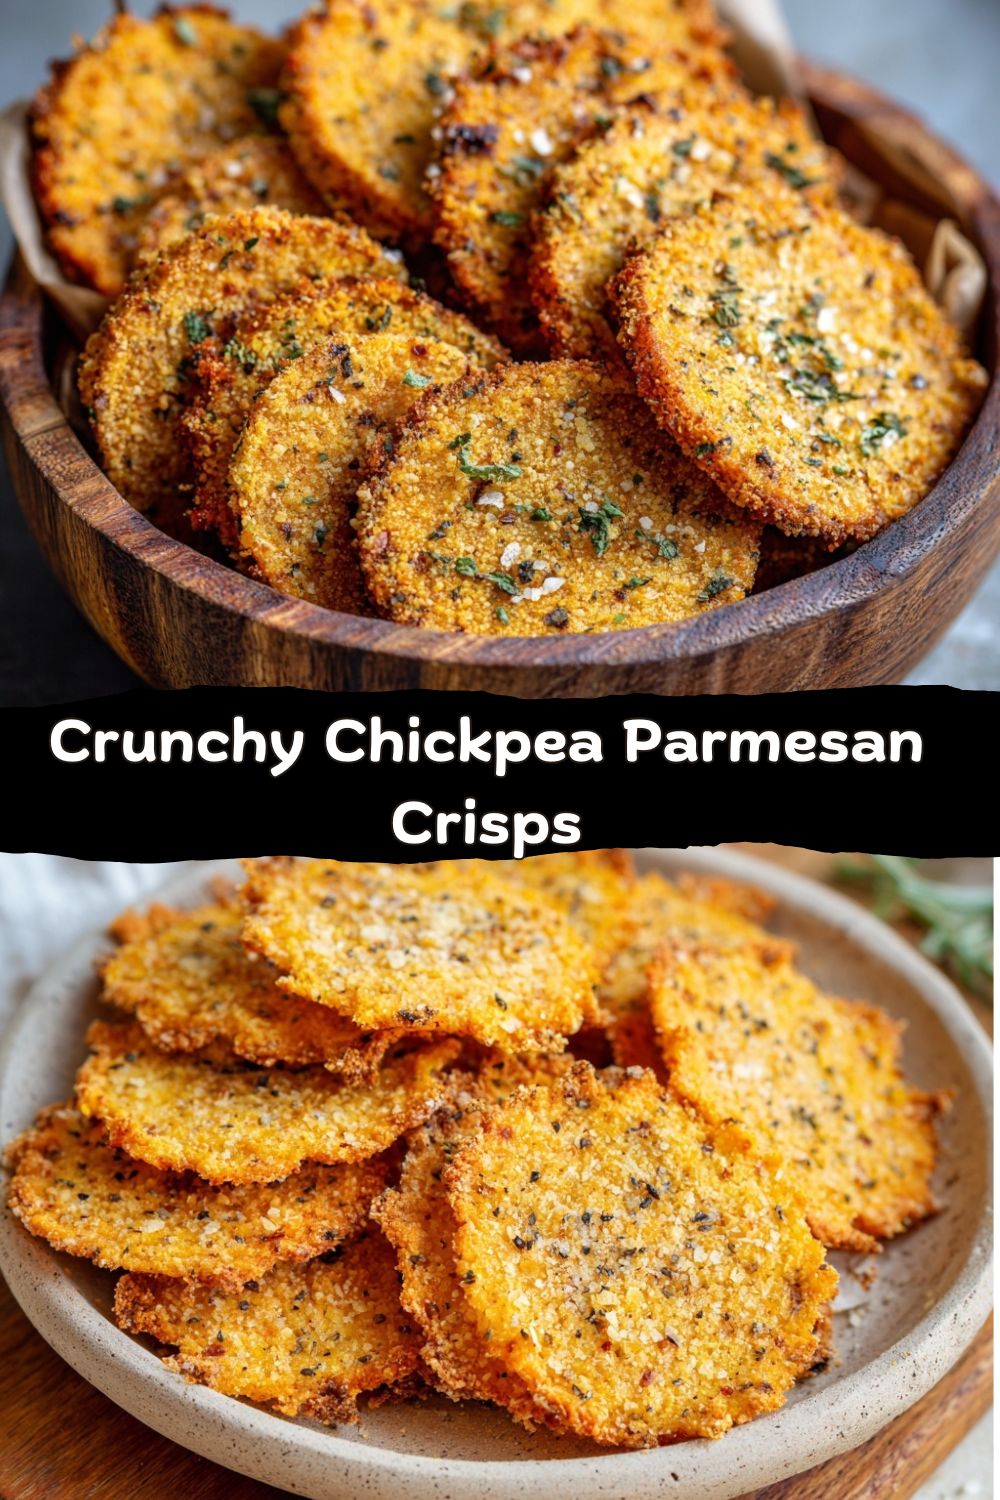
The Snack That Changed My Game: Crunchy Chickpea Parmesan Crisps
Hey friends, Jackson here from Food Meld. Let’s talk about the 3 PM slump. You know the one. Your energy is dipping, your stomach is doing that low growl, and you’re staring into the pantry abyss, willing something crunchy, salty, and actually satisfying to magically appear. I’ve been there more times than I can count, usually surrounded by a mountain of dish towels and a sink full of prep bowls. For the longest time, my go-to was a handful of this, a cracker with that… but I’d be hungry again in 20 minutes, or I’d feel that sluggish “why did I eat that?” feeling.
That’s why I became obsessed with creating a snack that fought back. I wanted something with a serious CRUNCH, a deep savory flavor, and the kind of staying power that gets you through to dinner without a second thought. Enter the humble chickpea. We’ve all roasted them, and they’re great, but I wanted more—more crisp, more surface area for flavor, more of a chip-like experience. After a few (dozen) “what if we tried this?” experiments in my kitchen, I landed on the ultimate solution: Crunchy Chickpea Parmesan Crisps.
These aren’t just another cracker. They’re a high-protein, fiber-packed powerhouse disguised as your new favorite treat. We’re using chickpea flour as the base, which gives them an incredible nutty flavor and a perfect crisp. We’re loading them with real Parmesan cheese for that umami punch, and we’re baking (or air frying) them into golden, shatteringly delicious crisps. They come together in about 30 minutes, they’re endlessly customizable, and I promise you, one batch will disappear faster than you can say “snack time.” So, let’s ditch the sad pantry stare and cook something awesome together. This is the crunchy, savory, feel-good snack you’ve been waiting for.
From Flatbread Failure to Snack Success
This recipe has a funny little origin story, as most of my favorites do. It all started with a socca disaster. Socca, if you haven’t tried it, is a gorgeous, simple chickpea flour flatbread from the South of France. I was attempting a version one night, dreaming of a thin, crepe-like bread to go with a stew. Well, I got distracted (probably by my dog, Waffles, doing something ridiculous), and I left the batter way too thick in the pan. What came out wasn’t a flexible flatbread—it was a thick, crispy, almost cracker-like disc.
I was annoyed for about three seconds. Then I broke off a piece. The CRUNCH echoed through my kitchen. I took a bite. It was nutty, savory (I’d added some herbs), and incredibly moreish. My “failure” was a total flavor and texture win. I started playing immediately: rolling it thinner, cutting it into shapes, adding more cheese. That happy accident became the foundation for these crisps. It was a perfect Food Meld moment: a global inspiration (French socca) meeting my Southern love for crispy, satisfying snacks and a whole lot of kitchen curiosity. Sometimes the best recipes aren’t planned; they’re discovered when things go a little sideways. This is one of those glorious, crunchy accidents.
Gathering Your Flavor Arsenal
Here’s the beautiful part: the ingredient list is short, sweet, and probably already in your kitchen. Each one plays a starring role.
- 1 cup chickpea flour (also called garbanzo bean flour): This is the MVP. Don’t substitute with regular flour! Chickpea flour is packed with protein and fiber, is naturally gluten-free, and gives these crisps their signature hearty, nutty base and perfect snap. You can find it in the baking aisle or with gluten-free flours at most grocery stores.
- ½ cup grated Parmesan cheese: Use the good stuff from the refrigerated section, not the shelf-stable canister. The pre-grated kind often has anti-caking agents that can affect the texture. Grating it yourself melts better and gives a richer, more uniform cheesy flavor in every bite.
- 1 tablespoon olive oil: This adds richness, helps the dough come together, and promotes that gorgeous golden-brown crisp. A good extra-virgin olive oil adds a fruity note, but any olive oil works.
- ½ teaspoon garlic powder: We’re using powder here for its even distribution and mellow sweetness. It gives that “what is that delicious flavor?” background note without the sharp bite of raw garlic.
- ½ teaspoon salt: Crucial for waking up all the other flavors. If you’re using fine table salt, you might even reduce this a tiny pinch. I use kosher salt for all my cooking.
- 2 to 4 tablespoons water: Our binder. Start with 2 and add just until the dough comes together. The exact amount can vary based on your flour and cheese.
- Optional: ½ teaspoon dried herbs: This is where you make it yours! Oregano or thyme leans Italian, rosemary feels earthy and sophisticated, smoked paprika adds a kick, or even a pinch of everything bagel seasoning is phenomenal.
Let’s Make Some Noise (The Crunchy Kind)
Ready to see how simple this is? Put on some tunes, clear a little counter space, and let’s do this.
Step 1: Heat Things Up. Preheat your oven to 375°F (190°C). If you’re going the air fryer route (which I love for super-fast, extra-crispy results), set it to 350°F (175°C). No need to wait for it to fully preheat before you start mixing—we’re efficient like that.
Step 2: The Dry Team Assemble. In a large mixing bowl, combine the chickpea flour, your freshly grated Parmesan, garlic powder, salt, and any dried herbs you’re using. Give this a good whisk. You want every powdery ingredient to be best friends with the cheese, ensuring every future crisp is evenly seasoned. Chef Hack: Use your fingers to break up any little clumps of chickpea flour as you whisk.
Step 3: Bring in the Wet Crew. Make a little well in the center of your dry ingredients. Pour in the olive oil and 2 tablespoons of water. Using a fork or your hands (I’m a hands-on guy), start mixing. It’ll look crumbly at first, then start to form larger clumps. If after a minute of mixing it’s still dry and sandy, add another tablespoon of water. The goal is a firm, slightly sticky, but pliable dough that holds together when you squeeze it. Think Play-Doh, not batter.
Step 4: Roll It Thin for the Win. This is the secret to maximum crispiness! Tear off two large sheets of parchment paper. Place your dough ball in the center of one sheet, top with the second sheet. Now, roll! Use a rolling pin to roll the dough out evenly until it’s about 1/8-inch thick—the thickness of two quarters stacked. The parchment prevents sticking and makes cleanup a breeze. Chef Hack: If the dough is stubborn, let it rest for 5 minutes covered with the parchment. The flour will hydrate more, making it easier to roll.
Step 5: Get Creative with Shapes. Peel off the top layer of parchment. Now, using a pizza cutter, sharp knife, or even fun cookie cutters, cut the dough into your desired shapes. Squares or triangles are classic and efficient (no rerolling scraps!). For a rustic look, you can just score the dough into irregular shapes with the cutter. If you reroll scraps, just press them together and roll out again.
Step 6: Bake (or Air Fry) to Perfection. Carefully transfer the parchment paper with your cut crisps directly onto a baking sheet. You can gently nudge them apart a tiny bit, but they won’t spread. For the oven: Bake for 15-18 minutes. For the air fryer: Cook in a single layer (you’ll likely need to do batches) for 10-12 minutes. You’re looking for a deep golden brown color and a firm, dry feel. They’ll crisp up more as they cool! Chef Hack: For extra even color, rotate your baking sheet halfway through cooking.
Step 7: The Hardest Part—Wait. I know, I know. But trust me! Let the crisps cool completely on the baking sheet or tray. This is when they transform from “maybe crispy” to “definitely crispy.” As they cool, they firm up into that perfect snap.
How to Serve These Flavor Bombs
Okay, they’re cool. Now the fun begins. Of course, you can just grab a handful straight from the tray (no judgment). But let’s get creative:
The Dip Vehicle: These crisps are sturdy! They can stand up to thick, glorious dips. Think a creamy roasted red pepper dip, a chunky salsa, a whipped feta with lemon, or a classic hummus for a double-chickpea delight.
The Salad/Soup Topper: Crush a few over a simple green salad instead of croutons for a protein boost. Or, float a few on top of a steaming bowl of tomato soup or a creamy pumpkin soup. The contrast of hot soup and cool, crunchy crisp is everything.
The Charcuterie Board Star: Arrange them on a board with cheeses, cured meats, olives, and fruit. Their savory, cheesy flavor pairs beautifully with sharp cheddar, sweet grapes, and salty prosciutto.
The On-the-Go Snack: Portion them into small containers or bags for a healthy, satisfying grab-and-go snack for work, hikes, or after-school munchies. They’re way better than anything you’ll find in a vending machine.
Make It Your Own: 5 Flavor Twists
The basic recipe is a perfect canvas. Here’s where you can really Food Meld it up:
- Everything Bagel: Swap the dried herbs for 1 teaspoon of everything bagel seasoning. Iconic.
- Spicy Sriracha & Lime: Add 1 teaspoon of sriracha powder (or a few dashes of cayenne) to the dry mix. After baking, while still warm, sprinkle with a little lime zest.
- “Pizza” Crisps: Add ½ tsp dried oregano and ¼ tsp crushed red pepper flakes. After baking, brush very lightly with a tiny bit of olive oil and sprinkle with a pinch of grated mozzarella and a few mini pepperoni slices if you’re feeling it. Pop back in for 1-2 minutes to melt.
- Vegan Magic: Use a high-quality vegan Parmesan substitute (the nut-based ones work great). Ensure your chickpea flour is certified vegan.
- Extra Herb & Lemon: Add 1 tsp of dried Italian herbs and the zest of one lemon to the dough. Bright, fresh, and irresistible.
Jackson’s Kitchen Notes
This recipe has evolved from that first socca oopsie into my most requested snack. I’ve made it for game days, book club, and as a “please stop asking if dinner’s ready” appetizer for my nieces and nephews. A funny thing I’ve learned: the thinner you roll, the quicker they cook, so keep an eye on them! Also, if your kitchen is humid, they might lose a little crisp after a day. No worries—a quick 3-minute warm-up in the oven or air fryer brings them right back to life. They’ve become my pantry staple, and I love hearing how you all customize them. Tag me @FoodMeld with your creations!
FAQs & Snack Rescue Tips
Q: My crisps are chewy, not crispy. What happened?
A: The most common culprit is not rolling them thin enough. Aim for that 1/8-inch thickness! Also, they might have needed a minute or two more in the oven. They should be a definite golden brown, not pale yellow. Finally, make sure they cool completely on the baking sheet—this sets the crunch.
Q: Can I make these ahead of time?
A: Absolutely! Once completely cooled, store them in an airtight container at room temperature for up to 5 days. For longer storage, you can freeze the baked crisps in a freezer bag for up to a month.
Q: My dough is too wet/sticky. Help!
A: If it’s a sticky mess, sprinkle a tiny bit more chickpea flour onto the parchment paper as you roll. If it’s too dry and crumbly, add more water, a teaspoon at a time, until it just holds together. The dough should be firm but pliable.
Q: Air Fryer vs. Oven – which is better?
A> You truly can’t go wrong. The oven gives a perfectly even, all-over crisp. The air fryer often yields a slightly more blistered, extra-crunchy texture and is faster, but you have to work in batches. I use both depending on my mood and how many I’m making!
Fueling Your Fun (The Nutrition Lowdown)
Let’s be real: we eat these because they’re delicious. But it feels awesome to know you’re also giving your body good stuff. Here’s the breakdown for a serving of about 5 crisps (based on the standard recipe):
- Calories: ~110 – A satisfying amount for a hearty snack.
- Protein: 6g – Thanks, chickpea flour and Parmesan! This is what makes them so filling.
- Fiber: 2g – Good for your gut and helps keep energy steady.
- Carbohydrates: 10g – Mostly complex carbs from the chickpeas, not simple sugars.
- Fat: 6g – A mix of the healthy fats from olive oil and the satisfying fats from cheese.
They’re naturally gluten-free and can easily be made vegan. Compared to most store-bought chips or crackers, you’re getting more protein, more fiber, fewer processed ingredients, and you control exactly what goes in. That’s a snack win in my book.
Final Crunch: Why These Crisps Deserve a Permanent Spot in Your Snack Rotation
And that’s the magic, friends. These Crunchy Chickpea Parmesan Crisps aren’t just a recipe—they’re a solution. They’re what happens when you stop settling for snacks that almost satisfy and start making ones that actually deliver. Big crunch. Deep savory flavor. Real ingredients. Zero regret.
They’ve saved me from countless 3 PM slumps, powered me through recipe testing days, and replaced more bags of store-bought chips than I can count. And the best part? Once you’ve made them once, you’ll start riffing—new spices, new shapes, new dips—because this recipe invites creativity.
So the next time hunger hits and you’re tempted to grab something forgettable, remember this: you can make something better in under 30 minutes. Something crunchy, nourishing, and honestly kind of impressive.
Now go roll that dough thin, bake it golden, and enjoy that snap.
That sound? That’s the snack game changing.
— Jackson


